Marmalade Squares Quilt


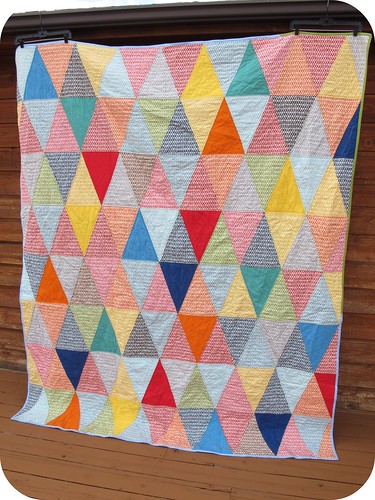
Happy January! It is LeAnne Ballard from Everyday Celebrations and I am excited to be here today sharing a bright and cheery quilt. I’ve been wanting to make a postage stamp quilt for awhile and decided put a little twist on this classic to make one darling little quilt.

This quilt features four different postage stamp‘esque’ blocks. Also, this quilt uses strip piecing so don’t fret over all those little squares. (The squares are 1.5″ finished.) If you like, you may add an initial for personalization. This quilt was made for my daughter’s 1st birthday so personalization was a must. I also will share this cute little coordinating dolly quilt.

1 Layer Cake, Marmalade by Bonnie and Camille
1 1/8 yard neutral, Bella Solid in Bleached White 97
1 3/4 yard backing, Dot in Strawberry
1/2 yard binding, Sugar in Raspberry
1 fat quarter – for appliqued initial, Bella Solid in Tea Rose 9900 89
60″ x 50″ piece of batting
6″ square of iron on adhesive, such as Heat n’ Bond Lite

2 fat quarters, for dolly quilt
crochet lace, for dolly quilt


  • Seam allowances are 1/4″.
  • RST = right sides together
  • WOF = width of fabric
  • blocks will measure 9.5″ square unfinished
  • If you wish to personalize your quilt, you will need to print off an initial. To do this, just type your desired letter in a blank document in Microsoft Word or other program. You want your letter to measure no more than 5″ tall. (There are rulers on the side of the document in Microsoft Word.) When you print, make sure you select the ‘mirror’ or ‘flipped’ option so the letter is BACKWARDS. If you don’t know how to do this, print normally and tape to a sunny window, with the back of the paper facing you. Then trace the letter onto iron-on adhesive.

This quilt is made up of four different blocks.

#1 – you will make {6}

#2 – you will make {3}

#3 – you will make {2}

#4 – you will make {1}

 Cutting

1. From the Layer Cake, reserve {4} squares. These will be used in blocks #2,  #3, and #4.

2. From remaining Layer Cake squares cut {80} 2″ x 10″ strips. Reserve two strips for block #3.

3. Sashing from neutral cut:
{2} 3″ x WOF strips then subcut into {8} 9.5″ strips.
{3} 3″ x WOF strips

4. Borders from neutral cut:
{4} 5.5″ x WOF strips

Making Patchwork Strips

5. Sew {6} 2″ x 10″ strips together to make {1} 9.5″ x 10″ block. Make {13}  total blocks. Press seams as desired.

6. Cut {5} 2″ x 9.5″ strips from each block for a total of {65} strips.  These will be called “patchwork strips”.

Block#1

7. Sew {6} patchwork strips together to make {1} 9.5″ square block.  Repeat for {6} blocks total.


Block #2

8. Cut one reserved Layer Cake square to 9.5″ x 10″.  Then cut {1} 2.5″ x 9.5″ strip and {1} 6″ x 9.5″ strip.

9. Sew {1} patchwork strip to the 2.5″ x 9.5″ strip. Press as desired. Then sew the 6″x 9.5″ strip to the other side of the patchwork strip. Press as desired. Repeat for {3} blocks total. (Sorry for the change in fabrics in the photos.)

Block #3

10. Sew {1}  patchwork strip to one of the reserved 2″ x 10″ strips. Press as desired. Then sew {4} patchwork strips together and sew to the other side of the 2″ x 10″ strip. Press as desired. Repeat for {2} blocks total. 

Block #4

11. From the remaining reserved Layer Cake square cut {1} 6.5″ square.

12. From {2} patchwork strips and remove {2} squares using a seam ripper. (These strips will now have 4 squares.) Press shortened strips. Sew to the top and bottom of the 6.5″ square. Press as desired.

13. Sew {2} patchwork strips to the sides of the block to complete. Press as desired.

14. To make the initial, trace the letter on to the iron on adhesive following the package directions. Adhere to center of the block. Applique as desired, I used a machine blanket stitch.

Quilt Assembly:

15. Layout the blocks in desired fashion or use quilt diagram. Sew blocks together in 4 rows of 3, with one 3″ x 9.5″ neutral strip between each block.

16. Measure the length of one row and cut {1} 3″ x WOF strip the same length. Sew rows together with one 3″ strip between the rows. Repeat for remaining rows. Press.

 17. Measure top and bottom of quilt and cut {2} 5.5″ strips the same length. (Save leftover for the sides.) Sew leftover 5.5″ strips to the two remaining 5.5″ x WOF strips. Measure sides and cut strips to same length. Pin and sew. Press quilt top.

 18. Baste, quilt and bind. Cut {4} 2.5″ x WOF strips for binding.

Dolly Quilt:
I’ve learned that whenever I make a quilt I had better just make a little dolly quilt. Otherwise, my quilts end up as dolly quilts by my sweet girls. Which is fine, but just a little challenging for little hands. 🙂  So using the remaining patchwork strips we will make one cute dolly quilt.

1. Sew {11} patchwork strips together.

2. Measure the length of the patchwork unit and cut {2} 4.5″ x (that length)” strips from one fat quarter.

3. If you desire, sew crochet lace to the sides of the patchwork unit. Cut two lengths of lace just a touch longer than the length of the patchwork unit. Pin lace about 1/8″ in from the edge of the unit. (My lace was narrower so I did this so the lace didn’t disappear in the seam allowance, if your lace is wider you could just line it up with the edge.) Baste lace in place close to the edge of the lace.

4. Sew 4.5″ strip to the side of the patch work unit using a scant 1/4″ seam allowance. (Again so I didn’t loose the lace in the seam allowance.) Press. Repeat for the other side.

5. Baste, quilt, and bind if desired. (Use the remaining fat quarter for backing.)

6. However, I was on a time crunch for this project so I decided to forgo the binding. Instead I just sewed white ric rac all along the edge of the dolly quilt. To do this baste the ric rac along the edge of the quilt top. I didn’t bother pinning, just line it up as you sew.

7. Then I cut my backing (from the remaining fat quarter) to the exact size as my dolly quilt top. I placed RST and pinned in place. Then sew together, leaving an opening along one of the fat quarter sides.  (It is tricky when you leave the opening along the patchwork edge.) Turn and press. Top stitch close to the edge sewing the opening close as you topstitch. I also topstiched about 1/8″ in from the lace.

{1} 53″ x 42″ snugly quilt + {1} 15.5″ x 16.5″ dolly quilt

LeAnne Ballard
{everydaycelebrate.blogspot.com}

Pharaoh’s Pyramids Quilt


Hi, Em here from Em’s Scrapbag, so thrilled to be back sharing another recipe.  Being the mother of three sons, I’m always on the look out for fabrics and patterns that lend themselves well to all things masculine.  I’m also a big fan of Malka and have been thrilled that Moda has taken her fabric and mass produced it.  So when I saw her new line I knew I had to design a quilt using it.  My oldest son, Alex, is studying engineering and recently he had to construct a bridge out of nothing but Popsicle sticks and wood glue.  Did you know that a triangle is the strongest shape structurally? Well it is.  I guess seeing his bridge sparked and idea for a quilt.  Using Simple Marks, Color Splash Batiks, and lots of triangles  Pharaoh’s Pyramids was born.

 
1- Color Splash Batiks jelly roll

1- Simple Marks jelly roll
4 yards background (23210 31)
1/2 yard binding (2321031)
5 yards backing
90″x 90″ batting

A 60* ruler
Cut your background fabric into 18- 6 1/2″ strips the width of fabric. Open your jelly rolls. Mix and match your strips into 18 sets of 3.
 Using your 60* ruler sub cut each of your strips into 10 triangles

Repeat this process with the background strips.
Starting with a background triangle place a strip triangle along pieced side.  Make sure that the point of your triangle extends 1/4″ past the end of previous triangle as shown in picture.  This ensures that you have a straight edge as you make your row.  Repeat this process until you have used 11 strip triangles and ended with a background triangle.
On alternate rows you will start and end with a strip triangle and use 11 background triangles.
Continue until you have made 15 rows total. 
Sew your rows together.  Next line up your ruler on inside points of the rows. Trim
Sandwich and quilt as desired.  I simply quilted a 1/4″ away from all the seams on either side.
One Pharaoh’s Pyramid quilt structurally sound and ready to keep that strong man of yours toasty warm.  Measures approximately 82″ x 90″ 

Emily Bailey
{emsscrapbag.blogspot.com}

Cozy Posy Triangle Quilt


Hello!  My name is Erica and I blog over at Kitchen Table Quilting.  I wanted to share this tutorial with you because (a) I love the fabric and I cannot get enough of those sweet little bunnies and (b) because this is a great way to make a quilt that is much easier than it looks!


2 jelly rolls of Posy by Aneela Hoey
1/2 yard Bella Lilac
1/2 yard Bella Tea Rose
1/2 yard Bella Petal Pink
1/2 yard Bella Green
1/2 yard any print or solid for binding (you could also use leftover jelly roll strips)
Batting that is 62″x72″ or larger
2 Yards Snuggles in White


Unroll your jelly rolls and separate them into groups:

  • 16 strips for the A Triangles.  Cut each strip into an 11″ piece, a 13″ piece, and a 15″ piece.  
  • 36 strips for the B Triangles.  Cut a 30″ piece from each strip and set the remainder aside for the D Triangles.
  • 6 strips for the C Triangles.  Cut each strip into 2 15-ish” pieces (you can cut these a little bigger if you want a little more room for error).  Set aside the remainder for the D Triangles.
From each of your solid fabrics:
  • Cut a strip that is 6.5″ by width of fabric (which I will refer to as WOF) and keep these folded in half.  
  • Cut a strip that is 10.5″ by WOF (keep these folded in half too).
To make the A Triangles, take your strips from step 1 and the 6.5″xWOF strip from each solid color. Subcut your solid strips into equilateral triangles.

To make the triangles with your ruler, place your folded fabric on your cutting mat with the raw edge to the right (trim your selvage if you haven’t already).  Align the 60 degree line on your ruler with the bottom of the fabric and the right side of the ruler with the bottom corner of the raw edge.  Cut along the ruler.

I like to move to the other side of the table or spin my cutting mat around so that the raw edge is now on the left side (you don’t have to flip it, I am just a little crazy about how I cut things).  Once again, line up the 60 degree angle line with the bottom of the fabric.  Line up the top edge of the ruler 1/4″ from the end of the fabric.  I don’t know why this works, but it does.

Here is a closer photo.  Cut along the edge of the ruler.  Continue cutting triangles along your strips by next lining up the ruler 1/4″ from the edge of the bottom.  You need 4 triangles of each fabric, but I cut a couple of extra so that I had options when pairing them up with my jelly roll strips.

Sew the 11″ strip onto one side of the block (it doesn’t matter which one) and press.
Trim the extra fabric off of the sides.
Add the 13″ strip, press, and trim.
And then add the 15″ piece, press, and trim.  Continue until you have made 16 of these blocks.  
To make the B Triangles, take your 30″ jelly roll strips and separate them into groups of 6.
Sew the strips together along the long side until you have one long piece that is 12.5″x30″.  

Just like in step three, cut the fabric into equilateral triangles.  You should be able to get 3 blocks out of each of these 12.5″x30″ pieces.  Continue until you have at least 16 triangles.

To make the C Triangle, take your solid strips that are 10.5″xWOF.  Cut into equilateral triangles just like in the previous two steps.  You only need a total of 12 of these blocks, so cut three triangles from each color or whatever suits your needs.

I managed to forget to take a photo of this step, but it is just like making the first part of the A Triangle.  Take your 15″ inch jelly roll pieces and attach to one of the triangle sides.  Press and trim the triangle and you’re done.

For the D Triangles, take your remaining streps for the B and C triangles.  Separate into groups of 3 and sew together along the long sides.

Cut into equilateral triangles just like before.

You should be able to get 2 triangles out of each of these.  Take 4 triangles and arrange them into a larger triangle (it doesn’t matter which way they are turned, I tried to vary between blocks).

Sew together the bottom three triangles.

And then sew on the top triangle.  Each the A, B, C, and D triangles should finish the same size.  Make at least 8 of these triangles.

Arrange your triangles on your floor (if you are me) or on your design wall (if you are lucky).  I alternated mine roughly A, B, C, A, B, D, A, B, C, etc.  Sew together into diagonal columns.  Please excuse my poor Photoshop skills, but I hope this illustrates my point.

Piece sets of triangles together, side by side.

And then piece the sets together to create a diagonal.

Arrange your diagonal columns.

And then start to shift them so that they are offset a little bit.  There is no right or wrong way to do this.  The more they are offset, the more waste you are going to have at the edge of the quilt, but you want to move them enough that it is obvious you did it on purpose 🙂  I moved my columns up or down by 2-3″.

Sew your columns together (this will feel weird because nothing will line up, but let go and enjoy that that the points aren’t supposed to match!).

And then square up the quilt so that all of the sides are even.

Baste, quilt, and bind as desired.  I backed my quilt in Moda Snuggles.  It makes an incredibly soft, luxurious quilt and it is much easier to work with than you might think.  I would definitely recommend giving it a try!


This yields a wonderfully cozy lap-size quilt.  Mine finished 55″x65″, but yours may vary a little depending on how much you offset your columns.

Erica Jackman
{kitchentablequilting.blogspot.com}

Neighbor Girl Quilt


Hello from Jo and Kelli at Jo’s Country Junction. We had a great fun designing and creating this full sized quilt using Zen Chic’s, Juggling Summer, fabric line. The quilt is destined to be a gift for our neighbor girl who is my daughter’s best friend, Regan. She is the sweetest gal you could know.
Good news, too… There is a giveaway of a Juggling Summer Fat Quarter bundle happening on my blog so follow this link and check it out.

Fat Quarter Bundle of Zen Chic

5 1/4 Yards Black Accent Fabric 1503 25
2 3/4 Yards Cream Fabric 1503 27
6 Yards Backing Fabric for Backing and Border

The cutting instructions make use of an Easy Angle Ruler.  If you aren’t familiar with using the ruler.  Here is a tutorial to help you.

Cutting Instructions:
From the black accent fabric:
Cut 10 ~ 1 1/2″ strips.  Sub cut into 272 1 1/2″ squares.
Cut 28 ~ 2 1/2″ strips.  Sub cut into 360 triangles using a Companion Angle Ruler.
Cut 8 ~ 4″ strips for the border.

From the cream fabric:
Cut 30 ~ 2 1/2″ strips.  Sub cut into 720 triangles using an Easy Angle Ruler
Cut 10 ~ 1 1/2″ strips.  Sub cut into 78 ~ 1 1/2″ X 4 1/2″ rectangles.  Sub cut 8 ~ 2 1/2″ x 1 1/2″ rectangles.  Sub cut 4 ~ 1 1/2″ squares.

From the fat quarter bundle:
Set aside the creamy fabrics and the black fabric that matches the accent color.

From the remaining fat quarters:
Cut each fat quarter into 2 1/2″ strips.  Layer two of the pieces wrong sides together.  THIS IS VERY IMPORTANT.  The blocks need mirror image pieces and the best way to get them is to have your fabric wrong sides together when you cut.

Using the companion angle ruler cut triangles.

Again layer two pieces on top of each other.  Using a companion angle ruler cut off the corner.  After the corner is cut off, position a ruler on the pieces as shown lining the ruler up on the two inch line.  Cut.

Continue cutting.

Each block needs four of the companion angle triangles and four of the parallelograms.  You will also need eight white triangles.

You can get five blocks from each fat quarter.  You will need a total of 90 blocks all together.


Sewing these blocks together is a little tricky.

When sewing the parallelograms, pieces need to be placed as shown.

Start by making the inner *56* blocks.  (The outer blocks are just a little different)

Sew the pieces together in strips as shown.


Sew the strips together to create the block.

Make 56 of them.

Now we need to make the *16* side blocks.

Make strips as you did before.  But this time, you will need to create the small black edge triangle pieces on each strip.  To do that, lay a black square on the corner.  Sew on the diagonal.

Trim and press open.

Create the shown strips.

Sew the strips together to create the block.

Next we need the top and bottom blocks.  There are *14* of them.

Create using the same methods adding two black triangles to the blocks as shown.

Next we need the corner blocks.  Create them using the same methods.  You need *2* like this.

You need *2* like this.

Lay the quilt out making sure to keep the inner blocks in the inside, the top and side blocks in place and the corner blocks in place.  Sew in rows.  Then sew the rows together to create the inner quilt top.

Time to make the inner border.  It is made using the 1 1/2″ x 4 1/2″ cream pieces and the 1 1/2″ x 1 1/2″ black squares.

Create 78 of these.  Sew them together in strip sets.  2 sets of 17 each and 2 sets of 19 each.

Using the 2 1/2″ x 1 1/2″ cream rectangles and the 1 1/2″ black squares create 4 of these and 4 of these.

Add one to each end of the border strips using the diagram below as a guide.  Make sure to match your seams.

Attach the long inner border pieces to the quilt.

Sew the cream 1 1/2″ squares to the remaining inner border strips.  Attach the strips to the quilt.

Sew the outer border pieces together.  Add the outer borders.

Cut the backing piece in half.  Seam the two pieces to create a backing.

Sandwich the top, batting and backing.  Quilt as desired.  Bind by cutting 2 1/2″ strips from the leftover backing fabric.  Bind.


Grab a good book, a cup of coffee and cozy in with this gorgeous quilt! Measures approximately 83″ x 91″

Jo and Kelli Kramer
{joscountryjunction.com}

Prairie Traditions Quilt


Hi everyone and thank you so much for checking out my pattern!

I would like to introduce myself, because I am a newbie here at the Moda Bake Shop. My name is Karen Ackva, and I am a Carolina girl living and quilting in Germany. I jumped the great pond about 12 years ago and am very fortunate to be living in a foreign country. It is really a dream come true. Although the day to day is the same – getting the kids ready for school, grocery shopping, making appointments, cleaning, having breakfast with the girls, etc., etc., it is great when a German festival or holiday comes around like Fasching! In the middle of winter, I can dress myself up funny, go to a Faschings party, act silly, and it’s okay. (Fasching is also known as Carnival or Fat Tuesday.) I also love to eat Eierlikör-Krapfen! Oh yummy! I can’t wait!

Prairie Traditions came about when I wanted to make a traditional yet easy pattern from just one layer cake without adding a lot of additional fabric. (Come on, these great bundles really have enough fabric for a whole quilt top!!) I played around with different ideas and came up with a monkey wrench or churn dash block used on-point. It only utilizes 20 – 10″ squares from a 42 piece Layer Cake, so you can adapt this to any size you want. Just add more solid yardage!

The lap quilt shown here uses fabrics from my favorite designer – Kate Spain! Her newest fabric line is called “Honey Honey” (from Moda) and will be available at your fabric store in January 2013. This is a great fabric line to get your spirits up when winter gets you down. 😉

If you make this quilt, you can post your “Prairie Traditions” quilt here at Flickr.

If you are curious about me or how life is for me and my family, check out my blog – www.easypatchwork.blogspot.de.

Thank you again for viewing my patterns!

Yours truly,
Karen

P.S. I wish you and your families a very happy new year. Ich wünsche euch und euere Familien einen guten Rutsch ins neue Jahr. Bis dann!


One Moda Layer Cake (Honey Honey by Kate Spain) or at least 20 layer cake squares
1¾ yards white fabric (9900-98) for background
¾ yard blue fabric (9900-174) for inner border and binding (WOF of 44″)
58 x 67 inches batting
58 x 67 inches backing fabric (27141-17)


Preparation and Cutting
Sort out (20) 10″-squares from your layer cake. These will be used for your monkey wrench block as well as for the outer border. To balance the quilt, I used four additional brighter/lighter fabrics for the outer border that didn’t have the color of the inner (dark blue) border.

From blue fabric cut:
    4 – 2½” x WOF strips for inner border (Trim later to the actual length you need.)
    5 – 2½” x WOF strips for binding

From white fabric cut:
    5 – 1½” x WOF strips (for Block A)
    12 – 6½” squares {D}
    4 – 10″ squares; sub cut each twice diagonally to get a total of 16 {E} triangles. Discard two.
    2 – 5¼” squares; sub cut each once diagonally to get 4 {F} triangles.
    40 – 3″ squares (for Block B)
    20 – 2½ squares {C}

From each 10″ square print cut:
1 – 1½” x 10″ strip (for Block A)
1 – 3″ x 10″ strip; sub cut to (2) 3″ squares (for Block B). Discard the lower 4″ x 3″ portion or save for the backing panel.
1 – 5½” x 10″ strip for outer BORDER

Sewing the Blocks
Use a scant ¼ seam allowance for all seams unless otherwise specified. You may want to sew together one block to make sure that your seam allowance and cutting strategy is correct before you decide to sew together all 20 blocks. Los geht’s. {Here we go!}

Block A
Sew each 1½” print strip to the 1½” white strips until all are gone. You should be able to get four different prints on one white strip. Finger-press toward the print. From the strips, cut four 2½” squares from each print/white combination to get 80 Block As.

Block B
On the back of all white B squares, draw a light line diagonally with a lead pencil. Sew one B print square and one white B square (right sides together) using a scant ¼” seam allowance to the right and to the left of this line. Repeat for all 40 squares. Cut through the pencil line. Finger-press toward the print. Trim to 2½” square. This is now a Block B.


Monkey Wrench Block
Sew one Block B to each side of coordinating Block A. Finger-press toward the inner block. Repeat for the other side or for Row Three.

Sew one Block A to each side of one C square. Finger-press toward print.Sew Row 1, 2, and 3 together. Repeat until all monkey wrench blocks are sewn together. Press and square up blocks to measure 6½” square.

Tip: If you have problems with one of your seams not matching up, rip the seam from the middle out, nest the seams again, and start sewing from the raw edge toward the middle and back stitch.

Assembling the Main Patchwork
Arrange the blocks to achieve the pattern you desire. First sew the D squares to the monkey wrench blocks. Continue until the rows are complete. Press toward the white fabric.

Sew the E triangles to each side of each row. Press toward the white fabric. Sew rows together interlocking the the seams. Iron how you feel it best lays flat. Sew the F triangles to the four corners. Iron toward the white fabric. Square the quilt top with large square rulers.


Adding Borders and Finishing
Measure the main patchwork through the center lengthwise. It should measure around 43″. Cut two blue inner border strips to the size of your patchwork. Sew to each side. Iron or finger press toward the border.

Measure the main patchwork through the center width. It should measure around 38½”. Cut your two border strips according to your measurement. Sew to each side of patchwork. Press toward the outer border print.

Measure the main patchwork including the blue border through the center lengthwise. It should measure around 47½”. Sew together five outer border prints. Shorten to the length you need. You can adjust your seam allowance or just shorten the strips. Sew to each side of patchwork. Press toward the outer print.

Repeat the previous step for the top and bottom of your patchwork piece.


Finishing
Iron thoroughly. Square up all corners and straighten edges. Prepare your backing. Layer front, batting and backing. Baste with safety pins. Quilt as desired. Apply continuous 2½” double-folded binding using a scant 3/8 inch seam allowance.  Add a label. Admire your work.  Photograph. Upload to Flickr!


One Prairie Traditions lap quilt or wall hanging designed by Karen Ackva of easypatchwork.de using “Honey Honey” by designer Kate Spain for Moda or another favorite Layer Cake! Be proud of yourself!

Measures approximately 48½ x 57 inches

Block Size 6″ finished

    Karen Ackva
    {easypatchwork.blogspot.de}

    You, a Chef?!

    Do you have creative ideas for using Moda pre-cuts? Share them with us! Join our team of Chefs in 2013. Fill out the submission form, and you might be seeing your project here soon! Click through for tips on how to apply.

    We are looking for original and unique projects using Moda pre-cuts.
    1. Take a look through the recipes to make sure your idea is not too similar to a published project.
    2. Include a clear sketch or photo of your project. It doesn’t have to be complete, but it should give an idea of how the finished project will look.
    3. Make sure pre-cuts are the focus of the project.
    4. Show us something different! Softies, bags, home decor…anything that uses pre-cuts in a new way.
    5. Submit that form! Your idea might be chosen.

    Sleepy Jean Crib Quilt


    Hello!  My name is Dawn Stewart, and I’m so thrilled to be visiting here at the Moda Bakeshop!  My normal hang out in the blogosphere is over on Spring Water Designs. I hope you’ll stop by and visit me over there when you’re done here at the Bake Shop, and say Hi. We’re cooking up a nice give away over at Spring Water Designs for all the Moda Bakers 🙂

    Today, I’m sharing a cute little quilt that’s perfect for crib or stroller, and because it sews up quickly it  makes a wonderful baby shower gift.  The small 34″ square size is just right for little hands to carry as they toddle around!

    One Moda Charm Pack of your choice ~ I used Honey Honey designed by Kate Spain
    3/8 yard of white fabric ~ I used Moda Bella Solid #9900-98 White Bleached
    2/3 yard of Coordinating fabric for outer border ~ I used Honey Honey 27140-14 Tide
    1/2 yard of Coordinating fabric for binding ~ I used Honey Honey 27147-14 Tide
    1-1/4 yard for Backing
    Piece of batting no smaller than 40″ x 40″


    All seams are sewn with a 1/4″ seam allowance.

    To begin, choose (16) of your favorite 5″ charms from the pack (that’s my most fun part!), and lay them out in four rows of four charms.  Sew them together in rows.   
    Tip: Press the seam allowances of the odd rows to the left, and press the seams of the even rows to the right ~ this allows the seam intersections to nest together nicely. 

    Take a moment to admire your cute little quilt body.  
    Tip: I like to give it a quick press with a little spray starch, because…

    …Now, you’re going to take your rotary cutter and ruler and make three cuts diagonally across the center of the blocks as shown below (I know that’s a little scary, but it’s ok.  Just be cautious handling the cuts that you make because they are on the bias and can be a little stretchy ~ the spray starch helps a little with that.)

    Now to add the white strips to the center slashes ~ from the White Solid fabric cut two 1-1/2″ strips.  Sew one across the center slash, and cut the other white strip in half and sew those in the two smaller cuts.  (Lay the cut pieces right sides together on top of the white strip and center over the blocks below as shown below ~ just eyeball this, it’s Ok if it’s not exact ~ really it is!)

    Press all the seam allowances away from the white strips so you don’t see shadowing of the seam allowances behind the white.

    Next, trim the extra fabric from the white strips that hang out beyond the edges.  Use the corner of a ruler to square up the corners.

    It’s Ok if it’s a little crooked because now you trim and square your quilt body to measure 18-1/2″ square.
     

    For the first White Inner Border, cut two more 1-1/2″ strips of white fabric, and sub-cut those to:  (2) 1-1/2″ x 18-1/2″ strips & (2) 1-1/2″ x 20-1/2″ strips

    Sew the two 18-1/2″ strips to the side of the quilt body, and press away from the white strips.  Next, sew the two 20-1/2″ strips to the top and bottom.

    For the Pieced Inner Border, choose 21 more 5″ charms from the charm pack, and cut them in half (You can cut more of them in half for more variety if you want, that’s what I did) ~ Ultimately you will need (22) 2-1/2″ x 5″ rectangles.

    Now sew the half charms together end to end in (2) groups of five-long, and (2) groups of six-long.  Here is an example of one of the five-long Inner Borders:

    Center and sew the five-long strips to the top and bottom of the quilt.  Press the seam allowances towards the pieced border and away from the white fabric.  Trim off the extra fabric that sticks out beyond the side edges even with the sides of the quilt.
    Then, center and sew the six-long colored strips to the sides of the quilt, and again press away from the white Inner Border (Trim up the excess that hangs over the edges again).
     

    To add the second white inner border, cut (4) more 1-1/2″ strips from the white fabric, and sub-cut them to:  (2) 1-1/2″ x 24″ strips & (2) 1-1/2″ x 26 strips.  (For the remaining steps, measure your quilt before cutting the strips to length, in case your quilt size is a little different than mine due to variations in the 1//4″ seam allowance.)
    Just like before, sew the shorter ones to the sides of the quilt, press away from the white, and then sew the longer ones to the top and bottom of the quilt.  

    From the Outer Border fabric, cut (4) 4-1/2″ strips, and sub-cut them to: (2) 4-1/2″ x 26″ strips, and (2) 4-1/2″ x 34″ strips.
    Again sew the shorter strips to the sides of the quilt.  Press toward the outer border fabric.  Then sew the longer strips to the top and bottom of the quilt. 

    Now layer the quilt top with batting and backing, and quilt as you choose.  I quilted mine with diagonal lines in the ditch of the white inset slashes and parallel to them.   
    Tip:  Use 1″ wide painters tape to keep your quilted lines straight when you extend them out into the outer borders, so you don’t have to mark your quilt top.

    Finally, cut (4) 2-1/2″ strips from the other coordinating fabric to bind your quilt.  I sewed my binding strips end to end and then sewed them to the front of the quilt all around the edge using my walking foot, and then turned the binding to the back and hand stitched it down to the back of the quilt ~ but you can bind it in any method that you wish! 


    One 34″ x 34″ Honey-Sweet little quilt to cuddle up and take a nap with 🙂

    Enjoy the day and happy New Year!

    Dawn Stewart
    {springwaterdesigns.blogspot.com}

    2012 in Review

    Happy New Year quilters and sewers! 2012 was a busy year at the Moda Bake Shop. 199 posts published! Click through to see the top ten projects from 2012.


    The Moda Bake Shop’s Top Ten Projects of 2012:

    1. Sunbathing Companion by Stella Rutherford | {The Golden Adventures of a Very Dark Horse}


    2. Sophie Car Seat Quilt by Jennie Pickett | {Clover & Violet}

    3. Cathedral Window Pincushion by Kim Niedzwiecki | {gogokim.blogspot.com}

    4. Patchwork Chevron Quilt by Jeni Baker | {In Color Order}

    5. Renaissance Waves Quilt by Karin Vail | {cascadequilts.com}

    6. Owl Tag Along Toddler Backpack by Angela Pingel |{cuttopieces.blogspot.com}


    7. Lucky Layers Tiered Dress by Anshu Jain | {Blooms And Bugs}

    8. So Soft Washcloths by AnneMarie Chany |{Gen X Quilters}

    9. Isosceles Picnic Quilt by Penny Layman | {sewtakeahike}

    10. Four Squared Quilt by Polly Monica | {auntpollysporch.blogspot.com}

    Wishing you a happy, safe, and sew-ful New Year,

    Easy as Pie Layer Cake Quilt


    Hi! My name is Sherri, and I blog over at A Quilting Life! I’m happy to be here today to share a fast and fun Layer Cake Quilt! What I love about this quilt is that there is absolutely no fabric waste, the quilt goes together quickly, and it’s the perfect classic pattern to showcase the fabrics you love!

    1 Moda Layer Cake, you’ll need 42 squares
    Extra Background Fabric, if desired*
    1 1/4 yard Border Fabric
    1/2 yard Binding Fabric
    4 yards Backing Fabric
    *If your Layer Cake has a lot more dark fabrics than light and medium, you might want to get a little extra yardage and cut a few 10″ light squares. For this quilt, I used 1/3 yard of one of the light prints and cut 4 squares 10″ x 10″ to add into the mix. I took out 4 of the darker squares, so that I still had 42 squares for my quilt.

    Choose a Layer Cake…

    Pick out some coordinating fabrics. Shown below, from top to bottom, are my binding, border, a little extra background fabric, and my quilt backing.

    Start out by dividing your 42 Layer Cake squares into groups of two. Be sure there is good contrast between each set of two squares.

    Next, draw a diagonal line from corner to corner on each of the lighter squares in each pair. Next you will sew 1/4″ from either side of the drawn line. I’ve drawn the stitching lines on either side of the diagonal line, shown above.

    It saves a lot of time if you do the stitching by “chain piecing”…just stack up your fabrics and start sewing!

    Next you will cut each pair of fabrics on the diagonal line.

    Press seams toward the dark fabric. Each pair of squares will give you two matching half-square triangles.

    Next, put your half-square triangles into sets of two. Again, go for contrast and variety…each pair of half-square triangles will make two quarter-square triangles for your quilt.

    Now, put each pair of half-square triangles right sides together. be sure the dark fabrics of each pair are on opposite sides so the seams “nest” together.

    Now, draw lines as you did when making the half-square triangles. Draw a diagonal line that goes across your stitching line. Sew 1/4″ away from either side of the diagonal line. Again, I’ve again drawn the stitching lines to the right and left to make it easier to see.

    Once again, cut on the diagonal line…

    Then press each block to one side. You will now have 42 quarter square triangle blocks! At this point you will want to trim your blocks to measure 9″ by 9″. The easiest way to do this is to use a 9″ or larger square ruler and line up the 4 1/2″ marks with the centers.

    Lay out your blocks, mixing up the fabrics. Make 7 rows of 6 blocks each, and turn the blocks so that the darks from one block are next to the lights in the surrounding blocks.

    Sew the blocks in each row together, and then sew the rows together. Since there are so many seams coming together, I pressed the block and row seams open to reduce bulk where 4 blocks come together. This helped the points to meet evenly.

    Now it’s time to attach your borders. Cut 8 border strips 5″ by width of fabric. Piece together for length. Measure the sides of your quilt and cut two strips to equal that measurement. Your strips for your left and right borders should measure close to 5″ x 60″. Sew these borders to your quilt, pressing towards the border fabric.

    Next, measure your quilt at the top and bottom and cut two border strips equal to that measurement. Your top and bottom border strips should measure close to 5″ x 60 1/2″. Again, sew these borders to your quilt and then press towards the border fabric.

    Your quilt should now measure about 60 1/2″ x 69 1/2″. Piece your backing fabric to make a backing at least 68″ x 78″. Layer Backing, Batting, and Quilt Top…then quilt as desired.

    Cut 7 strips 2 1/2″ x width of fabric and piece for length, to make your binding. Bind…

    1 Fast and Fun Quilt, 60″ x 69″

    And be sure to enjoy your quilt!
    Thanks so much…I hope you’ll enjoy making this!

    Sherri McConnell
    {www.aquiltinglife.com}

    120-Minute Gift: The Queen Bee Bag


    Hello, again!  I’m Polly Monica from Aunt Polly’s Porch blog. I am so pleased to be back at the Moda Bake Shop with a large mat and ruler tote bag designed just for quilters like you to use when you go to bee or a quilt class!!

    Believe me when I say you will certainly be The Queen Bee when your friends see your new bag!!  And it would sure be a favorite gift for a quilting friend this holiday season!


    DSCN2268
    1 charm pack ( I used A Stitch in Color)
    2 yards coordinating solid (I used Moda  Bella slate grey)
    1.5 yards print from same collection (I used the Spectrum print from the A Stitch in Color collection)
    2  small gold decorative buckles (about 3/4”)
    10” of matching Velcro
    batting, matching thread
     

    Cutting Directions-
    From the solid grey fabric-
    cut four 4.5” strips the full Width Of Fabric (WOF) for the straps
    cut a strip 22.5” by WOF, then sub cut it into
        one 22.5” by  28” piece for bag front lining and
        one 18.5” by 14” piece for the tall ruler front pocket
    cut another 22.5” strip by WOF, then sub cut it into
        one 22.5” by  28” piece for bag back lining and
        one 14” by  9.5” piece for short ruler front pocket and
        two little  1  3/8”  by  5  1/4” rectangles for buckle straps on mini pockets
    cut one strip  9.5” by WOF, then sub cut it into
        two 9.5” squares for inside pocket linings

    From the print yardage-
    cut a strip 14” by WOF, then sub cut it into
        one  14” by 18.5” piece for bag front (behind the ruler pockets) and
        one  14” by  18.5” piece for the tall ruler pocket lining
    cut a strip 14” by WOF, then sub cut it into
        one 14”  by 22.5” piece for the back pocket lining and
        one 14”  by 9.5” piece for the short ruler pocket lining
    cut a strip 22.5” by WOF, then sub cut it into
        one 22.5”  by  28” piece for bag back

    From the 42 Charm Squares in the pack-
        select 18 charms squares for the bag front
        select 15 charm squares for the back pocket
        select 4 charm squares for the 2 front mini buckled pockets

    From the Batting-
    cut two  22.5”  by  28” pieces for bag front and back
    cut one  18.5”  by  14” piece for the tall ruler pocket
    cut one   9.5”   by  14” piece for the short ruler pocket
    cut one  22.5”  by  14” piece for the back pocket 
    cut two  80”  by   1.5”  strips for the straps (these can be pieced or fused together from smaller pieces)
     
    Sewing and Assembly Directions- 
     
    Straps-
    Sew two  of your  4.5”  by  WOF  grey strips together on the short end.  Press the seam open.   Next, press both long sides under 3/4”.

    Slip one 1.5”  by 80” batting strip under one of the folded in long sides. 

    DSCN2302

    Bring the other long edge over to meet the folded edge and pin all the way to edge.

    DSCN2308

    Stitch the two edges together 1/4” from edge.  Stitch to end, turn and stitch across the raw edged short end, then back up the other side.

    DSCN2309

    Repeat this topstitching again 1/8” from the edges.

    DSCN2311

    SAFN!!  (Set Aside For Now!)
     
    Bag Front–  (using the 18 charm squares and one 18.5” by 14” print piece)

    image

    Select 4 of the charm squares, sew them together to make a strip. 
    Press seams however you prefer, then sew the strip to one 18.5” side of the print piece.
    Repeat this process with 4 more charms squares sewn together then sewn to the opposite 18.5” side.
    Take 5 of the charm squares and sew them together in a horizontal strip, press seams all one way
    Take another 5 charm squares and repeat the process but press the seams in the other direction.
    Sew the two rows together, nestling the seams at each intersection.
    Now sew this piece to the top of the previously pieced front, press well.

    DSCN2296

    Pin it to the front batting  piece and quilt as desired.  I used a sort of zig zaggy stitch to quilt it. 
    Here’s a look at it from the batting side…but you can quilt it however you prefer!

    DSCN2297

    SAFN!  (Set Aside for now.)
    The same process is used to make both the tall and short ruler pockets on the front of the bag.
    With right sides together, match up the solid grey tall ruler pocket piece with it’s matching print lining piece and it’s matching batting piece.  Pin and stitch across one 14” side.

    DSCN2285

    You want the lining to show a tiny bit across the top of the pocket at the seam line from the front side, so you will not press the sewn seam as you normally would, but allow the actual seam to be about 1/4” down from the pressed top edge… which means that the bottom edge of the lining will be a tad short…  about a 1/4”…so no big deal!   This is hard to explain in words but look at the photos and you’ll see what I mean.

    DSCN2286

    Quilt the pocket as desired.  I used a bright variegated thread with an simple meander design.  Repeat this process with the second smaller ruler pocket.  SAFN!

    Next we make the 2 mini buckled pockets!  Take the two grey  1  3/8” by 5  1/4” pieces and press them in half lengthwise.  Open up the pressed piece and now fold the long raw edges into the center fold and repress.  Now the raw edges are enclosed inside.  Topstitch down each long side .  Slide the buckle and center it onto the strap.

    DSCN2276

    Pin and stitch it to one charm square. Do the same with a second charm square.

    DSCN2277

    Using the remaining two charm squares as pocket linings, place them right sides together with the two charms you just sewed the buckle straps on.

    DSCN2280

    Remember to leave an opening in one side as you stitch around them, so that you can turn them right side out!

    DSCN2282

    Turn them right sides out, press and topstitch across the top edge of each pocket.

    DSCN2283

    Now center and pin one buckled mini pocket on top of the small quilted grey ruler pocket as shown in the photo.

    DSCN2288

    Stitch it down on three sides.  Now lay the small grey ruler pocket on top of the larger one and baste the side seams together with a scant 1/4” seam allowance.

    DSCN2291

    Now center and pin the remaining mini buckled pocket onto the taller ruler pocket and stitch it down on three sides as shown.

    DSCN2292

    Place the double ruler pocket piece onto the quilted front,  centered left to right and having the bottoms aligned together.  Baste the pockets down using a 1/4” seam allowance.

    DSCN2313

    Take one prepared strap and with the raw end of the strap even with the bag bottom, pin it up and over one side of the ruler pocket piece, and then bring the other raw end of that strap back down the other side of the pocket to end at the bag bottom.

    DSCN2314

    Slowly stitch through the strap, pocket and bag front all at one time.  Start stitching at the bag bottom/raw end of strap, and stitch up until you are about 5” below the top edge of the bag, turn and stitch across the strap at that point, then turn again and stitch right back down the other side of the strap, thus enclosing the raw edges of the ruler pocket. I stitched the straps on using matching grey thread and stitched between the 2 lines of top-stitching previously done with the bright variegated thread.

    DSCN2316

    Repeat this now on the other end of the strap … up the other side of the ruler pocket.  SAFN!
     
    Bag Back-
    Pin the print bag back piece to it’s matching batting piece and quilt as desired!

    Back Pocket-
    Arrange the 15 charm squares into three rows of 5 squares each and stitch them together.

    DSCN2273

    Pin the matching batting piece to it and quilt as desired.  I used the bright variegated thread and did a simple meander!

    DSCN2293

    With the matching print pocket lining piece, place right sides together, pin and stitch across one 22.5” side.  Do the same thing with pressing that seam as you did on the front ruler pockets… as you want to see a bit of the lining from the front side.

    Lay the second completed strap on the back  pocket- over the first seam line from each side of the pocket, with raw short end edges even with the bottom of the pocket.

    DSCN2318

    Pin the strap in place up over that seam on one side of the pocket, over the finished top edge of the pocket and then back down the other side of the pocket, ending with the other raw edged end even with the bottom of the pocket.

    DSCN2317

    I again used matching grey thread to sew the strap onto the pocket, stitching between the rows,  previously topstitched.   Sew up one side from the bottom of the pocket to the top, turn sew across the strap to the other side and turn again and then sew down the strap to the bottom.

    DSCN2319

    Lay the completed pocket on top of the bag back with sides and bottom even.  Baste around the pocket using a 1/4” seam allowance.  SAFN! 
     
    Inside Pockets-
    Use the leftover charm squares, cutting a few more from the leftover printed yardage scraps, to make up 2 sets of 4 charm squares arranged and sewn together like a four patch.

    DSCN2327

    Put these two four patches together with the pocket lining pieces previously cut from the grey yardage with right sides together and stitch all around the edges with a 1/4” seam, remembering to leave an opening for turning!

    DSCN2328

    Turn them right sides out and press.  Top stitch across the top edge of each pocket.  At this point, sew one 5” piece of Velcro (soft side) on the inside of each pocket, near the top.

      DSCN2331

    Center the two pockets on one of the print yardage lining pieces as shown below, and pin in place.

      DSCN2332

    Unpin just the top of each pocket and fold  it down so you can sew the other side of the Velcro where it needs to be in order to match the Velcro on the pocket itself.

    Now,  bring the pocket tops back up and repin, then stitch around all three sides of each pocket.

    DSCN2333

    Lay the two grey bag lining pieces, right sides together, matching the sides and bottom and pin.  Stitch the three sides with a 5/8” seam allowance, remembering to leave a 5” opening in the bottom for turning.

    Now pin and stitch the outer bag sides with right sides together, using a 1/2” seam allowance.
     
    DSCN2335

    Turn the bag lining right sides out and push it down into the outer bag with it still right sides IN…which means they are right sides together!!

    Match the side seams and pin all around the top edge, making sure you don’t accidentally catch any of the two straps in that top edge seam.  Sew the top edge seam with a 1/2” seam allowance.

    DSCN2336

    Turn the bag right side out through the opening you left in the bottom of the lining.  Sew that opening closed, then push the lining down into the bag.

    DSCN2338

    Again, as in the top edges of the pockets, you want some of the grey lining to show at the top edge of the bag, so manipulate the edge that way and pin it all around the top.

    DSCN2340

    I “stitched in the ditch” – in the seam line between the grey lining and outer bag to hold the top edge as I liked it with the grey lining showing a bit on the outside, then I topstitched it twice with the bright variegated thread.

    DSCN2344

    And finally, VOILA!!  all done!  YAY!!  Smile

    DSCN2350
    DSCN2351
    DSCN2364
    DSCN2366
     

    one 22” by 26” quilter mat and ruler tote bag
    Time to put your mat and rulers in the new bag and get on your way to bee or quilt class!!
     
    Yogi's bed
     
    Yogi and I hope you like the Queen Bee Bag quilting tote and will enjoy making one for yourself or for a gift for a quilter friend!

    Come visit us soon, over at my blog- http://www.auntpollysporch.blogspot.com/
    We hope you have a wonderful holiday and a most blessed New Year!!

      1signature
    Polly Monica
    {auntpollysporch.blogspot.com}