
I have always been a huge fan of Andy Warhol’s famous screenprints.
If you’re not quite sure who I’m talking about… you’d probably recognize his work if you were to see it. He’s most famous for his Campbell’s Soup prints and his Marilyn Monroe series which you can view here if you’re curious.
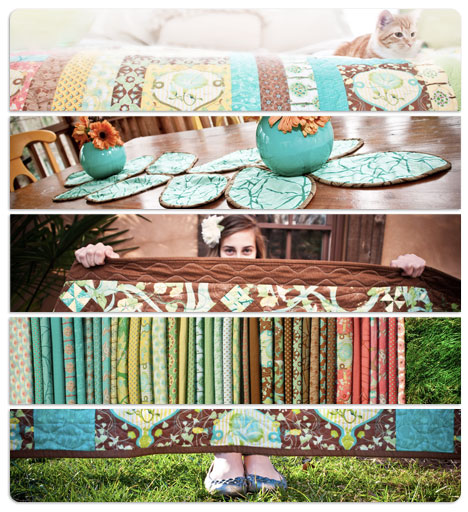
We’ve used the fabric line, Botany (which my mother and I recently designed) to create this series of “pop art” butterflies… It’s a great springtime project!
I’m so excited to be posting my very first tutorial here on The Bake Shop! Please feel free to reach out with any comments or suggestions or questions!
I hope you enjoy!
You can also find out more on our blog and website!

- 1 Botany Layer Cake
- Three 12” x 14” pieces of fabric for backgrounds (1 for each canvas)
- Three 8″ x 10″ canvases (you can find these at your local craft store: Michaels, A.C. Moore, etc., any brand will be fine)
- Staple gun
- Needle and thread
- Freezer paper and pen (for tracing templates)

This pattern will make 3 appliquéd canvases.
STEP 1 / We recommend planning out each of your canvases before starting… especially if you’re making more than one canvas. (When creating combinations that use 5 fabrics at a time, such as these do, it might be better to plan out groups of fabrics that contain similar color palettes. Here are some combinations that we really like, but the possibilities are truly endless!)

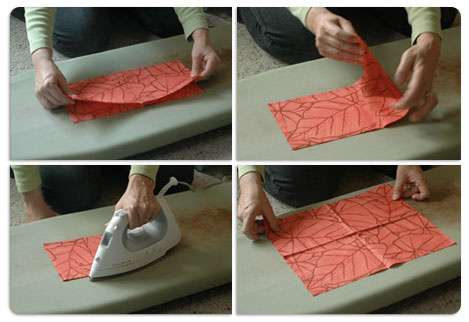
STEP 2 / Cut a 12” x 14” piece of fabric for background.

STEP 3 / To help you when laying out your appliqué pieces, we recommend creating guides:
- Fold square in half vertically.
- And again horizontally.
- Press folds.
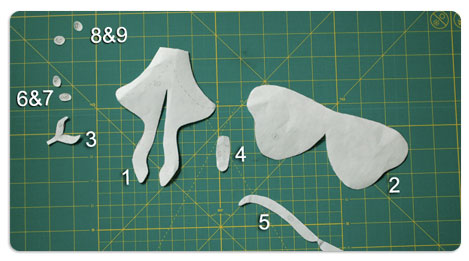
STEP 4 These are designed to print on an 8.5” x 11” sheet of paper.

- Trace pattern pieces from templates on to dull side of freezer paper. (Be sure to add the identifying numbers to each piece.)
- Cut out pieces.
Hint: Freezer paper is semi-transparent, so lay it on top of the diagram, then trace.
STEP 5 / Press the freezer paper pieces (shiny side down) on to the right side of your chosen fabric using a dry iron. (Pieces will temporarily stick to fabrics.)

STEP 6 / Trace around pattern pieces on right side of fabric using a mechanical pencil or pen. (Pencil/pen marks will be turned under and hidden when appliquéd.)

STEP 7 / Cut out drawn fabric pieces leaving a 1/8″ edge surrounding each piece.

STEP 8 / Position and pin pattern pieces on to the background square, referring to fold lines and placement chart as guides.

STEP 9 / Use “needle-turn” method of appliqué. Sew moth parts to square in layers following the number sequence on each piece. Do not appliqué edges which will be covered by overlapping layers. (Refer to placement chart.)

STEP 10 / Iron out fold lines.

STEP 11 / Center the butterfly on the canvas.
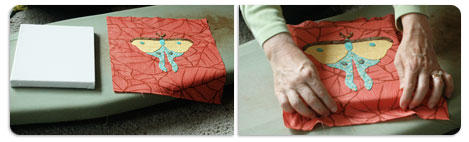
STEP 12 / Use a staple gun to attach the fabric onto the canvas. There’s no right or wrong way to do this, but I like to start by placing one staple into the middle of each horizontal bar (see left photo). Then I put a staple in the middle of each vertical bar (see right photo).

STEP 13 / Then I work my way out from those center staples until I reach the corners of the canvas.

STEP 14 / To finish off the corners, fold the excess fabric over a few times and staple it into place.

That’s it! Enjoy your awesome set of Butterfly Canvases!

You can also check out our blog at www.LaurenAndJessiBlog.com for more fun photos and ideas… AND, you can find 5 more free patterns on our website at www.LaurenAndJessiJung.com.
Happy Quilting!![]()
