


I added some buttons onto my valance where the pleats meet, but you could also add ric rac, pom poms, lace, or any other kind of trim you desire. Applique would be adorable as well!

Don’t say I didn’t warn you, but this recipe does call for some math (just a smidge, not a bunch). To get started, you will need to measure the hardware for where your valance(s) will hang. First measure the width of the hanger and if it’s a curved piece like mine, you will need to measure the sides too.

Alright, here’s the incy wincy amount of math needed. Take the measurements:
(side x width x side = total width)
For example my window measurements are : 2.5″ x 49″ x 2.5″ = 54″
To calculate how many jelly roll strips you will need, take the total width and divide by 2. (54″ / 2 = 27).
I will need to choose 27 strips to get the width to cover my window.

Take those 27 strips and lay them out until you get a pleasing assortment that mixes the colors. Sew the strips together.

Once sewn, you will need to trim off the selvage edges to make a straight square edge.

Also, trim off 2 strips 5″ wide and set these aside for now.

Fold the remaining strip set in half, right sides together. It should now measure roughly 15″ x the calculated width. Pin the edges if needed.

Sew along the edge stitching all the way to the fold. Repeat for both sides.

Trim the corner. Do not cut through your stitching! Fold the piece inside out and press. If you need to finagle (technical term for fudge) your seams to the edge and pin them in place until you press, you can do so if it helps. Top stitch around all 3 closed edges. Do not topstitch the open side!

From your Main Fabric, cut 2 strips 2.5″ wide and set aside. Cut the remaining fabric into equal halves, approximately 15″ wide x WOF each.
Now, look back at your window measurements – you’ll need those once again. Just a smidgen more of math, promise!
If you have sides to your window hardware, take that measurement and add 1/2″ to it. (2.5″ + .5″ = 3″) Cut a strip the width of this measurement from each of the 2 larger Main Fabric pieces. ( 3″ x 15″).
Then take the straight width measurement of your window and divide by 2. (49″ / 2 = 24.5″). Add 1/2″ to that calculation to get the measurement of the to front pleats needed. (24.5″ + .5″ = 25″) Now cut a segment the length of this measurement from each of your 15″ pieces. (25″ x 15″)

Fold each of the pieces just cut in half right sides together so they’re only 7.5″ x measurements from above. Stitch along the two 7.5″ edges on each piece, trim the corner fabric, turn right sides out and press. Then topstitch as you did with the larger pieces strip segment for each of these pieces. Set aside.

Now cut 2 strips 2.5″ wide from your accent fabric. Sew these two strips together into one long 2.5″ wide strip.
* Depending on your hardware, if you have a decorative end that may be larger than 2″ tall, you may need to adjust this measurement to make sure your valance will fit onto the hardware.

Sew the accent strip onto one of the 5″ wide strips cut from the jelly roll segment. Trim any excess so the accent is the same length as the jelly roll strip.

Fold the strip in half right sides together and only stitch from the seam to the fold. Do this on both ends. Trim the corners, and fold right sides out. While pressing, make sure the un-stitched areas of each end are folded in and pressed to match the sewn areas.
Topstitch only the sewn parts of this piece stitching along the top (folded) edge, the two sides, and stitching in the ditch (along the seam) of the accent fabric. (Stitching in the ditch along the accent fabric seam will form the pocket for the window hardware, don’t forget this step although I missed getting a picture of it somehow, I apologize. I must have just been in the groove and sewing away!)


Trim the selvage off one edge and fold over wrong sides together 1/2″ and press. Fold the raw edge into the crease and press again for a double 1/4″ hem. Topstitch the edge as shown. Measure the width of your jelly roll piece to be sure and add .5″. Trim the 2.5″ wide strip to that measurement and fold in the opposite end and topstitch as you did with the first one.

Now comes the fun part. Time to layer! Layout your jelly roll strip with raw edges opposite you.
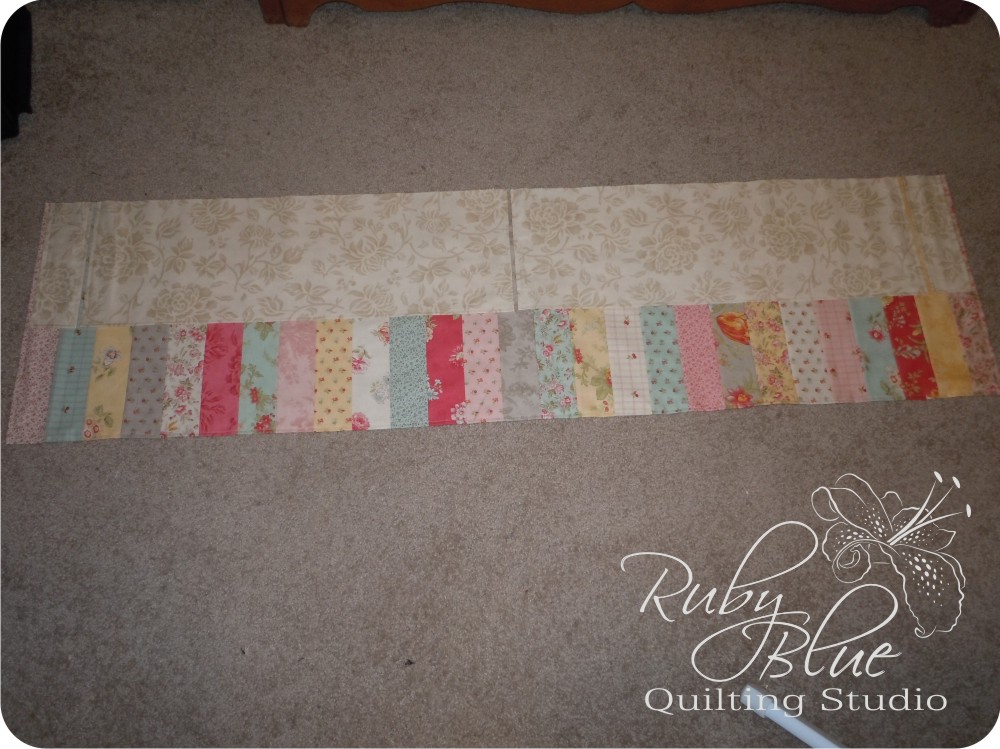
Next lay the main fabric pleats, 2 larger pieces in the center and 2 smaller pieces on the outsides. Align the raw edges from these with the raw edges of the jelly roll strip.
(If there’s a small gap in between the pieces that’s fine, just don’t overlap these pieces!)

Place the 2.5″ main fabric strip on top of these right side down and pin all the pieces together aligning the edges. Press the 2.5″ main fabric strip up.

Now place the smaller jelly roll and accent piece onto the valance aligning the raw edges and making sure the accent piece is going to be touching the main fabric.

Pin in place and press. The valance is done, but…

Remember that other 5″ strip from back in the beginning? If you have longer curtains you are going to be putting in the same window, you could use this strip for coordinating tie-backs. Press the strip in half wrong sides together.

Open it up to see the crease.

Press one side over to the crease.

Press the opposite side to meet the first at the crease.


One valance, approximately 20″ long and covering the width of your window with pleats at each corner and the center. Add buttons or any other embellishments you’d like before you hang it up, I put a button at each pleat.

This is what it looks like during the day with the sun shining, it almost gives it a stained glass window feel.


![]()
