
1 – layer cake. The Nostalgia collection by April Cornell is featured.
1/4 yard – Cream tonal from the same collection for the border.
3 yards – 1″ Elan Cotton Rick-Rack in rose

Break open your layer cake and separate them into creams and colors. There are some lovely cream prints in this collection, which will be used for the blocks behind the applique. Choose five of the color squares for the appliqué pieces and set aside.
This project makes full use of each square, with the scraps being used for the pieced border as well as the backing and binding. To make the best use of each square, use the following diagram when cutting the 6”squares listed below. This will result in each square yielding: 1 – 6” square; 1 – 4” x 10” rectangle; 1 – 4” x 6” rectangle.

From the cream squares, cut:
9 – 6” squares
4 matching 4 1/2” squares for the cornerstones
From the color squares, cut:
16 – 6” squares
From the cream and color scraps, cut:
48 – 2 1/2” x 4 1/2” rectangles for the pieced border
From the squares set aside for the appliqué, cut:
3 – Flowers
3 – Flower Middle
3 – Flower Centers
3 – Small Leaves
3 – Large Leaves
From the cream tonal, cut:
3 – 2 1/2” x width of fabric strips cut into:
2 – 2 1/2” x 24 1/2” inner border strips
2 – 2 21/2” x 20 1/2” inner border strips
From the rick-rack, cut:
4 – 25” long pieces
Sewing
Make the Quarter-Square-Triangle Units
Choose two color 6” squares and lightly mark a diagonal line on the wrong side of one square. Sew 1/4” away from each side of the line and cut along the line to make two half-square-triangle units; press.

Right sides together, align the two half-square triangle units together along their seams with opposite fabrics aligned.

Lightly mark a diagonal line, in the opposite direction of the seam, on the wrong side of a half-square-triangle unit. Align these two units together, pin and sew 1/4” away from each side of the marked line. Cut along the line to make two quarter-square-triangle units.

Repeat this process to make a total of sixteen color quarter-square-triangle units, and nine cream quarter-square-triangle units.

Assemble the Quilt Center and Add the Inner Border
Lay out the nine cream quarter-square-triangle units into three rows of three units. Position the sixteen color quarter-square-triangle units around the cream units to make a quilt center that is five rows of five units. Sew the units in each row together; press in one direction. Join the rows together to complete the quilt center; press in one direction.

Sew a 2 1/2” x 20 1/2” cream inner border strip to the left and right edges of the quilt center; press toward the cream. Sew a 2 1/2” x 24 1/2” cream inner border strip to the top and bottom edges of the quilt center; press toward the cream.

Make and Add the Pieced Border Strips
Sew together twelve 2 1/2” x 4 1/5” rectangles along their long edges to make a pieced border strip. Repeat to make a total of four pieced border strips. Baste a 25” length of rick-rack to one long edge of the pieced border strip using a 1/8” seam. Repeat for each of the four pieced border strips. Sew a pieced border strip to the left and right edges of the quilt center; press toward the pieced border with the rick-rack falling toward the cream inner border.

Join a 4 1/2” cream square to each short end of the remaining two pieced border strips (note: depending on how your rick-rack dips towards the edge fabric, you may need to fiddle with the ends a bit to avoid getting them stuck in the seams. i.e., I did this, so I’m giving all of you fair warning. Rick-rack is a stubborn thing to work with, but I can’t help myself. It’s worth it!)

Sew the two pieced border strips to the top and bottom edges of the quilt to complete the quilt center.
Applique the Quilt Center (template included in Printer Friendly Version at bottom of post)
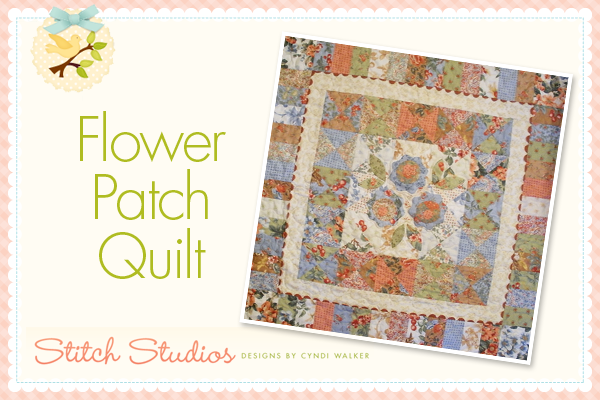
Using your favorite method of appliqué, prepare the large flowers, medium flowers, flower center, small leaves and large leaves. The sample project was made using the freezer paper and starch method of appliqué. Referring to the project picture, lay out the prepared appliqué pieces onto the cream panel in the center of the quilt.

Layer, baste and quilt however you like – I know, the dreaded “Quilt as desired”. I outline quilted the applique and did a simple stiple on the rest of the quilt. Bind the quilted quilt and voila…You’re done!

One 32″x32″ quilt top
This is a great way to use a full layer cake to make a quick and easy project. Personally, I love having a project like this to do the hand applique while watching TV or other activity that involves me sitting in one place for a while… 🙂
If you’d like to check out more of my patterns or find out what projects are coming out of my studio at the moment, you can visit my blog, wishfulstitches.blogspot.com, or check out my website at http://www.stitchstudios.com/.
Hope you enjoy making this!
Cyndi
![]()
