"Bubbles" Mod-Improv Color Pop Lap Quilt


Hi all!
Erin Davis here from Sew at Home Mummy with my contribution to Moda’s May Color POP! Challenge!  I think the colors of the “Noteworthy” line really pop against that Bella “Cloud”; this project incorporates both easy-peasy strip piecing and for a bit of a challenge, some gorgeous set-in circle work! Not to fear – you can do it – curved piecing just requires a bit of patience and a little practice! And for fun, you can personalize this quilt – after all, it’s improv!

This 50″ x 70″ lap quilt was a lot of fun – I hope you’ll give it a go!

1 Jelly Roll (“Noteworthy” by Sweetwater)
1 Layer Cake (“Noteworthy” by Sweetwater)
3.25 yards of Bella Solid, (front: Bella “Cloud”)
3.5 yards of Bella Solid, (backing: Bella “Snow”)
Twin-sized Batting
Circle Templates (in the “Printer Friendly Version” of the post)

Cutting Instructions:
Circles:
Cut 4 circles, using templates A – D provided, from layer cake pieces.
Cut 4 circle backgrounds:
          from front color yardage, cut 4 squares measuring  12.5” square
          from squares, remove circle cut-outs using templates E – H provided
Strips:
From Jelly Roll, choose at least 10 strips, and, cut strips at different lengths randomly (making sure the shortest is no less than about 12”); I left mine either 
– full length of strip    or/
– cut the strip in half
From front color yardage, cut approximately (6) 2.5” x wof strips (amount of strips required will depend on how many and how long the patterned strips you’ll be inserting)

Background:
“Cut on the fly”; once you start piecing the top, it’ll be really handy to have your cutting station set up so that you can cut fabrics as you need them – cut, piece, repeat.

Backing:
– Cut 2 pieces of backing fabric 36″ x 63″ (1yd27″).
– Select 7 layer cake pieces for the back piecing.
Instructions:
Inset Circles:
1.       Fold background and circles in 4 & finger press raw edges. Match circles with the appropriate background cut-out (A with E, B with F, etc.) 
2.       Pin circles to background, right sides together, easing fabric to fit.

3.       Sew, pivoting and easing fabric accordingly so as to eliminate risk of puckers.
4.       Press seams to inside of circle using steam and starch.
5.       Trim circle blocks to 11.5” square, centering circle while trimming.

Strips:
1.       Lay strips out in order you are happy with on your design wall/floor/table,  staggering/offsetting them randomly; organize your circle blocks in an orientation you’re happy with.

2.       Once you’re happy with your layout, attach pieces of background strips to the top ends of 4 of your patterned fabric sitting to the far left of your quilt, creating a “strip set”, so as to bring the ends even. 
3.       To the strips on the bottom of the quilt, add solids to either end; to the
a.       left side: enough to hit the vertical strip set already pieced (approximately 8″ wide strip)
b.      right side: enough to bring the horizontal strips to the end of the quilt 
4.       Sew in background fabrics accordingly to the blank areas surrounding the circle blocks, filling in the space as you go, starting from the top of the quilt and working down. Leave the sewn strip sets separate for now.

5.       Now, Sew all of your strips together, alternating the end you start sewing each time so as to avoid warping. Start with the vertical strips and sew them into one ‘section’. Next, sew your bottom strips together creating another “section”.
6.       Attach vertical strip-set section to the left side of the circle-block section; attach the bottom horizontal strip set section to create the quilt top.

Backing:
1.       Attach 7 layer cake pieces in a row randomizing patterns.
2.       Take the (2) cut back pieces and attach them to either side of your layer cake row lengthwise; press seam open.

Finishing the Quilt:
1.       Layer, baste, and quilt as desired.
2.       Bind quilt with left-over jelly strips.


One color-popping, gorgeous, 50″ x 70″ lap quilt!

…. and the back:

Erin Davis
{mummyquilts.blogspot.com}

Read With Me Quilt


Hi Moda Bake Shop Readers!!  I’m Melissa Corry from  Happy Quilting and I am so excited to be back here at the Moda Bake Shop to share my Read With Me quilt!! This fun twist on a standard “book” quilt uses typography and adorable quilting to add a whimsical touch.  Adding quilted titles of my families books makes this quilt a treasured heirloom.  I hope you enjoy the tutorial and even more, I hope you enjoy creating your own Read With Me quilt!!

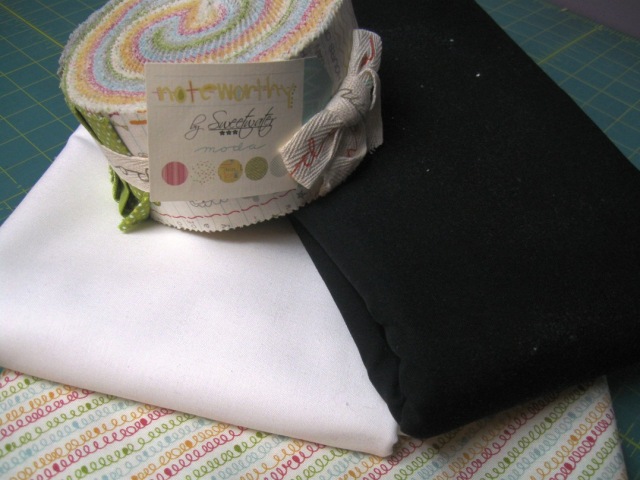
To make your own Read With Me quilt you will need :

1 Noteworthy Jell Roll
2 Yards of Moda Bella Solid White
1/2 Yard of Moda Bella Solid Black

4 Yards of your favorite print for Backing

Applique Templates (at the end of the tutorial)
1/2 yard of Heat N Bond
Twin size or 68″ x 82″ piece of Batting

Got your Ingredient’s, let’s get piecing!!

STEP 1 – CUTTING


Start by breaking out that jelly roll.  Choose 7 strips and set them aside to be used for your binding.  I choose to use the “white” strips for my binding.

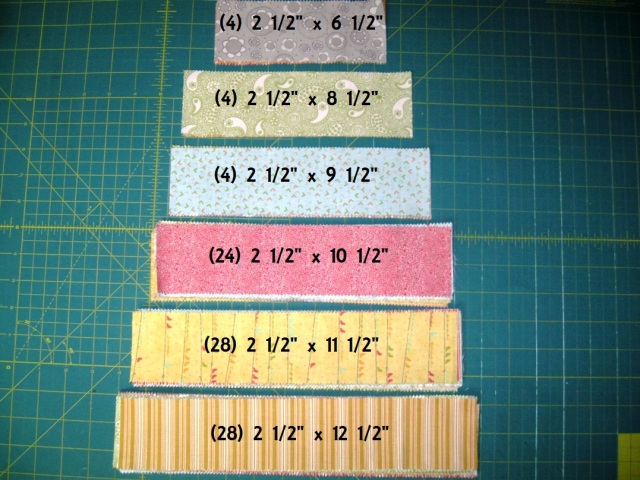
From the remaining jelly roll strips, alternating prints and colors for each group cut
   (4) 2 1/2″ x 6 1/2″ rectangles
   (4) 2 1/2″ x 8 1/2″ rectangles
   (4) 2 1/2″ x 9 1/2″ rectangles
   (24) 2 1/2″ x 10 1/2″ rectangles
   (28) 2 1/2″ x 11 1/2″ rectangles
   (28) 2 1/2″ x 12 1/2″ rectangles


From your white yardage cut the following
   (10) 5 1/2″ x Width of Fabric Strips
   (4) 3″ x 15″ rectangles
   (4) 2 1/2″ x 6″ rectangles
   (4) 1 1/2″ x 6″ rectangles
   (36) 1 1/2″ x 2 1/2″ rectangles
   (8) 2 1/2″ x 3 1/2″ rectangles
   (32) 2 1/2″ x 2 1/2″ squares

STEP 2 – BLOCK A

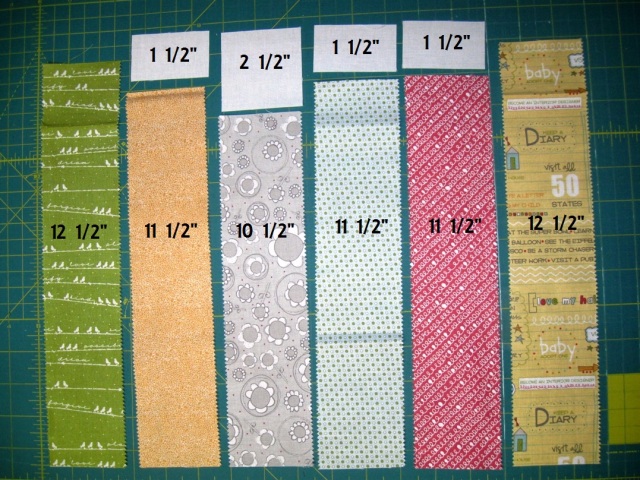
Gather the following size pieces and lay them out as shown.
   (2) 2 1/2″ x 12 1/2″ print rectangles, (3) 2 1/2″ x 11 1/2″ rectangles, and (1) 2 1/2″ x 10 1/2″ rectangles
   (1) 2 1/2″ x 2 1/2″ solid square, and (3) 1 1/2″ x 2 1/2″ rectangle.


Lay the solid rectangles onto the tops of the print strips and sew a 1/4″ seam along the edges.  Press.

Sew the 6 columns together.  Start by placing the second column onto the first, sew a 1/4″ seam along the edge.  Then place the third column onto the now sewn together first and second columns and sew a 1/4″ seam and so on until all 6 columns are sewn together.  Press.

Repeat this step to make a total of 4 blocks each measuring 12 1/2″ x 12 1/2″.


STEP 3 – BLOCK B

Gather the following size pieces and lay them out as shown.
   (1) 2 1/2″ x 12 1/2″ print rectangles, (2) 2 1/2″ x 11 1/2″ rectangles, and (3) 2 1/2″ x 10 1/2″ rectangles
   (3) 2 1/2″ x 2 1/2″ solid square, and (2) 1 1/2″ x 2 1/2″ rectangle.


Lay the solid rectangles onto the tops of the print strips and sew a 1/4″ seam along the edges.  Press.

Sew the 6 columns together.  Start by placing the second column onto the first, sew a 1/4″ seam along the edge.  Then place the third column onto the now sewn together first and second columns and sew a 1/4″ seam and so on until all 6 columns are sewn together.  Press.

Repeat this step to make a total of 4 blocks each measuring 12 1/2″ x 12 1/2″.


STEP 4 – BLOCK C

Gather the following size pieces and lay them out as shown.
   (2) 2 1/2″ x 12 1/2″ print rectangles, (1) 2 1/2″ x 10 1/2″ rectangle, (1) 2 1/2″ x 9 1/2″ rectangle,
        (1) 2 1/2″ x 8 1/2″ rectangle and (1) 2 1/2″ x 6 1/2″ rectangle
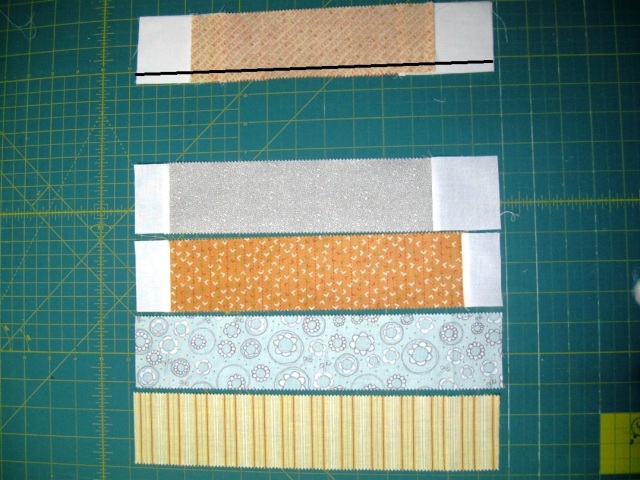
   (2) 2 1/2″ x 3 1/2″ solid rectangles, (3) 2 1/2″ x 2 1/2″ solid square, and (3) 1 1/2″ x 2 1/2″ rectangle.


Lay the solid rectangles onto the tops of the print strips on either end of the strip and sew a 1/4″ seam along the edges.  Press.

Sew the 6 rows together.  Start by placing the second row onto the first, sew a 1/4″ seam along the edge.  Then place the third row onto the now sewn together first and second rpw and sew a 1/4″ seam and so on until all 6 rows are sewn together.  Press.

Repeat this step to make a total of 4 blocks each measuring 12 1/2″ x 12 1/2″.


STEP 5 – BLOCK D

Block D has an angled book.  To make this start by slicing a 3″ x 15″ solid rectangle in half diagonally.


Place a 2 1/2″ x 11 1/2″ print rectangle between the 2 triangles, taking care to center the strip.  Lay the strip onto the top triangle.  Sew a 1/4″ seam aligning the raw edges.  Press.  Lay the bottom triangle onto the strip and sew a 1/4″ seam aligning the raw edges.  Press.  Using the ends of the strip as a guide, trim the top and bottom of the unit even with the ends of the strip.

Now gather a 2 1/2″ x 6″ solid rectangle and a 1 1/2″ x 6″ solid rectangle.  Lay the 2 1/2″ strip along the bottom of the block and the /2″ strip along the top of the block aligning the raw edges.  Sew a 1/4″ seam along each edge and press.

Now all that is left is trimming.  The trimming has to be done one side at a time and needs to be precise or you will end up with a floating book 🙂
    Place your long ruler so the top left hand corner of the print strip aligns with the 4 1/4″ horizontal mark on your ruler and the bottom right hand corner of the print strip aligns with the 1/4″ horizontal mark on your ruler.  Trim along the right hand edge of your ruler.
    Place your long ruler so the right hand side of the block aligns with the 4 1/2″ vertical line on your ruler.  Trim along the left hand edge of your ruler.
     Place your long ruler so that the right hand side of the block aligns with the edge of the ruler, the left hand side of the block aligns with the 4 1/2″ vertical line and the bottom right hand corner of the print strip aligns with the 12 1/4″ horizontal mark on your ruler.  Trim along the top edge of the ruler.
     Place your long ruler so that the right hand side of the block aligns with the edge of the ruler, the left hand side of the block aligns with the 4 1/2″ vertical line and the top of the block aligns with the 12 1/2″ horizontal mark on your ruler.  Trim along the bottom edge of the ruler.

You know you will have trimmed correctly if the three corners of the book that are pointed out are 1/4″ away from the nearest edge.

Gather the following size pieces and lay them out as shown.

   (2) 2 1/2″ x 12 1/2″ print rectangles, (1) 2 1/2″ x 11 1/2″ rectangles, and (1) 2 1/2″ x 10 1/2″ rectangles, and a pieced angle book block.
   (1) 2 1/2″ x 2 1/2″ solid square, and (1) 1 1/2″ x 2 1/2″ rectangle.

Lay the solid rectangles onto the tops of the print strips and sew a 1/4″ seam along the edges.  Press.

Sew the 5 columns together.  Start by placing the second column onto the first, sew a 1/4″ seam along the edge.  Then place the third column onto the now sewn together first and second columns and sew a 1/4″ seam and so on until all 5 columns are sewn together.  Press.

Repeat this step to make a total of 4 blocks each measuring 12 1/2″ x 12 1/2″.


STEP 6 – APPLIQUE STRIPS


Now the blocks are done and you can move onto the applique.  If you are new to applique, and need a bit more instruction on how to do it, please see my video tutorial on Applique Basics here.    From your black yardage lined with Heat N Bond cut the following letters.  (use the templates at the end of the post or make your own if you prefer a different font.)

Grab the WOF strips cut in the beginning and cut them into the following pieces.  Sew the pieces end to end to create (2) 5 1/2 ” x 63 1/2″ strips to be used for the side borders, (2) 5 1/2″ x 58 1/2″ strips to be used for the top and bottom borders, and (3) 48 1/2″ strips to be used for the applique.  Set the border strips aside.

Fuse your applique onto the three strips as follows.  For the first strip, start the applique 1″ in from the left and space the applique out over 32″.  For the second strip, start the applique out 8 1/4″ from the left and space the applique out over 32″. And for the third strip, start the applique out 1″ from the right and space the applique out over 32″.

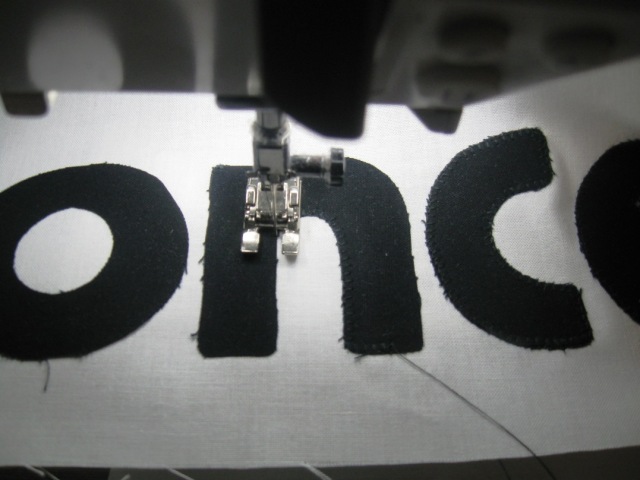
Secure stitch the applique.  It is much easier to do this while it is in a strip, verses once it is sewn into the quilt top.


STEP 7 – ASSEMBLING QUILT TOP

And now you are ready to put the top together.  Lay your 16 blocks out in 4 rows of 4.  You can use the same layout I did or your own, just whatever looks pleasing to your eye.


Once you have your layout, sew the rows together the same way you did with the blocks.  Lay the second block in each row on the first and stitch along the aligned edge.  Then add the 3rd block, and then the 4th.

Press your rows and then lay them back out adding the appliqued strips in between each row.

Sew the rows together.  Once again, use the same process as putting the blocks together.  Just sewing the second row onto the first, and then adding the third and so on until the rows are all sewn together.

Now gather your borders that were set aside.  Place the side borders along the sides of the quilt top.  Sew a 1/4″ seam along the edge, aligning as you go.  Press.  Then repeat the same process for the top and bottom border.  Press.

And your quilt top is finished!!


STEP 8 – FINISHING

Baste it, Quilt it, and Bind It.  I know, I make it sound so easy.  If you are new to finishing your quilt, I have created a video tutorial series that goes over the basics of each of these three steps.  You can find it at my blog 🙂   You will use the 7 strips you set aside at the beginning to do the binding.  I choose to quilt mine with a bit of a “Fairy Tale” scene.  I  used a water soluble pen to draw the basic sketch and then filled it in with all of my favorite FMQ designs.   The final touch of quilting that really made this quilt special was quilting a book  title of a family favorite onto each book.  To do that, I once again used a water soluble pen  and then quilt the titles in my very best loopy cursive 😉  To see more detailed quilted pictures see my blog 🙂


          One adorable 58″ x 73″ Read With Me Quilt that is sure to be a family favorite.  Whether you put it on a bed or just snuggle under it while reading stories, I hope it becomes a treasure.  Thank you so much for joining me and I hope you enjoyed the tutorial.  If you make your own Read With Me Quilt I would love to see it.  You can add it to my Inspired by Happy Quilting Flickr group here 🙂

Have a Happy Quilting Day!!

Melissa Corry
{happyquiltingmelissa.blogspot.com}

Noteworthy Labyrinth Quilt


Hello again!  This is Karin Vail from Cascade Quilts and I am happy to bring you my third Moda Bake Shop project!  This would look wonderul in just about any Moda collection!
I showed a preview picture of the pattern to a quilter friend of mine, and she said it looked like a labyrinth or maze, so the name was born.  This quilt came together pretty quickly – it looks complicated, but if you keep your consistent 1/4” seam, you should have no problems 🙂  This quilt top finishes at approx. 87”x87”.


2 jelly rolls (Noteworthy by Sweetwater)
3 1/2 yards Bella solids (Snow)
5 yards backing (#5500 15  ”Daisy” from Noteworthy collection)


We will be using 1/4” seam allowance throughout.

First, we’ll be cutting loads and loads of narrow strips from your Bella solid.

CUT:
8 WOF strips @ 1.75” for the border
66 WOF strips @ 1.5” wide for the sashing (30 are for your strip sets)
     Subcut 28 of the 1.5” strips into:
          45 pieces @ 16.5”
          50 @ 8”

Set aside 30 WOF @ 1.5” for your strip sets, and 8 WOF @ 1.5” for your sashing.

To get the most out of your solids, you can get two 16.5” pieces and one 8” piece from each WOF – so, from 22 strips, cut 44 pieces @ 16.5” and 22 pieces @ 8” – then from one strip, cut 1 piece @ 16.5” and 3 pieces @ 8” – then from 5 strips, cut 25 more pieces @ 8”.   This should give you the least amount of waste.

Take the remaining eight 1.5” strips and join into 4 longer strips @ 88” (sashing strip to join the rows together.)

Join the eight WOF 1.75” strips into 4 @ 88” for your border.

Open your two jelly rolls and choose 30 strips from each jelly roll for a total of 60 strips.  Some of the remaining jelly roll strips will be used for scrappy binding, so keep that in mind when choosing strips.  Also keep in mind what you choose if you might want to make matching pillows. Unfortunately, I left out the white/white prints and lower value prints and didn’t think about using the remaining for pillows until the top was already all assembled.  I wish I would have thought ahead further so I could have a matching pillow or two.

Anyhow, for each of the strip sets, you will choose 3 jelly roll strips and join together alternating with 2 of the 1.5” solid strips.  Press all seams to one side.

You will sew together 20 of these strips sets.  Each strip set should measure 8.5” wide.

Cut each strip set into five 8.5” squares.  There will be VERY LITTLE waste here, so cut cautiously.  After you have cut all your strip sets into 8.5” squares, you will take pairs keeping the seams orientated in the same direction, and cut them diagonally in opposing directions.

It is imperitive that you cut the angles in opposing directions for this to work.

Now, swap the upper pieces from each block and align and you will start to see the sub-block emerging!

If you pressed the seams to one side, and kept them in the same direction when you cut the blocks, your seams will all nest pefectly when you go to join the triangles back into a square!  The bias edge helps a LOT to make sure your seams line up.

Sew the blocks together and press.  You can press open or to one side here, your choice.  I chose to press to the side because it’s faster 🙂

At this point, carefully trim your blocks so they are 8” square.  You should have VERY little to trim, if anything at all.  The blocks will go together much nicer if these are all nice and square though 🙂
Continue cutting/sewing your sub-blocks – you should have a total of 100 for this quilt.

To assemble the 25 blocks, you will stitch an 8” x 1.5” solid between pairs of sub-blocks, press toward the solid.  Then, assemble pairs of those with the 16.5” x 1.5” strip for your finished blocks.  There will be 25 total.  Using your final twenty 16.5” x 1.5” strips, sew the blocks into rows of 5 – then use your 1.5” x 88” strips to join your rows.  Finally, use your final four 1.75”x 88” strips to add a border for a final quilt top finish of 87”x87”.

Now you can layer, baste, quilt, and bind using 9 of your remaining jelly roll strips!  (You will have 11 leftover jelly roll strips from the 2 jelly rolls and a small amount of the solid – maybe make some pillows to match?!)


One beautiful 87”x87” quilt!

Hop on over to my website to see the quilt in it’s post-washed crinkly goodness!

{cascadequilts.com}

Oh Pinwheels! Lap Quilt

Hi everyone! Debbie Taylor here from Fat Quarter Shop & It’s Sew Emma! I’m really happy to share with you my first project on Moda Bake Shop, Oh Pinwheels! I love this fun quilt with colorful sprinkles of pinwheels and oblong rings. While I usually make quilts as gifts for others, since I used my current favorite fabric Noteworthy, this one is a gift for moi!

In case you love my version, Fat Quarter Shop is offering kits of Oh Pinwheels in Noteworthy!

  • 1 Noteworthy Jelly Roll
  • 2 1/2 yards cream tonal for background, sashing and inner borders − I used Vanilla Fly a Kite SKU # 5501-21
  • 5/8 yard pink tonal for binding − I used Kisses Fly a Kite SKU # 5501-13
  • 3 1/4 yards for backing − I used Vanilla Bucket List SKU # 5500-11


Cutting

  1. Choose 25 strips from your Noteworthy Jelly Roll.
    From 9 strips, cut:
    • 2 – 2.5″ x 8.5″ strips
    • 2 – 2.5″ x 4.5″ strips

    From 8 strips, cut:

    • 1 – 2.5″ x 13.5″ strips
    • 8 – 2.5″ squares

    From 8 strips, cut:

    • 1 – 2.5″ x 10.5″ strips
    • 8 – 2.5″ squares
  2. For background, sashing and inner borders, cut:
    • 21 – 4.5″ x 8.5″ rectangles
    • 16 – 2.5″ x 4.5″ rectangles
    • 116 – 2.5″ squares
    • 8 – 4.5″ squares
    • 9 – 2.5″ x WOF strips, subcut into:
      • 6 – 2.5″ x 40.5″ strips
      • 2 – 2.5″ x 52.5″ strips
  3. For binding, cut 7 – 2.5″ x WOF (width of fabric) strips

All seams are sewn with a 1/4″ seam allowance.

Piecing
 
1. With right sides facing, layer a 2.5″ cream tonal scribbles square with a 2.5″ jelly roll square. Stitch together along center line. Press toward the darker color and trim off excess. Half-square triangle should measure 2.5″ x 2.5″. Repeat 115 more times. Make 116.

2. Assemble two 2.5″ x 8.5″ rectangles of the same fabric and one 4.5″ x 8.5″ cream tonal scribbles rectangle. Press toward the 2.5″ x 8.5″ rectangles. Unit should measure 8.5″ x 8.5″. Repeat eight more times. Make nine.

3. Assemble two 2.5″ half-square triangles of the same fabric and one 2.5″ x 4.5″ rectangle. Press toward the rectangles. Unit should measure 2.5″ x 8.5″. Repeat with the same fabrics once for two identical units. Repeat eight more times. Make nine pairs of identical units.


4. Assemble Oh Block as shown with matching fabrics. Press toward the 8.5″ x 8.5″ unit. Oh Block should measure 8.5″ x 12.5″. Repeat eight more times. Make nine.


5. Assemble two 2.5″ half-square triangles with different fabrics. Press toward the darker color. Unit should measure 2.5″ x 4.5″. Then assemble two 2.5″ x 4.5″ half-square triangle units of different fabrics and press toward the darker color. Pinwheel unit should measure 4.5″ x 4.5″. Repeat nineteen more times. Make twenty.

6. Assemble two 2.5″ x 4.5″ cream tonal scribbles rectangles and one 4.5″ x 4.5″ pinwheel unit. Press toward the pinwheel. Unit should measure 4.5″ x 8.5″. Repeat five more times. Make six. Assemble two 4.5″ x 8.5″ cream tonal scribbles rectangles and one 4.5″ x 8.5″ cream/pinwheel unit as shown. Press toward the cream/pinwheel units. Pinwheel Block should measure 8.5″ x 12.5″. Repeat five more times. Make six.

7. Assemble three Oh Blocks and two Pinwheel Blocks as shown. Press toward Pinwheel Blocks. Large Row should measure 12.5″ x 40.5″. Repeat two more times. Make three.

8. Assemble two 2.5″ x 4.5″ cream tonal scribbles rectangles, five pinwheel units and four 4.5″ cream tonal scribbles squares as shown. Press toward the cream tonal scribbles. Small Row should measure 4.5″ x 40.5″. Repeat one more time. Make two.

9. Assemble three Large Rows, four 2.5″ x 40.5″ cream tonal scribbles sashing strips and two Small Rows as shown. Press toward sashing. Quilt Center should measure 40.5″ x 52.5″.

10. Assemble four different 2.5″ x 13.5″ jelly roll rectangles as shown. Press toward darker colors. Side Border Unit should measure 2.5″ x 52.5″. Repeat one more time. Make two. Piece 2.5″ cream tonal scribbles strips end to end. Subcut into two 2.5″ x 52.5″ strips for the side borders. Assemble one Side Border Unit and one 2.5″ x 52.5″ cream tonal scribbles strip as shown. Press toward cream tonal scribbles print. Side Border should measure 4.5″ x 52.5″. Repeat one more time. Make two.


11. Assemble four different 2.5″ x 10.5″ jelly roll rectangles. Press toward darker colors. Top and Bottom Border Unit should measure 2.5″ x 40.5″. Repeat one more time. Make two. Assemble one Top and Bottom Border Unit and one 2.5 x 40.5 cream tonal scribbles strip. Press toward cream tonal scribbles print. Top and Bottom Border Row should measure 4.5″ x 40.5″. Repeat one more time. Make two. Then assemble two pinwheel units and one Top and Bottom Border Row as shown. Top and Bottom Border should measure 4.5″ x 48.5″. Repeat one more time. Make two.

12. Attach Side Borders to the Quilt Center. Press toward borders. Unit should measure 48.5″ x 52.5″. Second, attach Top and Bottom Borders to Quilt Center as shown. Quilt should measure 48.5″ x 60.5″.

Quilt and bind as desired! Natalia Bonner quilted mine with a leafy motif and cheerful flowers inside the Oh blocks.


One fresh 48.5″ x 60.5″ lap quilt for Spring! Hope you enjoy!

Debbie Taylor
{fatquartershop.blogspot.com}
{www.itssewemma.com}

Stack ‘Em Up Quilt


– One Ticklish Layer Cake by Me & My Sister Designs for Moda
– 1.5 yards 22194 22 Blue from Ticklish by Me & My Sister Designs for Moda {border & binding}
– 1 yard 9900 200 Off White, Bella Solid
– 1/4 yard – 22197 23 Purple from Ticklish by Me & My Sister Designs for Moda
– 1/4 yard – 22195 22 Blue from Ticklish by Me & My Sister Designs for Moda
– 1/4 yard – 5501 15 Daisy from Noteworthy by Sweetwater for Moda
– 1/4 yard – 5508 24 Pickle from Noteworthy by Sweetwater for Moda

My schedule is pretty much like everyone else’s- super busy! I love to quilt but just can’t find the time to make really intricate quilts especially when I need then to be a little larger in size than say, a wall hanging. So, I enjoy designing quilts that I can cut and piece in a day or two at the most. Yup! I said it… and I hope you’ll give this one a try so you can see exactly what I mean.
The quilt finishes about 58″ x 71.5″ and is made up of only 2 blocks. The blocks are NOT a traditional quilt block size in that they finish at 13.5″ x 13.5″. The reason for this is I designed the blocks to use Layer Cake squares as efficiently as possible.  This is great for three reasons: 1) less cutting for you and 2) very little to no fabric waste and 3) my favorite- a good size quilt that whips up quickly!
The way I’ve created the quilt here is just one variation using the two blocks.  Once you finish your 20 blocks feel free to play around with them and re-orient them any which way you want.  It’s a lot of fun to make your own one-of-a-kind quilt so it’s always something I encourage!
Let’s get to it!
I’ll break down the cutting and piecing into each block first then all you have to do is repeat until you get 10 blocks of each Block #1 and Block #2. Simple enough.

Block #1: You will need 10 of these total. Each finishes at 13.5″ in the finished quilt.
Center square: One 10″ x 10″ layer cake square {1 per block… easy, right?}
Side strips: 2.5″ x 10″ {4 per block}
Corners: 2.5″ x 2.5″ {4 per block}

Block #2: You will need 10 of these total. Each finishes at 13.5″ in the finished quilt.
Center strip: 5″ x 14″ {1 per block}
Solid white corners: 5″ x 5″ {4 per block}
Center color squares: 5″ x 5″ {4 per block}

Now that you see how easy it is to whip this quilt up let’s get started on how to get all the pieces we need from the fabric we have.

 Step 1:  Open your Ticklish layer cake and select 10 squares you want to use as your centers for Block #1. Be spontaneous. The quilt WILL be beautiful no matter which ones you select.  Press your squares flat with your iron and set aside.

 Step 2: Gather the 1/4 yards you have of each of the four different fabrics. Cut 3 strips measuring 2.5″ x WOF (width of fabric) from each fabric.

Step 3: Turn strips the other way and cut out rectangles at the 10″ mark. So you end up with pieces that measure 2.5″ x 10″.

 {Tip: You can get 4 rectangles from each 2.5″ x WOF strip you cut.}

 Repeat until you get 10 rectangle units measuring 2.5″ x 10″ from each of your 4 fabrics. Set your 40 units aside.

Step 4: Set aside units for Block #1 because we still need our corner squares but I like to wait until after I’ve cut the pieces I need for Block #2 so I can go back and use as many scraps as I can.

Step 5:  Cut up the 1 yard of white fabric to get 40 squares measuring 5″ x 5″.
{Tip: If you cut 5″ wide strips x WOF (width of fabric) you only need to cut 5.  Then from each of those strips you can cut 8 of the squares you need … for a total of 40.}

Step 6: Pick out 5 more layer cake squares that you want to be the accent color blocks in your Block #2. Press flat with iron. {See pic at beginning of post if you don’t remember what Block #2 looks like.}

Step 7: Cut each layer cake square in four.  Taking care to end up with 4 squares that measure exactly 5″ x 5″ from each layer cake square. You will get 4 squares from each for a total of 20 squares.
{Tip: Always check your measurements.  Some layer cake squares may be a little bigger or smaller than the 10″ x 10″ size. If it’s too big trim it down. If it’s too small, no biggie. Choose another square. There are more than enough for you to make this quilt.}

Step 8: To make the long pieced center strip in Block #2 we will need to piece it.  Start off by selecting another 5 layer cake squares and slice them in half to get two rectangles measuring 5″ x 10″. 

Step 9: Set one half aside. We will cut the other half up to create our center strip unit. Take the one half reserved for cutting up and cut 2.5″ strips from it.  You should be able to get 4 rectangles each measuring 2.5″ x 5″.

Step 10: The short strips you have will now be sewn to the short ends of the longer/bigger rectangle you have set aside but you will use a different fabric. So, cut up whatever layer cake squares you like for this and mix & match them any way you want.

Step 11:  Using a 1/4″ seam allowance sew the end pieces onto the half of the layer cake square piece until you get units that look like the ones below. The finished unit should measure 5″ x 14″. Repeat to get 10 units.

Step 12: Now we can revisit what’s left of our layer cake and select the ones you want to use as your cornerstones for Block #1. You didn’t forget about those did you?! Well, you will need to cut out a total of 40 squares that measure 2.5″ x 2.5″. To do that just take a layer cake square, cut it in half and then cut that half lengthwise to get two 2.5″ x 10″ strips as shown below. Then you can cut the 2.5″ x 2.5″ squares from those strips as shown below also. You will need 4 cornerstones per Block #1 for a total of 40.
{Tip: Feel free to use 4 different cornerstones for each block or keep them the same like I did. Make this fun quilt your own. It will be marvelous no matter what you decide!}


 Now that all the prep work is done we can start piecing! Yay! For a scrappy quilt like this with a lot of different fabrics I like to assemble the design of my quilt top on a design wall of some kind.  It just makes it easier to see the blocks from a far and make any changes as you go. Nothing expensive or fancy.  I just have a piece of batting thumb tacked into my studio wall.

Step 13: Lay out your 10 squares for Block #1 in any order you want. This quilt alternates blocks so leave space between each Block #1 for a Block #2 that will go there later. Move them around until you get a design you like.

Step 14:  Start laying the side strips around the center square using one of each color for every block. Arrange them any way you want similar to the picture below. Repeat for every Block #1 on your design surface.
{Tip: Space your Block #1s further apart than I show in the picture below. I had to do some moving around after to accommodate the full size Block #2s in there.}

Step 15: Place your cornerstones in place to finish off your ten Block #1s. Again, arrange them in any manner you want. You can keep them the same color on each block or totally randomize them.

Step 16:  Look at your Block #1s and see if you want to switch anything up. Once you have it just the way you want you can start piecing your Block #1s. Using a 1/4″ seam allowance to sew the corner stones to the one long strip at the top and the other longer strip on the bottom.  Then sew the side strips to the center square as shown below. Press your seams in opposite directions (see pic below).

Step 17: Now to sew the top and bottom units we just created to the larger center unit. Use a 1/4″ seam allowance and make sure you are abutting those intersecting seams so you get nice crisp meeting points as shown below.

Step 18: Repeat the process to get 10 Block #1s. 

Step 20: Start working on Block #2! Begin by placing the different parts that make up the block in the correct orientation. You need 4 white squares, one will go on each corner. Then decide which way you want to orient your longer center strip and place it either vertically or horizontally. The spaces that are blank will be filled in with the color squares you cut from the layer cake squares back in Step 7. Sew in the same manner as Block #1. The top row, center row, bottom row and then sew them all together using the same 1/4″ seam allowance. Repeat to get 10 Block #2s.

Step 21: By now you should have 10 Block #1s and 10 Block #2s. At this point double check to make sure each one of your 20 blocks measures 14″ x 14″.  I have a 14″ ruler so this was easy. You may need to do some trimming.
{Tip: If blocks are smaller than the 14″ x 14″ find which block is the smallest of the bunch and trim them all to that size. No need to panic if they are all different sizes. Consistency is key.  Just make sure they are all the same size before you start sewing them together.}

Step 22: Once all blocks are square and the same size we can start assembling the quilt top.  I have the quilt set up like this but you can rearrange them in any way you’d like at this point. Make it your own!

Step 23: Once you have the block arrangement to your liking start connecting the blocks!  I like to split it up and piece 3 blocks at a time instead of sewing the whole row of 5 across. This helps keep the pieces more manageable as you sew and will be a lot easier to match the intersection block points on the quilt.  Once I have one large 3 block x 4 block section pieced {shown below} I go to what’s left and piece another larger 2 block x 4 block section {shown below}.  Then, I’ll sew just one long 4 block seam to join the two quilt top sections.
{Tip: There only a few intersecting points that have to be matched when you are sewing the blocks together. So keep an eye out for those when pinning and sewing.  It’s basically only where the cornerstones on Block #1s meet.}

Step 24: Your quilt top is almost done! Now we just need add a super quick and easy border to finish it up!

Step 25: For the border we are working with 1.5 yards 22194 22 Blue from Ticklish by Me & My Sister Designs for Moda. Leave the fabric just as it comes folded off the bolt and re-fold it on itself making sure it is staying on grain. This will make it easier to cut with a shorter ruler.  If you have a WOF (width of fabric) ruler you can skip this step.

Step 26: Trim off a little from the edge to start with a clean cut straight edge. Then proceed to cut eight (8) 2.5″ x WOF (width of fabric) strips. {Use the remaining fabric to cut your binding strips when you get to that point.}

 Step 27: Cut the selvages off each strip.

Step 28: Now we’ll be sewing two (2) strips together at a time until we end up with four (4) long strips, each made up of two (2) 2.5″ x WOF strips. To prepare your strips for sewing lay one strip with the pretty side of the fabric facing up vertically in front of you.  Take a second strip and lay it with the pretty side of the fabric facing down horizontally in front of you so that the corners are flush over the strip that’s underneath.  Like I’m showing in the picture below.  The set up should look like a backwards letter “L”.

Step 29: Now pin in place and draw a line with some kind of fabric marking device starting on the top right corner and down to the bottom left corner.  Then stitch directly on that line {backstitching at beginning and end just in case!} Trim your seam allowance to 1/4″ and repeat to the remaining strips remember that you should only be sewing two together at a time.  DO NOT sew all eight (8) together.  Each combined pair of strips will be one side border and you will need four (4) to add borders around the four sides of your quilt. Make sense?

 Step 30: Press all seams open on your border strips and when you turn it over you should now have one continuous strip as shown below.

Step 31: To add the borders pick one side of your quilt and lay the pretty side of the border strip to the pretty side of quilt top and pin along entire edge.  Use a 1/4″ seam allowance to sew on.  {Note: You will see below that I like to leave at least an inch of excess border strip on both edges of my quilt tops because I prefer to go back and trim them afterwards.  This will ensure a nice straight angle border.}

Step 32: Then press your seam flat first and then by opening the border strip back and pressing your seams towards the darker fabric.

Step 33: Now we can trim the edges.  Take a square or rectangular ruler and line up two of it’s edges flush with the side of your quilt and trim away any excess fabric. Repeat on opposite end of border strip.

Step 34: Now you have one border strip attached.  For the next one you always want to attach the the border to the parallel side of the one you just sewed.  In other words, if you add your first border to one long side of the quilt the second border you attach should be to the opposite long side of the quilt and NOT a short side. Like I show you below. After two parallel borders are attached proceed to add the remaining border strips to the shorter sides of the quilt top. Press after each seam and trim flush with the edge of the quilt top.


That’s it! Your quilt top is complete! It should measure approximately: 58″ x 71.5″. Makes a fun picnic or lap quilt for Spring/Summer.  I love quickie quilt designs like this because they make great last minute gifts!

Vanessa Wilson
{craftygemini.blogspot.com}