120-Minute Gift: Drunkard’s Path Table Runner


Drunkard’s Table Runner: ‘marmalade’ with a festive spin:  A 12.5” x 54” table runner featuring “Marmalade” by Bonnie and Camille for Moda, >composed of (5) 9.5” square drunkard’s path blocks
 

Recipe Pattern by Erin Davis of Sew at Home Mummy


Hi all!

I wanted to do something festive for my dining room table, and I thought, hey! I love ‘marmalade’, why not pair it with a modern red & green to give the line a Christmas-y spin? I love the way it turned out – it looks good on my table for the upcoming holidays, yet I could most definitely pull it off year round! I had a lot of fun composing this runner and I have to say: don’t be scared of curved piecing! Look how gorgeous it looks when it’s done. This would make a fantastic holiday gift, too. 

Happy sewing, quilting and crafting everyone!

Cheers and enjoy the project,

Erin


– 1 Moda ‘marmalade’ by bonnie and camille Charm Pack
– 1 yard Bella Solids ‘Pistachio’
– 1/3 yards Bella Solids ‘Scarlet’
– 16”x60” piece of batting


Cutting:
From charm squares:
see attached templates (A) & (B) in the printable version of the post… I cut mine from the cardboard on the back of the charm square pack, like this:

***sort the charm squares as you like – have fun with it! I pre-sorted my squares into colorways (i.e. – all the ‘reds’ in one stack, all the yellows in another, etc. and then paired the patterns based on what I’d like to see as the center wedge piece, and what I’d like to see as the outer ‘L’ piece.***

·         Cut 20 pieces of template (A) (creating the ‘wedge’ shapes)

·         Cut 20 pieces of template (B) (creating the ‘L’ shapes)

Tip: when cutting curved pieces, try to use the smallest sized rotary cutter you have; you’ll find it much easier to navigate the curves.Your cut pieces will look like this, with the wedge-shaped piece appearing larger than the concave part of the ‘L’ shape – don’t worry:

This is what you want – it’s the seam allowances that make it appear too big to fit.

From yardage:

Pistachio:
Cut (2) pieces of 16” x 30”
Scarlet:
Cut (4) pieces 2”x9.5”
Cut (2) pieces 2”x12.5”
Cut (3) strips 2”x width of fabric


Piecing (Runner Top):
1. Sort your A’s and B’s in combinations of fours (there will be 4 each of A’s and B’s in one block) ; I sorted by colorway in a way that was aesthetically pleasing to me. Have fun with it!

Have fun arranging your pieces
2. Attach piece (A)s to piece (B)s, creating quarter block units. If you have never pieced Drunkard’s blocks before, here are some tips.

a. Fold your Piece (A) and (B) in half along the cut curve, and finger press like so:

b. Match your finger press marks, right sides together, and pin

Tip: When pinning for curved seams, try to have your pin enter where the sewing line will be – i.e. ¼” from the edge of the fabric, and only ‘grab’ a small amount of fabric with pin

c. Match the two outside edges together; pin in the same manner as described above. Place pins along the rest of the curve, easing the fabric to fit.

d.  Sew the two pieces together. I have sewn both with the wedge piece (piece (A)) on top, and the wedge piece on bottom. Personally, I find it easier with the ‘L’ shaped piece (or piece (B)) on top – but you’ll have to play with it to find what you’re most comfortable with. Here are some tips I have found helpful for sewing curved seams:

                             i. Slow and steady; don’t expect to zip around these curves like straight piecing (unless you’re pro! haha)

                             ii. Leave your pins in to the last minute, without sewing over them.

                             iii. every 3-5 stitches, lift your presser foot, pivot slightly, adjust your fabrics, etc.

                             iv. always be conscious of the fabric about to enter under your presser foot – make sure there are no lumps and bumps.

                             v. I have some more tips on my blog – I recently finished a 4” apple core quilt and posted ideas on curved piecing here: 
                             Sew at Home Mummy: Apple Core Quilt
e.  When you’re done sewing, you’ll have a block that looks like this:

f.   Press towards piece (A)s.
g.  Join two quarter blocks to create a half block; press. Repeat with other half of block.
                   Join two half block pieces, matching center seams. Press center seam open.
3.  Arrange completed blocks in an orientation you like. When you’re happy with your layout, attach 2”x9.5” sashing pieces (in ‘Scarlet’) between blocks to create table runner top, like so:
4.  Sew the (3) 2”x width of fabric (in ‘Scarlet’) together, creating one long strip. Use strip to border runner. ‘Cap’ ends with (2) 2” x 12.5” pieces:
Piecing (Backing & Binding):
1.  Sew short ends of the two 16”x30” pieces of ‘Pistachio’ together, creating a backing measuring 16”x60” with a ½” seam allowance. Press seam open.

2.  Use remaining ‘Pistachio’ for binding (as desired).
Finishing:
1.       Layer, baste and quilt as desired.
2. Bind as desired with remaining ‘Pistachio’. I used a decorative top-stitch on the binding seam to jazz it up a bit. 
One gorgeous ‘marmalade’ table runner with a festive spin.

If you have a minute, pop by my blog and see what shenanigans are brewing – there’s always something happening.

Erin Davis

{Sew at Home Mummy}

Big thanks to Moda for giving me the opportunity to work with their gorgeous fabrics again!

120-Minute Gift: Zen Tote


8 strips from your favorite jelly roll (or 24 12” sections of jelly roll strips if you prefer a scrappier look)
½ yard of fabric for lining
Wooden handles
Fusible or sew-in interfacing
¼” steam-a-seam double-sided fusible tape

Step 1. Select 8 strips for your tote exterior panels. Cut each Jelly roll strip into three 11.5 ” segments. If you prefer a scrappier look for your tote, select 24 different 11.5” segments of 2.5” strips.


Step 2. From each 11.5” segment cut one 6.5” rectangle and two 2.5” squares.

Step 3. Arrange your tote exteriors. Create the plus sign layout by overlapping the squares as shown and alternating squares and rectangles across columns.

Step 4. Continue to build your layout until you have a square made from 8 columns. As you get to the top and bottom of your columns, you may have pieces of rectangles that extend beyond your panel and will require trimming. Once you have an arrangement you are happy with, sew together the patchwork to make the exterior panels.

Step 5. Line the exterior panels with fusible or sew in interfacing and trim to 16.5” square. Next cut two 16.5” squares from your lining fabric. Shape both exterior and interior panels by rounding the bottom corners and narrowing the top 6” of the square to fit the width of your wooden handles.

Step 6. Use your double sided fusible tape to fold down a ¼” seam along the 6” which you narrowed to accommodate the wooden handles for the left and right side of all panel pieces.

Step 7. Sew the exterior panels, right sides together beginning from the bottom of the narrowed seam on one end and ending at the bottom of the narrowed seam at the other end. Leave the top 6” of the panel which you’ve folded over with fusible tape open. Repeat this step with the interior panels right sides together.

Step 8. Turn the exterior of the tote right side out and place the lining inside. Align the seams which have been fused together and topstitch all around to secure the lining to the exterior of the bag.

 
Step 9. Bring the top of the bag through the opening of your wooden handles about 1” and fold the raw edge under about ¼”. Machine or hand sew in place to complete your tote.


The perfect tote to give or keep for yourself!

Vanesa @ New Nest
{www.newnestdesigns.com}

120-Minute Gift: Charmed Message Board

Hello! I am excited to share my first Moda Bake Shop recipe with you as part of the ‘Just in Time Gifts’ series.  My name is Pauline Francis and I have been quilting for about 10 years. I blog at Quiltnqueen and I’d love for you to come for a  visit. I hope you love the message board as much as I do.

  • 1 mama said SEW charm pack (SKU 5490PP)
  • 1/4 yard mama said SEW (SKU 5495-11) for binding
  • 1/2 yard Moda Bella Off White(SKU9900-200) for header background and backing
  • 1 FQ chalk cloth (SKU OC48)
  • Piece of batting, measuring 15″ x 18″

  • DMC floss, colors #498 and #420
  • Mini clothes pins (optional)


All seams are 1/4″ unless otherwise noted.

Cutting
From the Moda Bella Off White, cut:

  • 1 rectangle, 10″ wide x 8″ length for the header
  • 1 rectangle, 15″ x 18″ for backing
  • 1 rectangle, 3″ x 3 1/4″ for the back of the mini quilt

From the chalk cloth, cut:

  • 1 rectangle, 12 1/2″ wide x 9 1/2″ long

From the binding fabric, cut:

  • 2 strips, 2 1/4″ x WOF

From the charm squares:

Choose 11 different charm squares.

  • Cut 8 of the charm squares into 2 – 2 1/2″ squares and 1 – 2 1/2″ x 5″ rectangle.
    • Choose 6 different 2 1/2″ squares for the header, 3 for the right side and 3 for the left side of the embroidered block.
    • Choose 2 of the 2 1/2″ x 5″ rectangles and 2 of the 5″ charms for the bottom pocket.

Embroidery

I have included 2 options for the header. See the Printer Friendly file at the bottom of the post for the template.

  • Option A is all redwork embroidery. Trace the entire PDF file. Stitch with DMC #498.
  • Option B is redwork embroidery with a mini quilt attached to the laundry line with mini clothes pins.  Trace the words and laundry line only, do not trace the quilt.  Stitch the words with DMC #498 and the laundry line with DMC #420.  When stitching the laundry line use the back stitch 1 inch at each end of the laundry line.  Leave 3 inches of the line unstitched to attach the mini quilt to the line.
  • Whether you choose Option A or B, trim the embroidered piece to 8 1/2″ wide x 6 1/2″ long, centering the embroidery.

    Option B: Mini Quilt

    To make the mini quilt, take the last 5″ charm squares and a piece of batting 3 1/4″ wide x 3 1/2 ” length. Wrap charm square around the batting, mitering the corners. Hand stitch close to the edge and hand quilt the body of the quilt. Press edges under 1/4″ around the rectangle you cut for the mini quilt backing and hand stitch to the back of the mini quilt, wrong sides together.

    Assembly
    I used my walking foot to assemble the entire message board. 
    Sew 2 sets with 3 of the 2 1/2″ squares. Press seams open. The length should measure 6 1/2″.

    Sew the 2 sets of squares to the embroidery block, press seams towards the squares.

    To make the pocket, trim 1/2″ off the side of the middle charm square. Sew the pocket pieces together, press seams open.   Trim to 12 1/2 ” cutting from the charm on the left…the pocket piece should measure 12 1/2″ x 5″. Fold the pocket piece in half lengthwise, press, it should now measure 12 1/2″ x 2 1/2″. Sew the sides of the pocket and the bottom of the pocket to the chalk cloth, raw edges even, using 1/8″ seam allowance.

    Sew the bottom of the header to the top of the chalk cloth (option A).
     

    Sandwich the top, batting and backing, stitch 1/8″ around the outer edge.Make one small pocket and one large pocket by stitching in the ditch…first seam on the left.  The larger pocket will hold your chalk pencil.Stitch in the ditch down the inside seams of the embroidered block or quilt squares as desired.

    Trim and bind using your favorite method.
      
    {TIP:  Use a binder clip to pleat the message board when sewing your binding ends together.  With every quilt I make, big or small, I always make a big pleat with the quilt, it makes sewing the binding ends together a lot easier….the quilt and the binding are not fighting each other.}

    Attach a hanging sleeve using your favorite method.

    The message board finishes at approximately 12.5″ x 15.5″.  If your local quilt shop does not carry the chalk cloth, ask them to order it from United Notions.

    I would love for you to visit my blog,where you will find more message board ideas. I hope you have fun making a message board for a gift and don’t forget to make one for yourself. It has been a lot of fun baking with Moda.

    Happy stitching,

    Pauline Francis
    {quiltnqueen.blogspot.com}

    120-Minute GIft: Tea Party Tuffets


    Brighten up your space with Vanessa’s happy little Tea Party Tuffets. Make them simple with just yardage or add a little patchwork fun with charm packs. There are so many lovely possibilities!


    *Fabric is “Marmalade” by Bonnie & Camille

    • 1 charm pack or 3/4 yard fabric for Tuffet-Top
    • 3/4 yard fabric for Tuffet-Bottom
    • 3/4 yard fabric for Tuffet-Side
    • 1 Tea Party Tuffet PDF pattern {see Printer Friendly file at bottom of post}
    • 6 lbs polyester fiberfill

    • 4-1/2 yards decorative trim or piping


    *Print out all pages of the Tea Party Tuffet PDF pattern. Be sure to print at 100% scale on regular 8.5 x 11″ paper and assemble according to pattern instructions.  

    PLEASE NOTE: There will be small gaps in the pattern circle shape where the pages are taped together–this is okay! Do not trim or overlap the pages in an attempt to connect the lines.
     
    Once all pages are taped together, cut out the pattern.


    Tuffet-Top: Use the pattern to cut one circle from the tuffet-top fabric. If using a charm pack instead of yardage, refer to the Patchwork Tuffet-Top instructions.
    Tuffet-Bottom: Use the pattern to cut one circle from the tuffet-bottom fabric.

    Patchwork Tuffet-Top: You will need 36 of the 42 charm squares; organize them into six rows with six charm squares per row.

    Assuming 1/4″ seam allowance, sew the charm squares into their rows, pressing open the seams afterwards. Sew the rows together, lining up the seams and pinning in place beforehand. Press those seams open as well.

    Center the pattern and cut out one circle for your tuffet-top.

    INTERFACING OPTION: At this point, I like to iron a feather weight fusible interfacing to the back of each tuffet-top and tuffet-bottom piece. It makes the fabric feel a bit stiffer and gives an overall stability to the shape of the finished product that I really love! Not a requirement though.

    EMBELLISHMENT OPTION: Another option is to embellish your tuffet-top and tuffet-bottom pieces with some sort of trim. I’ll use pom-pom trim to demonstrate, but there are many trim options you could use!

    In all likelihood, you will need to use a zipper foot to stitch your trim in place.  In general, you’ll want the seam allowance to be about 1/2″.  Because the pom-pom trim is so skinny, I’m going to lay it down 1/4″ in from the raw edge of the fabric, pom-poms on the inside.

    Whatever trim you use, I sometimes find it helpful to remember that everything left of the needle/stitching is what is going to show.

    Once you’ve sewn almost all the way around, cut the end of the trim to overlap with the beginning-piece and resume stitching it down.

    TUFFET SIDE: From the tuffet-side fabric, cut two strips 12″ x WOF; subcut into two 12 x 37″ strips. (Iron fusible interfacing to the back of each if you’ve done it to the tuffet-top and tuffet-bottom pieces.)


    To sew them into a tube: bring the 12 x 37″ strips right sides together, aligning the raw edges, and pin along the 12″ sides.

    [Switch to a regular presser foot and] sew down the 12″ sides using 1/2″ seam allowance, leaving a 6-7″ gap unstitched in the center of one of those sides as indicated by the diagram below. (This is how we will turn our tuffet right-side out later).

    Press open the seams. (Here is the side with the gap.)


    Pin the edges of the tuffet-top to the top-side of the tube, right sides together. 

    UNEMBELLISHED TUFFET: Sew the tuffet-top and tube together using 1/2″ seam allowance.
    EMBELLISHED TUFFET: Re-install the zipper foot and sew the the tuffet-top and tube together using the same seam allowance used to sew the trim in place (approximately 1/2″). The easiest way to do this is just sew along the seam showing on the wrong side of the tuffet-top.  (I apologize I neglected to take a picture of this as it makes more sense than what I did–I lined the zipper foot up against the bulk of the pom-pom trim and [blindly] stitched with the tube-side fabric showing on top.)


    Pin the tuffet-bottom to the other side of the tube, right sides together and repeat.

    Turn the tuffet right-side out through the 6-7″ gap in the side.

    Your tuffet will look quite sad and saggy without stuffing, so fill it! I stuffed mine pretty full so it would be nice and sturdy.

    Once it’s full to your liking, fold the edges in at the hole and pin closed. (This is probably the toughest part of the whole project!) Stitch the hole closed by hand (I recommend a ladder stitch).


     An adorable tuffet!

    Vanessa Goertzen
    {lellaboutique.blogspot.com}

    120-Minute Gift: Hugs and Kisses Quilted Table Runner


    Quilt Top:
    1 pkg. charm squares (I used a layer cake and trimmed them down to 5″ x 5″)
    1/2 yd. white (a background fabric contrasting with your charm squares)
    1/3 yd. inner border fabric

    Binding:
    1/3 yd. grey or coordinating fabric

    Backing:
    1/2 yd. grey or coordinating fabric (your runner will be reversible, so pick a fabric that looks great all by itself)

     Choose your favorite 16 squares from the charm pack. They need to be darker or bolder than your background fabric (my background fabric is white). Six of these 16 squares will be turned into X blocks, while the remaining 10 will become O blocks. If you have any large prints that you want to show off, set those in your X stack.

    White Squares:
    Cut your white or contrasting fabric into 20 5″ squares.

     Cutting the X Block:
    Line up four X squares perfectly on top of each other. Cut a 3″ x 5″ rectangle, leaving you with another rectangle measuring 2″ x 5″, which you will set aside for a moment. Cut a 3″ square from your 3″ x 5″ rectangle. This is the center of your X block. Use the remaining pieces to cute 5 sets of 1 1/2″ squares. (You will use four of these squares in the X block and the fifth set of squares will be used in the outer border of the quilt.) Cut the remaining two charm squares the same way.

    Cut 10 of your white 5″ squares in this same way as well.

    Your X Block will be cut like this:

    Cutting the O Block:
    Line up four squares perfectly on top of each other. Just like with the X Block, cut a 3″ x 5″ rectangle, leaving you with another rectangle measuring 2″ x 5″. From your 3″ x 5″ rectangle, cut three rectangles measuring 3″ x 1 1/2″. From the 2″ x 5″ rectangle, cut one rectangle measuring 3″ x 1 1/2″. You will have a spare 1 1/2″ square that you can use in the outer border of the quilt. 
    Cut 6 of your white 5″ squares in this same way as well.
    Your O Block will be cut like this:
    Cutting the Triangles:
    With the remaining four white 5″ squares, cut across the diagonal, like this:

    Cutting the Inner Border:
    You will need 3 strips of the inner border, 1″ wide.
    Cutting the Squares for the Outer Border:
    Using the remaining uncut charm squares, come up with 130 little squares measuring 1 1/2″ x 1 1/2″. 
    Ready to Sew!
    Start with your X Blocks. Lay out your block like a 9 Patch. THE CONSISTENCY IN SIZE OF YOUR SEAMS IS EXTREMELY IMPORTANT! Keep it right at 1/4″. Always. 
    Sew into three small rows, like this:
    Press the seams away from the lighter fabric and towards the darker fabric. Then sew those three little rows together:

    If you’ve pressed your seams correctly and maintained that 1/4″ seam, your pieces should nest perfectly as you sew along. 
    Press these seams toward the dark center of the X Block:
    Your O Blocks will be done the same way, with the exception of the direction you press the seams. Always press away from the lighter colored fabric. 
       

     Lay out your blocks the way you like them.

    Sew into rows.

    Press the first row one direction, the second row in the opposite direction, the third the same direction as the first row, etc. Then sew your rows together, remembering to nest those seams perfectly together.

    It’s time to square off your corners. You want each end of your runner to be perfectly square, while the sides of your runner need to meet at a 135 degree angle, if that makes any sense at all…Like this:
    Now sew on the first edge of your inner border. Cut the ends of the border strip flush with the edges of your quilt.

    There needs to be 1/4″ left on the long sides of your quilt, where the white triangles are.

    Add the rest of your inner border, keeping the same things in mind while cutting the edges.

    Press seams away from the quilt body, towards the inner border.
    For the Outer Border, sew those 130 little squares together into one enormous strip. Then add this strip the same way you added your inner border. Pull the outer border snugly as you sew along to prevent having a wavy quilt edge. 
    Press seams toward the inner border, away from the outer border.
    Your quilt top is finished! Sandwich your top, batting and backing and quilt away. Finish off with your binding. (For an excellent binding tutorial, visit here.)
    One table runner measuring approximately 16″ x 42″.
    Leah Douglas

    120-Minute Gift: Modern Log Cabin Tree Skirt

     
    {A note from Oda May: This delightful tree skirt can be cut and pieced in a couple of hours. It will take you a bit longer to quilt and finish it.}

    Hi!  It’s Lori from Lori H. Designs, and I am so happy to be sharing my first project here at Moda Bake Shop.  I started quilting/sewing in January of 2011 and have been hooked ever since!  For this project, I used Odds & Ends by Julie Comstock.  I really like how the colors read Christmas but it is still subtle.  I don’t know about you, but I love having homemade things in my home around the holidays.  This is the perfect project to spruce up your Christmas tree this year!


    1 Jelly Roll (I used Odds & Ends by Julie Comstock)
    1 yard of a coordinating solid for the sashing  (I used Bella Solids Ivory 9900 60)
    1 1/2 yards of a coordinating print for the backing (I used Odds & Ends Rosebud 37044 12) 
    44″ x 44″ piece of batting
    3 buttons of your choice (I chose to make fabric covered buttons)


    Set back 7 jelly roll strips that you will use for the binding.  Forget that you even have them while you are cutting your fabric for the log cabin blocks!!!  Put them in another room or even in a drawer!  Don’t cut them!!!!

    Cutting Instructions:

    From the Jelly Roll:
    Choose 9 strips and cut 1 – 2 1/2″ x  2 1/2″ square from each strip.  You will end up with 9 – 2 1/2″ squares.
    Choose 9 different strips and cut 1 – 1 1/2″ x 2 1/2″ piece from each strip.  You will end up with 9 – 1 1/2″ x 2 1/2″ pieces.

    Gather all of your jelly roll strips and cut them down to 1 1/2″ widths.  Now cut the following pieces.  If you want a scrappy look, you will want your cuts to be from different fabrics.  For example, none of my 18 – 1 1/2″ x 3 1/2″ strips were the same print.  Mix it up, have some fun!

    18 strips- 1 1/2″ x 3 1/2″
    18 strips- 1 1/2″ x 4 1/2″
    18 strips- 1 1/2″ x 5 1/2″
    18 strips- 1 1/2″ x 6 1/2″
    18 strips- 1 1/2″ x 7 1/2″
    18 strips- 1 1/2″ x 8 1/2″
    18 strips- 1 1/2″ x 9 1/2″
    9 strips –  1 1/2″ x 10 1/2″

    From the Coordinating Solid:
    6 strips – 3″ x 10 1/2″
    4 strips – 3″ x 35 1/2″
    2 strips – 3″ x 40 1/2″

    From the leftover backing material:
    1 – 2″ x 20″ strip for the loops (I cut this after I had basted and quilted the tree skirt)

    Piecing Instructions:

    You are going to make the 9 log cabins blocks first.  I laid out all of my blocks before I started sewing to make sure that my colors were broken up evenly.  You will piece the block in the order of the letters.  Sew A to B.  Then sew C to the A/B section.  And so on.

    For example.  I pieced A to B.

    Next, I pieced C to the A/B section.

    Then, I pieced D to the A/B/C section.  And it continues until you have finished the block.

    The finished block should look like this.  Make 9.  They should measure 10.5″ x 10.5″.

    Once you have all 9 blocks made, arrange them in a 3×3 arrangement that you like.  After they are in the order that you like, add the 3″ x 10.5″ strips.

    Add the 3″ x 35.5″ strips to connect the rows.

    To finish off the top, add the 3″ x 40.5″ strips to the left and right side.
    Finishing Instructions:
    Now that your top is finished, you will need to baste and quilt as desired.  I chose to do dense straight line quilting but you could be really creative!   Make sure you do NOT bind your project!
    Here comes the fun part!  We are going to cut the tree skirt!

    It’s time to add the loops!  Here’s how you make them!  Take your 2″ x 20″ strip and iron in half lengthwise.
    Open up and iron both sides toward the center, like so.

    Fold in half and iron.

    Stitch lengthwise down the entire strip.
    Cut three 5.5″ strips.
    The last step is to fold them and iron.  On one of the strips, take both ends and fold down toward the center and iron.  Continue to do the same to the remaining two strips.
    Now we will add the loops to the tree skirt.  Lay the three loops to the left of where you cut your tree skirt.  Space them out evenly.  Notice that the direction they are laid out.  
    Stitch down all three loops an 1/8″ out from the cut.
    Now it’s time to add the binding around the entire tree skirt.
    The final step is to add the buttons.  I chose to use fabric covered buttons.  And there you have it, a finished tree skirt!


    40″ x 40″ Tree Skirt

    Lori Hartman
    {www.lorihdesigns.com}

    120-Minute Gift: Cinnamon Spice Tree Skirt/Table Topper


    Hi there, it’s Cathy Victor from “Me and My Mum Quilting”, and I’m pleased to be bringing you my second Moda Bake Shop tutorial.  The great thing about this pattern is its versatility, you could swap out any 9″(9-patch) blocks for those that I’ve chosen.  Also you can make two tree skirts or table toppers from each layer cake.

    So grab your favorite holiday layer cake and let’s get started…I am using the Blackbird Designs collection “Cinnamon Spice.”

    As always I love to hear from you with your comments, questions and pictures.  You can find me at {Me and My Mum Quilting}
     

    1 Cinnamon Spice Layer Cake (2700LC)
    3/4 yd red fabric (2700-12)
    1-1/2 yd Bella Solid (9900-60) {This includes enough for the table topper backing.}
    Backing: 1 yd (2705-12)
    Binding: 1/2 yd (2706-12)This is enough for both.


    Ribbon
    Decorative Buttons


    For the tree skirt you need the following:

    Greens: 
    4 layer cake squares (a)
    1 LC square (b)

    Beige: 
    2 LC squares (c)
    2 LC squares (d)
    1 LC square (g) middle square

    Red: 
    4 LC squares (e)
    4 LC squares (f)
    Approx. 1/4 yd of yardage

    White: 
    approx 1/2 yd of yardage

    Cutting Instructions

    Lay out the 4 (a) green squares and cut as follows:

    Cut two {2} 2″ x 10″ strips from the bottom of the square

    From the remaining piece, cut two {2} 2 5/8″ strips.

    Subcut the previous 2 5/8″ strips into four {4} 2 5/8″ squares. Set aside the cut pieces until later; the leftover piece is not needed.

    Next…from the Green square (b), cut two {2} 2 5/8″ strips…..

    Subcut into four {4} 2 5/8″ squares. The rest of the fabric is not needed.

    The Beige (c) blocks are for your hourglass blocks. From each of your two Beige (c) squares…cut from two {2} 4 1/4″ squares. The rest you do not need.

    From your two Beige (d) squares…..Cut from each Beige (d) square three {3} 2 5/8″ strips.

    Subcut into a total of 18: 2 5/8″ squares (9 of each fabric. You only need 16 so 2 are scrap. You do not need the rest of the fabric.

    Go ahead and grab your 4 Red (e) squares…From the Red (e) squares, cut two {2}: 2 3/8″ strips.

    Subcut into 8: 2 3/8″ squares (for each print). You will have a total of 32 squares. (8 in 4 different patterns.) You will not need the rest of the fabric.

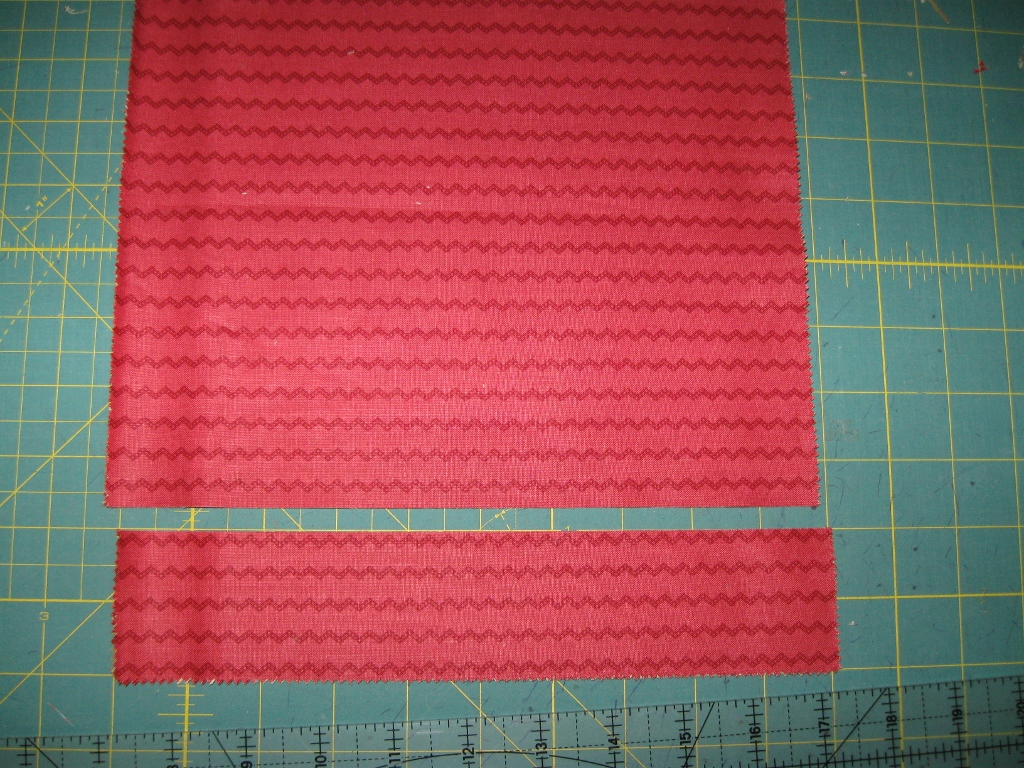
    The Red (f) squares are for the flying geese blocks and bricks. From your 4 Red (f) squares…cut a 2″x10″ strip from the bottom.

    Then, from the remaining piece of each square, cut three {3} 2″ x 8″ strips.
    There is a approx 4″ x 8″ piece leftover that you will not need.

    Cut the bottom (2″ x 10″) strip and one of the 2″ x 8″ strip into four {4} 2″ x 3 1/2″ rectangles (bricks). Do this for all 4 prints for a total of 16 bricks. Set aside the remaining 2″ x 8″ strips until later. The rest you will not use.

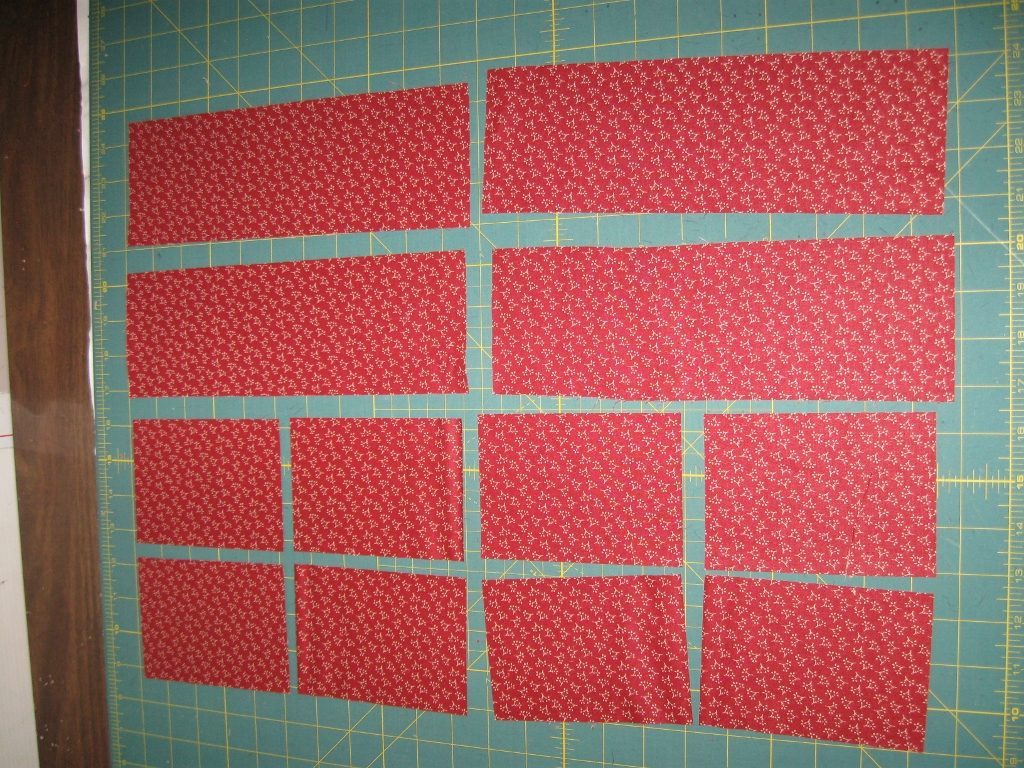
    Now grab the Red yardage. Cut two {2} 3 1/2″ strips. Subcut into four {4} 3 1/2″ x 10 5/8″ rectangles and four {4} 3 1/2″ x 5″ rectangles. (I cut out an extra 4 for the table topper, but if you aren’t making it don’t bother.)

    From the White yardage, cut two {2} 2″ strips, one {1} 3 1/2″ strip, one {1} 3 3/4″ strip, and three {3} 2 3/8″ strips.

    Subcut the 2″ strips into 9″ lengths.

    Subcut the 3 1/2″ strip into sixteen {16} 2″ x 3 1/2″ bricks.

    Subcut the 3 3/4″ strip into four {4} 3 3/4″ x 5 5/8″ rectangles.

    Subcut the 2 3/8″ strips(3) into forty {40} 2 3/8″ squares.

    Grab your remaining layer cake square (g) and cut it to: 9 1/2″ x 9 1/2″.

    Assembling the Blocks 

    So the first blocks to assemble are the flying geese blocks. Grab the 2″ x 3 1/2″ white bricks and the red bricks and strips that you cut from (f) LC squares. Also set aside the white 2″ strips and the green 2″ strips from (a). They will be coming up shortly.

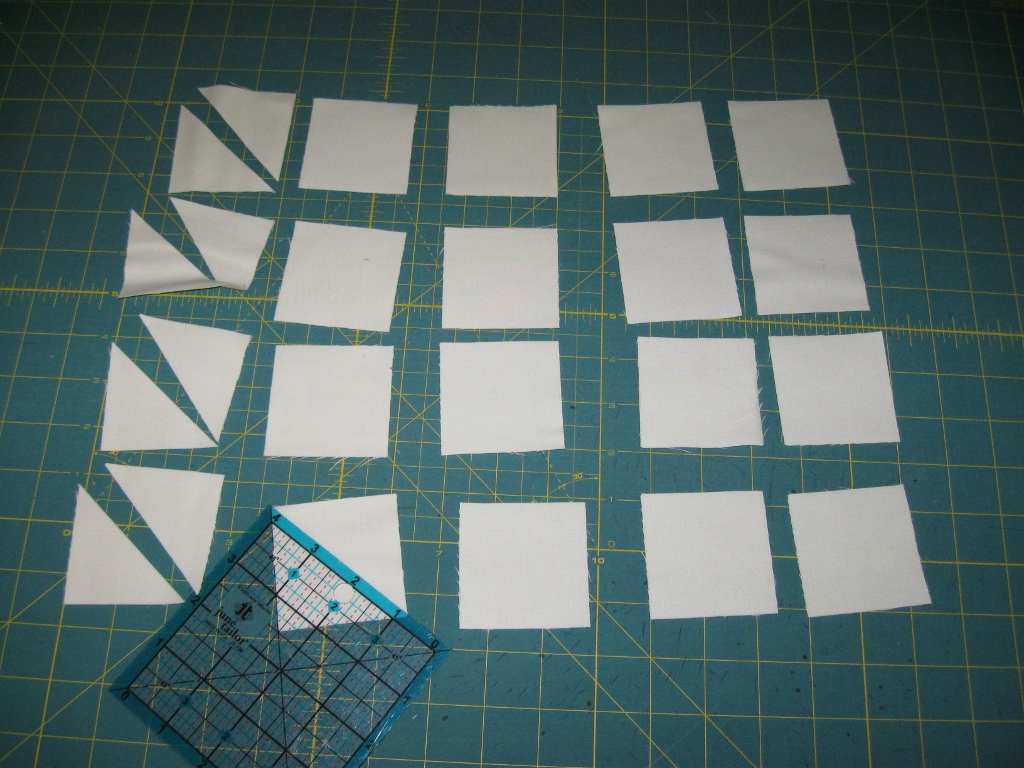
    The following pictures show how the blocks progress from beginning to completion….
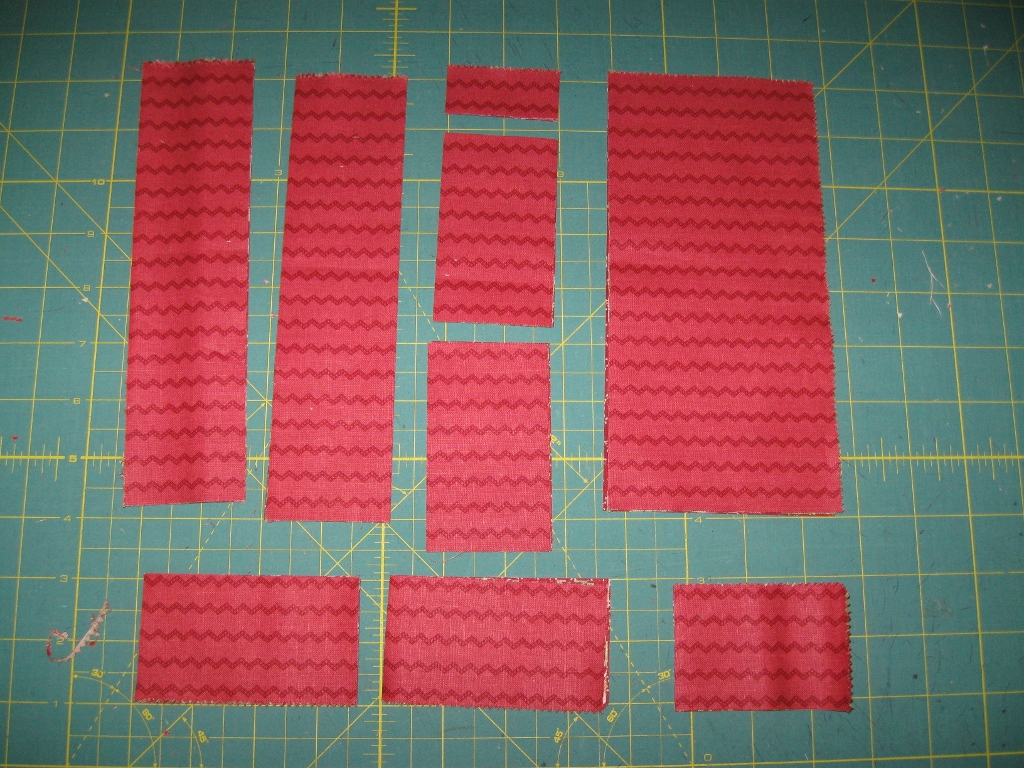
    You should now cut your red 2″ x 8″ strips into 2″ squares. You need 8 squares for each block and there are 4 blocks to make this tree skirt. That makes for 32 red squares all together.

    Draw a diagonal line from corner to opposite corner. This is your sew line.

    Place the red square on top of the white brick, and sew along the diagonal line, cut off the corner, leaving a 1/4″ seam. Press toward the red fabric. Place a matching red square on the opposite corner so that the line creates a point with the other red corner and sew. Cut off the corner, leaving a 1/4″ seam and press toward the red. You now have a flying geese block that measures 2″ x 3 1/2″.

    Continue until you have completed 4 flying geese blocks of each pattern. Match these up with the bricks of the same color and pattern.

    Sew the flying geese to the bricks so the seam crosses over the point of the flying geese block.
    Press away from the flying geese block.

    Next up green/white 4-patch blocks…..Grab the white and green 2″ strips and sew them together into twosie strips. Press toward the greens.

    Cut the twosie strip into 2″ sections. Spin 1 section so that opposite colors are aligned. Matching seams, sew into 4-patch blocks. Press in either direction.

    You will have a total of sixteen {16} 4-patch blocks (4 of each pattern).

    Next up the hourglass blocks….Grab the 4 Gold (c) squares. They measure 4 1/4″ square and we are going to cut along both diagonal lines (from corner to opposite corner; in both directions)

    Lay out the 2 patterns in the configuration shown in the picture.We will be sewing down the short side of these triangles first…..

    Sew them all the same way, with the same fabric on top of the opposite color on the bottom. They all go through the same direction, do this until you have 8 pairs of triangles.

    Press toward the darker of the 2 triangles.

    This photo shows how the block progresses from a twosie triangle…Matched up with another… Matching seams and sewing to form an hourglass block. Press either direction …Trim off the dog ears, the block should measure 3 1/2″square.

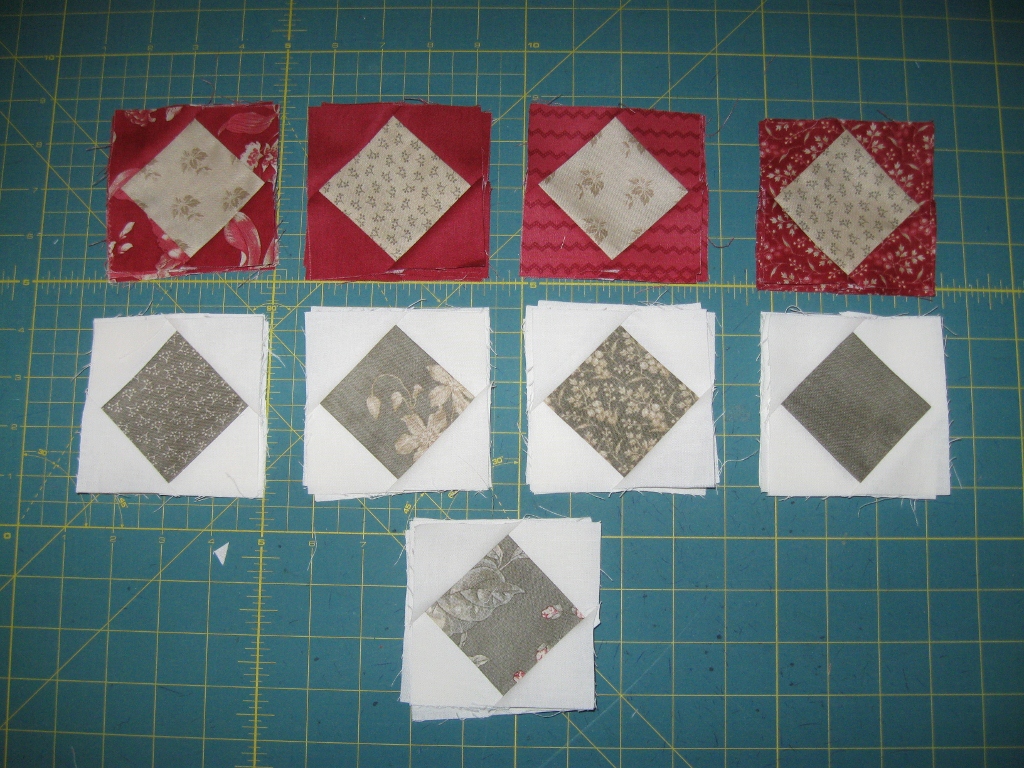
    You now have all the components needed to complete the first block…Match each pattern of red to a pattern of green and create an hourglass block as shown in the photo.

    Lay out the above squares into the design shown in the photo. This will make 4 star blocks.
    Sew them row by row and then press. I pressed away from my flying geese blocks.

    This photo shows how they are pressed.

    Go ahead and sew the rows into the final block, nesting seams and pinning if necessary. Press away from the middle row.You have now completed 4 blocks.

    Grab the red 2 3/8″ squares and cut diagonally once from corner to opposite corner.
    This will give you 64 triangles. (16 of each pattern.)

    Do the same for the white 2 3/8″ squares…There are 80 triangles when you are finished.

    Match up the red triangles with the beige 2 5/8 ” squares that were cut earlier. You can see in the photo that my green 2 5/8″ squares will be matched up with the white triangles.

    Lay out the beige squares and red triangles, like the photo shows.

    Make sure that when you line up the triangles you have equal amount of “dogears” on both sides. Go ahead and sew down the first side. Sew the opposite side the same way. Press the triangles toward the beige square. Trim off the dog ears and continue sewing the triangles to the remaining sides.

    Press either way and trim off the dog ears. The photo shows how the block progresses.
    Continue until you have completed all the red/ beige blocks.They should measure 3 1/2″ square.

    Repeat the process with the green squares and white triangles. This photo shows how they progress.

    You now have 4 piles of red/beige blocks and 4 piles of white/green blocks. Set them aside for now, we will return to them later.

    Now take the red 3 1/2″ x 10 5/8″ rectangles, and carefully fold them in half lengthwise and press to make a visible crease. Next, cut a diagonal line from the bottom right corner to the crease line like in the photo.Then do the other side from the bottom left corner to the crease line (point).


    With the white 3 3/4″ x 5 5/8″ rectangles, make 2 piles of 2. Cut diagonally once from bottom right to top left for the 1st pile.And cut the opposite direction (from bottom left to top right) for the other pile, like the photo shows.

    Layout the pieces as shown in the photo.

    Line up the white triangle with the red triangle point showing a little past the white, as shown in the photo.Your sewing machine needle should come down exactly where the 2 fabrics line up.

    This photo shows how the blocks progress. Press towards the red fabric. Place the opposite white triangle in the same manner and press toward the red fabric.Trim off the dog ears.

    The block should now measure: 3 1/2″ x 9 1/2″

    Do this with all 4 red triangles. Set aside for now.

    Next up grab the 4 red rectangles that measure: 3 3/4″ x 5 5/8″ and cut 2 diagonally from: top right to bottom left and,Cut 2 diagonally from: top left to bottom right.Set aside for now.

    Remember these blocks? We will be assembling them into rows for the next step…Lay them out like in the photo, I put identical squares into the same block.(except for the central green/white square. it is from the extra pile of squares.) It is going to be the middle square in all 4 blocks.

    Go ahead and sew them into rows.Make sure to match the points where they meet. You can pin them if you like.

    This photo shows how I pressed the rows:I always pressed away from the white squares.Continue sewing all the squares into rows. BUT DO NOT sew them into larger blocks.

    They are sewn together differently than normal to achieve the shape of the final tree skirt.

    Next grab 1 of each pattern, the row shown in the photo….

    And the red triangles we cut earlier.Lay them out like the photo shows with the flat side of the red triangles aligned with the bottom of the row of blocks.Sew them together and press toward the red triangles.

    Next, grab the remaining rows of blocks….Lay them out exactly as the photo shows, making sure the fabric patterns match.Sew the rows together, making sure the bottom block is “pointing” to the other 2 rows.And that any points are aligned. Pin if they need a bit of help.Press toward the middle row.

     
    You have now completed the other 4 blocks and are ready to assemble the tree skirt.

    Grab the 4 blocks finished here and the 4 star blocks finished earlier and the Layer cake square that was trimmed down to 9 1/2″ and find a space to lay them out.

    Lay the assorted blocks out, like the photo shows, moving the blocks around until you like the way they look.Sew them into rows, pinning where seams and points line up.Press away from the star blocks and central square. (doing this ensures the seams will nest nicely).

    Next sew the rows into the nearly finished tree skirt, and get the remaining rows ready to add as borders.

    Attach the border pieces to the sides, lining up the square in a square blocks and pin in place.
    Sew the borders in place and press.

    Now get ready to trace the hole for the tree stand.  I used a bowl for my template, you can use whatever makes the hole the size you like. Trace around the hole and straight through the middle of the tree skirt.(this bi-sects the square in a square blocks).


    Quilt as desired…may I also recommend stitching around the circle you traced and down both sides of where the opening will be. This will ensure the tree skirt doesn’t shift while you are binding it.
    Carefully cut the traced line for the opening and around the circle.

    Your tree skirt should now look like this….

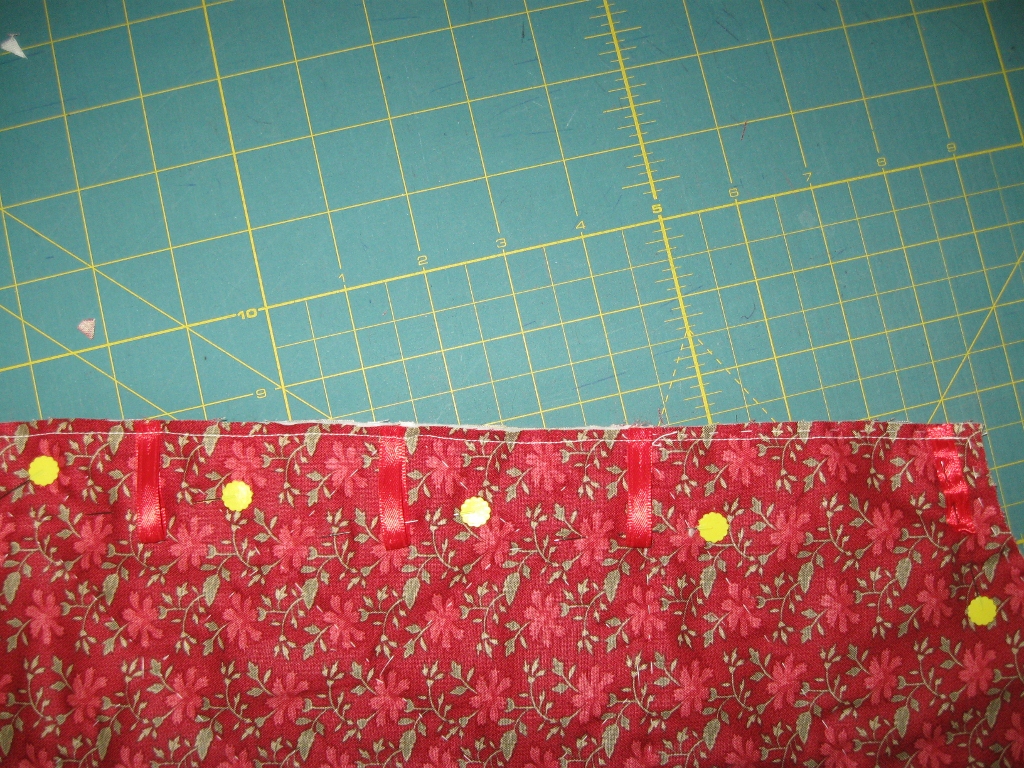
    Get your buttons and ribbon out…..Place your buttons on the tree skirt, to decide where you want them. With a pencil, make marks on both sides of the opening for button and loop placement.

    Cut your ribbon to 3″ lengths….

     Sew them in place along the opening with a scant 1/4″ seam that will be hidden in the binding.
    I also pinned them down so they wouldn’t get caught up in the binding.

    Prepare your bias binding strips and proceed to sew it around the tree skirt.

    You may need to stop sewing and re-position the binding when rounding corners.
    This is how it looks with the binding on.

    Now I just sewed it down to the backside.( just make sure that you don’t sew the loops into the binding when you do this).

    With the binding done, sew the buttons in the position you marked on the opposite side from the loops. You’ve completed the tree skirt!!!

    Next up a table topper from the rest of the layer cake and fabric. It is the same pattern, just don’t cut out a circle and opening. I will list the substitutions for the fabrics, but follow the cutting and assembly instructions listed at the beginning of the tutorial by the letters in ().

    Table topper substitutions…..
    Pinks: 4 layer cake squares (a) (by cutting 5 – 2 5/8″ squares from each pink you eliminate step (b).) Leftover Red: 2 LC squares (c) hourglass blocks.
    Approx 1/4 yd of yardage (4 – 3 3/4″x5 5/8″ and 4 – 3 1/2″x 10 5/8″ cut as per earlier instructions.)
    Green: 2 LC squares (d)
    Beige: 4 LC squares (e) 4 LC squares (f)

    * For the whites, follow the cutting instructions below, but the assembly instructions above*
    White:
    2 Identical LC squares(4- 3 3/4″x 5 5/8″ rectangles)
    4 LC squares (4– 2 3/8″ squares from each cut once diagonally to yield 32 triangles. Some of this can be leftover from previous.)
    6″ yardage ( this section is for the 4-patch blocks and the flying geese units in the star block)
    1 LC square for middle block (g) cut to 9.5″ square

    Assemble the blocks as per the instructions for the tree skirt. But don’t cut the hole in the middle square or the slit for an opening. Quilt and bind as desired….


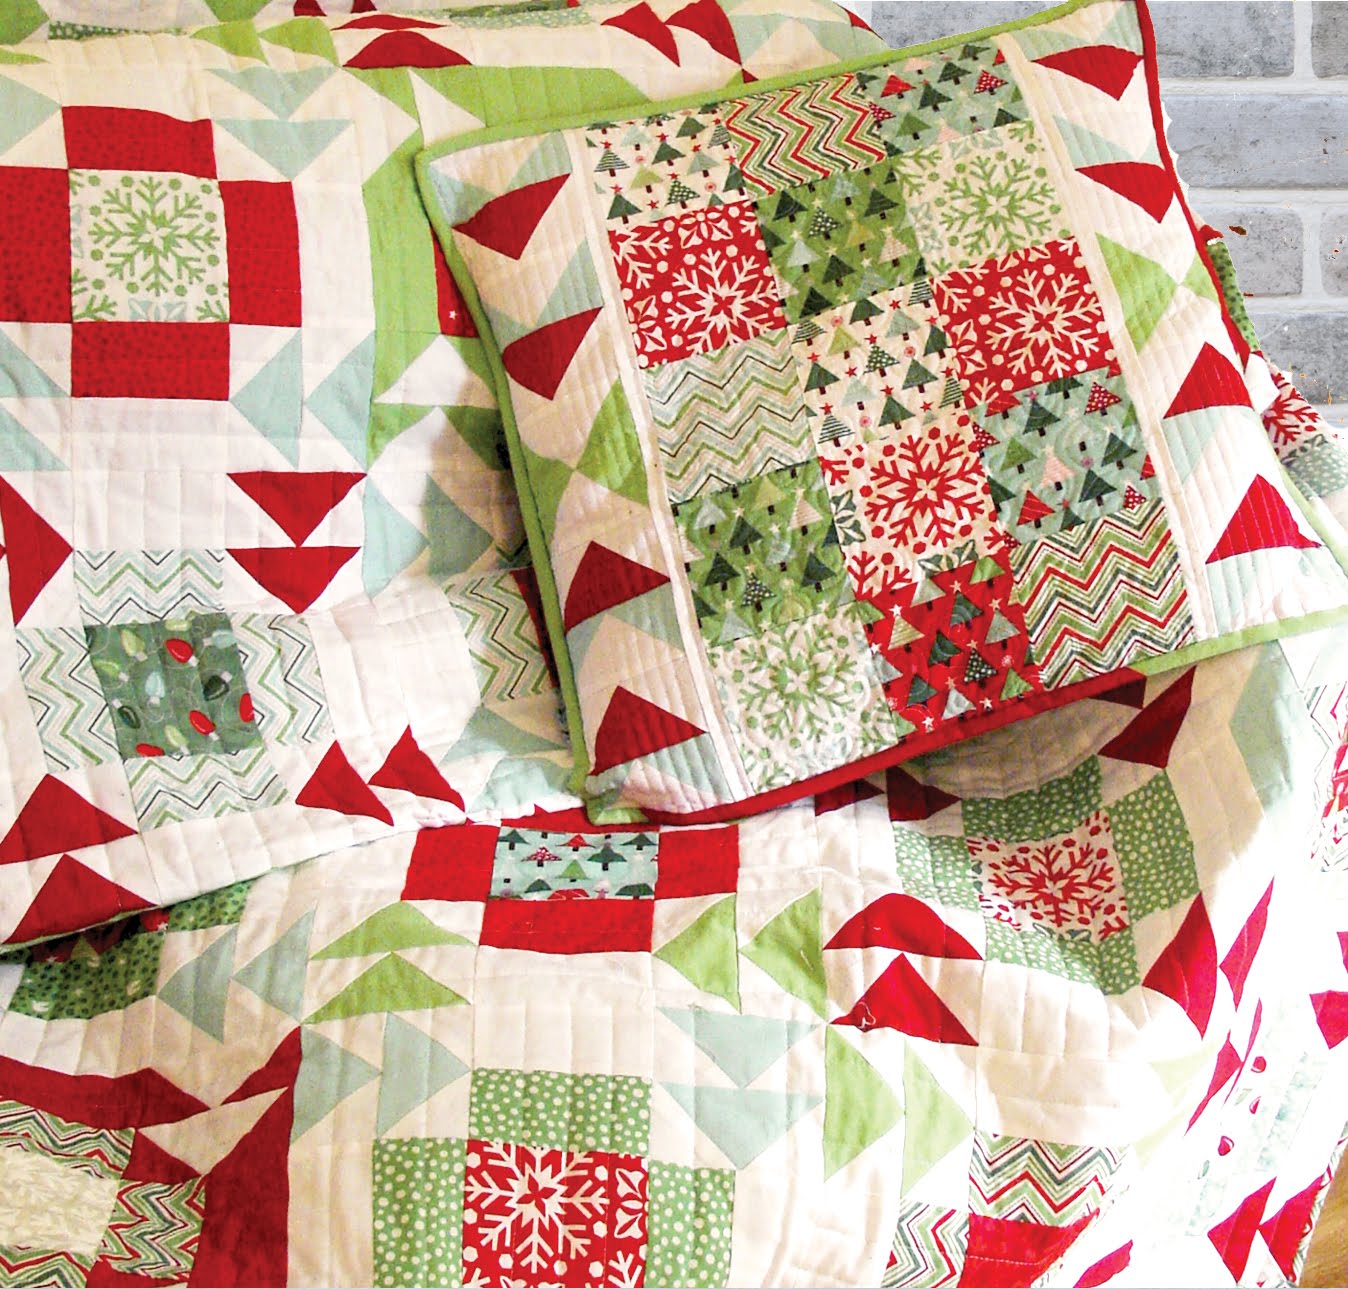
    A Cinnamon Spice Tree skirt that measures approx. 33″ square. Perfect for any traditional Christmas setting.

    A Cinnamon Spice Table Topper to compliment your Holiday decor. It also measures approx 33″ .

    I hope you enjoyed this tutorial and that you will make one for yourself and maybe some loved ones too. Have a happy and healthy holiday season.

    Season’s Greetings!

    Cathy Victor
    {Me and My Mum Quilting}

    120-Minute Gift: Yuletide Twist Pillow


    Christmas is almost upon us again but this year I am well prepared! I decided last year that I really needed to jazz up our living area this year with new Christmas pillows and Christmas quilts and for once I have actually been organized enough to do it!

    I made this pillow to co-ordinate with my Yuletide Twist Quilt which features in Issue 11 of Fat Quarterly. You can visit {www.fatquarterly.com/issues/issue-11}for more information.


    15 charm squares from Joy by Kate Spain
    1 fat eighth of red solid
    1 fat eighth of green solid
    1 fat eighth of blue solid
    1 fat quarter of white solid
    1/4 yard for binding
    24″ square piece of batting
    24″ square piece of lining fabric
    2 pieces 15″ x 22″ for the back of the pillow
    2 pieces 15″ x 22″ to line the back of the pillow

    Cutting Instructions

    From the red solid cut:
    8 strips 2 1/2″ x 4 1/2″

    From the green solid cut:
    8 squares 2 1/2″

    From the blue solid cut: 
    16 squares 2 1/2″

    From the white solid cut: 
    12 strips 2 1/2″ x 4 1/2″
    16 squares 2 1/2″
    2 strips 1″ x 20 1/2″

    Make the Centre Panel

    Trim the charm squares down to 4 1/2″ square. Arrange in 5 rows of 3 and sew together.

    Sew the white 1″ x 20 1/2″ strips to both sides of the panel

    .

    Make the Flying Geese

    Draw a line down the diagonal on the wrong side of all the green, blue and white 2 1/2″ squares.

    Make 8 flying geese using 16 white 2 1/2″ squares and 8 red 2 1/2″ x 4 1/2″ strips.

    Make 4 flying geese using 8 green 2 1/2″ squares and 4 white 2 1/2″ x 4 1/2″ strips.


    Make 8 flying geese using 16 blue 2 1/2″ squares and 8 white 2 1/2″ x 4 1/2″ strips.


    Sew the flying geese into 2 strips as shown.


    Finish the Pillow

    Sew the flying geese strip to both sides of the pillow top. Layer the pillow top, batting and lining fabric anmd baste in place. Quilt as desired.

    I quilted straight lines down the geese and a swirly pattern all over the centre panel. Trim away excess

    Place the back pieces and back lining pieces together right sides facing. Sew along the long edge. Turn right side out, press and topstitch.

    Lay the pillow top right side down and place the back pieces, right side up, on top so that they are overlapping. Pin in place and sew all the way around with 1/8″ seam allowance. Trim away excess.

    Cut the binding fabric into strips 2 1/2″ wide and sew together to form a continuous strip. Use this strip to bind your pillow.

    1 pillow 20″ x 21″

    Tacha Bruecher
    {www.fatquarterly.com}