Doggie Do Bag


Hello…I’m Jo from Jo’s Country Junction. My beagle, Gracie, and I are here to share with you a pattern we put together for a Doggie Do Bag. You may wonder what a doggie do bag is…Well, Gracie needed to go to dog obedience class and the instructor required all owners to have plastic bags (to pick up any messes) and treats with us at all times. So I made this little bag to carry my keys, wallet, and all the necessities Gracie needed.


Don’t have a dog? Don’t worry. This cute little bag can be use for anything: makeup, a crayon case…whatever you like.


1 honey bun of Charlevoix
2 fat quarters
zipper
fusible fleece
Deco Bond
black thread


Mini ricrac
Black scrap of felt


From the fat quarter, cut two 7.5″ x 8″ pieces for the lining.

Cut 2 pieces of fusible fleece 7.5″ x 8″.

Fuse the fleece to the lining pieces.

Select 9-10 fabric strips from your honey bun. Layer two of the pieces right side together diagonally on the fusible fleece. Sew them diagonally onto the fleece, using a quilt as you go method.


Press open.

Continue adding pieces until the whole piece is covered.


Do this for both pieces.

Trim both pieces to 6.5″ x 7.5″. Set aside.


For the front pocket, take the other fat quarter and cut a 7.5″ x 8.5″ piece. Cut a piece of Deco Bond 7.5″ x 4.25″. Iron the fabric in half. Open up. Place the deco bond on the fabric. Fold over.


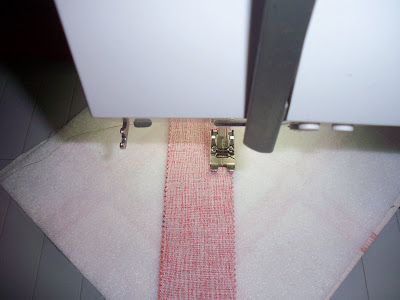
Position a piece of mini ricrac 1/2″ from the fold. Using matching thread, sew in place.

Using the dog pattern included in the Printer Friendly Version, cut a dog from the scrap of black felt. Cut a 1/4″ x 6″ strip of fabric from one of the fat quarters. Tie in a knot around the dog’s neck. Position the dog 1.25″ from the side and .75″ from the top of the right hand side of the pocket piece.


Sew in place using black thread.

Cut 4- 1.5″ x 2″ pieces of fabric from one of the fat quarters. Take two of the pieces and put them right sides facing. Slide the zipper pull down. Sandwich the zipper in the middle of the two pieces. Sew over the top using a 1/2″ seam. Press the fabric open. Trim to 3/4″.


Cut the zipper so it is 7.5″ long including the fabric piece. Take two of the fabric pieces and put them wrong sides facing.


Sandwich the opposite end of the zipper in the middle of two of the pieces. Sew over the top using a 1/2″ seam. Press the fabric open.

Trim to 3/4″.


Trim the sides so they are the same width as the zipper.


For the handle, cut 2- 12″ x 1.5″ pieces of fabric from the fat quarter. Cut one piece of Deco Bond 12″ x 1.5″.


Put the pieces right sides together and lay on top of the Deco Bond piece. Sew 1/4″ from each of the sides to make a tube. Turn right side out.


Pr
ess. Top stitch along both edges.

Lay the zipper along the 7.5″ side of the bag piece with the right side together. Stitch in place.

Layer the other bag piece along the other zipper side with right side together and stitch in place.
Press the seam away from the zipper. Top stitch along the zipper on both sides.


Lay the pocket along the edge of the bag piece. Pin in place. Baste in place.

Pin the handle in place just above the pocket matching the seams. Tack in place.

Open the zipper 3/4 of the way. Fold in half with right sides together. Sew around the edge, pivoting at the corners. Trim near the zipper and at the corners.


Fold the corners in as shown. Pin. Measure in 3/4″. Draw a line. Sew along the line.


Cut away excess.
Do this for both corners.


Turn right side out. Poke the corners out and your clutch is finished.


Your bag will be about 5.5″ x 7″…not including the handle. You can easily leave off or shorten the handle, depending on the intended purpose of your bag. I made my handle long so it could hook over my wrist when I was walking Gracie.

You will have plenty honey bun strips left over to make a few more bags.

I’d love to hear what you will use your “Doggie Do” bag for….and don’t forget to stop over and visit Gracie and me over at Jo’s Country Junction.


Jo Kramer
{Jo’s Country Junction}

Counting By Fives


Hi!  I’m Polly from Aunt Polly’s Porch, and this is my first Moda Bake Shop recipe!  I’m an elementary teacher by trade so when I designed this quilt last August, I had going back to school on my mind… so when it came time to name the quilt, “Counting By Fives” seemed just right!  I hope you enjoy the clean lines and overall simplicity of it!

From the Charlevoix collection
1 honey bun
2 yards     # 14696 15 for sashing
1/2 yard   # 14697 14 for binding
4 yards    #  14694 13 for backing
batting of your choice- I used Warm and Natural

Open up the honey bun, caress the strips but keep the drool off!! I mean, how could I NOT love this line…every selvage calls my name!  🙂
OK, nuff said!  Time to cook!!  🙂
Sort the strips into sets of five with a variety of colors, texture and value.
Stitch the strips together along the long sides, pressing the seams open as you add each of the five strips. 
Repeat this with all eight sets of 5 strips.
These are my eight strip sets ready to cut into blocks!
Sub-cut each sewn strip set into 5 1/2″ pieces. 
You will get 7 blocks from each strip set, giving you 56 blocks total. 
Layout the blocks in eight rows of seven blocks per row, alternating the direction of the strip orientation- horizontal then vertical then horizontal, and so on.
Next, tear or cut eleven 3″ wide strips of the sashing fabric lengthwise along the 72″ yardage.  
Take 9 of these strips and cut down to 52″ long.  These will be used for the horizontal sashing strips between rows.  Save the leftover pieces. 
Take the last 2 long sashing strips and cut them down to 63″. These will be used for the vertical sashing pieces on each side.
Next we need to cut the small vertical sashing pieces for between the blocks in each row.  Using all the sashing leftover pieces, sub cut them into as many 3″ X  5 1/2″ rectangles as you can. We need a total of 48, so you will need to tear or cut more 3″ wide strips from the sashing fabric. 
You can get thirteen  3″ X 5 1/2″ pices from each long strip, so you will need to tear or cut 2 or 3 more long sashing strips to get a total of 48 small sashing pieces for between each block in all eight rows.
Next, using the 3″ X 5 1/2″ sashing rectangles, sew one in between each block in all eight rows, pressing the seams toward the sashing pieces.
Next, sew the 52″ long sashing pieces between each row, as well as one on the top and one at the bottom. Press the seams towards the sashing pieces.
 
Almost done!  Lastly add the 63″ sashing pieces to each side!
Press the seams toward the sashing. 
TAAAAAA DAAAAAAA!! The top is all done! Easy peasy, right?
Cut the yardage for the backing in half, cut off the selvages, then sew the two 72″ sides together.  Press the seam open and continue to make your quilt “sandwich” as you usually do… then quilt as desired!  I free-motion quilted leaves and vines on mine. 
Cut six 2 1/2″ strips selvage to selvage (42″) for the binding. Sew them short end-to-end, press in half then sew onto the quilt edge as usual. Don’t forget to add a label!
one 56″ X  63″ quilt ready for a nap on the porch!  🙂
Please come visit me on my blog {auntpollysporch.blogspot.com}.My Westie, Yogi and I would love to see you there!!
Hope to see you again soon!  Ciao!  Polly 🙂
P.S.  If you’d like to make a cool scrappy Messenger Bag with these leftover scraps from this quilt- come to my blog to see what I cooked up!! I LOVE leftovers  🙂
Polly Monica