
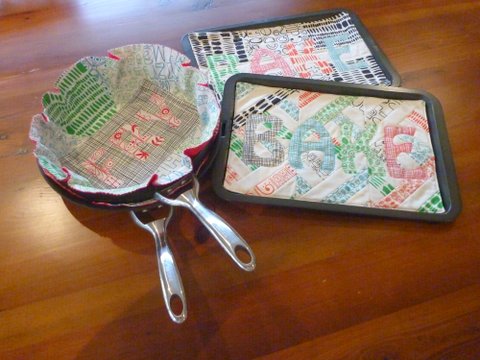
The holiday season is approaching and now is the time to start sewing and making gifts for friends and families. Today I will be sharing a quick project which can be made in under an hour to brighten up your kitchen drawers and protect your non stick cooking surfaces.

1 x Summerville Layer Cake
1 yd Bella solid snow 9900-11
1 yd Flannel
Light weight iron on pellon
Fusible web

Baking Tray Liners ( 30 mins )

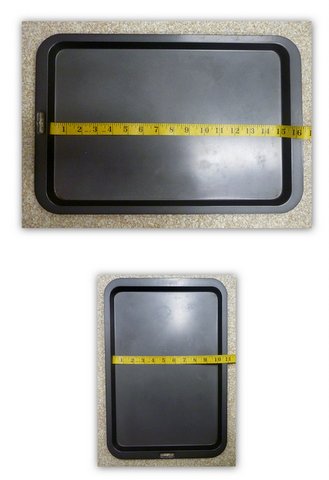
- Measure the baking tray. Record the measurement. For the purpose of this tutorial I will be making a liner to suit a 10″ x 15″ base. If you have have a smaller or larger tray, add 1/2″ to the measured length and width.
- From the solid cut 12 x 1 1/2″ strips
- From the print cut 12 x 1 1/2″ strips

- Alternate the solid and print and sew strips together
- Finished block is 8 1/2″ x 10″
- Make 3 blocks

- Cut each block twice on the diagonal

- Sew 2 triangles together to make a half square triangle (HST). Repeat with remaining triangles.
- Square each HST to 5 1/2″

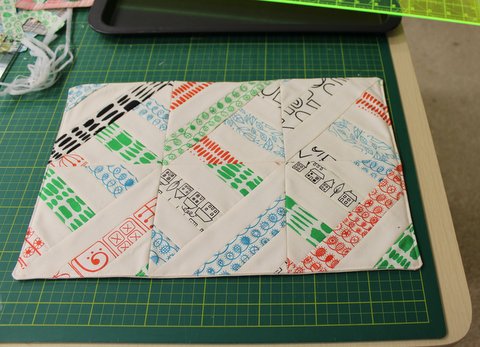
- Arrange in 2 rows of 3 blocks each
- Sew together
- Finished top measures 10 1/2″ x 15 1/2″


- From the solid cut 1 – 10 1/2″ x 15 1/2″ piece
- From the iron on pellon cut 1 – 10 1/2″ x 15 1/2″ piece
- Press the pellon to the wrong side of the solid piece
- Place the solid and top piece right sides together. Pellon will be on the outside.

- Sew 1/4″ from edge leaving a 4″ gap at the top for turning.
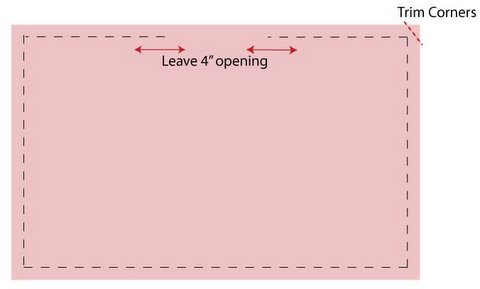
- Trim the corners and turn out. Use a stiletto or pointed object to push out seams and corners.
- Fold under opening 1/4″ and top stitch 1/8″ around edge of liner.
- Trace the letters ‘BAKE’ (these can be found in the Printer Friendly file at the bottom of this post) onto the dull side of the fusible webbing
- Cut 1/8″ away from the pencil line and press to back of selected print.
- Cut on pencil line and peel of paper backing
- Position and press onto front of liner
- Using a straight stitch or blanket stitch machine stitch the appliqué.

Hint: These liners are meant to be scrappy in nature. There are unlimited block designs and scrappy settings that could be used as long as the unfinished top is 1/2″ longer and wider than the base of the tray.
Frying Pans ( 30 mins)

- Measure the diameter of the pan including the sides. Record the measurement.

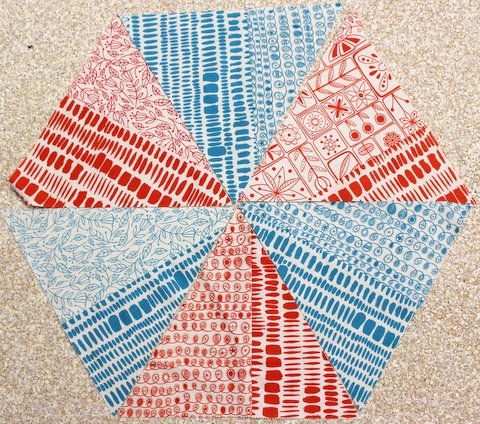
- Cut strips from the Layer Cake and make a piece measuring 10″ x 48″
- Using a 60 degree triangle ruler or the 60 degree marking on your ruler, cut 6 triangles from the strip

- Sew 3 triangles together. Repeat.

- Join the two rows together.
- Cut a circle ( using a compass / pencil and string / large plate ) 1″ larger than the diameter, including sides, of your pan. For example, my pan measured 15 1/2″ from side to side. I would cut a circle with diameter of 16 1/2″

- From the flannel cut a circle the same size as the top

- Place the flannel and top piece wrong sides together.
- Sew 1/4″ from edge using a shorter stitch
- Using pinking shears, cut around edge 1/8″ away from stitching.

- Cut a piece 6″ x 10″ from print
- Stitch to centre of liner
- Trace the letters ‘FRY’ ( these can be found in the PDF format for this project ) onto the dull side of the fusible webbing
- Cut 1/8″ away from the pencil line and press to back of selected print.
- Cut on pencil line and peel of paper backing
- Position and press onto 6″ x 10″ piece
- Using a straight stitch or blanket stitch machine stitch the appliqué.

- Cut a 5 1/2″ circle from layer cake
- Stitch to centre of liner
- Trace the letters ‘FRY’ ( these can be found in the PDF format for this project ) onto the dull side of the fusible webbing
- Cut 1/8″ away from the pencil line and press to back of selected print.
- Cut on pencil line and peel of paper backing
- Position and press onto liner centre
- Using a straight stitch or blanket stitch machine stitch the appliqué.

Two baking and fry pan liners to dress up your kitchen drawers and protect your non stick surfaces.
Jane Davidson
{quiltjane.blogspot.com}
![]()
