Cobblestone Path Quilt


Hi everyone, my name is Pauline Francis and I blog over at Quilt n Queen.   I’m happy to be back to share with you my second recipe for the Moda Bake Shop.  This recipe is super fast and easy and makes a lap size quilt.  This is my new ‘go to‘ pattern to make a donation quilt or as I like to call them…comfort quilts With careful cutting I was able to cut enough blocks from one Dessert roll to make two lap size quilts.  Do you know what a Moda Dessert Roll is?  It’s 20 strips of fabric that are 5 inches wide and 44″ in length, tied in a roll with a Moda twill ribbon.  Have you every used a Dessert Roll?   Let’s get started…you will need…


1 Marble Ombre Dessert Roll 9883DR
2 yards of Bella White 9900 98 for sashing and borders
3 yards Marble Ombre Dot Lime 9883 17 for backing and binding.  I was going to use the pink but I had enough fabric left from squaring up my quilt after it was quilted to make the binding…I will use the pink in another Marble Ombre Dots project.  It’s a Moda basic you are going to love.


  • 1/4” seam allowance throughout
  • remove salvages before cutting strips and rectangles

CUTTING

1. From the Moda Bella White cut:

  • 14 strips lengthwise 2.5″ x 72″, set 10 strips aside for sashing and borders
  • 50 rectangles 2.5″ x 5″ from the remaining 4 strips
2. From the Dessert Roll select 10 different strips and cut:
  • 24 rectangles 9.5″ x 5″ 
  • 25 rectangles 5.5″ x 5″
PIECING:

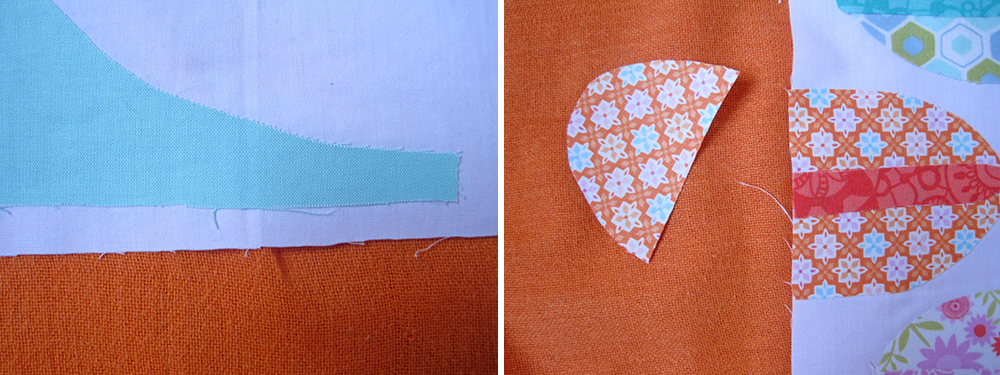
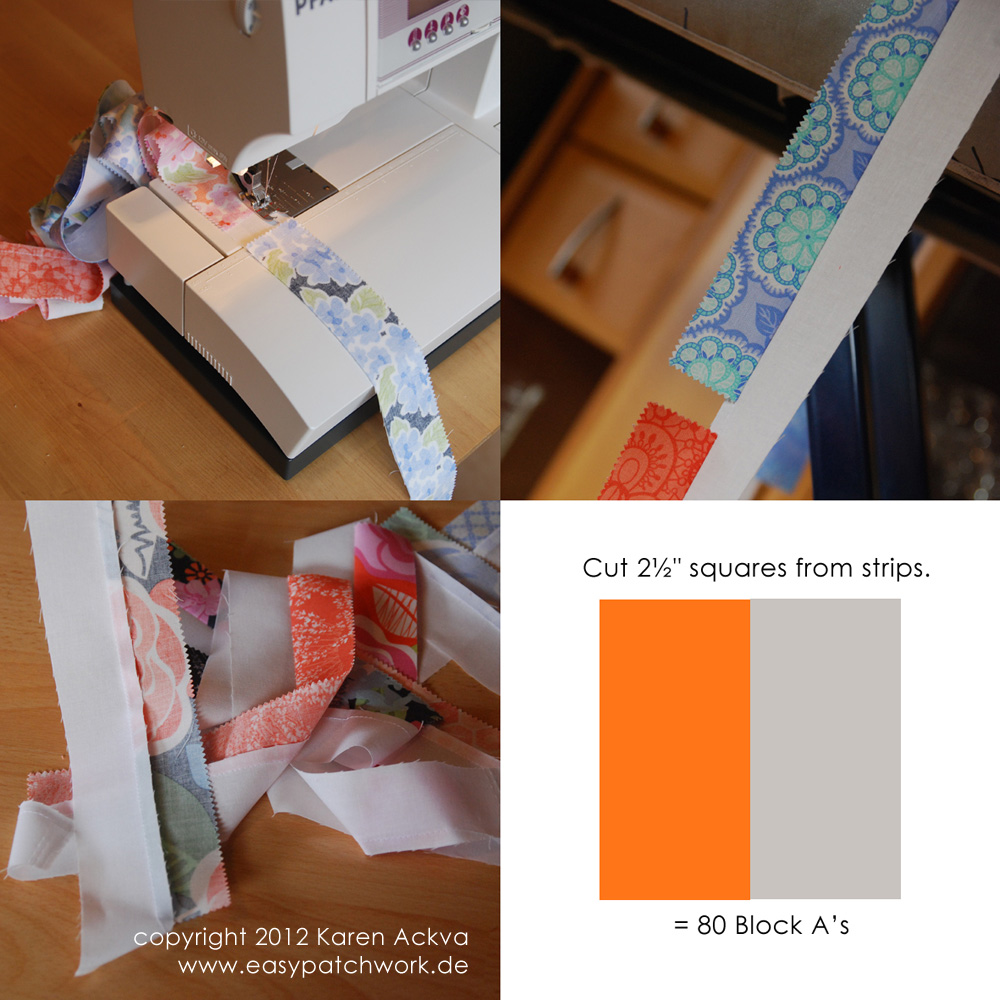
1. With right sides together chain piece the 5″ edge of a Bella white rectangle to both 5″ ends of the 5.5″ x 5″ rectangle.  


2. Set the seams and press the seams towards the dark.  I will call this block “A”.

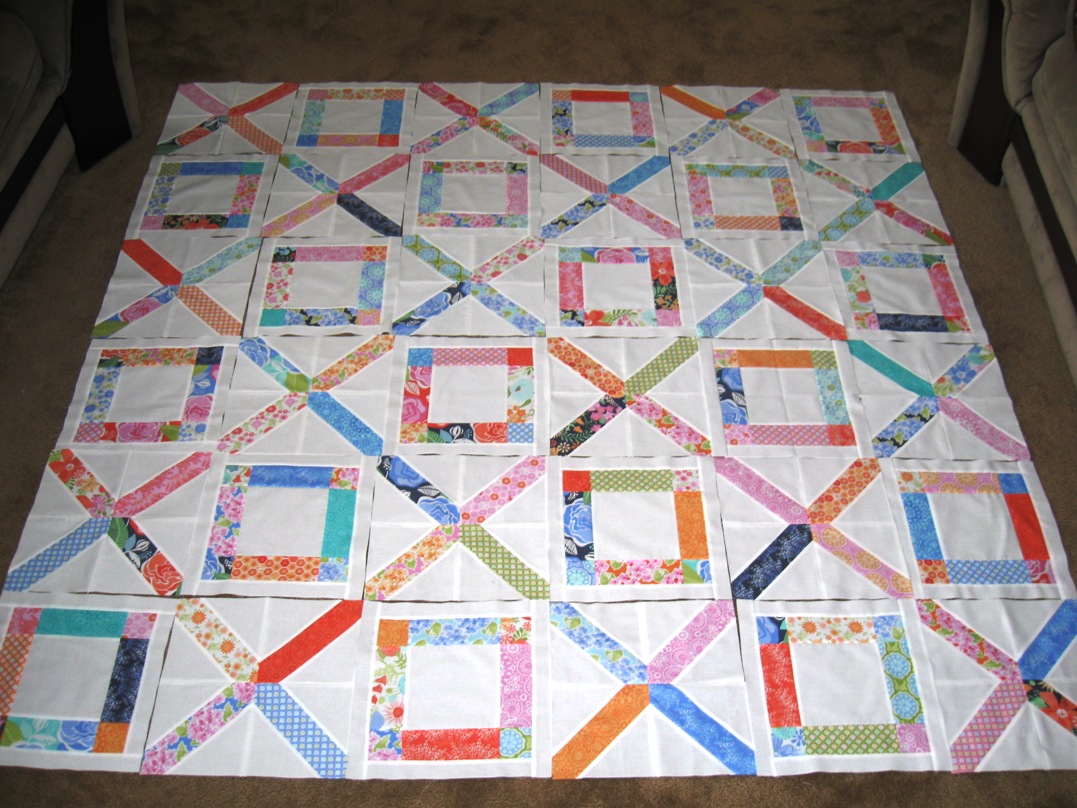
3. Once you have your pieced blocks pressed you will make 7 rows with 7 blocks in each row.  Rows 1, 3, 5, and 7 will start with an “A” block.  Rows 2, 4, and 6 will start with the 9.5″ x 5″ rectangle followed by an “A” block.  Arrange the blocks to your liking.

4.  Measure the length of your pieced strips… from the 10 strips you set aside for sashing and borders cut 8 of them the length of your pieced strips.  They should all measure approximately  63.5 inches.  The 2 remaining strips are for the top and bottom border.

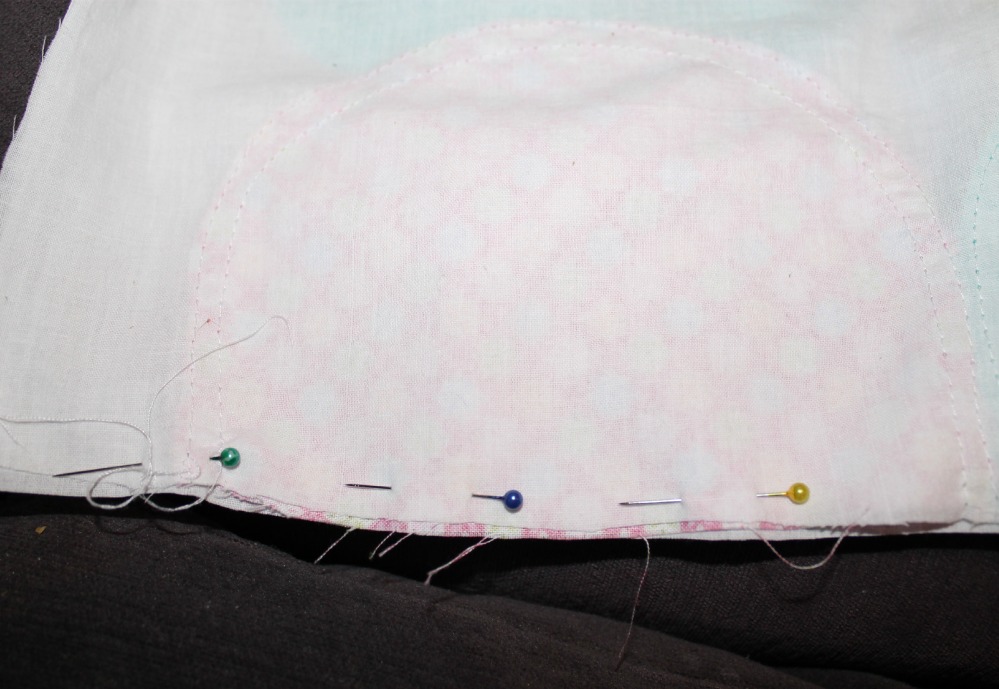
TIP:  I pin both ends first, then the middle of the strip and then I pin the rest, always dividing the space in half.   I would say I am a ‘pinner’…it is faster to pin than to unstitch.  When I attach my sashing to the pieced block strips, I pin RST…with the sashing strip on the bottom and sew with the sashing strip next to the sewing machine.  The pieced strip is on the top…that way you can see the seams and do not have any of the seams changing direction under your presser foot.

The picture below is another version of the quilt using Bella Black for the sashing and borders.  The completed quilt is pictured at the end of the tutorial.


5.  Stitch the side borders and the sashings to the pieced strips.  Press the seams towards the sashing/border…it just lays better.

6.  Now it is time to stitch the vertical strips together.   Align the seams so they will nest.  Your smaller block will be centered with the rectangle when the vertical strips are stitched together…again stitch with the pieced block strip on the top and the sashing next to the sewing machine.
7.  Stitch the vertical strips together…press seams towards the sashing. I like to stitch strips 1 & 2 together…then 3 & 4 together…5 & 6 and lastly 7 & outer border.    Set the seams and press towards the sashing.  Then I join 1 & 2 with 3 & 4…and 5 & 6 with 7.  Then 1 2 3 & 4 with 5 6 & 7.  Voila, you are almost finished…the only step left to do is add the top and bottom borders.  Measure your quilt top a few inches from the top, in the middle and a few inches from the bottom.  The measurements should be approximately 48.5 inches.  Attach top and bottom borders.

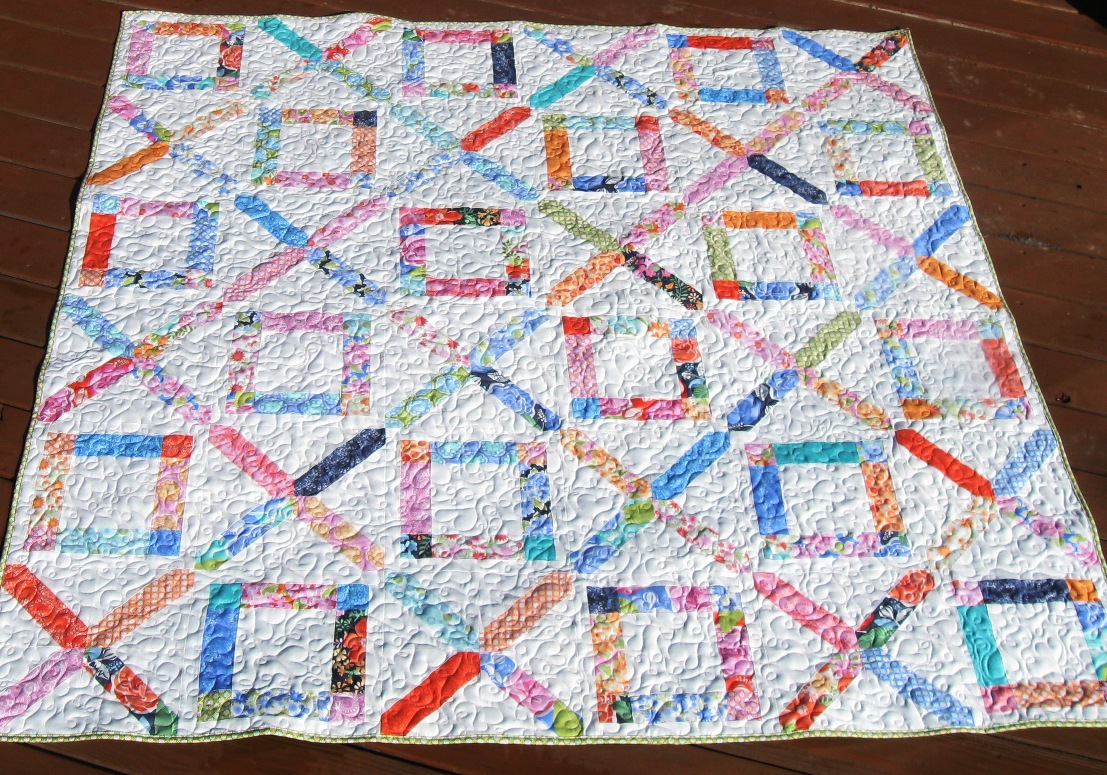
8. Quilt and bind as desired.  


…and a view of the back…


I love the ombre look…I was able to line up the binding to match the shading of the backing.  

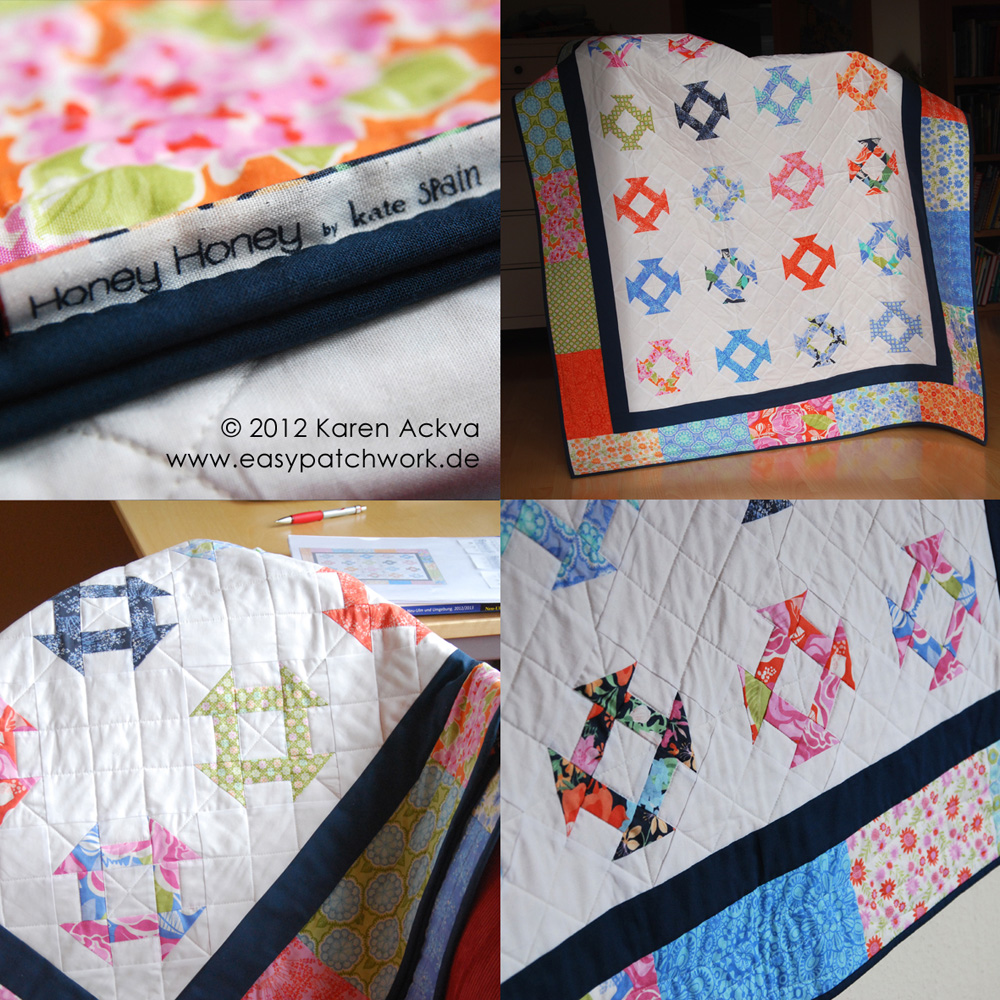
It is hard to pick a favorite…I love all three on the Cobblestone quilts hanging on the line.  


The middle one is made with Kate Spain’s Honey Honey and Bella white.   I used the left over Dessert roll pieces to make a pieced backing and a scrappy binding.  

The one on the left is made with the other half of the Marble Ombre Dots Dessert Roll with Bella Black for the sashing and backing.  


The binding is Bella Black and I added piping using Marble Ombre Dots Lime, the quilting was done with a variegated thread.


A lap size quilt approximately 48″ x 68″.  The dark one is perfect for a picnic.

Thanks for stopping by the Moda Bakeshop today to check out my recipe.  It has been a lot of fun baking with Moda.  I would love for you to stop by and visit my blog.  

Have a wonderful wonderful day!!

Happy stitching,  
Pauline Francis


Scallop Bunting Cot Quilt


Hi guys!  I’m so pleased to be back here with another project!  I loooooved putting this quilt together. Super quick and easy, perfect for a beginner quilter such as myself.  I have an obsession with scallop bunting at the moment, and have been making quite a bit of it for my own home and those of friends and family.  This quilt combines that love, with my need to make some baby gifts for friends who are expecting babies.  I can see myself making quite a few more of these, so sweet and soft…

4 x fat quarters in the fabric of your choice
2 yards white (or light) fabric for your background
2 yards white fabric for your backing
1 yard white fabric for binding
2 yards batting
Fabric glue

1. To begin with you will need to cut out your scallops.  My scallops measure 5″ wide and 5″ long, including the seam allowance.  To get perfectly rounded edges, I used an appropriately sized dining plate as a guide.
2. Cut your first piece of white fabric into five strips measuring 10″ (which includes 2 x 1/4″ seam allowances) by 30″, and one strip of 5″ by 30″.
3.  Attach four scallops to each strip, using fabric glue (alternatively, attach scallops to interfacing and skip this step – pinning them to the strips instead).  Make sure each scallop sits right up against the top edge of the strip and snug against each other – but not overlapping. You will want to make sure that you have rotated the colours for each one (though a random mix would also look lovely).  You will need to leave approximately  5″ on each end of the strip, which will be covered with binding.
4. For those of you with fancy machines (or anything made in the last few decades ;-)) you will now applique your scallops using a tight & wide zigzag stitch, or whatever your fancy machine does.  For me and my antique machine (which has no zigzag option – I make do), I did two single seams about a 1/4″ apart, with one as close to the edge of each scallop as I could safely get.  There will still be some fraying (for me), but the fabric glue will help keep that to a minimum.  
5.  Next place two strips (ensuring you have them in the right order) right side to right side, with the top piece facing upside down.  See image below for clarification.

Attach the two strips using a 1/4″ seam allowance, and then repeat with each of the rest of the strips.
6. Take the 5″ by 30″ strip and attach it to the top of your quilt top (see image of final quilt).
7. Sandwhich, pin or baste, and then quilt your… erm… quilt!
8. Attach binding, and you’re done!

Like I said, this is a super easy quilt to make, and would be a perfect wee quilt to gift to an expectant mom (or just keep for yourself – something I was tempted to do!).  I think you could have a lot of fun playing with the colour scheme and pattern.  I’m eager to have another go with some different fabric and see what I can come up with!

Stella Rutherford
{verydarkhorse.blogspot.co.nz}

Honey Hive Picnic Quilt

100_0591


Hey there everyone! It’s Allegory again from {sew} allegorical.

I don’t know about you but I’m still waiting on spring to show up at my house. I figured while I was hiding inside from the cold I could put together a spring picnic quilt. This way I’ll be ready as soon as a sunny day hits.

This jellyroll friendly quilt finishes at 48″ x 60″ using a repeat of a 12″ finished block. The repeating design means you can adjust this pattern to be larger if you’d like.

Let’s break it down.

1 Jelly Roll of Honey Honey by Kate Spain
1 Jelly Roll of Bella Natural (9900JR-12)
1 Charm Back of Bella Black (9900PP-99)

Batting: 56″ x 68″
3 yards of backing fabric of your choice. (I used Honey Honey Tide Apiary)
240 inches of binding in your preferred technique

This quilt is constructed off of one basic block. For mine I chose to mix different prints from the line together for a scrappy look. You can also use a single print for each block (which I think would be a great variation!).

I’ve made a handy block diagram to help keep track of the cutting and piecing for each block.

HH diagram
Cutting:
For one block you need to cut the following:
*The Natural and Honey Honey cuts use the 2.5″ width of the Jelly Roll. Just cut the length straight from the Jelly Roll strip*
From Natural strips:
Two 12.5″ 
Two 5.5″
Two 4.5″
Two 3.5″
Two 2.5″
From Honey Honey:
One 2.5″
One 4.5″
One 6.5″
Two 3.5″
From Black Charm square:
One 2.5″ square
Here’s all my cuts for one block: 
100_0587
Block Assembly: 
This block is super simple to construct. All piecing is done with 1/4″ seam.

Following the diagram above to match your cuts, piece together each of the rows. All of your rows will end up 12.5″ long.

Press seams however you choose. I like to press mine open.

100_0589
Now that you’ve turned pieces into rows, sew the rows together into your block.
100_0590
You’ve completed one Honey Hive block!
Repeat these steps to make enough blocks to complete your quilt. My layout was four blocks wide and five blocks long, so you’ll need twenty blocks total. 
Lay your blocks out into rows and play with the arrangement until you find one you like.
You’ll have five rows of four blocks.
HH quilt
Still using a 1/4″ seam, sew your blocks together into rows. Join your rows to complete your quilt top!
Baste, bind and quilt as desired.
For my quilt, I knew it would become my new picnic blanket so I chose a no-binding option and quilted it with wavy lines throwing in a few loops. It reminded me of a bee’s path.
HH quilting close up


One spring inspired 48″ x 60″ quilt!

HH full shot

Happy Sewing!

Allegory Lanham
{sew}allegorical

Honey Honey Layer Cake Quilt

Hi.  My name is Trish and I blog over at notes of sincerity.  I am so happy to be back at the Moda Bake Shop sharing another tutorial.  Let’s get started, shall we?!

You can use layer cakes or charm squares for this project. I used a Layer Cake, hence the name!

1 layer cake OR 4 charm packs Honey Honey by Kate Spain
1 layer cake OR 4 charm packs Bella Solids in Snow (background fabric**)
5/8 yard binding fabric
4 yards backing fabric (Honey Honey in Sunset)

**If you prefer to use yardage for your background fabric, you will need 2 3/4 yards.
 

one.
Open layer cake and choose 36 of the 42 prints you would like for the blocks, set the other 6 aside.
 

two.
Cut each layer cake into 5″ squares.  If you’re using charm squares, lucky you! Jump to step three.
 

You should have  144 5″ squares.  

three. 
I used yardage for my background fabric and the instructions below tell you how to cut your pieces. If you are using layer cakes, cut into quarters as shown above. You will need 156 squares. If you are using charm packs, jump on down to step four and start sewing.

From your background fabric, cut 20 5″ strips x width of fabric.  Sub cut each strip into 5″ squares – you will get 8 from each strip.  You will need 156 squares.

four.
Pull out 48 pattern squares and 60 solid squares.  Trim to 4.5″.  Set aside. (These are your filler squares.)

five.
Pair remaining 96 solid and pattern fabrics, making half square triangles.  Press seams open, trim to 4.5″ square.

six.
Arrange squares and sew block together in above pattern, one row at a time.  Pressing seams open when finished to reduce bulk.  Each block measures 20.5″.

seven.
Sew quilt together 3 blocks by 4 blocks.

Cut strips of 2.5″ x width of fabric and piece for length to make binding.

eight.
Quilt, bind, and enjoy!  
Beautifully long arm quilted by Kathy.  

 
61″ x  84″ Honey Honey Layer Cake Quilt

Trish Poolson
{notesofsincerity.blogspot.com}

Hugs Before Kisses Quilt


Melissa Corry here from Happy Quilting.  I’m so excited to be back here at the Moda Bake Shop and share this wonderful Valentines Day Quilt.  XOXO is big in our family!!  I shared a little bit of the story behind it in my last Valentine’s tutorial for MBS.  This quilt is a twist on the basic lattice quilt adding the O’s to create the perfect quilt  for you and your Valentine to snuggle up in.  Hope you enjoy!!

1 Honey Honey Jelly Roll
3 1/4 Yards of Bella Solid White

3/4 Yard for Binding
5 Yards for Backing

STEP 1 – CUTTING

Choose 36 jelly roll strips from your bundle.  (I set aside 4 of the double prints)  Lay them out as follow, keeping them folded in half.  You can cut about 6 rows at a time.  Using the lines on your mat as a guide, cut a sliver off the end to remove the fold.  Then cut a 2 1/2″ x 10 1/2″ rectangle, a 2 1/2″ x 6 1/2″ rectangle, and a 2 1/2″ x 2 1/2″ square.  Place the remaining bit in scrap.  You will have 2 of each cut.  Repeat with all 36 strips to have a total of (72) 2 1/2″ x 10 1/2″ rectangles, (72) 2 1/2″ x 6 1/2″ rectangles, and (72) 2 1/2″ x 2 1/2″ squares.

Now from your white yardage cut the following.

Separate your cut pieces into 2 groups as follows.  The first grouping will be used to create the O blocks and the second grouping will be used to create the X Blocks.

STEP 2 – O BLOCKS

We’ll start by making the O blocks.  Gather a 6 1/2″ square and (2) 6 1/2″ print strips and lay out as shown below.  Place the strips onto the square with right sides together.  Sew a 1/4″ along the edges, aligning as you sew.  Press towards the center square.  Repeat to make 18 center units total.  (Chain stitching saves time)

Gather a 6 1/2″ strip and (2) 2 1/2″ squares and lay out as shown below.  Place the squares onto the strip with right sides together.  Sew a 1/4″ along the edges, aligning as you sew.  Press towards the squares.  Repeat to make 36 top and bottom units total.  (Chain stitching will save lots of time 🙂

Lay (2) top and bottom units and one center unit out as follows.

Lay the top and bottom units onto the center with right sides together.  Nest the seams and pin.  Sew a 1/4″ seam along the pinned edge.  Press.  And now, you just have to add the sashing border.  Gather (2) 10 1/2″ white strips and (2) 12 1/2″ print strips and layout as shown.  Lay the top and bottom border onto the O with right sides together.  Sew a 1/4″ seam aligning as you go and press.  Repeat for the two side borders.

And the O Block is finished measuring 12 1/2″ x 12 1/2″.  Repeat the last 2 sub-steps to make a total of 18 O Blocks.


STEP 3 – X BLOCKS

Gather a 10 1/2″ strip and 2 subcut white triangles and lay them out as shown.  Place the right hand square onto the strip with right sides together centering the triangle.  Sew a 1/4″ seam along the edge, aligning as you go.  Open and finger press the triangle.  Lay the second triangle onto the left hand side of the strip with right sides together and lining the tips of the triangles up.  Sew a 1/4″ seam along the edge, aligning as you go.  Press towards the triangles.  Repeat to make 72 lattice units.  (Chain stitching will save lots of time here 🙂

Print of the Squaring Up guide that is attached at the end of this post.  Lay any square ruler onto the guide.  (It is okay if your ruler is larger than the guide, it just means you will have to turn it while trimming.  If you have a 6 1/2″ square ruler it will save time 🙂 
Using masking tape, mark the edges of the diagonal lines creating a guide on your ruler for squaring up your units.
Place your marked ruler onto your unit, aligning the lines of the seams with the edges of the masking tape.  Trim the excess along the edge of your ruler.  If your ruler is larger, trim 2 sides, then spin your unit, realign and trim the remaining 2 sides.  
And you have a perfect lattice unit that measures 6 1/2″ x 6 1/2″.  Repeat for all 72 lattice units.  
Lay 4 lattice units out as shown.  Lay the right hand side units onto the left hand sides with right sides together.  Align the diagonal seams and pin.  Sew a 1/4″ seam along the pinned edge and then press seams open.  Lay the top row onto the bottom row with right sides together.  Align the diagonal seams as well as the center seam and pin.  Sew a 1/4″ seam along the pinned edge and press the seam open.  

And the X Block is finished measuring 12 1/2″ x 12 1/2″.  Repeat the last step to make a total of 18 O Blocks.

STEP 4- SEWING THE QUILT TOP 

Lay the X and O blocks alternating into 6 rows of 6.  Play with the layout until you get a look that is please to the eye.  I tried to separate the red and navy units most as they tend to pop.   Once you have a please layout you are ready to sew the blocks into row.

I find the easiest way to do this is to stack each row and place some sort of marker on the first block indicating what row it is.  This way you don’t lose the layout you just did.

Then just start sewing the blocks together, one block adding to the next, and the next until you have sewn all 6 in the row.  Then just repeat for all 6 rows.  I do not pin my blocks when sewing them into row as there are no seams to line up.  I just align as I go.

Press your seams in the rows towards the O blocks.  This will allow you to nest the seam and avoids bulk around the X corners.

Sewing the rows together is just like creating them.  Lay the first row onto the second with right sides together.  Nest the seams and pin them and then along the rest of the edge.  Sew a 1/4″ seam along the pinned edge.  Press open.  Then repeat adding the third row to the now sewn together first and second row and so on.

And before you know it, you have a beautiful Hugs before Kisses Quilt Top!!

STEP 5- FINISHING THE QUILT

Baste it, Quilt it, and Bind It.  I know, I make it sound so easy.  If you are new to finishing your quilt, I have created a video tutorial series that goes over the basics of each of these three steps.  You can find it at my blog 🙂   You will need 8 strips for the binding.  I choose to quilt mine in an all-over free motion design of traveling loops and hearts to fit the Valentines theme.  There is also a video tutorial of how to do this design on the same page of my blog.  Just look down the page a bit 🙂 


One adorable Hugs before Kisses quilt measuring 72″ x 72″ perfect for snuggling under.

I hope you enjoyed and if you make your own Hugs Before Kisses quilt I would love to see it.  You can add it to my Inspired by Happy Quilting Flickr group here 🙂

Have a Happy Quilting Day!!

Melissa Corry
{happyquiltingmelissa.blogspot.com}

Macarons Lap Quilt

Hello! I’m Casey from Casey York Design and I blog at Studioloblog.wordpress.com. I’m delighted to be publishing my first pattern with Moda Bakeshop. This charm-pack friendly pattern features colorful French macarons, which seem to fit well with the title of this blog. For the quilt pictured, I used Kate Spain’s recently released Honey Honey collection, and I am in love with this line. The colors are so cheerful and springlike and work perfectly for the candy-colored macarons. I hope you enjoy this pattern and that you’ll share your finished quilts with me through the Casey York Quilts flickr group.

If you’d like to see some of my other quilts, many of which I will be releasing patterns for this spring, please stop by my blog and say hi!

(Unless otherwise noted, these requirements refer to 40” 100% cotton quilting fabric)

Macarons appliques: (1) Honey Honey charm pack
Cake Stand applique: ½  yd. fabric for cake stand appliqué (sample shows Bella Solids Aqua)
Background: 1 ½ yds. solid fabric (1 ¼  yds. if fabric is extra wide)
Binding: 1 yd. contrasting fabric for binding (based on 3”wide bias-cut strips; sample shows Lace in Sunset)
Backing: 3 yds. (or multiple fabrics to measure 44″ X 54″ for pieced backing)
Batting: 42″ X 52″ (1 3/4 yds 45+” batting, or one baby-sized package of pre-cut batting)
Lightweight, double-sided, paper backed fusible web : 1 ½ yds. 12” wide web or (6) 9” X 12” sheets


Step 1: Make the Appliqués:

Print the Appliqué Template page, which can be downloaded as a PDF here. Enlarge the Cake Stand template 300% using the settings in the print dialog box that appears when you print the PDF. (The cake stand will print over multiple sheets of paper, which you will then tape together.) The Cookie and Filling templates do not need to be enlarged.
Following manufacturer’s instructions, trace templates onto double-sided paper-backed fusible web. You will need to trace and cut (20) Cookies and Fillings and (1) Cake Stand. The cake stand may need to be traced in multiple sections, as shown below; these will be easy to reassemble when you fuse the web to the fabric in the next steps. As you will be applying these to the wrong side of your fabrics, the templates have already been reversed for you.
Tip: make sure to trace onto the correct side of the fusible web to avoid having to retrace your templates.

Decide which fabrics you want to use for cookies and fillings; I used large scale prints for the cookies and smaller scale or darker value complements for the fillings.
Cut out your traced templates and, following the manufacturer’s instructions, fuse the shapes to the wrong sides of your charm squares and cake stand fabric. Make sure to use a pressing cloth between your iron and fabric in order to avoid getting sticky residue on your sole plate.


Tip: Leaving a small margin around the templates when you cut them from the web is often helpful, but for this type of simple geometric shape I find this unnecessary. For this pattern, I cut the templates out along my tracing lines before fusing to the fabric. This saves my fabric scissors from cutting through extra layers of paper and adhesive, which can dull and gum up the blades. Use whichever method works best for you.
Match up each filling with its corresponding cookie. Although it may be tempting to fuse them together at this point, hold off on this until the next step, otherwise the overhanging portion of the fillings will fuse permanently to your ironing surface. 


Step 2: Assemble the quilt top:

Cut and/or piece your background fabric to measure 40” X 50.”  
Following the placement diagram below (click here for a PDF), arrange you appliqué shapes on the background.  

Position the cookies about one inch apart, and finalize your layout before fusing.  

Make sure to position the cake stand ¼ inch above the bottom edge of the background fabric, so that it is not covered by the binding when the quilt is finished. One cookie will be cut off at the left edge of the quilt—make sure to cut this to fit beforeyou fuse it, to avoid fusing the edge of the cookie to your fusing surface.

Tip: Try to complete this step on the same surface you will be ironing on. Although the unfused web is tacky, it will not necessarily hold the appliqués in place if you move the quilt top.
Appliqué around each shape by hand or with your machine. For this example, I used invisible thread and a zig-zag stitch.

Step 3: Finish the quilt:

Layer your quilt top, batting, and backing; baste and quilt as desired. For the sample, I quilted an allover scroll pattern.

Trim batting and backing even with quilt top. Place a large bowl or plate adjacent to the edges at each corner and trace along its outer curve to mark curved corners. Trim the quilt according to your markings.

Use your contrasting binding fabric to make bias binding and bind using your preferred method.

Tip: bias binding will be easier to sew around the curved corners of the quilt than will straight grain binding.

Have a macaron and admire your finished quilt!


This pattern will yield one 40” X 50” lap quilt, which is my favorite size for brisk late winter days.

Casey York
{studioloblog.wordpress.com}

Prairie Traditions Quilt


Hi everyone and thank you so much for checking out my pattern!

I would like to introduce myself, because I am a newbie here at the Moda Bake Shop. My name is Karen Ackva, and I am a Carolina girl living and quilting in Germany. I jumped the great pond about 12 years ago and am very fortunate to be living in a foreign country. It is really a dream come true. Although the day to day is the same – getting the kids ready for school, grocery shopping, making appointments, cleaning, having breakfast with the girls, etc., etc., it is great when a German festival or holiday comes around like Fasching! In the middle of winter, I can dress myself up funny, go to a Faschings party, act silly, and it’s okay. (Fasching is also known as Carnival or Fat Tuesday.) I also love to eat Eierlikör-Krapfen! Oh yummy! I can’t wait!

Prairie Traditions came about when I wanted to make a traditional yet easy pattern from just one layer cake without adding a lot of additional fabric. (Come on, these great bundles really have enough fabric for a whole quilt top!!) I played around with different ideas and came up with a monkey wrench or churn dash block used on-point. It only utilizes 20 – 10″ squares from a 42 piece Layer Cake, so you can adapt this to any size you want. Just add more solid yardage!

The lap quilt shown here uses fabrics from my favorite designer – Kate Spain! Her newest fabric line is called “Honey Honey” (from Moda) and will be available at your fabric store in January 2013. This is a great fabric line to get your spirits up when winter gets you down. 😉

If you make this quilt, you can post your “Prairie Traditions” quilt here at Flickr.

If you are curious about me or how life is for me and my family, check out my blog – www.easypatchwork.blogspot.de.

Thank you again for viewing my patterns!

Yours truly,
Karen

P.S. I wish you and your families a very happy new year. Ich wünsche euch und euere Familien einen guten Rutsch ins neue Jahr. Bis dann!


One Moda Layer Cake (Honey Honey by Kate Spain) or at least 20 layer cake squares
1¾ yards white fabric (9900-98) for background
¾ yard blue fabric (9900-174) for inner border and binding (WOF of 44″)
58 x 67 inches batting
58 x 67 inches backing fabric (27141-17)


Preparation and Cutting
Sort out (20) 10″-squares from your layer cake. These will be used for your monkey wrench block as well as for the outer border. To balance the quilt, I used four additional brighter/lighter fabrics for the outer border that didn’t have the color of the inner (dark blue) border.

From blue fabric cut:
    4 – 2½” x WOF strips for inner border (Trim later to the actual length you need.)
    5 – 2½” x WOF strips for binding

From white fabric cut:
    5 – 1½” x WOF strips (for Block A)
    12 – 6½” squares {D}
    4 – 10″ squares; sub cut each twice diagonally to get a total of 16 {E} triangles. Discard two.
    2 – 5¼” squares; sub cut each once diagonally to get 4 {F} triangles.
    40 – 3″ squares (for Block B)
    20 – 2½ squares {C}

From each 10″ square print cut:
1 – 1½” x 10″ strip (for Block A)
1 – 3″ x 10″ strip; sub cut to (2) 3″ squares (for Block B). Discard the lower 4″ x 3″ portion or save for the backing panel.
1 – 5½” x 10″ strip for outer BORDER

Sewing the Blocks
Use a scant ¼ seam allowance for all seams unless otherwise specified. You may want to sew together one block to make sure that your seam allowance and cutting strategy is correct before you decide to sew together all 20 blocks. Los geht’s. {Here we go!}

Block A
Sew each 1½” print strip to the 1½” white strips until all are gone. You should be able to get four different prints on one white strip. Finger-press toward the print. From the strips, cut four 2½” squares from each print/white combination to get 80 Block As.

Block B
On the back of all white B squares, draw a light line diagonally with a lead pencil. Sew one B print square and one white B square (right sides together) using a scant ¼” seam allowance to the right and to the left of this line. Repeat for all 40 squares. Cut through the pencil line. Finger-press toward the print. Trim to 2½” square. This is now a Block B.


Monkey Wrench Block
Sew one Block B to each side of coordinating Block A. Finger-press toward the inner block. Repeat for the other side or for Row Three.

Sew one Block A to each side of one C square. Finger-press toward print.Sew Row 1, 2, and 3 together. Repeat until all monkey wrench blocks are sewn together. Press and square up blocks to measure 6½” square.

Tip: If you have problems with one of your seams not matching up, rip the seam from the middle out, nest the seams again, and start sewing from the raw edge toward the middle and back stitch.

Assembling the Main Patchwork
Arrange the blocks to achieve the pattern you desire. First sew the D squares to the monkey wrench blocks. Continue until the rows are complete. Press toward the white fabric.

Sew the E triangles to each side of each row. Press toward the white fabric. Sew rows together interlocking the the seams. Iron how you feel it best lays flat. Sew the F triangles to the four corners. Iron toward the white fabric. Square the quilt top with large square rulers.


Adding Borders and Finishing
Measure the main patchwork through the center lengthwise. It should measure around 43″. Cut two blue inner border strips to the size of your patchwork. Sew to each side. Iron or finger press toward the border.

Measure the main patchwork through the center width. It should measure around 38½”. Cut your two border strips according to your measurement. Sew to each side of patchwork. Press toward the outer border print.

Measure the main patchwork including the blue border through the center lengthwise. It should measure around 47½”. Sew together five outer border prints. Shorten to the length you need. You can adjust your seam allowance or just shorten the strips. Sew to each side of patchwork. Press toward the outer print.

Repeat the previous step for the top and bottom of your patchwork piece.


Finishing
Iron thoroughly. Square up all corners and straighten edges. Prepare your backing. Layer front, batting and backing. Baste with safety pins. Quilt as desired. Apply continuous 2½” double-folded binding using a scant 3/8 inch seam allowance.  Add a label. Admire your work.  Photograph. Upload to Flickr!


One Prairie Traditions lap quilt or wall hanging designed by Karen Ackva of easypatchwork.de using “Honey Honey” by designer Kate Spain for Moda or another favorite Layer Cake! Be proud of yourself!

Measures approximately 48½ x 57 inches

Block Size 6″ finished

    Karen Ackva
    {easypatchwork.blogspot.de}

    Sleepy Jean Crib Quilt


    Hello!  My name is Dawn Stewart, and I’m so thrilled to be visiting here at the Moda Bakeshop!  My normal hang out in the blogosphere is over on Spring Water Designs. I hope you’ll stop by and visit me over there when you’re done here at the Bake Shop, and say Hi. We’re cooking up a nice give away over at Spring Water Designs for all the Moda Bakers 🙂

    Today, I’m sharing a cute little quilt that’s perfect for crib or stroller, and because it sews up quickly it  makes a wonderful baby shower gift.  The small 34″ square size is just right for little hands to carry as they toddle around!

    One Moda Charm Pack of your choice ~ I used Honey Honey designed by Kate Spain
    3/8 yard of white fabric ~ I used Moda Bella Solid #9900-98 White Bleached
    2/3 yard of Coordinating fabric for outer border ~ I used Honey Honey 27140-14 Tide
    1/2 yard of Coordinating fabric for binding ~ I used Honey Honey 27147-14 Tide
    1-1/4 yard for Backing
    Piece of batting no smaller than 40″ x 40″


    All seams are sewn with a 1/4″ seam allowance.

    To begin, choose (16) of your favorite 5″ charms from the pack (that’s my most fun part!), and lay them out in four rows of four charms.  Sew them together in rows.   
    Tip: Press the seam allowances of the odd rows to the left, and press the seams of the even rows to the right ~ this allows the seam intersections to nest together nicely. 

    Take a moment to admire your cute little quilt body.  
    Tip: I like to give it a quick press with a little spray starch, because…

    …Now, you’re going to take your rotary cutter and ruler and make three cuts diagonally across the center of the blocks as shown below (I know that’s a little scary, but it’s ok.  Just be cautious handling the cuts that you make because they are on the bias and can be a little stretchy ~ the spray starch helps a little with that.)

    Now to add the white strips to the center slashes ~ from the White Solid fabric cut two 1-1/2″ strips.  Sew one across the center slash, and cut the other white strip in half and sew those in the two smaller cuts.  (Lay the cut pieces right sides together on top of the white strip and center over the blocks below as shown below ~ just eyeball this, it’s Ok if it’s not exact ~ really it is!)

    Press all the seam allowances away from the white strips so you don’t see shadowing of the seam allowances behind the white.

    Next, trim the extra fabric from the white strips that hang out beyond the edges.  Use the corner of a ruler to square up the corners.

    It’s Ok if it’s a little crooked because now you trim and square your quilt body to measure 18-1/2″ square.
     

    For the first White Inner Border, cut two more 1-1/2″ strips of white fabric, and sub-cut those to:  (2) 1-1/2″ x 18-1/2″ strips & (2) 1-1/2″ x 20-1/2″ strips

    Sew the two 18-1/2″ strips to the side of the quilt body, and press away from the white strips.  Next, sew the two 20-1/2″ strips to the top and bottom.

    For the Pieced Inner Border, choose 21 more 5″ charms from the charm pack, and cut them in half (You can cut more of them in half for more variety if you want, that’s what I did) ~ Ultimately you will need (22) 2-1/2″ x 5″ rectangles.

    Now sew the half charms together end to end in (2) groups of five-long, and (2) groups of six-long.  Here is an example of one of the five-long Inner Borders:

    Center and sew the five-long strips to the top and bottom of the quilt.  Press the seam allowances towards the pieced border and away from the white fabric.  Trim off the extra fabric that sticks out beyond the side edges even with the sides of the quilt.
    Then, center and sew the six-long colored strips to the sides of the quilt, and again press away from the white Inner Border (Trim up the excess that hangs over the edges again).
     

    To add the second white inner border, cut (4) more 1-1/2″ strips from the white fabric, and sub-cut them to:  (2) 1-1/2″ x 24″ strips & (2) 1-1/2″ x 26 strips.  (For the remaining steps, measure your quilt before cutting the strips to length, in case your quilt size is a little different than mine due to variations in the 1//4″ seam allowance.)
    Just like before, sew the shorter ones to the sides of the quilt, press away from the white, and then sew the longer ones to the top and bottom of the quilt.  

    From the Outer Border fabric, cut (4) 4-1/2″ strips, and sub-cut them to: (2) 4-1/2″ x 26″ strips, and (2) 4-1/2″ x 34″ strips.
    Again sew the shorter strips to the sides of the quilt.  Press toward the outer border fabric.  Then sew the longer strips to the top and bottom of the quilt. 

    Now layer the quilt top with batting and backing, and quilt as you choose.  I quilted mine with diagonal lines in the ditch of the white inset slashes and parallel to them.   
    Tip:  Use 1″ wide painters tape to keep your quilted lines straight when you extend them out into the outer borders, so you don’t have to mark your quilt top.

    Finally, cut (4) 2-1/2″ strips from the other coordinating fabric to bind your quilt.  I sewed my binding strips end to end and then sewed them to the front of the quilt all around the edge using my walking foot, and then turned the binding to the back and hand stitched it down to the back of the quilt ~ but you can bind it in any method that you wish! 


    One 34″ x 34″ Honey-Sweet little quilt to cuddle up and take a nap with 🙂

    Enjoy the day and happy New Year!

    Dawn Stewart
    {springwaterdesigns.blogspot.com}