Big Girl Quilt and Pillow

moda bake shop big girl quilt 001

Hello all! My name is Megan and I blog over at Downtown Housewife. I also work at the fabulous Sew Sweet Quilt Shop with my family. I was inspired by my niece Drake Lynn to make a quilt that would fit a toddler-sized bed.  Enjoy!

title_ingredients
Quilt:
2 charm packs
7/8 yard print for big inner border
1 1/2 yard print for final border and binding
(2) 1/2 yard cuts of a patterned print for scrappy inner borders
1/2 yard cut of a solid colored fabric
Quilt backing 53” x 65”
Quilt batting 53” x 65”

Pillow:
1 yard fabric (keep in mind how directional prints will lay out)
Scrap piece of fabric (2” x 43”)

For Both:
Coordinating thread
Washable pen
Scissors and ruler or rotary cutter and cutting mat
Iron

title_garnishes
1  1/4 yard pom pom trim for pillow case

title_instructions
Cut Your Pieces:
Cut 24 stars (prints of your choice) with the stencil included in the Printer Friendly Version. The stencil should be printed and sized to approximately 4  1/2”. Each star is cut from one charm square. You may be one square short. If so, use an extra scrap piece.
moda bake shop big girl quilt 007

Cut 4 (9  1/2” x  9 1/2”) squares with the solid fabric.

Out of your 2 half yard patterned prints, cut 14 strips (13” x 2”), 7 of each print.

Use 6 charm squares to cut 12 strips (2” x 5”).

Cut 36 charm squares into half. This will give you 72 (2  1/2” x 2 1/2”) strips.

For the big inner border, cut 2 strips (5” x 43”), 2 strips (9  1/2” x 43”) and 4 (5” x 9  1/2”) for the corner pieces.

Cut 2 strips  (6” x 53”) for the final border.

Cut 5 (2” x width of fabric) strips for the binding.

Begin Piecing:  All seam allowances are 1/4”.

Begin by making 5 blocks made up of 4 charm squares each.
moda bake shop big girl quilt 002

Once you have sewn your 5 blocks, lay them out with your 4 solid blocks and sew them all.

moda bake shop big girl quilt 003
Next, sew together the scrappy border. This will be for the 2 thin inner borders. Together you will have 288” x 2”. Once you have one long strip you will cut each of the 8 pieces as needed, as you go. I found this method easiest! Use the 14 (13” x 2”) and 12 (5” x 2”) pieces to make up your 288” following the diagram below.
moda bake shop big girl quilt 004
moda bake shop big girl quilt 005
Next, take 2 stars and place one directly on top of the other, lining up all edges. Both stars should have the right sides of the fabric facing up. Next, sew both stars onto the quilt using one continuous set of stitches 1/4” from the edges of the star so that it has an unfinished edge in order to allow it to ravel. A stitching line is shown on the star stencil. Repeat with the other 3 stars.

Note: One point of the star is longer, point the longest point of each toward the center of the middle block.
Next, sew the inside out border using the 72 (2  1/2” x 2  1/2”) pieces. Simply sew 4 strips made up of 18 pieces each, making sure to place each piece of wrong sides together!

Once all 4 sides of the inside out border are attached, piece on charm square in each corner. This is a little tricky because these will be sewn with the wrong sides together also. The ends of each border strip may need to be trimmed before attaching the corner pieces if  more then 1/4” is left on the end.

Next, sew and attach the bigger inner border. Begin by sewing 1 corner piece to the end of each of the 2 (5” x 43”) strips. Attach the 2 (9  1/2 x 43”) onto the top and bottom.  Finish by sewing the 2 (5” x 43”) with the corner pieces to each side.

On the top and bottom big inner border sew 4 evenly spaced stars. Attach them in the same manner as the first set of stars. Doubled stars with a 1/4’”seam.

Finally, attach the final border pieces. They are the 2 (6” x 53”) strips. Simply sew one to the top and bottom.
moda bake shop big girl quilt 006
Finish The Quilt:
Quilt your pieced top, batting and backing together.

When finished, make your binding out of 2” strips and sew in place.

In order to get the shabby border and the stars to ravel, give the quilt a quick wash through the washer and dryer.

Make sure to add a cute label to personalize your quilt!

Pillow Case:
Cut the pillow body (43” x 33”)
Cut the trim piece (2” x 43”)

Begin by folding each side of the trim piece over long ways. Each raw edge will meet in the middle of the strip. Thus making the strip 1” x 43”.
moda bake shop big girl quilt 008
Layout the pillow material. On one 43” side, draw a line 6” up from the bottom. This will be the trim placement guideline while attaching the trim, if you prefer trim!
moda bake shop big girl quilt 009Place the pom pom trim under the 1” trim strip and pin in place directly over the guideline drew in the previous step. Sew in place and consider adding a decorative stitch!

After, fold and press the bottom seam under the stitch.

Next, fold the body piece in half with right sides together and sew the two unfinished edges. Finishing them by serging or using a zig zag stitch.
moda bake shop big girl quilt 010
moda bake shop big girl quilt 011
title_yield
Quilt: 53” x 65”
Pillow case: 21  1/2 “ x 33”

I hope your toddler will enjoy “The big girl quilt and pillow” as much as my niece. Although I must mention when I gave it to her she said, “Aw,but  I wanted a pink one!” Too cute. You may want to ask your wee one for her of his fabric choices!

Megan Frock
{Downtown Housewife}

Jelly Roll Floor Pillows

Hi everyone!  It’s Val over at PinkPlease! bringing you another double recipe.   Taking a spin off my last Moda Bake Shop recipe, Just Playin’ Around {Baby Changing Pad & Matching Play Mat}, I wanted to show you another fun creation you can make using the circular quilt pattern.  With just one Jelly Roll (plus some extra fabric for the back and piping), you can make two matching oversized floor pillows.

I am teaming up with the Fat Quarter Shop to help you with your Sherbet Pips collection (or any other Moda fabric) so that you can make a few pillows of your very own.  If you’d like a chance to win a $25 gift certificate to The Fat Quarter Shop, stop on over to my blog for a giveaway today!

One Sherbet Pips Jelly Roll by Aneela Hoey

2 1/2 yards of fabric for the pillow bottom

1/2 yard of fabric for the piping
6/32″ Cotton Piping (95″ long for the small pillow and 140″ long for the larger pillow)

2 packages of 1 ½” Cover Button Kits  (You will need to make 4 fabric covered buttons)

Stuffing (4 bags of 24oz. poly-fil will fill both pillows. If you are just making the large pillow, you will need 3 bags.)

Fishing Wire or Super Strong Beading Thread.
One Extra Long Needle (I used a darning needle)

***Most seam allowances are a ¼”, unless indicated.***

***Read the entire recipe before starting.  By doing this, you will learn how to use the scraps of the larger pillow to make the top of the smaller pillow.

***You may want to use a stronger needle (90/14) since it gets pretty crowded in the middle as you finish up the pillow top.  If all you have is an 80/12 needle, you should be fine, just go slowly when you are going through the thick center, so your needle doesn’t break and fly at you.***

Creating the large pillow
          
1. Cut the entire Jelly Roll in half, creating 80 (2 1/2″ x 22″) strips.

2.  Set out all your strips in a circular pattern to decide how you’d like your pillow to look.  You will need approx. 68-74 strips. 
3.  Choose your first strip and lay it right side up on your cutting mat.
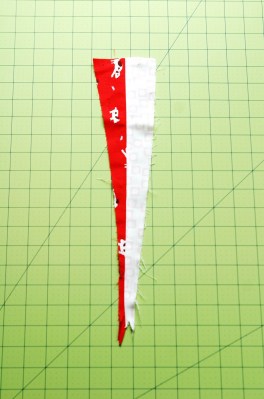
4.  Cut the strip diagonally lengthwise starting at the top right corner and cutting to 1/4″ over from the bottom left corner (see close-up photo).  This 1/4″ provides the necessary seam allowance for attaching the next strip.  Make sure the selvage is always the widest part of your strip (this will be the outside edge of your pillow top).
 
5.  Here is what the first piece looks like after it’s cut.
The piece of the left will be used for the large pillow top,
the scrap on the right will be used for the smaller pillow top.
Save the scrap you just cut!  This will be used to make the smaller pillow top.
6.  With right sides together, pin (if you choose) and sew your second full uncut strip to the first diagonal piece, sewing from the outside (selvage end) of the strip to the middle/inside.

7.  Press seams open.
8.  Place the two pieces you’ve sewn together right side up on your cutting mat.  Cut the second strip (on the right) as you did in Step 4 (above), starting from the top right corner and cutting on the diagonal down the length of the strip to 1/4″ over from the bottom left corner of the second strip.
9.  With right sides together, sew the third full strip to the second diagonal piece.

10.  Press seams open and trim that strip as you did in steps 4 and 8.
UPDATE!!!!!   I have added the next two pictures after a few readers have made the pillows and have gotten a small hole in the middle of their pillow after they have sewn all the way around the circle.  To avoid this hole, it is imperative that you do this next step.
10a.  As you begin to sew around the pillow, you may notice that the strips don’t always line up perfectly in the middle.  (Usually after about 10 or so strips).  You will need to trim it up starting at the outside edge of the pillow and coming right to the center of the pillow.  Below, I have drawn a line where I “trimmed it up” once and another line where I still need to “trim it up.”  Even though it looks like you are ruining the pillow by chopping off some of the center, you will never be able to tell once the pillow is complete. 
I promise! 

Here it is after “trimming it up.”
11.  Repeat this adding/cutting/trimming process with the remainder of the strips all the way around the circle.
12.  When it is time to sew the final seam connecting the last diagonally cut strip to the beginning first strip, I have found that it is most effective to sew this strip starting from the center of the pillow top and sewing toward the outside to make sure everything lines up nicely.  Sew slowly, so your needle can get through all those layers without breaking (and taking out an eye!)
13.  After you have sewn the last strip to the first, press the final seam open.  As you will notice, the middle gets a little crazy.  When pressing, don’t worry about the middle so much.  Let it go where it wants to go.  Just make sure to press the seams open as well as you can on the outer portion of the pillow top.
14.  When your pillow top is complete, it may be a little wonky at the outside edge.  An easy way to trim it up is to fold in half and then fold that half in half.  You will now have 1/4 of a circle.
15.  Find a ruler, a piece of string, or a ribbon (whatever you have close by).  Holding it at the center of the circle, measure the shortest distance to the outside edge of the pillow top.  I cut a ribbon to the shortest distance and dragged it across the edge of the 1/4 circle marking where I will need to trim.
16.  Use the ribbon or ruler as if it were a protractor, marking the distance all the way across the ¼ circle so the when you cut along the line, it will be a perfect circle.  Trim along the line.
17.  Create your pillow bottom.  You can either piece together scraps, use one large piece, or create another “pillow top” and make this a reversible pillow.  I pieced together strips from the gray Sherbet Pips colorway.
18.  Lay the pillow bottom face up on the floor.  Next, lay your pillow top face down directly on top of the pillow bottom.
19.  Trim the pillow bottom to match the pillow top.
20.  Now it is time to make the piping.  Piece together a strip of fabric that is 3”x 140″.  Lay the cotton piping on top of the strip.
21.  Fold the fabric over the piping.
22.  Put on your zipper foot and move the needle as far to one side as possible so that it is as close to the piping as you can get it without sewing through it.   Start sewing a straight line all the way down the piping leaving 2” unsewn at the beginning of the strip.
23.  Pin your piping in between the pillow top and bottom making sure to put the open side of the piping on the outside of the pillow sandwich.  I pinned mine so that I had at least a 1/2” seam allowance and approx. 1/2″ sticking out of the sandwich.
24.  Use lots of pins!!!
25.  Take a look at the pillow bottom to make sure you pinned the fabric far enough in on the back that you catch the fabric plus have extra fabric to trim away in step 30.  You don’t want to sew around the entire pillow and then realize that you’ve missed a part of the back and have to redo.  It is best to catch it now!
26.  After pinning all the way around the circle, stop when you have about 3 jelly roll strips left. (This will be the opening to stuff your pillow).  Leave the remaining piping dangling.  It is good if you have more than enough left there to finish up the circle. We will cut it down later.
27.  Begin sewing 2″ in from where you put your first pin (don’t forget to backstitch a few stitches to lock in your seam so that when you are stuffing the pillow, the thread won’t come out).  The reason you leave a little bit of it unsewn at the beginning is to make it easier to finish the piping after you have stuffed your pillow.
28.  Keeping your zipper foot on, put your needle all the way to the left in order to sew as close to the piping as possible.  I like to put my finger right in front of where I am about to sew in order to help the needle get super close to the piping.
29.  Sew all the way around the circle as close to the piping as possible.  When you get to your last pin, back stitch a few stitches and cut your thread (leaving the 3 jelly roll strips still open).
30.  Now trim off all excess fabric around your circle leaving 1/4” of fabric on the outside of your seam.  I used pinking shears, but this is not necessary.  Don’t cut too close to your seam or the seam may come out at that spot.  It is better to leave more fabric on the outside edge than not enough.
31.  Turn your pillow right side out through the hole that you left open. 
32.  Stuff your pillow.  I used 2 ¾ (24oz.) bags of Silky Soft poly-fil.  This stuffing is seriously soft!   Use whatever you can find though…stuffing from old pillows, bean bag filling, etc.  (However, if you do bean bag filling, you may need to make an inner liner to hold them all in.)
33.  When you are ready to sew the pillow shut, you will want to bring the two sides of the piping together because you should have extra piping that needs to be trimmed down. 
34.  Trim off the excess piping, but leave the fabric that was wrapped around it. 
35.  Fold in the edge of the excess fabric to give it a finished look, and then wrap it over the other side of the piping to complete the circle and pin it shut.  (If your piping doesn’t meet perfectly together, no one will anyone ever notice!)
36.  Now, you can either blind stitch the pillow shut by hand or use the zipper foot again to top stitch it closed.  I took the lazy quick route and sewed the pillow closed.  I used the right side of the zipper foot this time, moving my needle all the way to the right.
37.  Now the fun part….time to make your covered buttons!  For each pillow you will need two buttons.  I used Dritz’ Cover Button Kit (size 1 ½”) which was the largest button I could find at Joann Fabrics. 
38.  These are super simple to make.  Especially the large buttons.  Just follow the instructions on the back of the kit.  The kit has everything you need in it to make the button (other than the fabric that you want to add to it).
You can make some seriously cute buttons with Sherbet Pips!!!

39.  Taking the largest needle you have, I used a Darning needle (but I am sure there are larger ones out there that I don’t know about), thread it with strong beading thread or fishing wire.  I originally tried it with regular polyester thread, but it broke when I pulled the thread tight. 
40.  Attach your thread to the button that you want on the front of the pillow.  Doubling up the thread wouldn’t be a bad idea!  Send your needle through the center of the pillow top.
41.  Pull the needle out on the bottom of the pillow and send your needle through the hoop of the back of the 2nd button.  Send the needle back up to the top and go back through the hook on the top button.  Do this over and over (about 3-5 times).  When you think it is secure enough, pull the thread tight in order to tuft the pillow in the middle.
42.  When you are ready to tie off the thread, first wrap your thread around the bottom of the button a few times to make a shank.  Then knot your thread and cut.
Ta Dah!
You just finished a beautiful jelly roll pillow!
Creating the smaller pillow
Now, using all the scraps that you just cut off from the first pillow, let’s make another pillow!
This is going to use the same process, only it will be much faster because you’ve already cut all your strips.
Take your first two strips and sew them right sides together.
Press open.
Add next strip and press open.
Trim up your strips.
Continue all the way around the circle.
Repeat the exact same steps to make the smaller pillow as you did above to make the larger one.


There you have it… two pillows with one jelly roll!
One floor pillow measuring 40″ in diameter and a smaller pillow measuring 28″ in diameter.

I really hope you are able to follow along with this tutorial.  I can’t wait to see your creations.   Don’t forget to stop by my blog for a Giveaway sponsored by The Fat Quarter Shop. 

Val Campbell

Hopscotch Pips

Hi there!  I’m Jennifer Jenkinson of That Girl… That Quilt and I am so excited to be back with my second Bake Shop project!  When I first saw Sherbet Pips, I knew that I wanted to make a quilt with these adorable characters.  My first Bake Shop quilt was a bit on the complicated side, so this time I decided to share a quilt that you can easily finish over a weekend or less if you are quick about it! 

The design and construction are simple which really allows you to show off cute fabric, your favorite quilting method, and maybe even a new binding technique… 😉

1 Moda Bella Solid White Jelly Roll

1 Sherbet Pips layer cake
3 yards of Grey Cherry for backing
1/2 yard of Vanilla Cherry for binding
Batting that measures at least 65″ x 70″

To get started, select 20 of your favorite squares from your layer cake.

Next, pick 2 of the red squares from the layer cake for the little accent blocks.
Set aside the rest of the layer cake squares; I used mine to piece the backing for the quilt!

Now grab your jelly roll and let’s get to cutting!

For your blocks:

Cut 40 10″ strips from the jelly roll
Cut 40 14″ strips from the jelly roll

For the sashing:

Cut 15 13″ strips from the jelly roll
From your red layer cake squares that you set aside, cut 8-10 2.5″ squares

Piecing the blocks:

* Use a 1/4″ seam allowance for all piecing*

Your block will be constructed as shown above…

Chain piecing make this quilt fly together and I chain pieced my blocks like this:

1. Sew the 10″ strips to one side of the square.  Snip the thread between each block.

2. Sew the other 10″ strips to the other side of the square.  Snip the thread between each block again.

3. Press the seams open
4. Repeat steps 1-3 with the 14″ strips on the other two sides of the square.

*If you have questions about chain piecing, you can find a great tutorial here.*

Making the sashing:

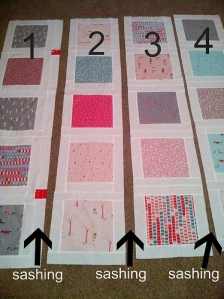
I constructed this quilt with vertical rows so you will be making 3 rows of sashing.  Each row of sashing will use 5 13″ strips.

I wanted my little red squares to be scattered bursts of color floating in the white background.  That’s completely a personal preference.  To do this, I simply sewed the 2.5″ red squares randomly to some ends of the 13″ strips. 

If you want a more uniform look, you can stitch the red squares in a consistent pattern… i.e. one red square stitched to one end of each 13″ strip.

Once you have 5 strips and the desired number of red squares sewn together, stitch the 5 strips end to end to form one row of sashing.  Repeat this step 2 more times to complete your 3 rows of sashing.

Assembling your quilt top:

Referring to the sashing picture above, lay your blocks out 4 across x 5 down.  Remember that we are assembling this quilt vertically.  Once you like the layout, stitch your blocks together to form 4 rows of 5 blocks.  Press the seams and lay the rows out again.
As shown in the picture, your sashing will go in between rows 1 & 2… 2 & 3… 3 & 4.

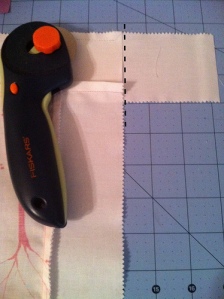
Depending on how many red squares you use in your sashing, your sashing strips might be a bit too long once sewn to the corresponding row of blocks.  If this is the case, don’t panic!  Before you open the unit to press, simply square the end of the strip even with the row of blocks as shown in the picture.

Sew your sashing to row 1 and press your seams.  Stitch this new unit to row 2.

Sew your second sashing unit to row 2 and press your seam.  Stitch this unit to row 3.

Sew your last sashing unit to row 3 and press your seam.  Stitch this unit to row 4.

Press that last seam and your quilt top is complete!

Tips on finishing your quilt:
If you need a step-by-step guide to basting {pinning or with spray}, head here.
I used a variegated pink thread to free motion quilt… I wanted a pink “tint” to the quilt and I really love how it turned out.
If you would like to make the quilt with rounded corners, head here for the tutorial.  I think it’s a great compliment to the squares and it’s not as scary as you might think!
One adorable 60″ x 65″ {approx} quilt ready to give or keep for yourself to enjoy!
Thanks for following along today and I hope you will come and visit me soon over at That Girl… That Quilt!  If you have any questions please let me know.
PS:  If you would like to have a laugh or two, take a look here for the outtakes of making this quilt… 😉

Jennifer Jenkinson
{That Girl… That Quilt}

Love Is Timeless

Hello there my Moda Bake Shop friends!! I have another quilt tutorial for you and I hope you love it just as much as I do!

I’ve named this quilt “Love Is Timeless” because it is made out of a lot of hourglass blocks and of course, hearts! I think this line is perfect for this quilt, too!!

I hope you enjoy the tutorial and come visit me, KarrieLyne, over at my blog, Freckled Whimsy, when you’re done reading!

Oh…and guess what??!! The famous Leah over at Burgundy Buttons is kitting this quilt just for you!! Hurry on over to grab yours up! Click HERE to go shopping! 😀

Enjoy…. Love Is Timeless …


2 sherbet pips layer cakes
3/8 yard solid white fabric (border for heart blocks)
1/2 yard for border #1
1 1/4 yard for border #2
5 yards for backing
3/4 yard binding (8 strips 2.5″ x WOF, pieced)
template plastic
Heart Template {included in Printer Friendly Version at bottom of post}

Notes before beginning::
*All seams are 1/4″
*WOF means Width Of Fabric (selvage to selvage)
*LC means Layer Cake
*You will have to piece your backing

1. Choose 6 LC pieces that you want to use for your hearts and set them aside. You will use these for your Four Patch Heart Blocks.

Hourglass Blocks:
1.  Choose 60 layer cake pieces and trim them to 9.5”. I trim off the top and right side first just enough to cut off the pinked edge.

2.  Turn it 180 degrees and square it up to 9.5”. I put 4 LC pieces together to make trimming go faster. Just be careful to keep them lined up. Best way to do this is to turn your mat when you do the second cut instead of moving your pieces.

3.  Pair these up into 30 pairs. Remember to use contrast in choosing your pairs.

4.  Take one pair, place them right sides together and sew 1/4” seam along EACH edge of the LC pieces. Basically you are sewing a big square. Be sure to sew edge to edge, remove your piece, and begin again on the next edge. You will have no openings!  *Note* Chain piecing works well here too. Sew all of your right side edges together in a chain, trim apart, then sew your next edge on all 30 pieces, trim and repeat until you have all 30 pieces sewn. This makes the process go faster!

5.  This is the fun part!!

6.  DO NOT MOVE YOUR PIECES AT ALL UNTIL ALL 4 CUTS HAVE BEEN MADE!!

7.  Using your ruler and rotary cutter and mat, cut your piece from corner to corner, and repeat for the other corners. (You just cut an X in your piece)

8.  Now cut 4.75” from the left (cutting in half vertically)

9.  Then cut 4.75” from the bottom (cutting in half horizontally)

10. You should now have 8 quarter square triangle (QST) pieces! 🙂

11. Psst…you can move them now. 😉

12. Press each piece to the darker print. Take care not to iron the piece as this will stretch your bias edges. Just press.

13. You will have two sets of four QST that match. One has a seam pressed to the left, one to the right. Keep these piles the same as you cut each LC set. One pile that has all seams pressed to the right, one pile that has all it’s seams pressed to the left.  Keep these piles separate.

14. Using all these QST choose 2, both from the same pile, and both with different fabrics. Place these right sides together, matching and nesting your seams and sew along the LONG edge.

15. Press to one side. This makes up 1/4 of your block and it should measure 6” square. Square up if necessary.

16. Make 3 more.

17. Sew two pairs together, press to opposite sides.

18. Sew the pairs together. Press.

19. This is your Hourglass Block! It should measure 11.5”.

20. Make 30 Hourglass Blocks total.


Four Patch Blocks:

1. Choose 6 LC pieces and pair them up for contrast. (Note: You can use more than 6 to get a better variety in your blocks).

2. Lay 2 LC pieces right sides together, matching all edges. Sew 1/4” along each edge. (right and left)

3. Keeping your sewn edges to the right and left sides, cut piece in half. (5” from edge.)

4. Press to darker fabric. You should have two pieces that look like this.

5. Repeat for the other 2 pairs of LC pieces.

6. Pair up these pieces so each pair has different fabrics.

7. Place them right sides together with the middle seams matching. Be sure that the lighter and dark fabric pieces are opposite each other between the two pieces. See photo.

8. Sew 1/4” along each edge (left and right) so you are crossing over the seam. (refer to photo). From the edge that is sewn, cut in 1/2 way. (5” from edge”)

9. Press. You know have a Four Patch Block measuring 9.5”.

10. Repeat until you have 6 blocks.

11. Now cut 6 strips of white 1.5” x WOF and sub cut them into 12 strips measuring 1.5” x 9.5” and 12 strips measuring 1.5” x 11.5”.

12. Sew the 9.5” strips to the top and bottom of each of your Four Square blocks. Press.

13. Sew the 11.5” strips to the right and left of each of your Four Square Blocks. Press.

14. Continue this block using the Heart Template instructions below.

Heart Template:
1. Trace the heart template onto template plastic and cut it out on the line.

2. Using this template, place it on the wrong side of each of your 6 LC pieces you set out earlier and trace around the heart.

3.  Cut out each heart on the line.

4.  Attach the hearts to the Four Patch Blocks using your favourite method of applique. I placed mine in the center of each block then I sewed 1/4” away from the raw edge on the inside all the way around the heart.

 5. When washed, this will cause it to fray and give it a scruffy look. 🙂

Finishing:
1.  Layout your blocks in a pleasing order, 6 x 6, scattering the 6 heart blocks.

2.  Sew the blocks together in each row. Press row 1 to the right, row 2 to the left, row 3 to the right, and so on.

3.  Sew your rows together. Your seams should nest nicely.

4.  Using your first border print, cut 8 strips measuring 1.5″ x WOF.  Piece these in pairs. Add border strips to the right and left sides first, trim excess. Press.  Then add to the top and bottom. Trim excess. Press.

5.  Using your second border print, cut 8 strips measuring 4.5″ x WOF. Piece these in pairs. Add border strips to the right and left sides first, trim excess. Press.  Then add to the top and bottom. Trim excess. Press.

6.  Press your quilt top well.

7.  Piece your backing then layer the backing, batting, and quilt top. Baste, and quilt as desired.

Before washing, your quilt should measure approximately 76″ square.

I hope you have enjoyed this tutorial! If you make this quilt, please oh please share it with me? You can email a photo of it to me HERE or you can add it to my Flickr Group HERE.  I would love to feature them on my blog! 🙂

Much Love and Happy Quilting!!

KarrieLyne
{http://www.freckledwhimsy.com}

Portrait Gallery Quilt

Sherbet Pips!

My absolute, most highly-anticipated fabric this season has been Aneela Hoey’s Sherbet Pips.  They are ADORABLE.  Full of personality, clear soft pinks and grays, and having what I can only describe as a dreamy quality, the Pips (as they are called in my house) are excellent at providing creative inspiration!  They beg to be fussy cut, and the scarf prints would love to be made into bias binding, frame log cabin blocks, or serve as interesting mitered borders.  I could go on and on about these Sherbet Pips but let’s get to the recipe!

This recipe is for one 80×80 quilt which is about the right size for a double bed. 

9 Fat Quarters of your favorite feature fabrics for inside the frames

2 1/4 yd background fabric – I used Moda Bella White 9900-98

2 1/2 yd “frame” fabric – I used Moda Washed Black 9900-118 but it would look great with Gray also!

4 2/3 yd backing fabric – I used the gray Pip puppies 18502-16

2/3 yd binding fabric – I used scraps of some of the other prints

Batting at least 82×82 which is a Full Size if you’re buying it packaged


Before we start cutting, you may want to change your rotary cutter blade!  There is quite a bit of cutting involved.  Most of it starts with 2.5″ strips so if you have an Accuquilt Go! cutter, dust that baby off 😉  I went ahead and did it with my rotary cutting tools. 

Cutting Instructions:
Be sure to pay attention to squaring your fabric as you’re cutting strips.  After cutting several strips, check to be sure your edge is still square. 

When cutting the fat quarters, you need to be really careful about which direction your pattern is going.  You want a total of 25 squares – 13 cut with the pattern running vertically and 12 cut horizontally.  You will see what I mean in the pictures.

From each fat quarter you will cut two “horizontal” pieces and two “vertical pieces” each measuring 10.5″x6.5″.  Here are some detailed cutting instructions based on how I did it. 
Start by folding the FQ in half “selvage to selvage”.  Obviously, it is missing one selvage so you’re actually folding it selvage to middle.  Lay it out with the fold close to you and cut into a width of  10.5″ and then a width of 6.5″.  The sliver all the way to the left is scrap.

Next turn the cutting mat 90 degrees.  Cut off the fold in a small sliver and continue to trim each piece into 10.5″x6.5″ rectangles.  When you’re finished you’ll have four.
I thought it would be super-confusing rather helpful if my pictures showed random fabrics in each picture.
The left-most pieces are scrap:

Okey-doke.  Now comes the fun part.  Take your ginormous piece of Moda Bella White (or whatever background fabric you’re using) and fold selvage to selvage so you’re cutting strips the WOF (width of fabric).
Cut 5 strips 4.5″ wide.
Then subcut each strip into 9 squares 4.5″x4.5″ for a total of 45 squares.  You’ll use 40.
Go back to your huge piece of background (white) and cut 26 strips 2.5″ wide.

Subcut 3 of those strips into 3 lengths of 14.5″ each.
Subcut 1 of those strips into 1 length of 14.5″ and (8) 2.5″ squares.
Subcut 4 of those strips into 4 lengths of 10.5″ each.
Subcut 8 of those strips into 9 lengths of 4.5″ each.
Subcut 2 of those strips into (16) 2.5″ squares each.
Leave the remaining 8 strips untouched.  They will be used in the border.
Next take your Moda Bella Washed Black (or whatever Frame fabric you’ve chosen) and cut (35) 2.5″ strips.  Set 25 of them aside for the frames. 
Subcut 5 strips into (16) 2.5″ squares each.
Subcut 5 strips into (9) 4.5″ lengths each.
Backing: cut in half so you have two pieces 2 1/3 yds x WOF.
Binding: cut (8) 2.5″ strips x WOF.
Piecing Directions:
The key to getting this going at a decent pace is Chain Piecing.  For those of you unfamiliar with chain piecing, it is a bit like an assembly line.  Piece all of your pieces back-to-back without cutting your machine thread and starting over.  Here is an example of chain piecing:
Let’s start by taking the long frame strips (I used black) and framing the feature fabric rectangles.  I didn’t measure this out.  I pinned, sewed, pressed, and trimmed one side then started the next until the entire frame was completed.  Here is the process:

Once you’ve completed framing your feature fabrics, set them aside.  We will work on the sashing bars next.
First let’s make (20) Block A, (20) of Block B, and we already have (10) Block C cut and ready:
To make Block A take (2) 4.5″ white squares, (1) 2.5″x4.5″ white piece, and (2) 2.5″x4.5″ black pieces.  Sew them together in the order you see above and repeat until you have (20) Block A’s.
To make Block B take (2) 2.5″x4.5″ white pieces, (1) 2.5″ white square, and (2) 2.5″x4.5″ black squares.  Using the photo above, piece them together to complete (20) Block B units.
The final sashing unit is a very long skinny strip called Block D:
Make (4) Block D units:  Each uses (2) 2.5″x4.5″ white pieces, (10) 2.5″ black squares, (5) 2.5″ white squares, and (4) 10.5″ white pieces.
The next step is to create your layout.  Use your feature framed pieces to find a pleasing layout of 5 rows of 5.  You will be alternating horizontal and vertical blocks like this:
The upper-right-hand corner should be a vertical block.  My black & white border collie thought she really needed to be a part of this black & white quilt!
Next it’s time to insert the sashing to create rows.  Here is the top left block:
Moving across, here is the next block:
And the next:
Ultimately, creating this top row:

Ok, from here on out, the layout is easier to see than to explain.  Basically, you’re using Block B and sometimes Block C (on outer edges) to sash horizontal blocks.  Use Block A and sometimes Block C (on outer edge) to sash vertical frame blocks.  Once you begin attaching blocks to form rows, you will include the long Block D sashing strip between rows.  Here is layout:
Now sew your 8 background border strips (I used white) into pairs and attach to each side and top and bottom to complete the quilt top:
Whew!  Pat yourself on the back for a job well done.  Then grab your backing fabric 😉  Once it’s cut into two pieces, right sides together and sew down one selvege edge using enough seam allowance to trim off your selvage.  Press that seam.
Find your favorite helper (ie, tape dispenser) and baste:
Now, I’m going to be honest here and say that basting is a, ahem, challenge.  If you use black and white fabric like I did, there might be a smidgy-poo of black threads showing through your white fabric, clinging to your batting, etc.  Trim as much as you can and then just get over it and move on LOL.  Remember about the Amish leaving mistakes in their quilts to remember to stay humble.  I dedicate many of my “special touches” to the Amish.
Quilt.  Bind.  I used my remaining Fat Quarters to create scrappy binding.

Enjoy the Pips!
1 Portrait Gallery Quilt about 80″x80″
Please be sure to stop by my blog http://www.frecklemama.com/ to check out how great Sherbet Pips look on a gray background as well as joining a Spring Quilt Along using your favorite Moda Charm Packs and one of my favorite Moda free patterns!  Happy Sewing 🙂
Chris Warnick

Quilted Chalkboard Organizer


Hi y’all!  I’m Kelly from Kelbysews.  I’ve only been sewing a year and I’m completely addicted to the Moda Bake Shop.  Obviously, I was thrilled when they liked my little project!  I was gifted some chalk cloth and I had an idea for a kids’ project, but then I realized I desperately needed a to-do board.  With all my quilt ideas, quilting bee blocks, swaps, etc., I was starting to forget what I was supposed to be working on!  Rather than hang one of those boring white dry erase boards, I decided to make my own quilted chalkboard organizer.  This is an easy project you can complete in a day and it’s a great way to use those charm packs you’ve been hoarding.  Please tell me I’m not the only one who collects charm packs like a squirrel does acorns!  Hope you guys like it and find it as cute and practical as I do!


1 Sherbet Pips Charm Pack (you only need 37 squares)
12.5″ square of chalk cloth
1/4 yard for binding (you only need 5″ x WOF)


ric rac
yo-yo
fabric origami:  Lisa has a great tutorial for this on her blog
buttons

You will need 37 charms for this project.  Select 3 prints for the outside of the pockets.  I chose my favorite charms that also had the print well centered.  Select 3 more charms for the inside of the pocket.  Choose 20 charms for the back.  You will need only 11 charms for the front, but if you’d like a bit more variety in the prints for the front, you may use the remaining 5 charms.

Cut the 11 charms you set aside for the front into (4) 2.5″ squares.

Cut a 12.5″ square of chalk cloth.  There are lots of places to buy this online.

Layout the 2.5″ squares and monkey around with the placement until you’re happy.   I did this somewhat randomly, only making sure I did not have two of the same print right next to each other.  It is important if you have directional prints that you sew the rows with the print in the correction direction, so laying all the squares out like this is helpful.   Using a 1/4″ seam allowance, sew 4 rows of 6 squares and 2 rows of 10 squares. Chain piecing makes this process go by very quickly.  Press seams open.

Sew 3 rows of 6 squares together.

With right sides together, sew the 18 square unit to one side of the chalk cloth.   WARNING!!!!  Once you put a hole in chalk cloth it is there for life so be careful while sewing.  Do not use pins on the chalk cloth! 

WARNING!!!  Yep, another one!  You CANNOT iron chalk cloth.  Got that?  No ironing!  Nada, zip, zilch.  Unplug your iron now please!  The chalk cloth will no longer work if you iron it!  Finger press the chalk cloth toward fabric.

I also finger press the fabric away from the chalk cloth on the front side.

Next, sew the remaining row of 6 squares onto the opposite side from where you just attached the unit of 18.  This will be the top.  Now sew a row of 10 squares on either side.  I use pins only on the areas that do not have chalk cloth.  Do you see that blue pin?  I made sure it was going through fabric only!  The key here is to sew slowly.  If you rush, your squares will not line up–trust me, I know! 

You should now have something like this.  Remember, do NOT iron this!!!!  I suppose you could iron the fabric part on the bottom, but I think it’s best to play it safe and keep your irons far, far away. 

Part of the reason I chose a more random layout is because I can never sew the squares back in the order I laid them out.  Hence, I now have a dog with four ears!  This was completely unintentional as you can see by my initial layout.  Thankfully, any boo-boos on the bottom will most likely be covered by the pockets we will attach later.

Now to piece the backing.  Using 1/4″ seam allowance, sew the charms you set aside for the back into 5 rows of 4 charms.  Press seams open.

I grouped mine by color just for fun.

Sew the rows together to create a rectangle that is 4 charm squares across and 5 charm squares down.

Cut a piece of batting at least as big as the backing.  I cut mine slightly larger.  Layer the backing, batting, and chalkboard top.  I lifted up the top and batting to make sure the top was well centered on the backing.

Baste and quilt as desired on the fabric only.  I free motion stippled mine because it is so quick, but straight-line quilting would look beautiful too!
Trim the excess batting and backing away.
Now it’s time to make the pockets!  Place the outer pocket and lining charms right sides together.  Starting at the middle of the bottom, sew a few stitches and back stitch.  Continue sewing all the way around the using a 1/4″ seam allowance.  When you get back to the bottom, leave about a 2″ opening.  Remember to backstitch on either side of the opening or your pocket can come apart when you turn it right side out!

The little opening I left at the bottom of the pocket.

Trim the corners, being careful not to clip your stitching.

Turn the pocket right side out through the little opening you left at the bottom and press.  Make sure the seam allowances at the opening are all tucked in while you press.  These openings will be sewn shut when we attach the pockets to the chalkboard.

Topstitch about 1/2″ from the top of each pocket.
First, center the middle pocket on the chalkboard.  Then, measure about 1/2″ to 3/4″ from either side and place the other pockets.  Use a ruler to ensure the pockets are level across the top.

Pin pockets in place.

Using your walking foot, sew slightly less than 1/4″ along the sides and bottom of the pockets.  This will sew the openings you left in the bottom of the pockets closed. 

Cut (2) 2.5″ x width of fabric strips from your binding fabric and bind as you normally do.  I have purposefully not included instructions on how to hang the chalkboard because this will be an individual choice.   Options include:

  1. Stick it to your design wall
  2. Pins or small nails
  3. Stick on tabs for pictures/posters:  my preferred method because there are no holes left in my walls
  4. Gromets and ribbon
  5. Add fabric or string loops to the back for hanging
  6. Magnets
  7. Velcro
****Please note:  Before using the chalkboard, you must “treat” it by coloring the entire board with the side of a piece of chalk and wiping the board clean. 


One super cute quilted chalkboard measuring approximately 16″x20″.   Hang it in your sewing room to keep track of your projects and hold small notions. Put it by the phone to jot down messages and important numbers. Hang it on your child’s door for a personal touch, or give it to a teacher as an extra special gift!  The possibilities are endless.  You can also decorate it with ric rac, buttons, yo-yos, etc!  Be creative!

Kelly Bowser

Peppermint Snowballs Quilt


Hello, it’s Corey Yoder from Little Miss Shabby back again with another fun little quilt.  I think Aneela totally nailed her debut fabric line for Moda, Sherbet Pips, & I came up with this quilt to showcase some of her oh so cute prints.  Snowball blocks meet Peppermint Pinwheel blocks….Peppermint Snowballs Quilt. =)

**All seams are to be sew with a 1/4″ seam allowance

1 Sherbet Pips Layer Cake
1 1/4 Bella Solids White (9900-98)
1/3 Yard Binding Fabric Sherbet Pips Gray Dot (18505-19)
3 Yards Backing Fabric Sherbet Pips Girl on Swing (18500-11)


Begin by choosing 12 of your favorite prints from the layer cake.  These will be used for the snowball blocks.  I chose the dog, scooter, & tree prints.  From the remaining layer cake squares, choose 5 squares to be used for the pinwheels–I went with the solid/dot fabrics you see below.

Trim each of the Snowball squares to 9.5″ square.  From the layers you have chosen for the Pinwheel blocks, cut a total of 7 strips 2.5″ x 10″ (1 strip from each square plus an extra strip from two of the prints).  Subcut the strips int 2.5″ squares.

From the remaining 25 layer cake squares cut:

(48) strips 2″ x 10″ (these will be used for the pieced square border around the pinwheel blocks)–cut 2 strips from each layer cake square

(14) strips 2.5″ x 10″–subcut into 2.5″ squares (these will be used for the hst blocks on the corners of the Pinwheel blocks)–choose these strips at random from remaining layer cake squares, don’t cut more than one strip per fabric

(10) strips 2″x 10″–subcut into 2″ squares (these will be used for the outermost triangle on the Snowball blocks)–choose these strips at random from remaining layer cake squares,  don’t cut more than one strip per fabric

From the White Solid Fabric cut:

(4) strips 3.5″ x WOF–subcut into (48) 3.5″ squares
(3) strips 2″ x WOF–subcut into (26) 2″ x 3.5″ rectangles
(6) strips 2″ x WOF–subcut into (26) 2″ x 6.5″ rectangles
(2) strips 2.5″ x WOF–subcut into (26) 2.5″ squares

On the back of each white 3.5″ square, each white 2.5″ square, each Sherbet Pips 2″ square, and 1/2 of the Sherbet Pips 2.5″ squares draw a diagonal line from corner to corner.

*Please note that I do not have the white 2.5″ squares pictured above–make sure to include them just as the instructions read.*

Assembling the Snowball Blocks

Begin by sewing one 3.5″ white square to each corner of a 9.5″ layer cake square.  Sew directly on the diagonal line–pay attention to the orientation of the diagonal.

Trim each corner 1/4″ from sewn line on each corner.

Press open.

Now you will repeat the same process using the Sherbet Pips 2″ squares.  Place a 2″ square right sides together on each corner of the snowball block.  You will sew a diagonal line directly on your drawn line–pay attention to the orientation of the diagonal.

Trim corners 1/4″ from sewn line & press open.

Continue until you have completed all 12 Snowball Blocks.

Assembling the Pinwheel Blocks
Begin by placing one white 2.5″ square right sides together with one Sherbet Pips 2.5″ square.

Sew 1/4″ away from the diagonal on each side of the drawn line.

Cut on drawn line.

Press to the Sherbet Pips fabric. Repeat these steps to make a total of 52 triangle units.  Trim all hst units to 2″ square.

Now we will repeat these steps to make the triangle units for the outermost corners of the pinwheel block.   Begin by placing (2) 2.5″ Sherbet Pips Squares right sides together.

Sew 1/4″ away from the drawn diagonal line just like you did for the Pinwheel blocks a moment ago.  Cut apart on the diagonal line and press open to the darker fabric.  Trim all hst units to 2″ square.

You will end up with a bunch of fun little half square triangle units. 52 of the Sherbet Pips/Sherbet Pips units & 52 of the White/Sherbet Pips units.

To make the pinwheel units, sew together 4 of the white/sherbet pips units pressing seams to the Sherbet Pips fabric.

Sew together to complete the pinwheel unit.

Continue sewing all of the pinwheels together until you have a lovely little stack of them.
Next, sew a 2″ x 3.5″ white rectangle to the top and bottom of the pinwheel block.  Then, sew a 2″ x 6.5″ rectangle to the right and left of the pinwheel.  Press seams out.

Sew all of the pinwheel blocks in this manner.

Now we will begin sewing together the 2″ x 10″ strips in sets of four.  Press open to one side.

Continue until you have sewn together all of the strips.

Subcut into 2″ strips.

Now we will sew one of the half square triangle units onto each end of 26 of the strip sets.  Please note:  It is very important that the diagonals are oriented exactly as shown for each strip.  Press seams toward the center.

Continue until you have sewn triangle units onto each end of 26 of the strips.

Now we can assemble these blocks.

Begin by sewing one of the 4 square strips to the top and bottom of the pinwheel unit.  Press away from the center.

Sew the remaining strips to the right and left of the block making sure to orient the diagonals as pictured.

And Voila–completed pinwheel blocks.

You are ready to assemble the quilt as shown.

Once you have your blocks sewn together (25 blocks total — 5 blocks x 5 blocks) you are ready to sandwich your quilt, baste, quilt, and bind. 
A fabulous 45″x45″ quilt showcasing Aneela’s wonderful fabrics!  Enjoy!

Corey Yoder
{Little Miss Shabby}

Zig Zag Skirt

Hi! My name is Melissa Mortenson I’m so excited to share with you today this tutorial for a zig zag skirt! It’s made with one of my favorite new fabric lines from Moda, Sherbet Pips!!  Please stop by my blog www.polkadotchair.com and say “hi” and check out the sewing patterns I offer in my shop fourteenmay!  

For this skirt you will need:
1 Bella Solids Charm pack
2 Sherbet Pips Charm pack- I recommend getting 2 charm packs. You only need 18 5″ squares but you need them ALL to be in the same color family, so depending on the charm pack you pick you may not have enough of the right color in one charm pack. The good news is that you can make more skirt with the other colors too!!
1 Jelly Roll- you will need 7 strips from your Jelly Roll
1/2″ wide elastic

I find it easiest to sort my fabrics into “front” and “back” piles. That way your skirt does not have all the same prints on the front or the back. Sorting ensures the skirt is evenly distributed.
You need 18 squares all of similar color, sorted into 2 piles of 9 squares. As we work, we will keep the skirt front and back separate (this will help you in construction).
Take 18 white charm pack squares and draw a diagonal line down the center.  
Place 18 white squares on top of 18 pink squares, right sides together.  Pin.
Stitch 1/4″ down each side from the centerline.
The black lines represent stitching lines.
Cut the square in half along the pencil line you drew. Press open.
You will have 2 half square triangles (HST).  
Measure to make sure each HST is perfectly square, adjust as necessary.
Arrange your blocks like the diagram above.
Sew the 1st row together, press all seams to one side
Sew the 2nd row together, press seams to opposite side.
Sew row 1 and row 2 together.
Set aside and repeat for other side of the skirt.
Each side of the skirt will have 9 blocks by 2 rows.
Place 1 jelly roll strip over skirt right sides together. Stitch to bottom of skirt. Trim off excess.
Stitch one more jelly roll strip to bottom of skirt and 1 jelly roll strip to top of skirt.
Repeat for skirt back.
You should have 2 pieces that look like the above photo.
Stitch skirt front and skirt back together. Press these seams open so that you know where your side seams are.
Run 2 rows of gathering stitches across the top of the skirt, stopping and starting at side seams.
To make waistband, take one jelly roll strip and fold it in half. Stitch closed, leaving a 3/4″ hole to feed your elastic through.
Fold the waistband piece in half, WRONG sides together.
Pin waistband to skirt, right sides together, matching side seams and waistband center.  Pull up on gathering stitches until skirt and waistband are the same size.
Stitch waistband in place.
Cut your elastic to the correct size (measure waist and cut elastic that length).
Using the hole you left in the waistband, feed elastic through.  Hand stitch opening closed.
To finish skirt…
On bottom of skirt, press under 1/4″.
Fold over so that folded edge matches seam. Pin VERY well in place.
On right side of skirt, top stitch band in place.
Press well.
Clip strings and enjoy!

2 skirts (of different colors) from 2 charm packs.

Melissa Mortenson

{polkadotchair.com}
{fourteenmay}

Hexagon Park

MBS pic


Hi, I’m Lynne, from Lily’s Quilts.  I’m a UK quilter and leapt at the chance to design a quilt using the eagerly awaited new line from UK fabric designer, Aneela Hoey, Sherbet Pips.  Want to make this quilt right now?  Head on over to my blog this week for a chance to win a Sherbet Pips layer cake!


For the quilt top:
One Sherbet Pips layer cake
Two and a half yards of Moda Bella Solids white

DSC_0359

For the binding and backing:
1/2 yard of fabric for the binding
5 yards of fabric for the backing


Choose 30 layer cake squares for the hexagons and save the remaining squares for the small square border.  To make each hexagon, take one layer cake square, fold and iron it in half horizontally and cut a half inch strip off along the folded line, yielding two rectangles 4 1/2″ by 10″.  For clarity, the strip you are cutting off is an inch wide when unfolded.

DSC_0373

Keeping those two rectangles of fabric together as they are, position them on your cutting board so that first the bottom right and then the bottom left corner line up with the 60 degree line marked on the cutting board and cut off triangles on each side as shown in this picture:

DSC_0374

You will end up with two half hexagons and four small triangles looking like this.  Keep the triangles; you will use some of them in the quilt.

DSC_0375

For the sashing between the hexagons, cut 12 WOF (width of fabric) strips 2″ wide.  Cut these strips into 7 1/4″ lengths.  Also cut 8 WOF strips 1 1/4″ wide and cut these into 5 1/4″ lengths.  Sew one of the shorter, narrower strips onto the top and bottom of each of the half hexagons, press the seams away from the white strips and trim following the lines of the half hexagon edges.

DSC_0378

Separate all your half hexagons into two piles – the tops and the bottoms. Add 7 1/4″ sashing strips to the sides of each of the tops, lining up the sashing with the top of the block so that there is some overhang at the bottom.

DSC_0379

Press seams away from the white sashing and trim, following the lines of the half hexagons sides.

DSC_0380

Arrange the hexagons into a pleasing layout (refer to the picture of the whole quilt to help if needed).  Take the pile of little triangles cut off when you cut the hexagons and choose some pairs of these to add down the sides of the quilt layout.  Take each of the bottom half hexagons on the left hand and right hand side of the layout and add a 7 1/4″ sashing strip along the side that will be attached to a small triangle.

DSC_0381

Sew the small triangles to the half hexagon next to them, lining them up with the white sashing:

DSC_0382

Sew each row together, pressing seams away from the white sashing.  My top row looked like this:

row 1 of 12!

Sew all 12 rows together, pressing seams open and trimming along the edges of the small triangles, removing the little points of sashing.

Sashing and small square border:
Cut 12 WOF strips 2 1/2″ wide from the white fabric and add a white border to the quilt top.

Cut 5 WOF strips 2 5/8″ wide and cut into 5″ lengths.  Cut (36) 5″ squares from the remaining layer cake. Add the 5″ square border alternating 5″ squares with the white 5″ sashing strips.  Add one more 2 1/2″ white border.  You now have your completed quilt top.

Hexagon Park

Cut the backing fabric in half lengthwise, remove selvages and sew the two pieces together along the long sides to create the quilt backing.  Sandwich, quilt, bind, wash, dry and enjoy.


One sashed hexagon quilt 80″ by 70″.  Mine will be used for snuggling under on the sofa.  I made it for me but I suspect my twin daughters may make it their own before too long.  If you make this quilt, I’d love you to let me know via my blog, Lily’s Quilts.

Thank you!

Lynne Goldsworthy
{Lily’s Quilts}