
![]()
Hi! My name is Jen, owner/designer of ReannaLily Designs, and this is my first recipe here at the Moda Bake Shop. I had a blast in the kitchen whippin’ up a batch of Wine Gift Bags. The bags fit a standard 750mL wine bottle, but might be great for a bubble bath gift basket, as well.
This project uses just a few supplies and makes up 4 Gift Bags. They are each unique, scrappy, and original. These would make wonderful garden party centerpieces.


1 Charm Pack (Fresh Flowers By Deb Strain)
7/8 yard coordinating solid (30’s Yellow)
Rotary cutting supplies
Hand sewing needle and thread

20″ length of assorted ribbons

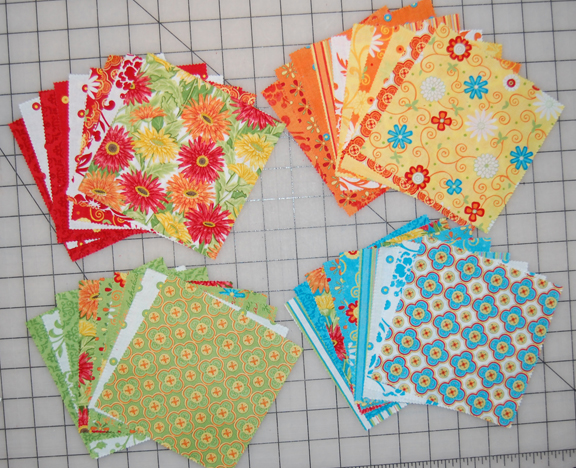
Open and sort the charm pack into 4 stacks of 9 charm squares each. Fresh Flowers has 4 colorways, so this project is sorted by color. You will have 6 charm squares left over.
NOTE: This tutorial will yield 4 gift bags. For photo reasons, we are working on only one.

Cut the 9 squares in half. You will then have 18″ rectangles measuring 2 1/2″ x 5 for each bag.

Cut the Bella Solid lining into 4 rectangles measuring each, 12 1/2″ x 14″.
Step 2: Build the Wine Gift Bag Exterior

Arrange the rectangles into 3 rows with 6 rectangles each. The project should look scrappy and random. You’ll want to make sure that no two like fabrics are touching. Pay attention because when the bag is complete, the fabrics on the right hand side will be joined to the left hand side.

Use a 1/4″ seam allowance to join pairs of rectangles to form rows.

Keep them in order.
Step 3: Press and Join the Rows


Join the rows to complete the exterior of the wine gift bag. The finished exterior should measure 12 1/2″ x 14″.

Step 4: Apply the Lining
Lay the right side of the lining onto the right side of the wine bag exterior. Match the 12 1/2″ sides along the top edge. Join the two pieces using a 1/4″ seam allowance along this edge.

Open the seam and press the seam allowances towards the solid. Edge-stitch along the solid lining fabric.

Fold the long rectangle in half lengthwise, matching the exterior side seams.


Step 5: Create the Bag Shaping Darts in the Lining
Match the bag bottom seam with the side seam to form a triangle. Pin the triangle in place. Measure from the tip of the triangle along the stitched line 1 1/4″. Make a mark.

Draw a line perpendicular to the seam line, along the mark. Stitch on the line. Repeat this for the remaining corner of the bag lining.

This will create the bag shaping darts. Remove the excess triangle fabric 1/4″ past the stitching line.

Step 6: Turn the Bag Right Side Out

Turn the bag right side out through the narrow opening in the bag lining.

Push the corners of the exterior fabric to a nice crisp point.

Tuck the seam allowances of the lining opening into the opening and pin. You may either stitch this by hand to give a more invisible look, or edge stitch the opening closed as shown. (below)

Step 7: Finishing the Bag Exterior
Similar to the lining bag shaping dart, lay the side seam on the lower edge seam to form a triangle at each exterior corner. Pin this triangle shape.

Also, like the lining bag shaping darts, mark 1 1/4″ along the seam line, measured from the point. Draw a line perpendicular to the seam at this point. Stitch across the line. Repeat for the other corner. DO NOT CUT OFF THE EXCESS TRIANGLE. Instead….
Consider the three decorative options pictured (below)
1. {red} Leave the triangle as it is.
2. {orange} Fold the triangle up and hold it in place with a decorative button.
3. {green} Fold the triangle up and stitch it in place with a small, hand-sewn tack stitch.

Pictured below: Small hand stitched tack stitch, behind the triangle as it’s folded on the side of the bag.

Once the sides are finished, the bag is complete. Fill it with the bottled gift of your choice, fold the lining down to form a cuff and secure it with decorative ribbon.


4 Wine Gift Bags
Jen Eskridge
{ReannaLily Designs}
![]()
