When looking at Maison de Garance I was reminded of an antiqued cross stitch I’d once seen in the old homestead where my great-grandparents had lived. The cross stitch had a Ukrainian design and the bright whites and reds faded and stained over time. This design emerged as I tried to think of how I could piece something simple, at least simple compared to the intricate designs that can be cross stitched and embroidered. Antique Etoiles, which translates into Antique Stars, was born from there.

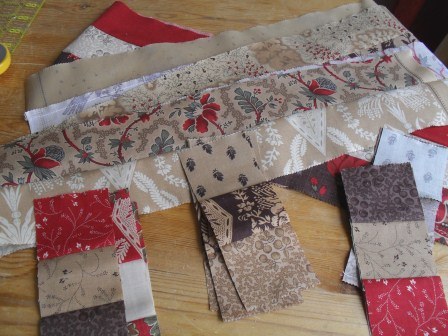
1 layer cake, Maison de Garance
1 charm pack, Maison de Garance
2/3 yard Tea background
1/2 yard Oyster background
2/3 yard Red “bars”
2 1/8 yards Old Brown (Border, setting triangles )
4 yards backing fabric
1/2 binding

Cutting
WOF = Width of Fabric, from selvage to selvage.
QST = Quarter Square Triangle
From the Red cut (4) 5” x WOF strips and subcut to a total of (124) 1¼” x 5″ strips, these are the “bars.”
From the Oyster background cut (5) 3 ½” x WOF strips. Sub cut into (60) 3 ½” squares. Cut in half diagonally.
From the Tea background cut (5) 3 ½” x WOF strips. Sub cut into (64) 3 ½” squares. Cut in half diagonally.
Cut (25) Red 3 ½” squares, from the layer cake squares and charm squares.
Cut one 5” x WOF of Old Brown and subcut (6) 5” squares for the QSTs.
For the setting triangles cut (3) 14” squares of Old Brown and cut in half on the diagonal twice.
For the setting triangles cut (1) 7 1/2″ x WOF strips of Old Brown. Subcut into (12) 3 1/2″ x 7 1/2″ strips.
For the corner triangles cut (2) 7 ¼” squares of Old Brown and cut in half once on the diagonal.
Borders- From Old Brown cut (7) 5 1/2″ x WOF. Subcut 1 of the strips in half.
Sewing
Create Quarter Square Triangles that finish at 3″. You can use whatever method you prefer, so long as you can make them from 5″ squares. This is how I made mine.
Draw a line diagonally across each of the Oyster and Tea squares.
Layer one Old Brown and one Oyster 5” square, charm square or cut from the layer cake, right sides together and stitch ¼” on either side of the drawn line. Cut along line and press towards the light side. Repeat 25 times.
Layer one Tea and one Old Brown right sides together and stitch ¼” on either side of the drawn line. Cut along line and press towards the light side. Repeat 25 times.
Layer on Oyster/Old Brown and one Tea/Old Brown squares right sides together with the Old Brown laying on top of each other. Again stitch ¼” on either side of the center line. Cut apart and press open. Line up the 1 ¾” mark on the center and with the line on the ruler on the diagonal through the center. Trim blocks to 3 ½”.
Using the background triangles, stitch one 1 ¼” red strip to the long side of the triangle. Stitch a matching triangle to the other side of the strip. Press away from the strip.
Finger press in half diagonally, so that you can find the center of the red strip lengthwise (figure 1).
Open and finger press diagonally the opposite direction (figure 2).
Open and line up your ruler with the line matching up with the finger pressed line and the 1 ¾” mark on the center and trim to 3 ½” square (figure 3).
Make 48 with Oyster and 64 in Tea.
 |
| Figure 1 |
 |
| Figure 2 |
|
|
 |
| Figure 3 |
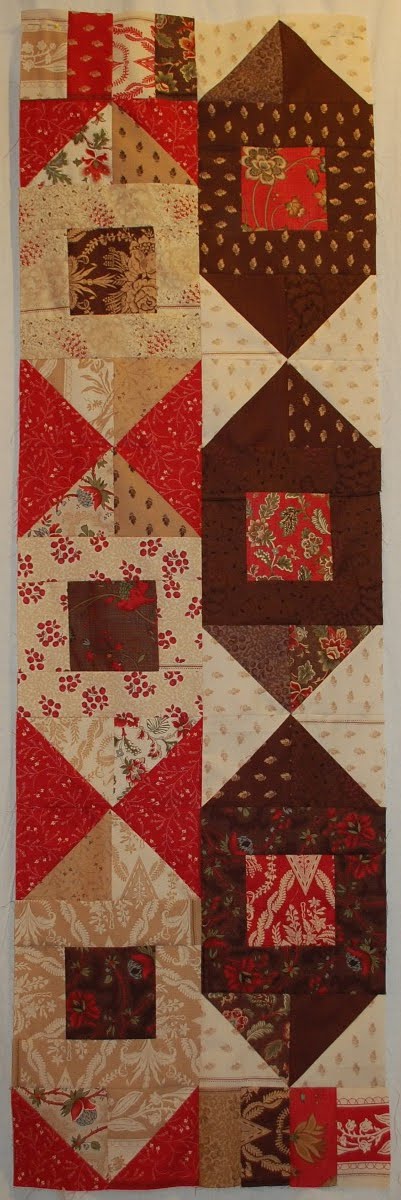
Arrange the patches into a 9 patch as per the diagram. Because each set of QSTs yields 4 matching patches, you can have each star have the same fabric points, or you can go random, which is what I did.
Setting Triangles
In the same manner used for the blocks, create 12 additional Oyster and Red “bar” patches.
Take (1) 3 1/2 x 7 1/2″ strip of Old Brown and stitch the Oyster bar patch to the end. Stitch the unit to the bottom of the cut setting triangle. Press.
Line up your ruler across the top and trim off the excess as shown in picture. Repeat so that you have 12 setting triangles.
Layout the quilt on point with the Oyster and Tea squares alternating. Stitch together. Don’t worry about overlap, it can be trimmed off.
Lay your ruler along the quilt top, lining up the points of the blocks with your 1/2″ line. Trim the entire top.
Border #1
Take the 1 Oyster, 1 Tea and 1 Red layer square and cut into 2″ x 10″ strips. Stitch together lengthwise following the pattern Oyster, Tea, Oyster, Tea, Red, Oyster, Tea, Oyster, Tea. Press all in one direction. Subcut into 2″ strips. Make up each border strip with 6 of these sections.
Attach a strip to the top and bottom and press towards the center.
Cut (2) 2 1/2″ squares from both the Old Brown and the Red. Draw a line diagonally across the Red squares. Layer one Old Brown and one Red square right sides together and stitch ¼” on either side of the drawn line. Cut along line and press towards the Red side. Trim to 2″.
Attach one HST to the end of each of the remaining strips. Make sure the red points down and in.
Attach to the sides of the top. Press towards the top.
Border #2
Using the stitch and flip method, attach one half strip to one of the full strips.
Place strips right sides together at a 90 degree angle and stitch from one corner to the other. Open and press well. Trim to a ¼” seam allowance.
Press. Repeat so you have two of these strips.
Attach one of the strips to each of the sides and press towards the strip.
Using the stitch and flip method again, attach one full length strip to another full length strip. Press. Repeat.
Attach to the top and bottom of the quilt. Press towards the strips.
Now for the for the most loved and hated words in quilting; Baste, Quilt and Bind!

One 64” x 64″ quilt, perfect cozy under this cold winter!
Cara Wilson


