
![]()
Welcome! My name is Erica and I blog over at Kitchen Table Quilting. I absolutely loved working with Scrumptious; just sewing with it made me feel happy. This quilt is kind of a modified Irish Chain quilt that uses charm squares and jelly roll strips. I hope that you enjoy the tutorial!


1 Scrumptious charm pack
1 Scrumptious jelly roll
1 Bella Solids jelly roll in white
1/2 yard Scrumptious print for the binding (or you could use leftover jelly roll strips)
3.5 yards fabric for the backing
1/2 yard Scrumptious print for the binding (or you could use leftover jelly roll strips)
3.5 yards fabric for the backing

1. From your charm pack and jelly rolls separate out:
- 9 charm squares
- 14 white jelly roll strips
- 5 solid jelly roll strips from the Scrumptious jelly roll
- 18 print jelly roll strips from the Scrumptious jelly roll
2. For each block I chose one print strip that was the same color as the solid strip (I will refer to this as the B strip) and 1 print strip that contrasted that color (I will refer to this as the A strip). You will also need:
- 1 charm square
- 1.5 white jelly roll strips
- 0.5 solid jelly roll strips from the Scrumptious jelly roll
- 2 print jelly roll strips from the Scrumptious jelly roll
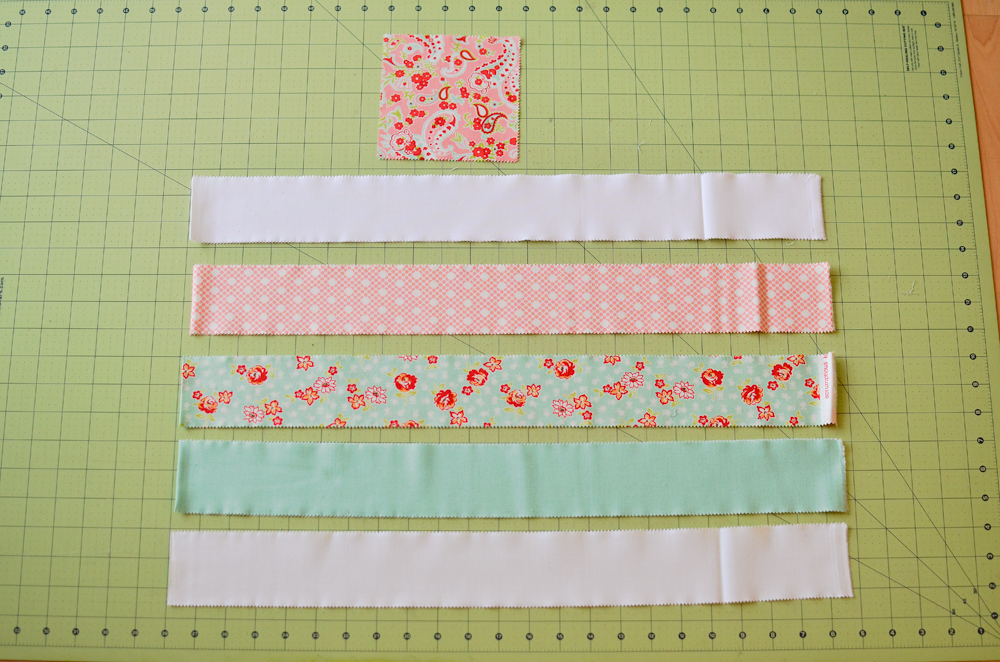
3. Take your print strips and your white strip and cut them in half so that you have strips that are 2.5″x22″.

4. Piece them together with the A strip on top (the one that contrasts your solid), B strip in the middle (the one that matches your solid), and white strip on bottom.

5. Square up the edge so that it is straight and cut this long strip into 8 strips that are 2.5″x6.5″. 

6. Take the remainder of your B strip and cut it in half so that you have 2 pieces that are 2.5″x11″ and your A strip so that you have a piece that is 2.5″x11″.

7. Piece them together so that the B strip is on top, A strip is in the middle, and B strip is on the bottom.

8. Square up the edge so that it is straight and cut the long strip into 4 pieces that are 2.5″x6.5″.

9. Trim your charm square down to 4.5″ square.

10. Take 2 white strips that are 2.5″x20″ and your solid Scrumptious jelly roll strip that you have cut down to 2.5″x20″.

11. Piece them together.

12. Trim the edge so that it is straight and cut into 4 pieces that are 4.5″x6.5″. 

13. Arrange the newly cut strips into the following block.

14. Piece together the 4 corners.

15. And then the columns.

16. And then piece together the columns into the finished block which should be 16.5″ unfinished.

17. Layout the squares in a 3×3 grid and piece together.
18. Baste, quilt, and bind as desired.


A 48″x48″ baby quilt.
Erica Jackman
{www.kitchentablequilting.blogspot.com}
![]()


