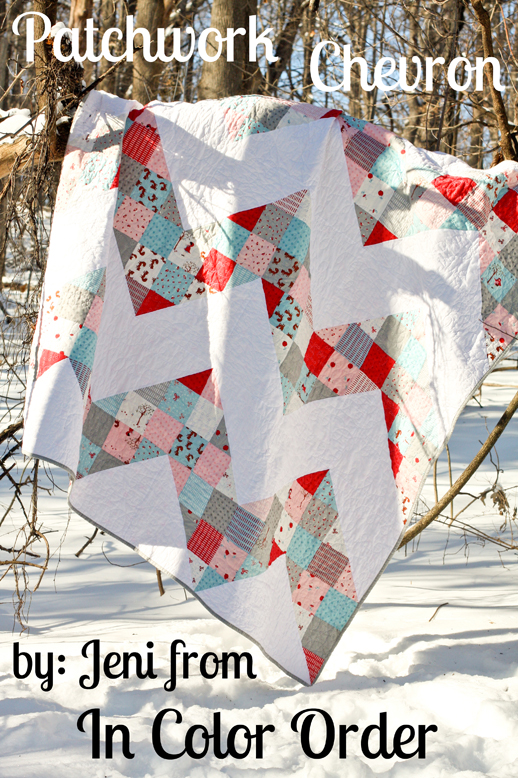
Hello all! I’m Jeni from In Color Order! I’m very excited to be here today to share a fun and quick lap quilt with you!
This quilt was inspired by a serious love for patchwork; it just makes everything better! I have loved working with Aneela Hoey’s previous fabric collections, and a Walk in the Woods did not disappoint! I had fun showcasing the sweet prints in this quilt!

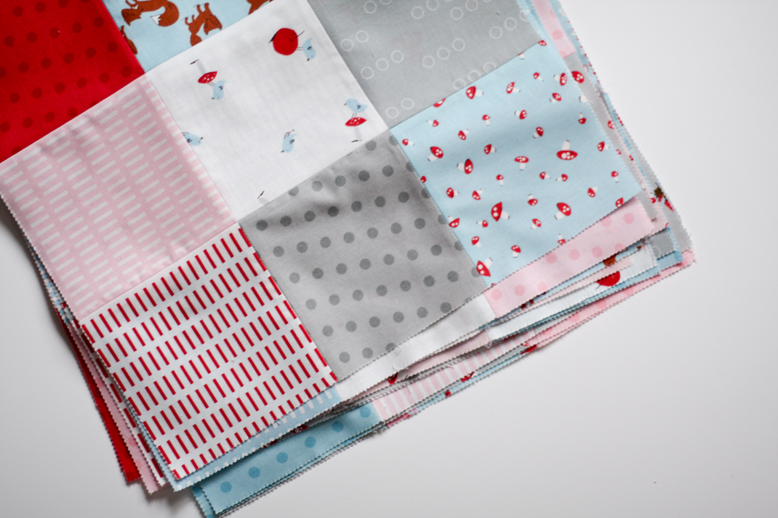
– 4 charm packs of A Walk in the Woods by Aneela Hoey
– 2 1/2 yards of Moda Bella White 9900 97
– 5/8 yard of A Walk in the Woods 18525 13 (circles on gray) for binding
– 5 yards of A Walk in the Woods 18522 13 (birds on gray) for backing
*Note: Use 1/4″ seam allowances throughout

Cutting
From Moda Bella solid:
– Cut 6 strips: 14″ x width of fabric
– From those strips, cut (3) 14″ squares from each, for a total of 18 squares.
Take apart your 4 charm packs. Pick out 6 squares and set them aside, you won’t need them for this quilt!
Piecing 9-Patch Blocks
First we’ll be piecing traditional 9-patch blocks to make the patchwork!
Grab 9 squares and arrange them in a simple 3×3 layout, making sure to get plenty of variety in prints.
Piece the squares together in each row. Press seams open.
Sew the three rows together to complete the 9-patch block. Press seams open.
Make a total of (18) 9-patch blocks!
If you’d like to chain-piece the rows for these 9-patch blocks, you’ll need to first separate your squares into two piles: 108 squares and 54 squares. Piece the 108 squares into pairs. Now join each pair with a single square (from the other pile!). This will give you 54 rows that can be pieced into 18 blocks!
Piecing Half-Square Triangle Blocks
Now that you’ve completed your 9-patch blocks, we’ll be using them to make half-square triangles!
Take your 14″ solid squares and draw a line diagonally from corner to corner using a ruler and pencil. Do this to all 18 squares.
Place a 9-patch block and solid square together, with your pencil marked side facing up. Pin in place.
Sew 1/4″ on either side of the pencil line.
Using your rotary cutter (or scissors), cut along the pencil line, separating your half-square triangles.
Press seams toward the solid triangle to reduce bulk. Repeat with remaining squares until you have a total of 36 half-square triangle blocks.
Finishing
Arrange your blocks, 6 rows of 6 blocks, in a chevron pattern as shown in the diagram below:
Piece your rows together, pressing seams in alternating directions. Pin your rows together, matching up the block seams. Don’t worry about the patchwork seams; they won’t match up! Sew your rows together and press seams open. Your quilt top is done!
To piece your backing, first cut your backing yardage in half. Press. Carefully trim off the selvedges and sew your pieces together lengthwise.
Now you’re ready to baste and quilt! I quilted mine using a doodle-like free motion quilting pattern. I wanted something fun and whimsical to play with the sweet prints in this line! Finish off your quilt with binding made from the gray circle fabric! Yay, you’re done! 🙂

A cheerful lap quilt! Before washing it should measure approximately 78″x78″.
Throw it in the wash for wrinkly goodness!
I hope you’ve enjoyed this tutorial! Happy Sewing! 🙂
Cheers,
Jeni Baker
{In Color Order}