Baby Showers Quilt

Hi there! It is LeAnne Ballard from Everyday Celebrations with a fun baby quilt for you today. Like many, I absolutely adore the new line April Showers and loved making these two baby quilts. The design is the same for both, appliqued raindrops, but the placement is different for each quilt.

I hope you have fun making this quilt! Check out my other recipes here.

Per Quilt

10 fat quarters*
1 1/2 yards background/neutral fabric
1 1/2 yards backing fabric
1/2 yard binding
2 1/4 yards fuisble webbing (I prefer Heat n’ Bond Lite or you can use your preferred applique method.)
template plastic (Print out raindrop template and trace onto template plastic. Transfer markings from the raindrop onto the template plastic. Cut out template.)
batting

*Note: You could also use jelly roll strips for the scrappy raindrops and fat quarters/fat eighths for the solid raindrops.

Decide whether you want to make the normal or staggered layout:


 *All seams are 1/4″ unless noted.

Cutting

From the 1 1/2 background/neutral cut:
{4} 12.5″ x WOF strips
subcut into {4} 10.5″ x 12.5″ rectangles for a total of {16} rectangles
*Note: If you are making the staggered raindrop quilt, trim {4} of the rectangles to 10.5″ x 12.25″. Place these in a separate pile and label. This is the only cutting difference between the quilts.

From each fat quarter cut:  the remaining fat quarter will be used for the solid raindrops
{2} 2.5″ x 21″ (or width of the fat quarter) strips
from each strip subcut {1} 9.5″ x 2.5″ and {1} 11.5″ x 2.5″ (I just left the remaining strip. The strip needs to be at least 11.5″.)

Binding
From the 1/2 yard for the binding cut:
{5} 2.5″ x WOF strips

Prepare Applique
Trace {16} raindrops onto the fusible webbing using the raindrop template. Transfer markings onto the fusible webbing. Roughly cut around each raindrop leaving about 1/4″ around each raindrop.  Next, cut out the centers of the raindrops leaving about 1/2″. This will help keep the quilt cuddly and soft instead of stiff from the fusible webbing.

Block Assembly

Vertical Raindrops

1. For each vertical raindrop select {4} 2.5″ x 11.5″ strips.  Arrange as desired and sew.  Press seams OPEN. Make a total of {4} vertical units. (You will have extra of these strips.)

2.   Flip the unit over and line up the mark at the bottom with the center seam as shown below. Line up the tip of the raindrop with the same center seam. Quickly fuse in place. (I found it easier to “baste” the fusible web in place by quickly lifting the iron up and down over the webbing. Then I flipped the unit over to the front and fused as directed by my instructions. Otherwise, it was easy to  mess up the directions of the seams.) 
 
 
3. Cut out the raindrop. Leave paper in place until you are ready to fuse in place. Repeat for {4} vertical raindrops.
Horizontal Raindrops
1.  For each horizontal raindrop select {5} 2.5″ x 9.5″ strips.  Arrange as desired and sew.  Press seams open. Make a total of {4} horizontal units.

2. To line up this raindrop, fold the unit in half and lightly press to create a crease. Fuse the webbing in place just like you did for the vertical raindrops, just use the crease as you guide. Repeat for {4} horizontal raindrops.

 Solid Raindrops

1.  Select {8} of the fat quarters for your solid raindrops. Fuse the raindrop fusible web onto the remaining part of the fat quarter. (Follow the directions for your brand of fusible webbing.)

2.  Allow to cool then cut on tracing line. Repeat for {8} solid raindrops.

Patchwork Raindrop
If you opt to make this block, make in place of one of the solid raindrops.

1. From one of the remaining fat quarters cut {1} 4.75″ x 11″ piece and {1} 3.5″ x 11″ piece. From the leftover 2.5″ strips cut {6} 2.5″ squares.

2. Sew together all the 2.5″ squares. Press seams all one direction. Trim unit to measure 11″ long.  I just trimmed a little off the top and bottom.

3. Sew the pieces cut from the fat quarter to either side of the patchwork unit. Mine didn’t line up exactly which is fine. It doesn’t have to be perfect.

4.  Flip unit over with the patchwork unit to your left.  Line up the mark on the raindrop with the seam line running the length of the patchwork unit. Fuse in place and cut raindrop out.


Fuse Raindrops to Background

1. Fold the background rectangles in half lengthwise to create a crease.

2. Remove paper backing and center raindrop onto the rectangle. Raindrop should be about 1.5″ inches from the sides and 1.25″ from the top and bottom.  Fuse in place following webbing directions. Repeat for all raindrops.
*For the staggered layout: Adhere {2} of the SOLID and {2} of the VERTICAL raindrops to the slightly smaller (12.25″ x 10.5″) rectangles. These will go in the positions shown below. (Don’t sew the quilt top together yet, this picture just references where the smaller rectangles will go.)

3. Machine stitch around each raindrop to secure in place. This can be done in a variety of ways. You could use a zig-zag, satin, blanket (if your machine has that option), or a simple straight stitch.  For my quilts I opted to use a blanket stitch and straight stitch. With the straight stitch, I sewed about 1/4″ away from the edge of the raindrop. Note if you choose to use a straight stitch, the raw edges will fray and wear over time. This step is easiest to do BEFORE you sew the quilt top together. 

Quilt Assembly

For the regular layout:
1. Arrange the quilt units in {4} rows of {4} as shown below.

2. Sew units together in rows and press seams one direction, alternating from row to row.  Then sew rows together. Press seams one direction. Press entire quilt top.

For the staggered layout:
3. Cut 2 of the SOLID raindrops in half, NOT the slightly smaller ones. Cut the unit in half to make {2} 6.25″ x 10.5″ units. These will go in the positions below:

4. Sew units together in rows and press seams one direction, alternating from row to row.  Then sew rows together. Press seams one direction. Press entire quilt top.

5. Then baste, quilt, and bind!


 one 40″ x 48″ baby quilt

LeAnne Ballard

Fairground Quilt


Hi everyone! It is LeAnne Ballard from Everyday Celebrations. Confession. I love banners! I have a banner for just about every holiday and season that I love to hang on my mantel. At the end of last year, I sketched up this quilt and got so so excited to make it, but I was waiting for the perfect fabric. When I saw Scrumptious I knew it was the one. 

1 Scrumptious Layer Cake 
2 1/8 yards neutral fabric – Bella Solid in Bleached White 97
1 1/3 yards for border – Scrumptious Berry in Aqua 55074-12
5/8 yard for binding – Scrumptious Bias Stripe in Lime 55071-13
3 3/4 yards backing – Bella Solid in Aqua 34
65″ x 85″ batting 

finished size 61″ x 80″


1. All seams are 1/4″.
2. WOF means width of fabric.
3. HSTs stands for half-square triangles.  
4. When cutting the layer cake squares, use the cutting diagrams.  When you cut for blocks #1 and #2, some pieces will be used in other blocks. I recommend placing the pieces in piles and labeling with the corresponding measurement and block to avoid confusion. 

This quilt is made up of four different blocks. 

Decide if you would like your pinwheels in block #3 to be scrappy or not. If you choose scrappy note the change in the cutting of block #3. Otherwise, follow the cutting as follows. 

{Cutting}

Neutral *based off 42″ wide fabric
From the 2 1/8 yards of neutral fabric cut:
{6} 3.5″ x WOF strips
Subcut {6} 6.5″ x 3.5″ strips per strip for a total of {36}

{11} 2.5″ x WOF strips (you only may need {9} if your fabric is 44″/45″ wide)
Subcut {4} 8.5″ x 2.5″ strips per strip for a total of {42}  

{9} 2.5″ x WOF strips strips for the sashing between rows

Border
From the 1 1/2 yards of border fabric cut:
{7} 6″ x WOF strips

Binding
From the 5/8 yard of binding fabric cut:
{8} 2.5″ x WOF strips

Layer Cake Squares – select 30 layer cake squares
There is very little waste so cut carefully; measure twice, cut once! I recommend cutting one or two before cutting multiple at a time. After you are done cutting for each block, stack pieces together and clearly label to avoid confusion.

If you are using HSTs from the Flying Geese, skip the following:
From any of the remaining layer cake squares cut:
{6} 2.5″ squares – Add to 2.5″ squares for block #2 for a total of {24}
{6} pairs of 3 3/8″ squares for a total of {12} – the contrasting part of the pinwheels in block #3

{Flying Geese}

All blocks use a Flying Geese unit. Draw a diagonal line on the back of all {72} of the 3.5″ squares. If you making the scrappy pinwheels, or if you want a bunch of FREE HST, draw a second diagonal line 1/2″ away from your first line on your 3.5″ squares. 

1.Take one 6.5″ x 3.5″ neutral piece and place right-side up. Place one 3.5″ square as shown with the wrong-side up. Make sure the diagonal line is correctly positioned as shown below. (1a) If you have a second diagonal line for the HST, place so it is above the first line. (1b) Pin square in place.

2. Sew directly on the drawn diagonal line. (If you have a second diagonal line, sew on that line next.)

3. Next, use a clear ruler and place the 1/4″ line directly on top of your stitching. Cut on the outside with a rotary cutter. (3a)  If you are making HST, this will yield one HST per side. (3b)

4. Press the seam to the print or top of the unit. (Do not IRON this seam, or you may get a wonky unit.)

5. Repeat on the the other side of unit. If you have a second line, position it ABOVE the first line.


6. Press entire unit.

7. If you are using HSTs from this step, choose {4} HSTs per block #3 for a total of {24} HSTs. Square up to 2.5″. Place your HSTs with your block #3 cutting.  


Remember, keep these organized by block to avoid confusion. (For example. I made all my Flying Geese for block #1 then placed them with all my block #1 cutting. Then continued for the next block and so on.)

{Half-Square Triangles (HSTs)}

If you are using HSTs from the flying geese, skip this step: 
For each #3 block, you will need {2} pairs of 3 3/8″ squares. One fabric will be the same as the outside part of the block. Call this the “neutral”. The other fabric will be the the contrast part of the pinwheel. Call this the “color”.

1. Using a pencil, lightly draw a diagonal line on the back of your neutral squares. 

2. Place one neutral square and one color square right sides together with the diagonal line facing up. 

3. Sew 1/4″ from the diagonal line on each side. 

4. Cut directly on the drawn diagonal line to yield {2} HSTs.

5. Press the seam towards the darker of the two fabrics.  


6. Square up your HSTs to 2.5″.


7. Place HSTs with your block #3 cutting.

{Block Assembly}
unfinished size 6.5″ x 9.5″

Block #1

For each block #1 you will need:
{1} 6.5″ square, and {1} flying geese unit – all from same fabric

1. With wrong sides together, pin a flying geese unit to a matching 6.5″ square as shown below.  Sew together and press seam towards the 6.5″ square.

2. Repeat for a total of {18} blocks. 

Block #2

For each block #2 you will need:
{2} 1.5″ x 4.5″ strips, {2} 1.5″ x 6.5″ strips, and {1} flying geese unit – all from same fabric 
{4} 2.5″ squares from various fabrics

1. Choose {4} 2.5″ squares four each four-patch unit. Sew together in two rows of two and press seams in opposite directions. Pin the rows together, nesting the seams, and sew. Press seam open to reduce bulk. 

2. Sew a 4.5″ x 1.5″ strip to both sides of the four-patch unit. Press seams to outside. (2a) Sew a 6.5″ x 1.5″ strip to both sides of the four-patch unit. Press seams to outside. (2b) The unit should measure 6.5″.

3. With wrong sides together, pin the matching flying geese unit to the four-patch unit as shown below.  Sew together and press seam towards the four-patch unit.

4. Repeat for a total of {6} blocks. 

Block #3

For each block #3 you will need:
{2} 1.5″ x 4.5″ strips, {2} 1.5″ x 6.5″ strips, and {1} flying geese until – all from same fabric 
{4} HSTs

1. Arrange {4} HSTs into a pinwheel design. 

2. Sew together in two rows of two and press seams in opposite directions. Pin the rows together, nesting the seams, and sew. Press seam open to reduce bulk. 

 3. Follow step two in block #2 for attaching the 1.5″ strips to each side. Press seams to outside. The unit should measure 6.5″.

 4. With wrong sides together, pin the matching flying geese unit to the pinwheel unit as shown below.  Sew together and press seam towards the pinwheel unit.

5. Repeat for a total of {6} blocks.   

Block #4

For each block #4 you will need:
{1} flying geese unit – shouldn’t match any of the other fabrics for this block
{3} 2.5″ x 6.5″ strips – each a different fabric

1. Sew {3} 2.5″ x 6.5″ strips together along the 6.5″ side. The unit should measure 6.5″.

2. With wrong sides together, pin a flying geese unit to the stripe unit as shown below.  Sew together and press seam towards the stripe unit.

3. Repeat for a total of {6} blocks.  

{Quilt Assembly}

Layout your blocks in {6} rows of {6}. In each row I included {3} of block #1, and {1} each of the other blocks. Then alternate their position from row to row. (I know this picture only shows five rows. I decide to add another row after this picture.) 


 {Sashing}

1. Sew {1} 2.5″ x 1.5″ tag piece to the top of {1} 8.5″ x 2.5″ neutral piece. Press seam OPEN. Repeat until you have {42}.

2. Sew {1} sashing strip to both sides of the first block in the row. 

3. Sew {1} sashing strip to the right side of the remaining blocks in the row.

4. Sew the the row together. Press seams out towards the sashing.Press the entire row. Repeat for six rows.

5. Sew together {2} of the 2.5″ x WOF sashing strips. Press seam OPEN.

6. Using a tape measure, measure each row. If they are different take the average. Mark this measurement on your sashing strip and mark with a pin. Pin and sew sashing between rows. Trim after sewing, saving the excess for remaining sashing. Repeat between all rows.

7. After adding the sashing between all rows, measure the width of the quilt at the top, middle, and bottom.  If they are different, take the average. Measure this on a sashing strip and mark with a pin. Sew to the top of the quilt. Trim after sewing, saving the excess. Repeat for the bottom.

{Borders}

1. Sew together {2} border strips. Press seam OPEN.

2. First we will attach the side borders. Measure the length of the quilt at both sides and down the middle. If they are different, take the average. Measure this length on the border strip and mark with a pin. Bring the end of the border strip to the pin and mark the middle of the strip with a pin.

3. Fold your quilt top in half lengthwise and mark with a pin.

4. Place border strip and quilt top right sides together. Using the pins as a guide, match the middle of the quilt and the middle of the border strip. Pin in place. Match the ends of the quilt with the ends of the border and pin in place. Pin between the middle and ends.

5. Sew border in place. Trim border and check corner is square. Repeat with other side. 

6. Next, measure across the width of the quilt at the top, middle, and bottom. Again, if different take the average. Fold your quilt top in half widthwise and mark with a pin.  Repeat the same process in step 4 for the top and bottom border.

Next, comes everyone’s favorite phrase in quilting, “Baste, quilt, and bind”. Then wash, love, cuddle, and use your Fairground quilt.  


one darling 61″ x 80″ quilt 

LeAnne Ballard
{everydaycelebrate.blogspot.com}

Charming Christmas Ornaments


Happy Christmas in July to everyone! It’s LeAnne from Everyday Celebrations with a fun and Christmassy project for you all. I have to say it was a little fun doing a Christmas project in June because I already have some of my handmade gifts crossed off my list! However, something not fun was the fact that the weekend I worked on these, it was 120 F degrees outside. (I live in Arizona.) As far from Christmassy weather as you can get. This project is simple, fun, and something you can do with your entire family. There are lots of options to make this project reflect you and your family’s Christmas decor and traditions.

{for all ornaments}
1 mini-charm pack  and/or
1 to 2 charm packs (depending on how many and whether you want identical ornaments)
1 fat quarter for initials (depending on how many you are making the solid charm squares may be sufficient)
scraps of cotton batting
baker’s twine or other desired string for hanging
1 to 2 skeins white embroidery floss
1 yard fusible webbing (I prefer Heat n’ Bond Ultrahold)
embroidery needle
doll needle or other needle with large eye for adding hanging loops

{handprint ornament supplies}
solid squares from charm pack or 1 fat quarter for initials
fabric or acrylic paint
foam brush
black embroidery floss (to embroider the year)

Note: The printable PDF includes the text for all the ornaments and hexi templates. When you print these pages, just print them flipped or mirror so the letters are backwards for fusible web.  If you don’t know how to do this, just print normally and tape the paper to a sunny window with the back facing you. Then trace onto fusible web. Or you can always print off your own letter!

Below are instructions for all the ornaments. All ornaments are finished the same way so those steps are at the very end.

{Handprint Ornament} 

I love making handprint memorabilia with my girls. These ornaments are rather large, but they still look wonderful on the tree. (They are the full 5″ with the corners trimmed.) Every year I have my girls make an ornament for their Grandmas. So this is their Grandma ornament for this year! 

1. First, select two 5″ charm squares for each ornament. Next, you will want to put a handprint on the charms you picked for the ornament backs. (I found using less busy prints helped the handprint standout more.) Tape the charms to a piece of cardboard at each corner. (After doing this I found it helpful to tape at each corner instead of just the top. The fabric can move quite a bit.) Paint your child’s hand generously with fabric or acrylic paint. Help them place their hand in the middle of the square and press their hand firmly down to get a nice print. Allow to dry.

2. I cut the corners of my squares after adding the handprint to give more of an ‘ornament’ shape. To make a template, simply take the cardboard that comes with the charm pack and cut each corner at a 45 degree angle. (I used the 45 degree mark on my cutting mat to make it consistent. Cut ornament fronts, backs, and batting using the template. Trim batting so it’s slightly smaller than the fabric.

3. If desired, embroider the year on the back with the handprint using a backstitch.

4.  To make initials trace the appropriate letter on to fusible webbing. Adhere to fabric according to directions and cut. Adhere onto ornament front. (A set of letters is included in the printable PDF.) I used my Cricut to cut my letters. If you have one, or another digital craft cutter, check out my tutorial for cutting fabric with the Cricut.

To finish the ornament, see the finishing section.

 {Hexagon Ornaments}

I love hexis! These are fun and much smaller than the handprint ornaments. (Perfect if you have kids whose hands are too big for the charms.) I made a set of mini hexi ornaments for my family with our initials. I also made a large hexi ornament that says JOY.

 1. First, select two squares for each ornament. Cut front, back, and batting using the hexagon template. (Included in the printable PDF.  I included both a large and small hexi template.) Trim batting so it’s slightly smaller than the fabric.

2. To add text or initials, trace the appropriate letter(s) on to fuisble webbing. Adhere to fabric according to directions and cut. Adhere onto ornament front. (I included a small set of letters in the printable PDF and the JOY letters.)

To finish the ornament, see the finishing section.

{Square Ornaments}

For these ornments I used the mini-charms. Select two for each ornament.

1. Select ornament front and back.  Cut a piece of batting slightly smaller than the squares.

2. Trace letters onto fusible webbing. Adhere to fabric according to directions and cut. Adhere onto ornament front. 

3. To make the JOY ornament, string together the three squares after finishing.

{Finishing}

You can either finish the ornaments by hand with a blanket stitch or by machine. 
Blanket Stitch

1.  Place the back wrong side up with the batting on top. Thread a needle with embroidery floss and knot the end. Pass needle through the batting. Place ornament top on the batting and use a blanket stitch around the ornament. (I am not an embroidery pro by any stretch so here is my favorite tutorial on the blanket stitch. So helpful!)
Machine
1. Layer the ornament back, batting, and ornament top together. Pin in the middle. Machine stitch with a generous 1/4″ seam around the ornament. Backstitch at the end. 
Hanging Loop
1. Thread a needle with baker’s twine, or other string, and thread through the top of the ornaments. Cut to desired length and tie off. (Since baker’s twine is thicker, I used a doll needle with a large eye to add the hanging loop.)


Lots of fun and festive Christmas ornaments! 

LeAnne Ballard
{everydaycelebrate.blogspot.com}

Marmalade Squares Quilt


Happy January! It is LeAnne Ballard from Everyday Celebrations and I am excited to be here today sharing a bright and cheery quilt. I’ve been wanting to make a postage stamp quilt for awhile and decided put a little twist on this classic to make one darling little quilt.

This quilt features four different postage stamp‘esque’ blocks. Also, this quilt uses strip piecing so don’t fret over all those little squares. (The squares are 1.5″ finished.) If you like, you may add an initial for personalization. This quilt was made for my daughter’s 1st birthday so personalization was a must. I also will share this cute little coordinating dolly quilt.

1 Layer Cake, Marmalade by Bonnie and Camille
1 1/8 yard neutral, Bella Solid in Bleached White 97
1 3/4 yard backing, Dot in Strawberry
1/2 yard binding, Sugar in Raspberry
1 fat quarter – for appliqued initial, Bella Solid in Tea Rose 9900 89
60″ x 50″ piece of batting
6″ square of iron on adhesive, such as Heat n’ Bond Lite

2 fat quarters, for dolly quilt
crochet lace, for dolly quilt


  • Seam allowances are 1/4″.
  • RST = right sides together
  • WOF = width of fabric
  • blocks will measure 9.5″ square unfinished
  • If you wish to personalize your quilt, you will need to print off an initial. To do this, just type your desired letter in a blank document in Microsoft Word or other program. You want your letter to measure no more than 5″ tall. (There are rulers on the side of the document in Microsoft Word.) When you print, make sure you select the ‘mirror’ or ‘flipped’ option so the letter is BACKWARDS. If you don’t know how to do this, print normally and tape to a sunny window, with the back of the paper facing you. Then trace the letter onto iron-on adhesive.

This quilt is made up of four different blocks.

#1 – you will make {6}

#2 – you will make {3}

#3 – you will make {2}

#4 – you will make {1}

 Cutting

1. From the Layer Cake, reserve {4} squares. These will be used in blocks #2,  #3, and #4.

2. From remaining Layer Cake squares cut {80} 2″ x 10″ strips. Reserve two strips for block #3.

3. Sashing from neutral cut:
{2} 3″ x WOF strips then subcut into {8} 9.5″ strips.
{3} 3″ x WOF strips

4. Borders from neutral cut:
{4} 5.5″ x WOF strips

Making Patchwork Strips

5. Sew {6} 2″ x 10″ strips together to make {1} 9.5″ x 10″ block. Make {13}  total blocks. Press seams as desired.

6. Cut {5} 2″ x 9.5″ strips from each block for a total of {65} strips.  These will be called “patchwork strips”.

Block#1

7. Sew {6} patchwork strips together to make {1} 9.5″ square block.  Repeat for {6} blocks total.


Block #2

8. Cut one reserved Layer Cake square to 9.5″ x 10″.  Then cut {1} 2.5″ x 9.5″ strip and {1} 6″ x 9.5″ strip.

9. Sew {1} patchwork strip to the 2.5″ x 9.5″ strip. Press as desired. Then sew the 6″x 9.5″ strip to the other side of the patchwork strip. Press as desired. Repeat for {3} blocks total. (Sorry for the change in fabrics in the photos.)

Block #3

10. Sew {1}  patchwork strip to one of the reserved 2″ x 10″ strips. Press as desired. Then sew {4} patchwork strips together and sew to the other side of the 2″ x 10″ strip. Press as desired. Repeat for {2} blocks total. 

Block #4

11. From the remaining reserved Layer Cake square cut {1} 6.5″ square.

12. From {2} patchwork strips and remove {2} squares using a seam ripper. (These strips will now have 4 squares.) Press shortened strips. Sew to the top and bottom of the 6.5″ square. Press as desired.

13. Sew {2} patchwork strips to the sides of the block to complete. Press as desired.

14. To make the initial, trace the letter on to the iron on adhesive following the package directions. Adhere to center of the block. Applique as desired, I used a machine blanket stitch.

Quilt Assembly:

15. Layout the blocks in desired fashion or use quilt diagram. Sew blocks together in 4 rows of 3, with one 3″ x 9.5″ neutral strip between each block.

16. Measure the length of one row and cut {1} 3″ x WOF strip the same length. Sew rows together with one 3″ strip between the rows. Repeat for remaining rows. Press.

 17. Measure top and bottom of quilt and cut {2} 5.5″ strips the same length. (Save leftover for the sides.) Sew leftover 5.5″ strips to the two remaining 5.5″ x WOF strips. Measure sides and cut strips to same length. Pin and sew. Press quilt top.

 18. Baste, quilt and bind. Cut {4} 2.5″ x WOF strips for binding.

Dolly Quilt:
I’ve learned that whenever I make a quilt I had better just make a little dolly quilt. Otherwise, my quilts end up as dolly quilts by my sweet girls. Which is fine, but just a little challenging for little hands. 🙂  So using the remaining patchwork strips we will make one cute dolly quilt.

1. Sew {11} patchwork strips together.

2. Measure the length of the patchwork unit and cut {2} 4.5″ x (that length)” strips from one fat quarter.

3. If you desire, sew crochet lace to the sides of the patchwork unit. Cut two lengths of lace just a touch longer than the length of the patchwork unit. Pin lace about 1/8″ in from the edge of the unit. (My lace was narrower so I did this so the lace didn’t disappear in the seam allowance, if your lace is wider you could just line it up with the edge.) Baste lace in place close to the edge of the lace.

4. Sew 4.5″ strip to the side of the patch work unit using a scant 1/4″ seam allowance. (Again so I didn’t loose the lace in the seam allowance.) Press. Repeat for the other side.

5. Baste, quilt, and bind if desired. (Use the remaining fat quarter for backing.)

6. However, I was on a time crunch for this project so I decided to forgo the binding. Instead I just sewed white ric rac all along the edge of the dolly quilt. To do this baste the ric rac along the edge of the quilt top. I didn’t bother pinning, just line it up as you sew.

7. Then I cut my backing (from the remaining fat quarter) to the exact size as my dolly quilt top. I placed RST and pinned in place. Then sew together, leaving an opening along one of the fat quarter sides.  (It is tricky when you leave the opening along the patchwork edge.) Turn and press. Top stitch close to the edge sewing the opening close as you topstitch. I also topstiched about 1/8″ in from the lace.

{1} 53″ x 42″ snugly quilt + {1} 15.5″ x 16.5″ dolly quilt

LeAnne Ballard
{everydaycelebrate.blogspot.com}

Sweet Flowers Quiet Book


Hi, everyone, it’s LeAnne Ballard from Everyday Celebrations. It has been too long since I’ve posted over here so I am very excited to share this project.

When I first started up my blog back in 2007, some of my first projects were Quiet or Fabric Books. I love making them to keep little ones happy and distracted while mama, or dad for that matter, are out and about running errands, sitting in church, or waiting in a doctor’s office. I’ve made several different books and you can see all my patterns/tutorials for quiet books here or in my shop. (My most popular one is the FREE ‘my colors’ quiet book tutorial.) I had fun making this little quiet book for the Bake Shop and hope you enjoy all things summery, flower-y, and nature-y found in this little book. For a change, this book has no words, and I think it turned out just darling.

Enjoy!

1 charm pack of your choice, Vintage Modern pictured
one or two of your favorite fat quarters
1 yard of green ric rac, for flower stems
1/2 yard each of pink, yellow, and orange ric rac
1/4 yard 72″ wide white felt
black embroidery floss, bird’s eyes
orange embroidery floss, bird’s legs  1 1/2″ binder ring
1 yard of fusible webbing, I use and prefer Heat n’ Bond
     – If you want to reinforce pieces by sewing, use a sewable type of webbing like Heat n’ Bond Lite
     – If you do not want to sew pieces at all, use a non-sewable type of webbing like Heat n’ Bond    Ultrahold
hot glue or tacky glue

the following fabrics/felts can come from your stash/scraps:
5″ square of yellow fabric, for sun
small scrap of orange fabric, for bird’s beak 
scraps of green felt, for flower leaves
scrap of pink felt, for flower center


Below you will find a picture for each page of the book and brief directions. Assembling each page is pretty self-explanatory if you use the pictures as your guide. However, here are some general instructions to keep in mind as you assemble your book.

General Instructions

  1. Keep all page elements approximately 1/2″ away from the edge of each page. You will be sewing the pages back to back and want space for a seam allowance.
  2. Attach page elements layer by layer. Meaning, start with the pieces that are underneath and work your way to the top.
  3. Play with the placement of all pieces before sewing anything in place. Then remove pieces and attach layer by layer.
  4. Backstitch. Backstitch. Backstich. Did I say backstitch? This will secure your pieces in place, if you don’t they will fall off over time.
  5. Please follow the instructions for you brand of fusible webbing. Each one is a little different, so I won’t give directions for that.
  6. I used fusible webbing on the fabric pieces. I sewed felt pieces in place with my sewing machine.
  7. When fusing the pieces onto the felt, use a pressing cloth between the iron and the felt. This helps prevent melting the felt. Yes it melts, and yes I know that from experience. 
  8. Fuse the raw ends of ric rac to prevent fraying before sewing in place. I just hold the ends close to an open flame. Be careful, don’t play with matches, use in a well ventilated area….just be safe. 🙂 
  9. To attach ric rac, pin in desired position and sew down the middle. Backstitch. 🙂

Cutting Pages 

  1. Cut one 6 1/2″ strip from your 72″ wide felt. Sub cut into eight 6 1/2″ squares.

Pattern Pieces

  1. All pattern pieces are in the printable PDF version at the bottom of this post. 
  2. Pattern pieces indicate whether the piece needs to be cut from felt. Otherwise, trace onto fusible web and adhere to the appropriate fabrics.

Cover 

  1. Cut one 4 1/2″ and one 3 1/2″ piece of green ric rac for the stems. Fuse ends. Pin in desired positions and sew in place.
  2. Place petals on felt for the flower on the left. (The petals’ will slightly overlap or touch .) Fuse and sew in place. Place center on top. The center will cover the raw inside edges of the petals. Sew in place.
  3. Layer the flower on the right in place. Fuse and sew in place.
  4.  Sew two leaves per flower as desired.

Sun Page

1. Cut two 3″ pieces of orange ric rac. Cut two 3 1/2″ pieces and one 4″ piece of yellow ric rac. Fuse ends of ric rac.
2. Place ric rac in desired positions, use picture above for placement help.
3. Sew the ends of the ric rac that will be under the sun in place. (photo below)
 

4. Place sun so it covers the ends of the ric rac. Fuse in place. Topstitch close to the edge. (I pinned the ric rac so it wouldn’t move around while I sewed.)

    Birdie Page

    1. Cut the following pieces from charm squares and sew together using 1/4″ seam allowance: 3″x2″, 1 3/4″ x 2″, 2″ x 2″ Press seams as desired.
    2. Place this piece and sew on the right hand side of the page. Sew in place as desired. 
    3. Fuse bird’s beak in place.
    4. Fuse and sew bird’s body in place.
    5. With wrong sides together, sew bird’s wings together using narrow seam allowance. (Mine is pretty close to the edge.) Attach wing to body by zig zag stitching along raw edge.
    6. Embroider bird’s eye using French Knot and 6 strands of black embroidery floss.
    7. Embroider bird’s legs using back stitch and 3 strands of orange embroidery floss

    Rain Page

    1. Fuse raindrops in place in desired positions.
    2. Sew in place using decorative stitching. I basically just sewed down the middle of each rain drop however I wanted. I used zig zag stitches, a series of straight stitches, etc. 

      Flowers #1 Page

      1. Cut two 2 1/2″ and one 1 1/2″ pieces of green ric rac.  Fuse ends. 
      2. Place ric rac pieces about 2 1/4″ from the bottom of the page.  Pin in desired positions and sew in place.
      3. Cut  the following pieces from charm squares and sew together using 1/4″ seam allowance:      1 3/4″ x 2″, 2 1/2″ x 2″, 2 1/4″ x 2″ Press seams as desired.
      4. Place this piece on the bottom of the page so you cover the ends of the ric rac stems. Sew in place as desired. (I sewed about 1/8″ from the edge.)
      5. Place flowers on stems as desired, covering the ends of the ric rac stems. Layer the bottom layer, then the top. Add some decorative stitching to the flower centers to secure both layers of the flowers. 
      6.  Sew two leaves per flower as desired. 

        Flower #2 Page

        1. Cut the following pieces from fat quarters (or you can use charms but they will be slightly shorter, still totally works) one 1 1/2″ x 5 1/2″ strip and one 1″ x 5 1/2″ strip. Piece together using 1/4″ seam allowance. Press seams as desired.
        2. Place this piece and sew on the bottom of the page. (I sewed about 1/8″ from the edge.)
        3. Cut one 4 1/2″ and one 5 1/2″ piece of pink ric rac. Fuse ends. Place ric rac as shown and sew in place.
        4. Place flower petals as shown. Fuse in place.  Use decorative stitching to secure the flower petals. I sewed down the middle of the petals, similar to how I did the rain drops. (As you can see I just went from flower to flower through the middle part. Saved me a little time instead of removing the page after each stitch.)

        6. Place felt center and fabric center as desired, covering the stitching and the raw inside edges of the petals.
        7. Sew centers in place by sewing through both layers.

        Flower Finger Puppets Page

        1. Place one charm square on the page, about 3/4″ from the top of the page and sew in place using about 1/8″ seam allowance.
        2. Cut one 5 1/2″ x 6″ rectangle from a fat quarter. Fold in half and press. Place on page about 1/2″ from the bottom with the fold at the top. Sew in place about 1/8″ from the edge to create a pocket. Don’t sew across the top.
        3. Cut out six finger puppet shapes from felt. Sew or fuse flowers to three of the finger puppet pieces.
        4. Put a thin bead tacky or hot glue around the edge of one finger puppet piece. (Not along the bottom.) Place a finger puppet piece with a flower on top and press together. Glue leaves in place.
        5. I included a flower song and finger play that my daughter and I have been singing. They were kinda the inspiration for this page. The songs don’t require puppets, but puppets always make songs more fun! Right?  Two song cards are included in the printable PDF. Just print it off, cut down to size, adhere back to back and laminate if desired. I also rounded the corners of my card. Songs are by Jean Warren and can be found here. (Paper backgrounds are from Crystal Wilkerson’s Pretty Patterns Paper Packs in Caribbean Blue and Perfectly Pink.) The card is sized to fit into the pocket.

          Back Cover

          1. In the upper right hand corner leave a about a 1″ square free from fabric for the binder ring hole. 
          2. The back cover is just a series of thin strips from charm squares. I cut them in various widths from 1/2″ – 1″. Then just stagger them across the page and sew in place. Again, I used various types of decorative stitching.  

            Assembling the Book
            1. Place the following pages back to back with WRONG sides together. Pin at the corners to secure.

            • Cover & Sun Pages
            • Birdie & Raindrop Pages
            • Flowers #1 & Flower #2 Pages
            • Finger Puppet Page & Back Cover

            2. Sew pages together using 1/4″ seam allowance.  Backstitch.
            3. To make the holes for the binder ring, simply snip a small hole in the upper lefthand corner of each page pair about 1/4″ inside the stitching lines. I’ve had customers say they’ve made button holes or used grommets for this step. I’ve never done either but is an option. This way has always worked for me.
            4. Slide pages onto binder ring. 
            5. Cut 1/2″ – 3/4″ wide strips from charm squares. Or you can use ribbon, just fuse the ends. Tie onto the binder ring.


            one darling quiet book for one lucky little lady

            LeAnne Ballard
            {everydaycelebrate.blogspot.com}

            Sunkissed Aprons

            Hi there Moda Bake Shop Bakers, it is LeAnne over at Everyday Celebrations. With all the baking going on around here, it is about time to make some aprons!  The great thing about this project is you can pick whatever fabric line you love to make aprons that fit your personality. One layer cake will yield at least four aprons. Or, since only 10 squares are needed, use some leftover layer cake squares from a previous project.  Whatever layer cake you decide to use will result in a darling apron that will make you want to get baking in the kitchen or the sewing room!

             {Absolutely loving the color combo of gray and yellow!}

            1 Layer Cake
            3/4 yard for lining and front of apron ( 1 1/4 yards if you are going to increase the size of the apron)
            1/2 yard for ties and straps
            1/4 yard neutral fabric (this will not be seen)
            Pattern piece, found in the Printer Friendly Version. Make sure ‘auto scale’ and/or ‘shrink to fit’ option ARE NOT SELECTED.


            Note on Sizing:
            This apron fits teens (as modeled) through adult. (I wear a size medium/large top and I still had room in this apron.) To get an idea how this apron will fit on you, take a tape measure and measure 21″ from  hip to hip. This is how the apron will measure across you when finished. The apron top measures about 14″ across at the bust.  Instructions for increasing the size of the pattern are included with the Printer Friendly Version.  (In the measurements an * indicates where changes need to be made if you are altering the size of the apron.)

            1. Unfold your 3/4 yard of fabric. Fold one selvage to the middle of the fabric. (Make sure it is the EXACT middle or you may not have enough for the lining.) Place pattern piece on the fold and cut. This will be the ‘front’ of your apron. You will cut the lining from the remaining fabric shown in the photo.

            Optional: To make a pieced section at the top of the apron, as shown in the gray and yellow apron, cut the apron front as marked on the pattern piece. (For the lining however, cut as directed in step 2.)

            Next, cut out the following pieces from the layer cake squares:
            (1) 2.5″ x 3.75″
            (2) 3″ x 3.75″ 
            (1) 2″ x 3.75″
            (1) 4″ x 3.75″
            (1) 1.75″ x 3.75″

            Sew the pieces RST end-to-end using 1/4″ seam allowance. The length of this piece should be about 13.5″. Press seams open. Sew this piece to the top edge of the apron front using 1/4″ seam allowance. Press seam open. To curve the edge of this new piece, fold the apron front in half and use the pattern piece to trim to size.

            2.  From the remaining fabric above, cut (1) 25″ long x 21.75″* wide piece. Fold in half, matching the long edges. Place pattern piece on the fold as shown below. Cut only along the curved edge of the apron as shown in the second photo below.

             3. When you unfold the lining it will look like this:

            4. From the neutral fabric cut:
            (3) 4″ x 21.75″* pieces (for the under ruffle pieces)

            From the 1/2 yard strap and tie fabric cut:
            (4) 3.5″ x WOF pieces (ties) – trim selvages off and cut to 36″ in length
            (1) 2.25″ x WOF piece (strap) – trim selvage off and cut in half

            5. Take (2) 3.5″ x 36″ tie pieces and place RST. (Pressing helps keep edges lined up.) With the two ties still RST angle one end of the tie as shown below. Repeat for remaining tie.

            6. Sew the tie RST using 1/4″ seam allowance. Leave the not angled end open for turning. Clip corners at the angled end of the strap. Turn right side out and press. Repeat for remaining tie. 

            7. Topstitch around the tie about 1/8″ away from the edge. (I did not topstitch the opening.) Repeat for remaining tie.

            8. Press under 1/4″ on one of the short ends of a strap. (This end will be the end you want showing on the apron.)

            9. Fold the strap in half lengthwise and press to crease. Unfold the strap and fold one long edge to the center crease. Press. Repeat for the other side.

            10.  Fold strap in half again and press. (The raw edges will now be turned to the inside.)

            11. Sew the strap closed by starting at the end that you folded under. Start sewing away from fold and continue down the open side of the strap. Backstitch at the beginning and end. (Basically I didn’t sew down the folded edge of the strap.) Repeat steps 8 -11 for the other strap.

            12. Select 8 – 10 Layer Cake Squares. Cut in half so they measure 5″x10″. (You will only need 16 5″x10″ rectangles, so you can either choose 8 Layer Cake squares and use each print twice, or choose 10 Layer Cake squares to have a little  more variety in prints.)  Lay out the 5″x10 rectangles in four rows of four to help you determine which prints you want to make up each ruffle strip.

            13. Sew each row of four rectangles together short end to short end using 1/4″ seam allowance. Press seams open.  (These seams will be the only exposed raw edges. Serge or zig zag if you desire. However, I just left the pinked edges as they were.)

            14. Turn under the bottom edge of ruffle strip 1/4″ and press. Repeat. Sew folded edge in place.

            15. Turn under the short ends of each ruffle strip 1/4″ and press. Repeat. Sew folded edge in place. Repeat steps 14 – 15 for all the ruffle strips.

            16. Ruffle the top edge of each ruffle strip using the method of your choice. (Ruffle about 1/8″ away from the edge.) Need help with ruffling? Check out my tutorial here. Repeat for all the ruffle strips.

            So pretty!

            17.  On the apron front piece and three under ruffle pieces, mark 1/4″ from both bottom short ends. (See my purple marks below.)

            18. With the right side down, pin one ruffle strip to the bottom edge of the apron front. Use the mark you made above to place the ruffle strip 1/4″ away from the edges of the apron front. I like to place a pin at the bottom of ruffle strip to keep the strip nice and straight. (See green pin in the second picture.) Sew ruffle in place 1/8″ away from the edge.

            19. With the ruffle strip still right side down, place one under ruffle piece on top of the ruffle strip.  (Make sure the edge with the purple mark is at the top. See outlined black circle.)

            20. Flip over the apron to the back and pin under ruffle piece in place. (I pin from the back because I will be sewing on the back.)

            21. Sew just beyond the stitching line from sewing on the ruffle, about 3/8″ from the edge. Backstitch at beginning and end. Press seam up towards the top of the apron. Topstitch the seam in place.

            22. Turn the ruffle to the top of the apron. You will now see the under ruffle piece. Place another ruffle strip right side down and repeat steps 18 – 21 for remaining ruffle strips/under ruffle pieces except for the very last ruffle strip. 

            23.  When you add the last ruffle strip, you will only repeat step 18.

            24.  Mark 1/4″ from the bottom of the curve on the apron front. Place a tie below the mark and pin as shown. Baste tie in place with 1/8″ seam allowance. Repeat on the other side. (Keep tie pinned down in the middle of the apron.)

            25. Mark 1/4″ in along the top edge of the apron. Line up the edge of a strap with the mark and pin. Baste strap in place with 1/8″ seam allowance. Repeat on the other side.

            26. Since this apron is lined, pin the straps to the middle of the apron to keep  in place.

            27. Using basting pins, pin the ruffles away from the edges and to the center of the apron.

            28. Place the lining and the apron RST and pin from the back. (Again, I like to sew from the back so I can watch my stitching lines.) Sew the apron together using 1/4″ seam allowance. Leave an opening along the bottom for turning. After sewing, press, clip corners, and turn. Remove all pins.

            29. Topstitch beginning along the bottom edge, making sure to close the opening.  Continue top stitching around the rest of the apron. When you get to a ruffle, backstitch, stop sewing then remove apron from machine. Clip threads, return apron to the machine, and begin sewing after the ruffle.


            One layer cake will yield 4 – 8 aprons

            LeAnne Ballard
            {Everyday Celebrations}

            Just Growing Quilt

            Hi Moda Bake Shop fans! It is LeAnne from over at Everyday Celebrations. I am excited to bring you this new project and hope you love it as much as I do.

            If a one year-old could answer the question, ‘What have you been up too the last year?’ they’d probably answer, “Oh, just growing!’ This little quilt celebrates the first year of life for any little one, or should I say former little one, 😦 and what they’ve been up to…GROWING! This quilt is a simple twist on the classic patchwork quilt. Besides charm squares, this quilt features wide strips of fabric and darling flowers that are growing and blooming. You can also add an initial to this quilt for personalization.

            2 Bliss charm packs
            1/2 yard fabric – for horizontal strips
            1/2 yard fabric – binding
            1 3/4 yard fabric – backing
            1/3 yard neutral fabric
            4 – 5 fat quarters
            1 yard iron-on adhesive such as Heat n’ Bond Lite
            batting

            • Seam allowances are 1/4″ of an inch.
            • RST = right sides together
            • WOF = width of fabric
            • I used a machine blanket stitch to finish off my flower appliques. Applique templates are found in the printable version of this recipe.
            • You will need to print off your own initial if you wish to personalize your quilt. To do this, just type your desired letter in a blank document in Microsoft Word or other program. You want your letter to measure no more than 4 1/2″ tall. (There are rulers on the side of the document in Microsoft Word.) Then, print off the letter. Make sure you select the ‘mirror’ or ‘flipped’ option when you print so the letter is BACKWARDS. If you don’t know how to do this, just tape the letter to a sunny window, with the back of the paper facing you, then trace the letter onto iron-on adhesive.

            1. Select 60 charm squares for your quilt. I wanted the color scheme of my quilt to be just red, aqua, and pink. So I just left out the green and brown colors. (However, I did use the green charm squares for the leaves on the flower appliques.)

            2. Cut twelve 5″ squares from the 1/3 yard of neutral fabric.  

            3. Cut two 6 1/2″ x 37″ strips.

             4. Layout your squares in 9 rows with 8 squares in each row. Place the neutral blocks as pictured below:
            Rows 1, 5, and 9 only have charm squares. (The neutral colored blocks are included in the charm pack; it is a white on white polka dot.) 
            Rows 2, 4, 6, and 8 have neutral blocks in the third and sixth positions.
            Rows 3 and 7 have neutral blocks in the second and seventh positions.

            5. After deciding placement, sew your blocks for each row RST. Press seams open or to the side, whatever you fancy. Repeat for all the rows.

            6. Next, pin the rows together, matching up the seams of the blocks. I like to pin where the seamlines intersect. Sew the rows together. After sewing each row, press seams open. REMEMBER: After rows 2 and 7 sew a 6 1/2″ strip.


            7. Decide how many flowers you will want on your quilt, I did four. The flowers will go on any neutral block in the quilt. The larger flower template will be the one you want to put an initial on if you desire.

            I like to use Heat n’ Bond Lite for appliqueing on quilts. To use this method, trace the templates on to the paper-side of the Heat n’ Bond. Then just roughly cut out around each shape. Adhere to the appropriate fat quarter following the directions on the package. Then cut out around each shape using the tracing lines.

            Appliqueing 101 Tip: When I applique on quilts, I like to cut out the middle of any LARGER shapes to help keep the quilt soft and cuddly. (Yes, I have forgotten many times, but for the most part I remember.)

            8.  After you have cut out all the shapes for the flowers, remove paper backing and place on desired neutral block. Play around with placement. YOU WILL NOT BE ADHERING YET!!!!

            9. After you are happy with the placement, remove all but the leaves. Fuse the leaves following the directions on the package. (Note: To help things go faster, I fuse all the leaves for all the flowers in place at this time, then I blanket stitch all at the same time. Then I fuse all the petals for all flowers in place, etc.)

            10. Blanket stitch around each leaf. I did not do the base of the leaf because it will be covered by the rest of the flower.

            11. Next, place the petals in place. Fuse and blanket stitch to finish. Again, I did not blanket stitch on the base of the petals since it will be covered by the center.

            12. Next add the center, fuse, and blanket stitch to finish.

            12. Lastly, add the initial if you desire. Fuse and blanket stitch to finish.

            13. Next, make your quilt sandwich, quilt as desired, and bind. (I cut five 2.5″ x WOF for my binding strips.)

            One darling 37″ x 53″ quilt for your growing baby or toddler

            LeAnne Ballard
            {everydaycelebrate.blogspot.com}

            Three Halloween Treats


            Hello again! It is LeAnne over at Everyday Celebrations. Today I am bringing you three delicious little Halloween treats that can all be made from one jelly roll!

            I will warn you, this is a loooong post! However, I made one apron, three wall hangings, and six trick or treat totes with one jelly roll! (Along with minimal additional fabrics.)  So if you are looking for some quick projects, just pick up your favorite seasonal jelly roll, some solid fabric, a couple of fat quarters, and get sewing.

            p.s. These all would make adorable Christmas projects too!

            p.p.s Since I was able to make so many cute little trick or treat totes, I have a couple in need of a home! So click on over to my blog and leave a comment to win one of the pictured trick or treat totes!

            1 Haunted Mansion Jelly Roll by Sanae

            Below is the breakdown of materials for each project.


            Additional fabrics/materials for wall hanging:
            1/2 yard Bella Solid in Black
            2 Fat Quarters
            1 yard jumbo black ricrac
            1/4 yard iron-on adhesive, such as Heat n’ Bond Ultrahold – the kind that does not require sewing
            (2) 6 foot 1″x 2″  finished or unfinished, mine are finished
            hand saw or table/circular saw
            staple gun

            Additional fabrics for trick or treat tote:

            1/2 yard Bella Solid in Black for lining & top and bottom pieces – per tote
            30″ of 1″ wide black handle strapping, found with the trimsper tote
            seasonal ribbon, optional

            Optional: If you want the top and bottom pieces to be from a different fabric you will need
            1/2 yard fabric for each the top and bottom pieces – will yield enough pieces for many totes

            Additional fabric for hostess apron:
            3/4 yard Bella Solid in Black

            note:
            WOF = width of fabric
            RST = right sides together
            All seam allowances 1/4″ unless otherwise stated.

            Tip: I remember the first time I sewed with jelly roll strips. Boy was I surprised when I had a massive ‘curve in my pieced jelly roll strips! Argh, it was one of those ‘Why do I sew?’ moments. 

            To help with this, place two strips RST lining up the selvages (uncut end) as PERFECTLY as you can. Sew the length of the strip. Press seams open. Then sew another pair together, repeating the same process. Repeat till all jelly roll strips are in pairs. Next sew two pairs together, again lining up the selvages as perfectly as you can and pressing the seam open. Now sew the sets of four jelly roll strips together, each time remembering to match up the selvages at the top and pressing seams open. It worked for me. 🙂

            {wall hangings}

            1. From the black fabric cut the following pieces:
            (3) 15″ x 7″ pieces
            (1) 1.75″ x WOF, then cut in half

             2.  Select 6 strips from the jelly roll and cut in half at the fold. (You will need 6 half jelly roll strips for this project, save the other halves for the totes or apron.)

            3. From the two Fat Quarters cut the following:
            (4) 5″ x 5.25″
            (2) 5″ x 5.5″
            (4) 6.5″ pieces of jumbo black ric rac

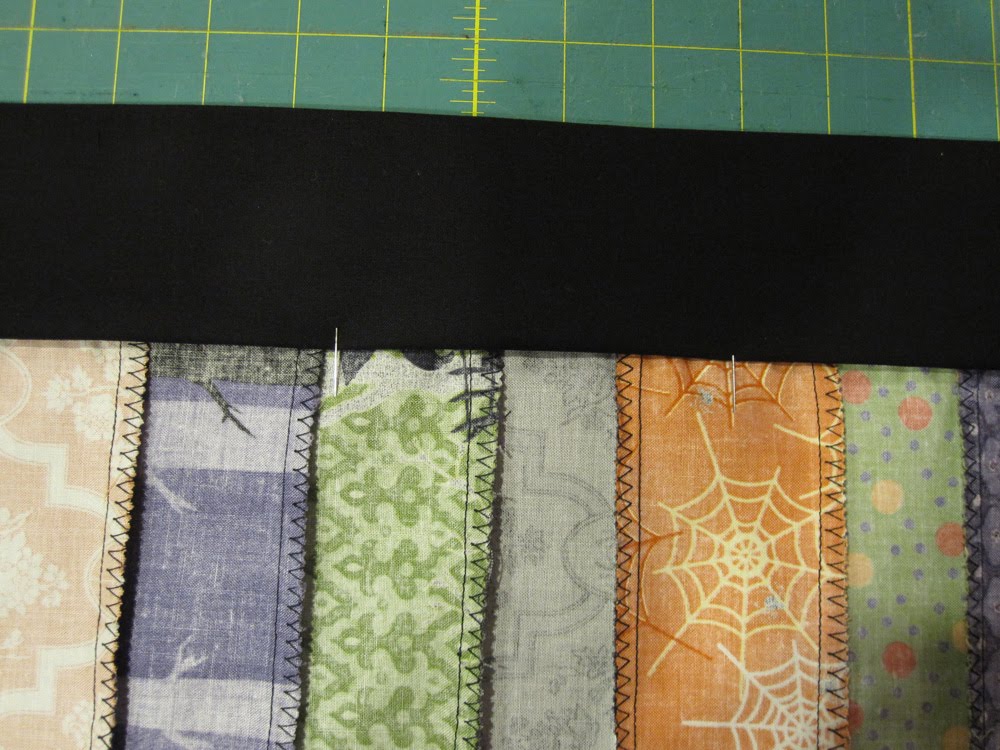
             4.  Sew together the jelly roll strips adding a 1.75″ black strip on the top and bottom. Press seams open. Even up the ends of jelly roll strips so the panel is 20″ long.

            5. Cut the panel into (4) 15″ x 5″ strips.

            6. With RST, sew a 15″ x 5″ strip on both sides of a 15″ x 7″ piece. Press seams open. Repeat again to make an identical wall hanging.

            7. Place one of the pieces of ricrac across the 5″ edge of one 5″ x 5.5″ rectangle. Place the ricrac so the dip in the top wave is just about even with the top edge of fabric.

            8. Place a  5″ x 5.25″ rectangle on top, RST. Line up the top edges of both rectangles and pin together. Sew in place. Repeat for the opposite end of the rectangle.

            9. Press seams open. Top stitch the ricrac in place. Repeat steps 8 and 9 for the remaining rectangles. Sew both pieces to the sides of the remaining 15″ x 7″ black piece like in step 6.

            10. Trace the words ‘boo’, ‘trick’, and ‘treat’ onto iron-on fusible webbing. Follow the directions for adhering to fabric for your brand of fusible webbing. Cut out letters. Templates for words are included in the Printer Friendly PDF at the bottom of the post.

            11. Fuse the words 3″ up from the bottom in the lower right hand corner of the black panel. Top stitch along either side of the black panel as shown. I used a decorative zigzag with orange thread. Repeat for the remaining panels. (Since this is a wall hanging, I am not concerned about reinforcing the letters with sewing.)

            12.  To help stretch each panel evenly, stitch around each panel about 1/4″ away from the edge. Trim away threads and ricrac ends.

            10.  Cut both 6 foot long 1″ x  2″s every 10.5″ with a hand saw or table/circular saw. Arrange as shown below. Repeat for other two frames.

            11. Secure in place with two staples at each joint. Flip frame over and staple from the other side at each joint. Repeat for the other two frames.

            12. Place one of the wall hangings right side down. Place the blunt side of the frame on top of the panel. (The rounded edge should be facing up.) Center the frame 1.5″ from the top and bottom and 2.25″ from each side.

            13. Fold up the top and bottom edges and staple in place, slightly stretching as you go. Stretch evenly. (It is helpful to have one person fold the fabric and the other staple.)

            14. Fold the side pieces as shown below. Secure with a staple.

            15.  Finish folding up the sides like you are wrapping a present. Secure with staples. Repeat for other wall hangings.

            {trick or treat tote}

            1. Cut the following pieces:
            5 jelly roll strips
            (2) 4″ x 12.25″ bottom – from FQ or solid fabric
            (2) 2.5′ x 12.25″ top – from FQ or solid fabric
            (2) 12.25″ x 16″ lining
            (2) 15″ pieces of 1″ wide handle strapping, found with the trims

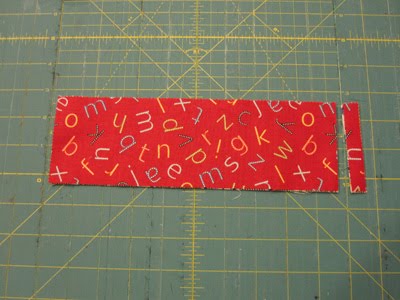
            2. Cut three of the jelly roll strips in half at the fold line. (The orange strips. You will only need 3 halves for this project.)  Trim the two remaining jelly roll strips to 2″ wide then cut in half. (The gray strips. You will use all four halves for this project.)

            Arrange the half strips in this order:

            4. Sew strips RST. Press seams open.

            5. Even up the panel so it measures 21″ long. Then cut into (2) 10.5″ pieces.

            6. Take one of the 4″ x 12.25″ pieces and pin to the bottom of one panel. Sew RST along the bottom edge.

            7. Repeat with the 2.5″ x 12.25″ piece and sew RST along the top edge. Press seams open. Repeat steps 6 and 7 for the other panel.

            8. If desired, cut a 3″ piece of ribbon for a ‘tag’. Fold in half and pin in place about 1″ from the top edge on one of the panels. Match up the raw edges of the ribbon with the raw edges of the bag.

            9. Pin both panels RST and sew. Leave the top open. Press seams and clip the bottom corners. Turn right side out.

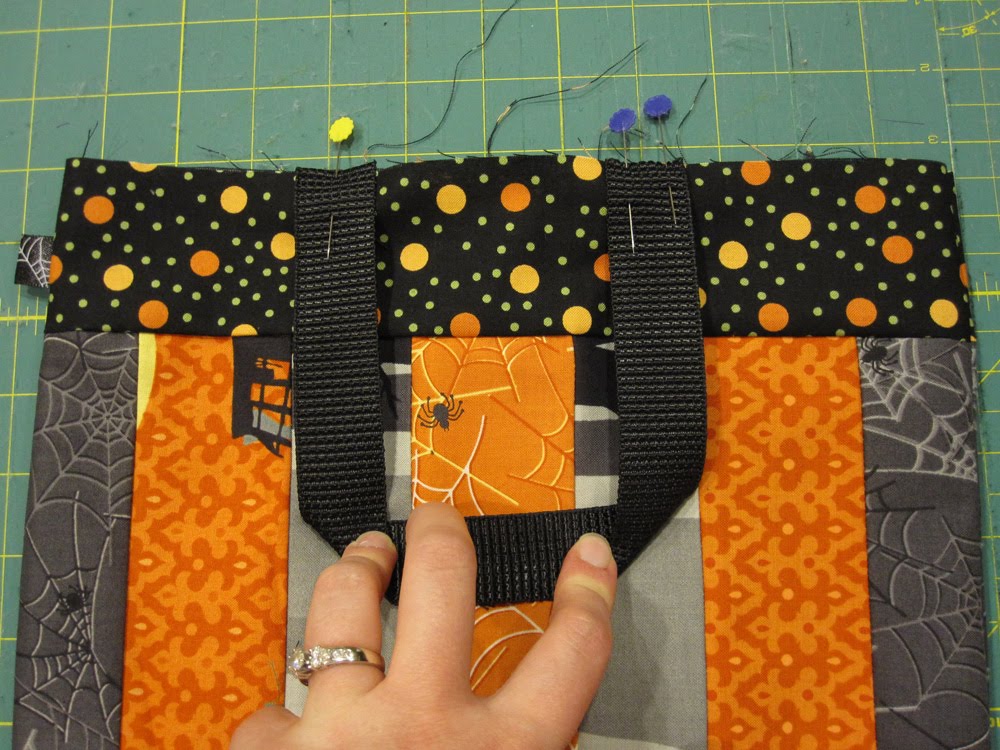
            10. Pin handles in place  3.25″ from the side of the bag. Repeat for other side. Baste handles in place using a long machine stitch about 1/8″ away from the top edge.

            11. Pin the two lining pieces RST and sew together. Leave the top open and a 6″ opening at the bottom of the bag. Press seams and clip corners.

            12. Place the outer bag inside the lining, RST.

            13. Pin the two bags together and sew the two bags together. Do not leave an opening.

            14. From the opening in the bottom of the lining, turn the bag right side out. Press along the top edge of the bag making sure the lining isn’t peeking out. Top stitch about 1/8″ from the top edge of the bag.  Tuck the raw edges in the raw edges of the opening in the lining and press. Sew the opening close.

            {hostess apron}

            Note: The finished size of this apron is 26″ wide x 21″ long. The ties measure 37″ long on either side. To add/subtract width to the apron just add/remove jelly strip halves.  For each strip added/removed, you will add/reduce 2″ to the width of the apron. The length is also adjustable. I am 5’10” and the apron comes to just above my knee and ties generously around me.


            1.  Cut the following pieces:
            14 jelly roll halves
            (1) 6.5″ x 27″ top band (add/subtract an additional 2″ to/from 27″ for each strip added/removed)
            (1) 4″ x 27″ bottom band (add/subtract an additional 2″ to/from 27″ for each strip added/removed)
            (2) 6.5″ x 36″ ties

            2. Sew the jelly roll strips together in pairs lining up the selvages at the top.Press seams open. Then join all the pairs together.Press seams open. The cut edges will be slightly uneven and all at the opposite end. (See second picture in this step.) The panel should measure 27″ wide.

            3. Even up the panel and trim to 17″ long.

            *Note: You can cut the panel to any length. The bands/hems will add about an additional 4″ to the apron.

            5. You will want to finish the raw edges. Either serge or zigzag each seam of the panel.

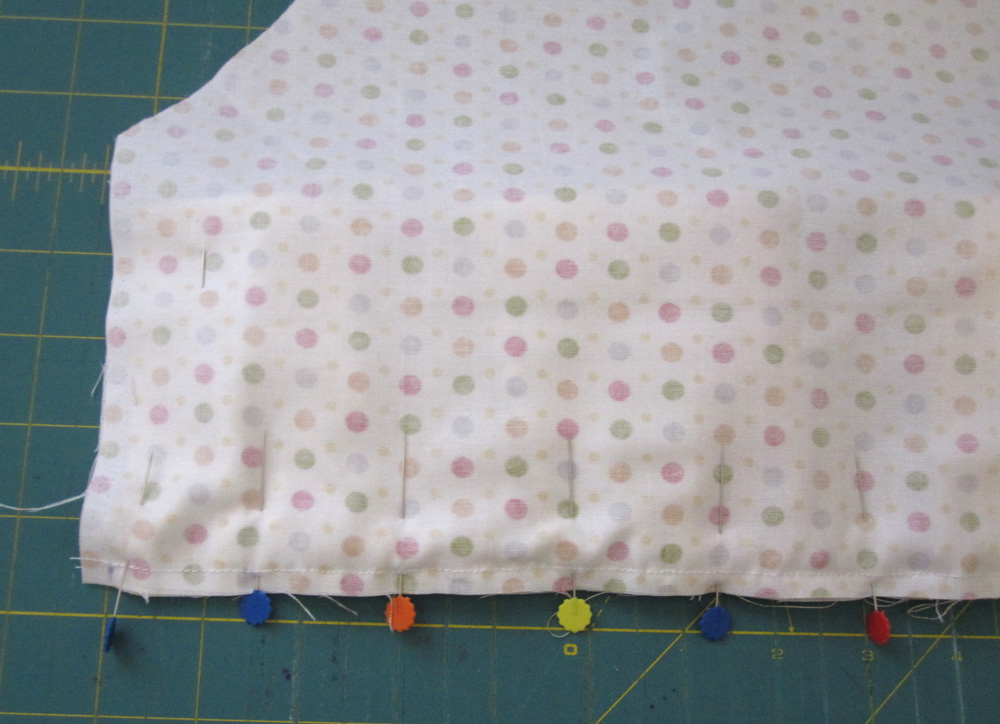
            6. Along the long edge of the 4″ x 27″ bottom band, fold under 1/4″ and press. Then fold under another 1/4″ and press again. Sew hem in place 1/8″ from the edge. Pin the raw edge of the bottom band and the bottom raw edge of the apron RST together and sew in place. Zigzag or serge to finish the seam.

            7. Fold the side raw edges under 1/4″ and press. (From the top to the bottom band.) Then fold under another 1/4″ and press again. Sew in place 1/8″ from the edge.

            8. Sew the ties and top band together RST. (The top band needs to be in the middle and a tie on either side.) It will be WAYYYY long. Press seams open.

            7. Center the WAYYY long band/ties over the apron panel RST and pin. The seams should be on either side of the apron panel. Sew only to the apron panel. Do not sew onto the free hanging ties.

            8. Press the seam and place the band/ties up as shown below. You should now see the right side of the band/ties. Press well.

            9. Now fold the band/ties down, RST so the raw edges of the free hanging ties meet. Pin the free hanging ties as shown below.

            10. Start sewing at the end of one tie and continue sewing. Stop when you get to the apron panel. Skip over the apron panel and continue sewing the other tie together. Clip corners at the ends. Press.

            11. Turn the ties right side out. Push the end back through the tie with a wooden spoon.

            12. Tuck the raw edge of the band/tie to the inside and press. Pin in place from the front, being sure to catch the back of the band with your pins. Top stitch 1/4″ from the edge starting at one of the ties continuing onto the apron, closing the opening, and ending at the end of the other tie. Press well when completed.

            I hope you enjoy your yummy Halloween Treats. 😉
            Happy Baking!!

            1 hostess apron
            3 wall hangings
            6 or more trick or treat totes

            LeAnne Ballard
            {Everyday Celebrations}

            jump. hop. count. {a number playmat}


            Hello! I’m LeAnne from Everyday Celebrations. This is my first recipe here at the Moda Bake Shop. I am thrilled to be a part of the wonderful contributors and hope you enjoy this fun project!  Please drop by my blog and say hi. You can also find more fun items and patterns in my Etsy shop.

            Enjoy!

            I made the Number Playmat with the young preschooler in mind. Little preschoolers are filled with excitement as they begin to learn the basics. This mat can be used as a fun and interactive aid in teaching numbers and numerical representation. This colorful Number Playmat has many uses:

            • Toss the bean bag to the square with the matching number.
            • Toss a bean bag on ‘jump’ or ‘hop’ and jump or hop that many times. 
            • Toss two bean bags on two squares. Add or subtract the two numbers.
            • Pick a number. Find a representation of that number in the room and place it on the square. Repeat for all the numbers. Example: Find two blocks and place on the 2 square. 
            • Write number words on index cards and place on the appropriate square. Also place a representation on the square. 


              1 Punctuation Layer Cake by American Jane
              1 yard for backing
              1 yard for binding and optional drawstring bag – find the drawstring bag tutorial here
              (if not making bag, 1/2 yard is enough for the binding) 
              batting 
              numbers and words templates – (included in printer friendly version at bottom of post)
              **Note there is not a 9 in the file because you can flip the 6 and have a 9.**
              1 yard iron-on adhesive, such as Heat n’ Bond
              beans to fill bean bags

              1/2 yard of flannel for bean bags, optional see step 19
              1 1/2 yards ribbon or cording, for the optional bag


              {playmat}
              ***All seam allowances are 1/4″ unless otherwise noted. ***

              ‘Slice’ into that yummy layer cake and decide which squares you will use for what.

              • playmat  – 12 squares
              • numbers/words –  4 – 7 squares (I used less ‘busy’ prints to help the numbers standout.)
              • bean bags – 5 squares
              • rock pockets, optional – 1 square (I added ‘rock pockets’ in case I use my playmat outside.)

              Two quilt blocks make up this playmat:
              Block A – you will make 4 of these, corner pieces
              Block B – you will make 6 of these, middle pieces
              Center Squares – two layer cake squares that will remain whole


              1. For block A: Select four squares.

              2. For block B: Select three sets of two squares. (They are stacked on top of one another.)

              3. Center Blocks: Select two squares. These will remain whole.

              Cutting Block A
              4. Stack the four squares for block A together. Cut 3″ from one side. 

              5.  From the 3″ x 10″ piece just cut, cut 1/2″ from one of the short ends.

              6. From the main piece that remains, cut 3″ from the 7″ side.  You will have three sizes for block A:

              • 3″ x 9 1/2″
              • 3″ x 7″
              • 7″ square

              Cutting Block B
              7. Stack the six squares for block B together.  Cut  3″ from one side.

              Piecing Block A
               8. To make each block, pick one 3″ x 7″ piece, one 3″ x 9 1/2″ piece, and one 7″ square. With right sides together, sew the  3″ x 7″ piece to the left side of the 7″ square.  Press seams open. Repeat for the other A blocks.

              9. For this step, keep the block in the position shown above. For two of the blocks, sew one 3″ x 9 1/2″ piece to the top of the block. For the other two blocks, sew the one 3″ x 9 1/2″ piece to the bottom. Again, sew with right sides together and press seams open.

              Piecing Block B
              10. To make each block, pick one 3″ x 10″ piece and one 7″ x 10″ piece. (I just swapped pieces between the two squares I initially matched up.) Place pieces right sides together, matching up the 10″ sides. Sew and press seams open. 

              11. Decide on the placement of the squares. Refer to the picture below for placement of the blocks. 

              12. Sew the blocks right sides together so you have three rows. Then sew the rows together to form the playmat top.

              13. Trace the numbers and letters on to iron-on adhesive and adhere to desired fabric squares. **Note there is not a 9 in the file because you can flip the six and have a nine.** Follow the directions for cutting and adhering as indicated on the package for your brand of iron-on adhesive. Then adhere the numbers and letters to the playmat. I put my numbers on in a clockwise fashion with the words in the middle. You can also trace and cut out the numbers for the bean bags at this time.

              14. Blanket-stitch or zig-zag around the numbers and words to reinforce the adhesive. (I used a machine blanket stitch.) Make a ‘quilt sandwich’ and quilt or tie as desired. I have to admit, this was the first ‘quilt’ I ever machine quilted using my own sewing machine. I loved the result although it isn’t perfect. However, it was the perfect sized project for a beginner machine quilter. I just quilted around my numbers and words, it wasn’t a problem.

              15. Optional: After quilting but before binding, add the rock pockets. Take one square and cut into four 5″ squares. Fold each 5″ square diagonally and press.

              16. Pin one pocket in each corner with the folded edge facing out. Baste the pockets in place about 1/8″ from the edge.

              17. Bind the playmat as desired.

              {bean bags}
              18. Select 5 squares from the Layer Cake. Stack the squares together and cut into 5″ squares. You will have (20) 5″ squares in all. On 10 of the squares adhere the number in the center of the square.

              19. Optional: I found adding a layer of flannel to the bean bags made them a bit sturdier.  Cut (20)
              4 1/2″ squares from flannel.  (I cut my 4 1/2″ squares from some leftover flannel from a previous project.) To make this quick cut two or three 4 1/2″ strips from flannel, stack, and then cut into 4 1/2″ squares. 

              20. Blanket stitch or zig-zag around each number to reinforce the adhesive. I HIGHLY recommend doing this since the bean bags will be handled and tossed. Zig-zag stitching around each number doesn’t take very long. (To tell the difference between the 6 and 9 I stitched a line of red zig-zag stitching below the six at this point.)

              21. Place two 5″ squares for one bean bag right side down. (One square should have a number, one shouldn’t.)  Center one  4 1/2″ flannel square on each 5″ square.

              22. Flip one square over so wrong sides are now together. Line up all the layers of fabric. Pin each corner.

              23. Sew the bean bags together using 1/2″ seam allowance. Leave an opening at the top. Fill the bean bag about 1/2 way with beans.

              24. Machine stitch opening close and secure by back stitching. Pink the raw edges with pinking shears.

              Get ready to learn with your little one in a fun and interactive way!

              27.5″ x 37″ Number Playmat 

              10 or more bean bags
              drawstring storage bag, tutorial found here

              LeAnne Ballard