120-Minute Gift: Yuletide Twist Pillow


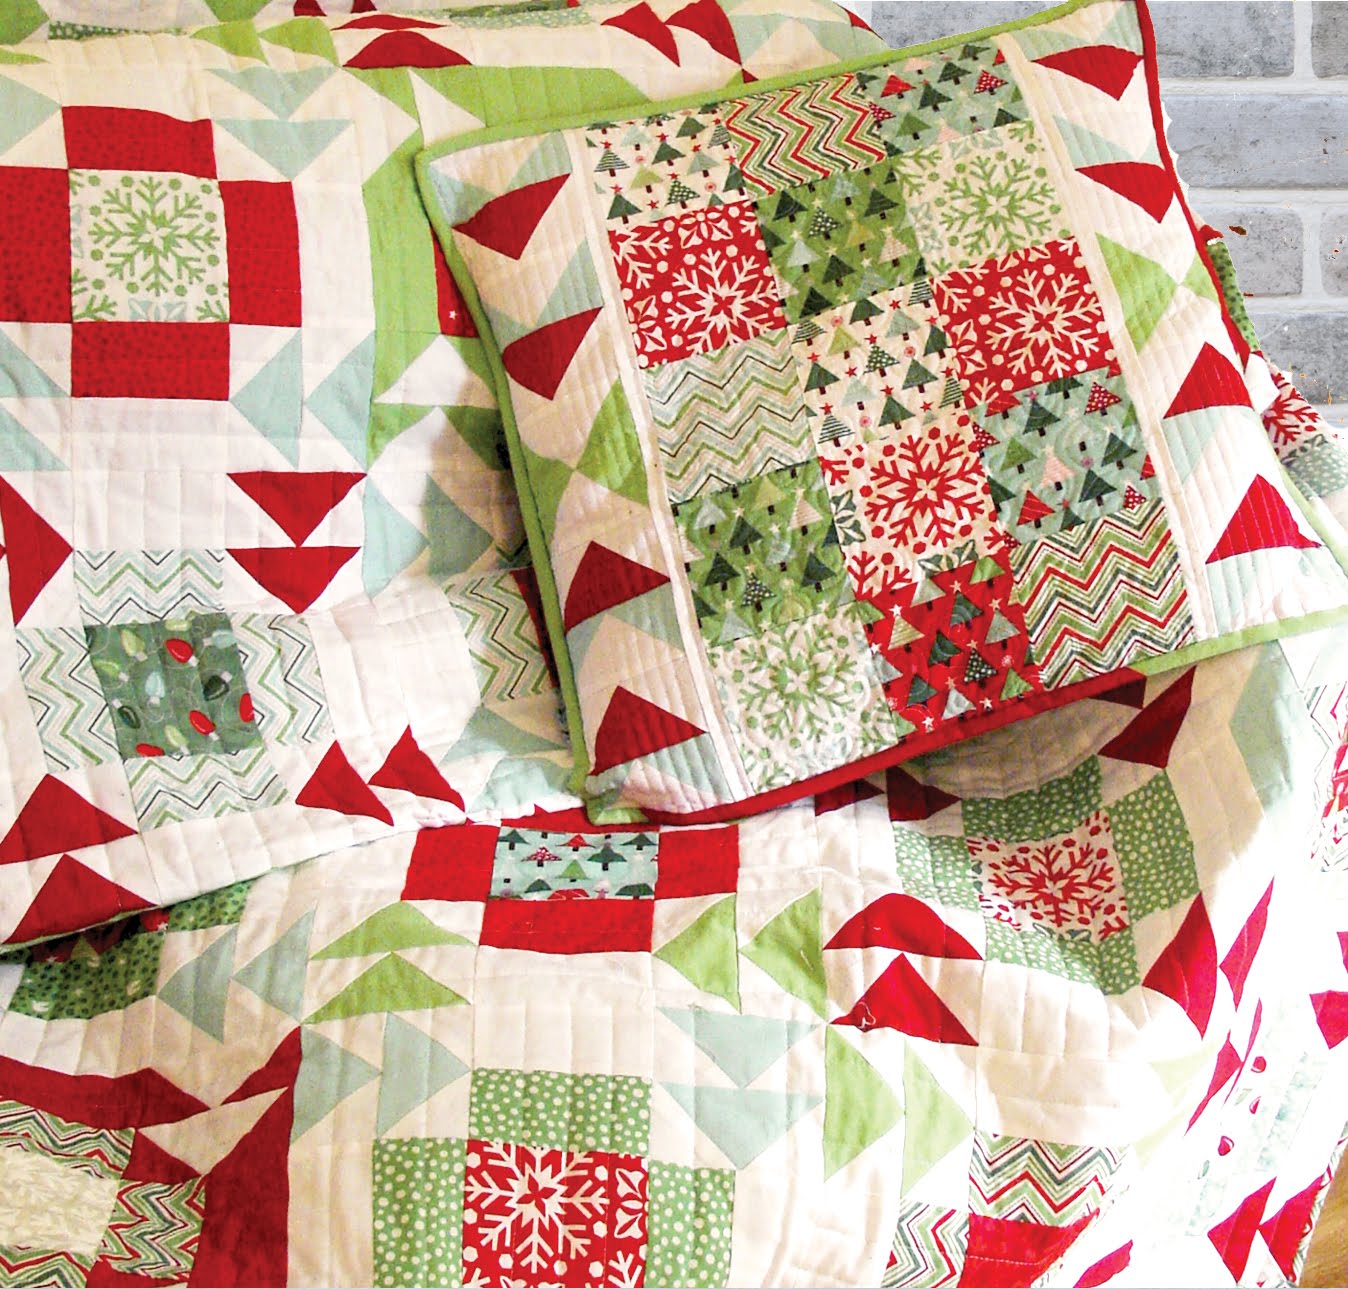
Christmas is almost upon us again but this year I am well prepared! I decided last year that I really needed to jazz up our living area this year with new Christmas pillows and Christmas quilts and for once I have actually been organized enough to do it!

I made this pillow to co-ordinate with my Yuletide Twist Quilt which features in Issue 11 of Fat Quarterly. You can visit {www.fatquarterly.com/issues/issue-11}for more information.


15 charm squares from Joy by Kate Spain
1 fat eighth of red solid
1 fat eighth of green solid
1 fat eighth of blue solid
1 fat quarter of white solid
1/4 yard for binding
24″ square piece of batting
24″ square piece of lining fabric
2 pieces 15″ x 22″ for the back of the pillow
2 pieces 15″ x 22″ to line the back of the pillow

Cutting Instructions

From the red solid cut:
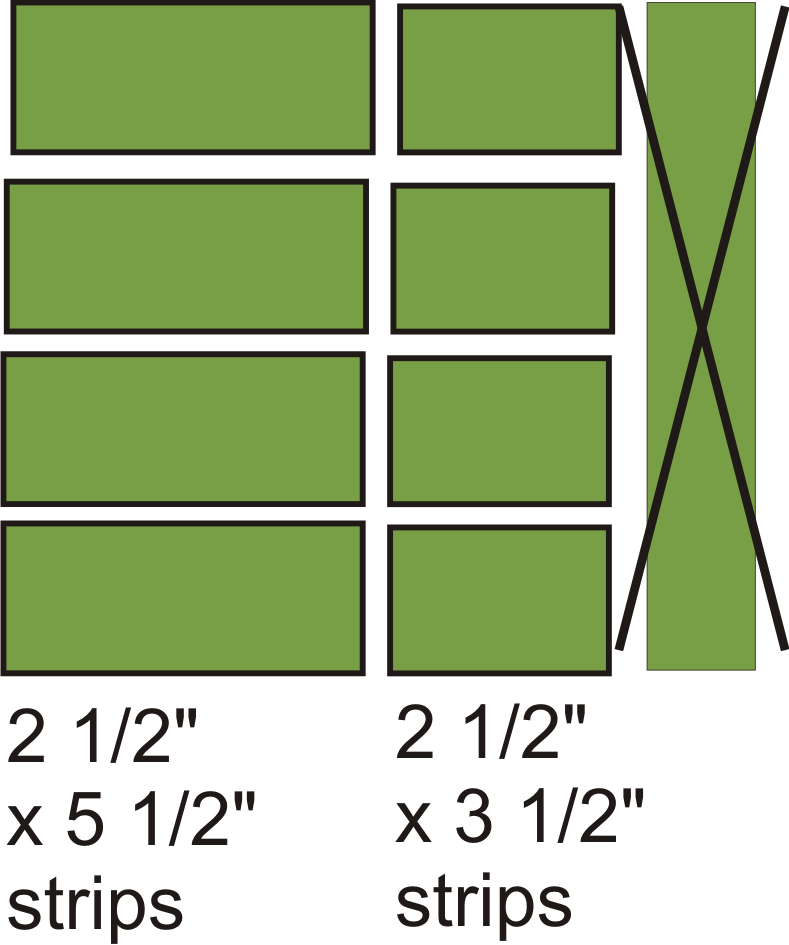
8 strips 2 1/2″ x 4 1/2″

From the green solid cut:
8 squares 2 1/2″

From the blue solid cut: 
16 squares 2 1/2″

From the white solid cut: 
12 strips 2 1/2″ x 4 1/2″
16 squares 2 1/2″
2 strips 1″ x 20 1/2″

Make the Centre Panel

Trim the charm squares down to 4 1/2″ square. Arrange in 5 rows of 3 and sew together.

Sew the white 1″ x 20 1/2″ strips to both sides of the panel

.

Make the Flying Geese

Draw a line down the diagonal on the wrong side of all the green, blue and white 2 1/2″ squares.

Make 8 flying geese using 16 white 2 1/2″ squares and 8 red 2 1/2″ x 4 1/2″ strips.

Make 4 flying geese using 8 green 2 1/2″ squares and 4 white 2 1/2″ x 4 1/2″ strips.


Make 8 flying geese using 16 blue 2 1/2″ squares and 8 white 2 1/2″ x 4 1/2″ strips.


Sew the flying geese into 2 strips as shown.


Finish the Pillow

Sew the flying geese strip to both sides of the pillow top. Layer the pillow top, batting and lining fabric anmd baste in place. Quilt as desired.

I quilted straight lines down the geese and a swirly pattern all over the centre panel. Trim away excess

Place the back pieces and back lining pieces together right sides facing. Sew along the long edge. Turn right side out, press and topstitch.

Lay the pillow top right side down and place the back pieces, right side up, on top so that they are overlapping. Pin in place and sew all the way around with 1/8″ seam allowance. Trim away excess.

Cut the binding fabric into strips 2 1/2″ wide and sew together to form a continuous strip. Use this strip to bind your pillow.

1 pillow 20″ x 21″

Tacha Bruecher
{www.fatquarterly.com}

Il Cuscino


Hi my name is Tacha and I am part of the Fat Quarterly team and I’m super excited to be here on the Moda Bake Shop to share my latest recipe!

Pillows are a weakness of mine. I love making them and could happily deck every piece of furniture and even cover the floor with pillows given half the chance. Somehow or other all my pillows usually get commandeered by someone else. Our cat Noodles has taken a fancy to this particular one – probably because of the pom pom trim!

I called this pillow Il Cuscino as the black and white, and, red and white, check prints remind me of the fabric used for the chef’s trousers or aprons in some Italian pizzerias. Il cuscino simply means the pillow in Italian!


1 Charm pack of Reunion by Sweetwater
Fat eighth of black and white check print (Ink 5478 18)
Fat eighth of red and white check print (Cherry 5478 12)
Fat quarter of white solid
Pom Pom trim
22” square piece of batting
½ yard of backing fabric ( I used strips from Reunion)
1 yard of lining fabric


Cutting Instructions:
From the charm pack cut:
45 squares 1 15/16”
18 squares 3”

From the black and white check print cut:
32 squares 1 7/8” cut in half diagonally

From the red and white check print cut:
40 squares 1 7/8” cut in half diagonally

From the white solid cut:
18 squares 3”
18 squares 1 7/8” cut in half diagonally

From the lining cut:
20” square
1 piece 14” x 18 1/2”
1 piece 10” x 18 1/2”

From the backing fabric cut:
1 piece 14” x 18 1/2”
1 piece 10” X 18 1/2”

The pillow is made up of 1 block repeated 9 times.

Make the half square triangles
Draw a line down the diagonal on the wrong side of each of the white squares.
Put a white 3” square and a print 3” square right sides facing. Sew ¼” away from the diagonal line on both sides of the line. Cut along the line. Open, press and trim each half square triangle to 2 ½” square.

The pillow front is made up of 9 blocks. There are 5 print 1 15/16” squares and 4 HST squares in each block. Have fun trying out different combinations until you are happy with the layout of prints in each block.


Sew the Block
Take the print 1 15/16” square that will be the centre of the block and 4 of the triangles made by cutting the white 1 7/8” squares in half diagonally. Sew the triangles to the sides of the print square.

Press and trim away the ears.

Take the remaining 4 print 1 15/15” squares and 16 of the triangles made by cutting the red or black check print 1 7/8” squares in half diagonally. Sew these to the sides of the print squares.

Sew the block together in rows as shown.

Repeat to make 9 blocks. 5 of the blocks will use red check print and 4 blocks will use the black check print. Arrange the blocks in a 3 x 3 layout. Sew the blocks together in rows.

Layer the quilt top, batting and lining fabric and baste in place. Quilt as desired. I stippled all over the quilt top. Trim the pillow top to 18 1/2” square.


Make the pillow
Place the backing 14” x 18 1/2” and lining 14” x 18 1/2” pieces together right sides facing and sew down one of the 18 1/2” edges. Open so wrong sides are facing and topstitch along the same edge.
Repeat for the backing and lining 10” x 18 1/2” pieces.

Cut 4 lengths of pom pom trim about 2” longer than each side of the pillow. Pin in place along the sides of the pillow, allowing the ends to overlap the edge of the pillow. Baste in place about 1/8” from the edge.

Place the pillow backing pieces and pillow front together, right sides facing, with the pillow back pieces overlapping. Sew all around the pillow. Use a zig zag stitch to prevent fraying.

Turn your pillow right side out. Press and stuff with your 18” pillow form.


18″ square pillow.

Tacha Bruecher

Crossroads Quilt

Hi, Tacha here! I’m part of the Fat Quarterly Team and am Hanies on Flickr. But more important than that, I am the Mum of two little girls and now that Spring has sprung we are out and about a lot more. I decided that I needed a new quilt to throw on the floor wherever we are so we can have impromptu picnics or snuggle up if the sun goes behind the clouds! We live in Germany so it isn’t that warm yet!

I fell in love with the Just Wing It line and its great colours. I wanted a design that would show off all the prints and make good use of every tiny piece of a layer cake. I hope you like what I came up with.


1 layer cake of Just Wing It by MoMo
2 1/2 yards of white solid
10” square of dark grey solid
8 strips 2 1/2″ x width of fabric for binding
4 yards of backing fabric
64” x 78” of batting


59″ x 74″

Step 1 – Cut and Organise your fabric

The quilt is made up of 20 blocks.

Divide your layer cake into 2 groups of 20 squares 10”.

One group (A) will be the corners of the blocks and the other group (B) will be the centre bars and small squares of the blocks.

From EACH of the squares to be used for the corners, group A, cut:
4 strips 2 1/2” x 5 1/2”
4 strips 2 1/2” x 3 1/2”

From EACH of the squares to be used for the centre bars and small squares, group B, cut:
2 strips 2 1/2“ x 8 1/2“
7 squares 2 1/2”

From the white solid, cut:
240 strips 1 1/2” x 2 1/2”
40 strips 1 1/2” x 10 1/2”
71 strips 1 1/2” x 14 1/2”

From the dark grey solid, cut:
12 squares 1 1/2″

For each block you will need:

4 strips 2 1/2” x 5 1/2” and 4 strips 2 1/2” x 3 1/2” from 1 of the group A prints
2 strips 2 1/2” x 8 1/2” from 1 of the group B prints
3 squares 2 1/2” from a different group B print
2 squares 2 1/2” from a different group B print
12 strips 1 1/2” x 2 1/2” of white solid
2 strips 1 1/2” x 8 1/2” of white solid
2 strips 1 1/2” x 14 1/2” of white solid

Play around with the groupings of group A and group B fabrics until you are happy.

Step 2 – Make the Blocks

Now you are ready to make the blocks!

Sew the block together in rows.

Start with the centre row. Take 4 white strips 1 1/2″ x 2 1/2″, 3 squares 2 1/2″ of a group B print, and 2 squares 2 1/2″ of a different group B print. Sew together as shown.

Sew a white 1 1/2″ x 14 1/2″ strip to the top and the bottom of this row.

Sew a white 1 1/2″ x 2 1/2″ strip to both ends of the 2 1/2″ x 8 1/2″ strips. Sew the 1 1/2″ x 8 1/2″ strips to the top.

Sew the 2 1/2″ x 3 1/2″ strips to the side of these strips. Make 2 of these rows.

Sew a white 1 1/2″ x 2 1/2″ strip to either side of each of the remaining 2 1/2″ group B squares.

Sew the 2 1/2″ x 5 1/2″ strips to either side. Make 2 rows like this.

Sew the rows together as shown.

Step 3 – Sash the Blocks

Arrange the 20 blocks in a 4 x 5 layout. Rotate alternate blocks by 90°.

Sew the white 1 1/2″ x 14 1/2″ strips between each block in each row.

Sew the remaining white 1 1/2″ x 14 1/2″ strips and dark grey 1 1/2″ squares into 4 strips of 4 white 1 1/2″ x 14 1/2″ strips and 3 squares 1 1/2″.

Sew the rows of blocks together and sashing strips together as shown.

Step 4 – Finish the Quilt

Layer the backing, batting and quilt top. Baste.

Quilt as desired. I quilted a simple all-over meandering stitch but I think this would look fabulous with straight lines to complement the squares and rectangles of the design.

Sew the binding strips together and bind your quilt.

There are some great tutorials if you need help with basting, quilting or binding your quilt. We have compiled a list on our tutorial page on Fat Quarterly.

Head over to Fat Quarterly if you would like to download this quilt pattern as a pdf file. You may also download the Printer Friendly version included at the end of this post.

Issue 5 of Fat Quarterly is all about precuts and is packed with fabulous patterns to make the most of your charm packs, layer cakes and fat quarter bundles.

Tacha Bruecher
{Fat Quarterly}