Layer Player Quilt


Welcome to another great tutorial from Quilted Works! One of our fantastic quilt designers, Julie Macfarlane, designed this quick and easy Layer Cake Quilt. She used the new fabric line by American Jane called “Pot Luck.”

  • 1 Layer Cake
  • 1/2 yard fabric for binding
  • 53″ x 60″ piece of batting
  • 2 1/2 yards fabric for quilt back


Select a Layer Cake. Divide the Layer Cake into 21 pairs, making sure that the fabrics coordinate well and create a contrast with each other.

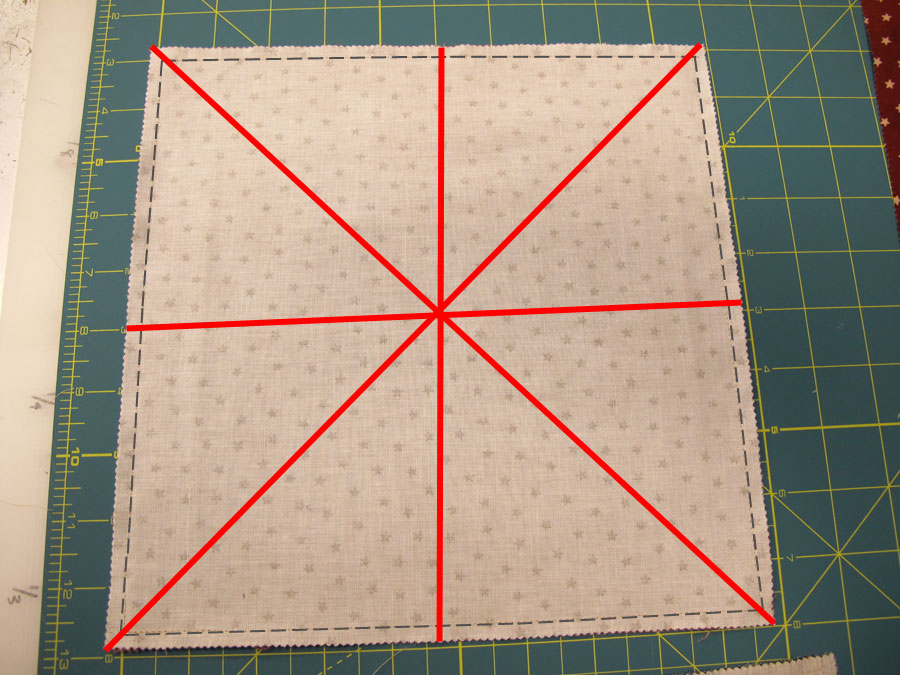
Place two contrasting layer cake pieces right sides together and stitch 1/4″ seam along the two parallel sides. Then, also stitch a seam at 1 1/2″ (from the edge of the fabric) on these same sides.

Now we are going to cut two strips off of each side. First, cut 1 1/4″ from the edge, then move your ruler to cut a second 1 1/4″ strip. It helps to place the stitch line directly on the 1″ mark of your ruler. Do this to both sides, and you will end up with 4 strips.

Using the remaining center piece 5″x10″, stitch again at 1/4″ and 1 1/2″ on the short (5″) sides of the fabric. Trim them the same way as above. You will end up with 4 pieces.

To reassemble the blocks, first sew the short sides onto the center 5″ square, then press.

Next, trim the long strips to 8″ and sew onto the top/bottom of the blocks. Press your finished block.

The finished block size will be 8″ square. You will then begin laying the blocks out with 6 blocks across and 7 rows down. Every other block is rotated 90 degrees. Arrange the blocks to your liking and sew the rows together.

45″ x 52″ Quilt 

We hope you all have a great time making this quilt! For information on kits, please visit our website at www.quiltedworks.com
Barb Johnson with Julie Macfarlane for Quilted Works

Ring of Memories


Hi! It’s Quilted Works blogging with you today on the Moda Bake Shop. We are excited to be here again to share a unique project created by Rhonda Ferguson, an instructor here at Quilted Works. This super easy “Ring of Memories” is sure to be a project you’re going to want to make. It’s just perfect as a gift for little ones, because we all know kids LOVE to see pictures of themselves. And what a great way to accomplish that…with fabric of course!

  • Family Pictures
  • Charm Pack (one square for each picture)
  • Iron-on Photo Transfer Paper
  • Hobbs Batting – 3 1/2″ square for every two pictures
  • 1/4″ (6mm) Eyelets and setting tools
  • 2-inch metal book ring (found at office supply stores)


Picture Preparation:
* We realize there are numerous Photo Editing programs and different techniques you can use to edit your photos for print. Please choose whatever you’re comfortable with or follow our simple instructions.


Bring family pictures into a photo editing program and crop pictures to make them square. Make sure you leave enough room on the top left or right hand corner so that the eyelet will not interfere with the faces in your pictures – this should be approximately 1/2″. Save pictures to your desktop.

In Microsoft Word, open up a new document. Go to margins, and adjust them to .25″ on all sides. Go to Insert Picture, and insert a picture from the desktop. With the picture highlighted, click on text wrapping. Click on square (this allows you to move the picture anywhere on the page). In the picture toolbar, adjust the size to 3 1/2 x 3 1/2″. Move the picture to the top left hand corner.

Insert a total of six pictures onto the page using the steps listed above. Pictures will be end to end with the paper having 1/4″ margins. *You can print the photos any size you wish. We did the 3 1/2″ x 3 1/2″ to maximize the use of our photo transfer paper.


Remove any paper from your printer’s paper tray and insert photo transfer paper (one at a time) into the tray. Using manufacturer’s directions, adjust settings as needed for your printer and print.


Continue to replace pictures in your layout with new pictures and print each new page of pictures.

Cut out pictures to 3 1/2 x 3 1/2″.


Choose a charm square for each picture. Place the picture in the center of the charm square and iron it on, according to manufacturer’s directions.


Sewing Instructions:
To reinforce the picture, sew 1/8″ inside each picture.


Group pictures in sets of two. Remember that you need to leave room for the eyelet so it doesn’t interfere with faces in the picture.


Make a sandwich with a picture square (right side down), then a layer of batting (centered over picture) and last another picture square (right side up).

Pin the square in each corner, lining up the corner of the top picture, the corner of the batting and the corner of the bottom picture.  Follow these instructions for each set of pictures.


With coordinating thread, sew 1/8″ away from edge of picture.


Eyelets:

Following directions on eyelet package, place eyelet in top left hand corner of each picture square.

We placed the eyelet on the picture and traced the inside, then cut out that small circle to fit the eyelet piece inside.


Trim edges of fabric square with pinking shears to desired size. I trimmed 1/4″ from each side.


Slide picture squares onto the 2″ metal ring and you’re done!  


One darling Photo Book! The perfect gift for baby!!!

Quilted Works
{www.quiltedworks.com}

Old Glory Quilt

Hello quilting friends! We are Quilted Works and we are so excited to be sharing our very first Moda Bake Shop project! Today we are sharing with you a fast and easy tutorial for creating hour glass blocks using a Layer Cake. We had so much fun creating this quilt and know that you will all love it.


(Old Glory Gatherings by Primitive Gatherings)

  • 2 Layer Cakes
  • 1/2 Yard Inner Border – 1040-39G (RED)
  • 1 3/4 Yard Outer Border – 1077-19 (BLUE)
  • 5 3/4 Yards Backing Fabric
  • 3/4 Yard Binding – 1040-43G (NAVY)


Begin by separating the Layer Cakes into LIGHTS (all the beiges) and DARKS (all the reds & blues)

Select one DARK and one LIGHT fabric square and place them with right sides together.  Pin all sides.


Sew 1/4″ seam around the entire 10″ square. When you come within 1/4″ from the corner, simply leave your needle down, and pivot the fabric to continue sewing around the square.

Your entire square will be sewn closed. Repeat with the remaining Layer Cake squares – sewing one DARK and LIGHT together. (Image below shows the 1/4″ stitching all around.)

Next we will be cutting the squares into 8 pieces. Place your square onto the cutting board. Do not reposition your square after making any of the cuts. First, cut diagonally both ways (from corner to corner), then cut vertically and horizontally at 5″.

Press each piece towards the dark fabric.

This is what your pieces will look like:

Mix up all your pieces and then re-pair them together with one BLUE piece and one RED piece.

Match the center of them together, pin, and sew 1/4″ seam. 

Now you have a finished “Hour Glass” block! It should measure 6 1/4″ and will end up being 5 3/4″ finished.

Repeat this process until you have created all the hour glass blocks.

Now we are ready to start laying out our blocks and forming rows. Make sure to rotate every other block 90°. Arrange the blocks until you are happy with the color placements.

Sew together in rows, making sure to pin well so that everything is lined up perfectly.

This quilt is 11 blocks across and 13 rows down.

Attach the borders.
INNER Border: cut 7 – 2″ strips from the RED fabric. Attach sides first, then top and bottom.
OUTER border: cut 7 – 6 1/2″ strips from the BLUE fabric. Attach sides first, then top and bottom.

Baste, Quilt and Bind your quilt as desired!


Finished Quilt Size is approximately 81″ x 92″.

We hope that you’ll come visit us at www.quiltedworks.com.  If you create a quilt using this tutorial, we would love to see it – be sure to link up to the Flickr Group here. Kits for this Moda Bake Shop project can be purchased on our website and will be eligible for free U.S. shipping! We have loved sharing our first project with you and hope to have many more to share.

Quilted Works
{www.quiltedworks.com}