
I designed this Christmas Advent Quilt for my children, my grandchildren, and for each of YOU. The quilt has 25 pockets that are perfect for hiding treats, small toys, coins, or even different Christmas activities that you can do with your children or grandchildren. I hope you are inspired to make this Christmas Advent a yearly tradition with your family.
I’m sorry about the last minute inspiration (sometimes that’s how it comes) but thinking on the positive side of things. . . did you realize that you can take advantage of the Christmas Fabric Sales? Now hurry out and hit those sales and start working on it today so it will be ready for next year.

Finished Quilt Size: 37″ x 53″
Finished Block Size: 7 1/2″ x 7 1/2″

- 1 Layer Cake of “Fruitcake” by Basic Grey for Moda
- 4 Fat Quarters of Moda Wool in Red, Ivory, Black, and Teal
- 1/2 yard Red fabric for block borders
- 1/2 yard White fabric for block borders
- Heavyweight Heat & Bond for numbers
- 13″ of Brown Snowflake fabric for large border
- 1/4 yard of Brown Polka Dot fabric for small border
- 2 yards fabric for quilt backing
- 2 yards batting for quilt

- 2 yards Red Medium Ric Rac
- 2 yards Green Medium Ric Rac
- 2 yards Teal Medium Ric Rac
- 2 yards Brown Medium Ric Rac
- 2 1/4 yards Red Jumbo Ric Rac


Part One:
Cutting the Layer Cake for Advent Pockets
& Fabric Yardage for Block Borders
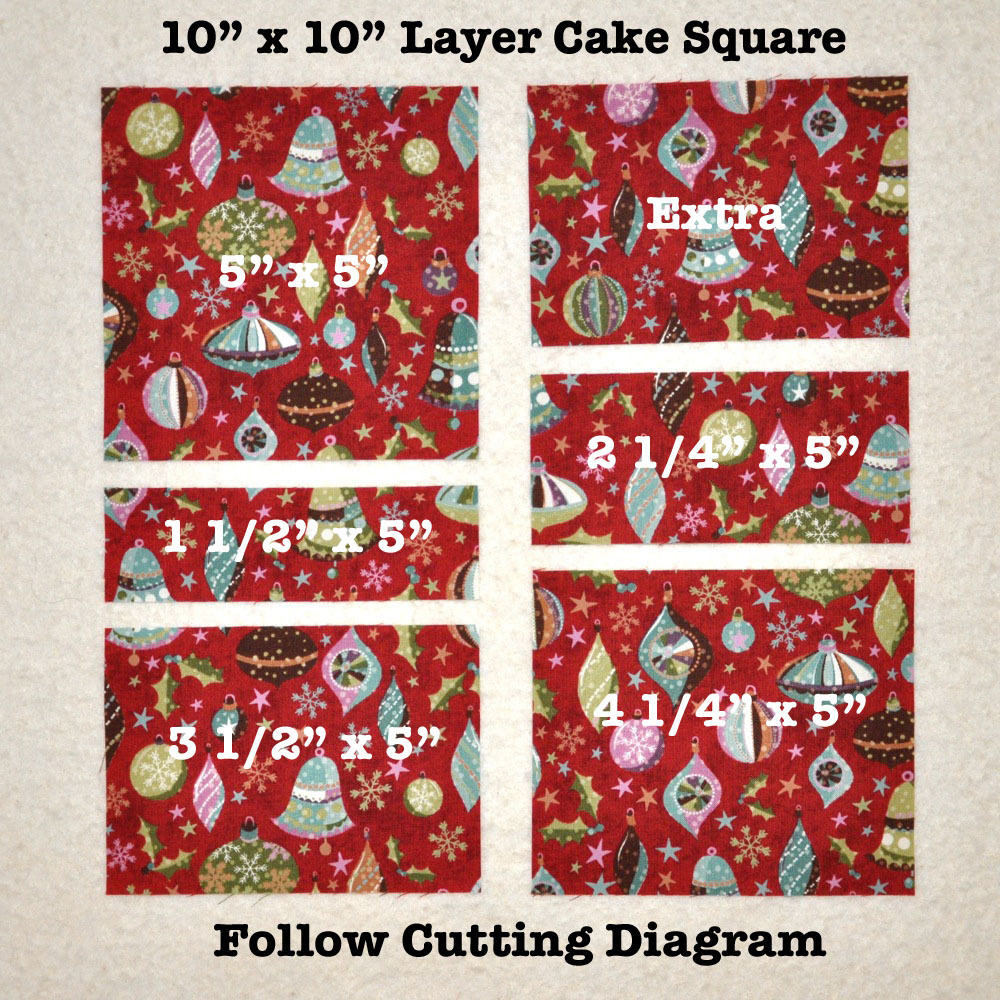
1. Choose 25 fabric squares from the Layer Cake then separate them from the pack.
2. From each of the 25 squares you will cut the following:
- Cut 1 foundation square 5″ x 5″ for inside pocket lining
- Cut 1 rectangle 1 1/2″ x 5″ for top portion of pocket
- Cut 1 rectangle 2 1/4″ x 5″ for top pocket binding/lining
- Cut 1 rectangle 3 1/2″ x 5″ for bottom portion of pocket
- Cut 1 rectangle 4 1/4″ x 5″ for bottom pocket binding/lining
3. You will be making 13 Red Blocks and 12 White Blocks for a total of 25 Blocks.
4. From the 1/2 yard cut of red and white border fabric, cut the following:
- Cut 26 red rectangles 2″ x 5″ for side borders
- Cut 26 red rectangles 2″ x 8″ for top and bottom borders
- Cut 24 white rectangles 2″ x 5″ for top and bottom borders
- Cut 24 white rectangles 2″ x 8″ for side borders
Part Two:
Making the Advent Pockets

1. Cut 2 pieces of Ric Rac measuring 5 1/4″ out of any color you wish to use.
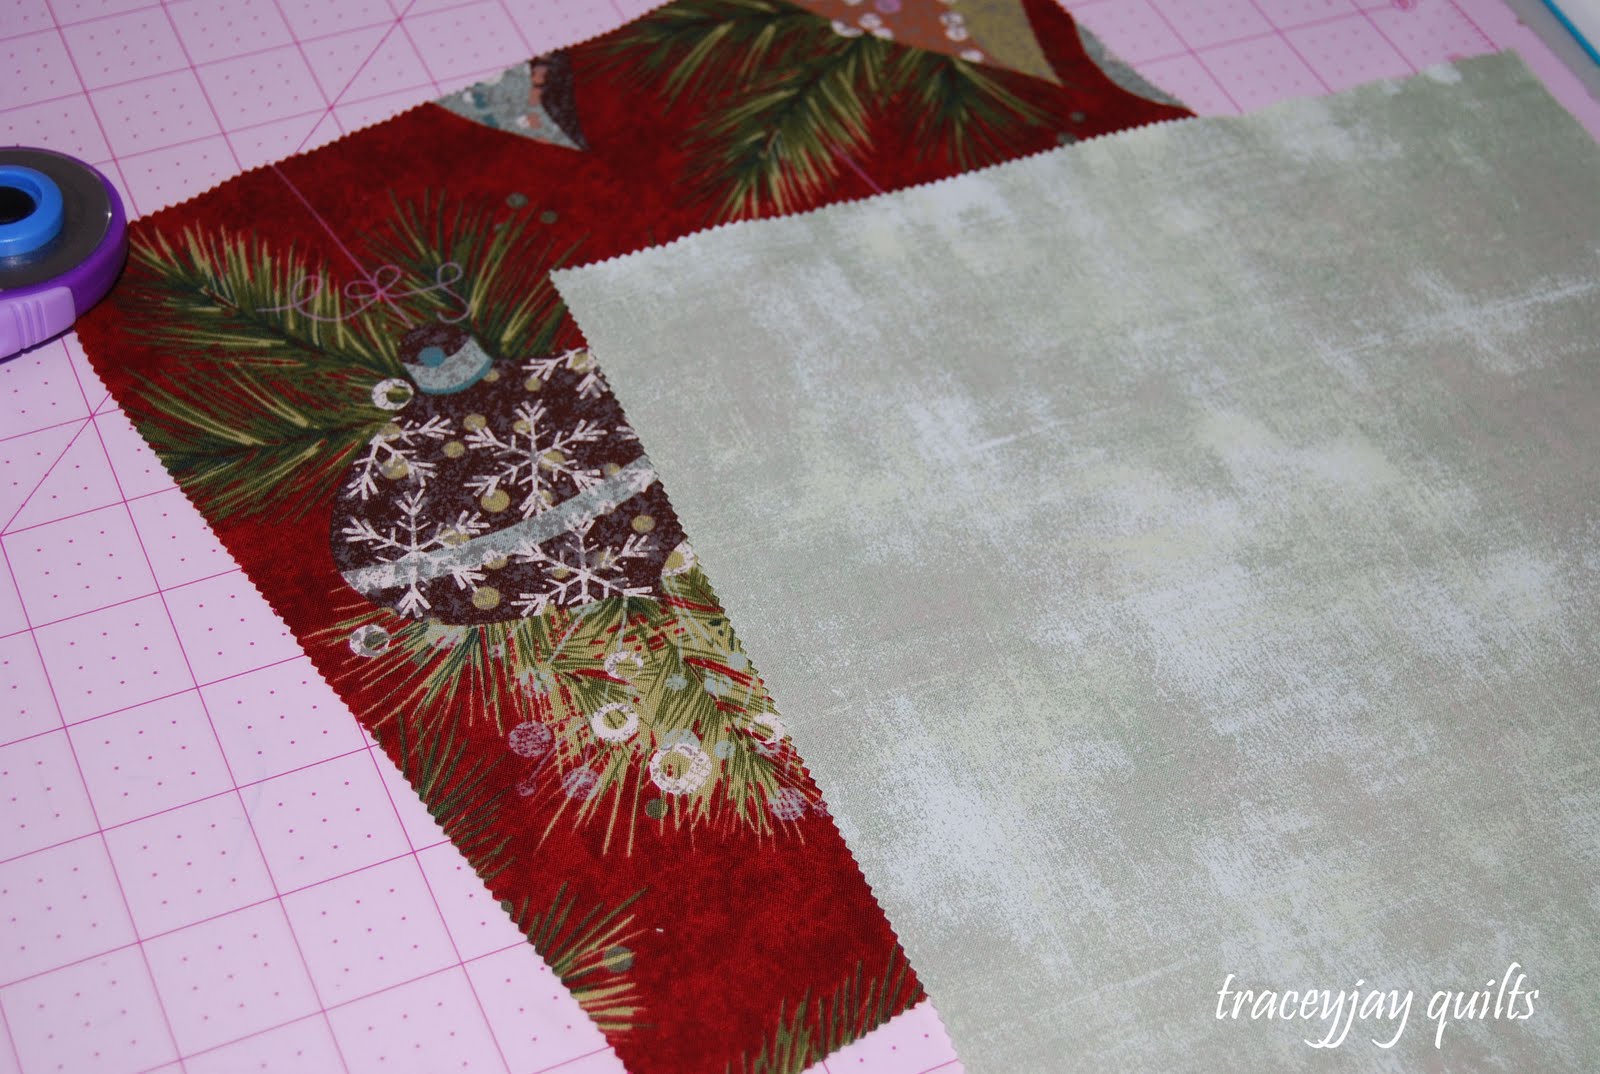
2. Choose the outside pocket fabric for the top and bottom pieces measuring 1 1/2″ x 5″ and 3 1/2″ x 5″
3. Then choose the matching top and bottom binding/lining fabric pieces measuring 2 1/4″ x 5″ and 4 1/4″ x 5″

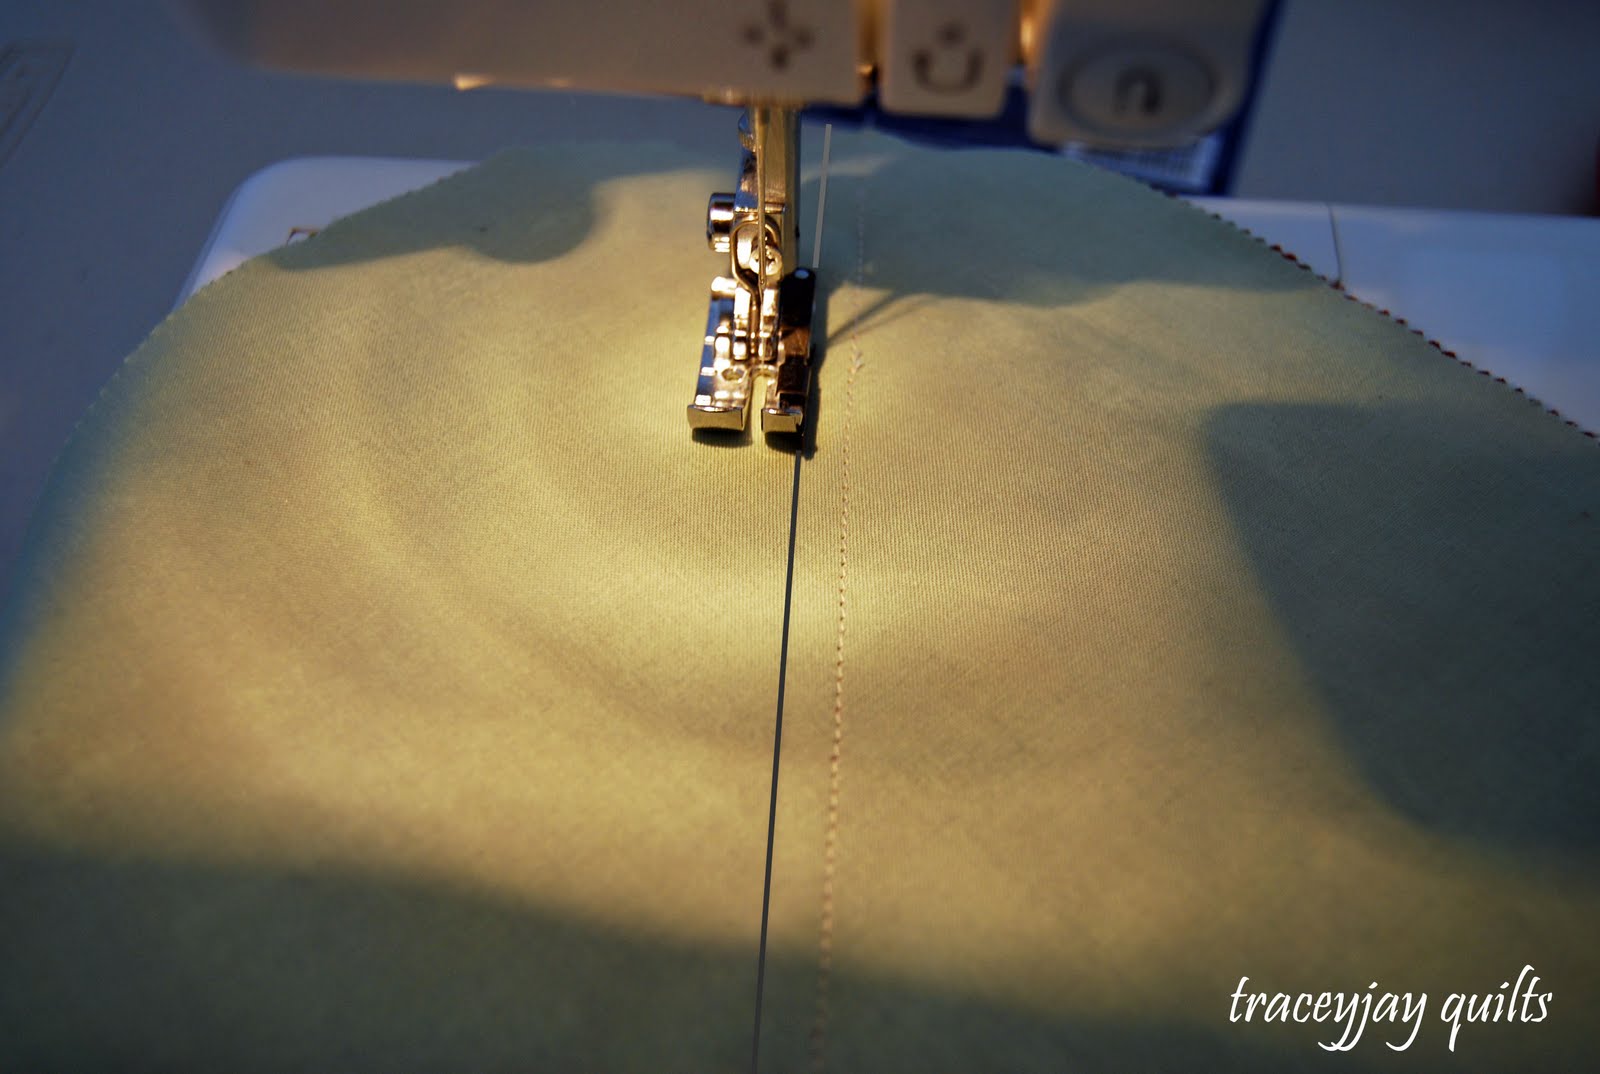
4. Place the 1 1/2″ x 5″ piece with right side facing up on your sewing table. Then sandwich the Ric Rac in the middle with the 2 1/4″ x 5″ piece of fabric with right side facing down on top of the Ric Rac. Pin in place to prevent any shifting. Sew the seam using a 1/4″ seam allowance.

5. Repeat this process for the bottom portion of the advent pocket. You will use the two pieces measuring 3 1/2″ x 5″ and 4 1/4″ x 5″


6. Open the two fabrics revealing the Ric Rac inside. Press the larger fabric piece up and over and around toward the back of the pocket. This forms the pocket binding and the inner lining of the advent pocket.

7. Trim off any excess lining fabric.

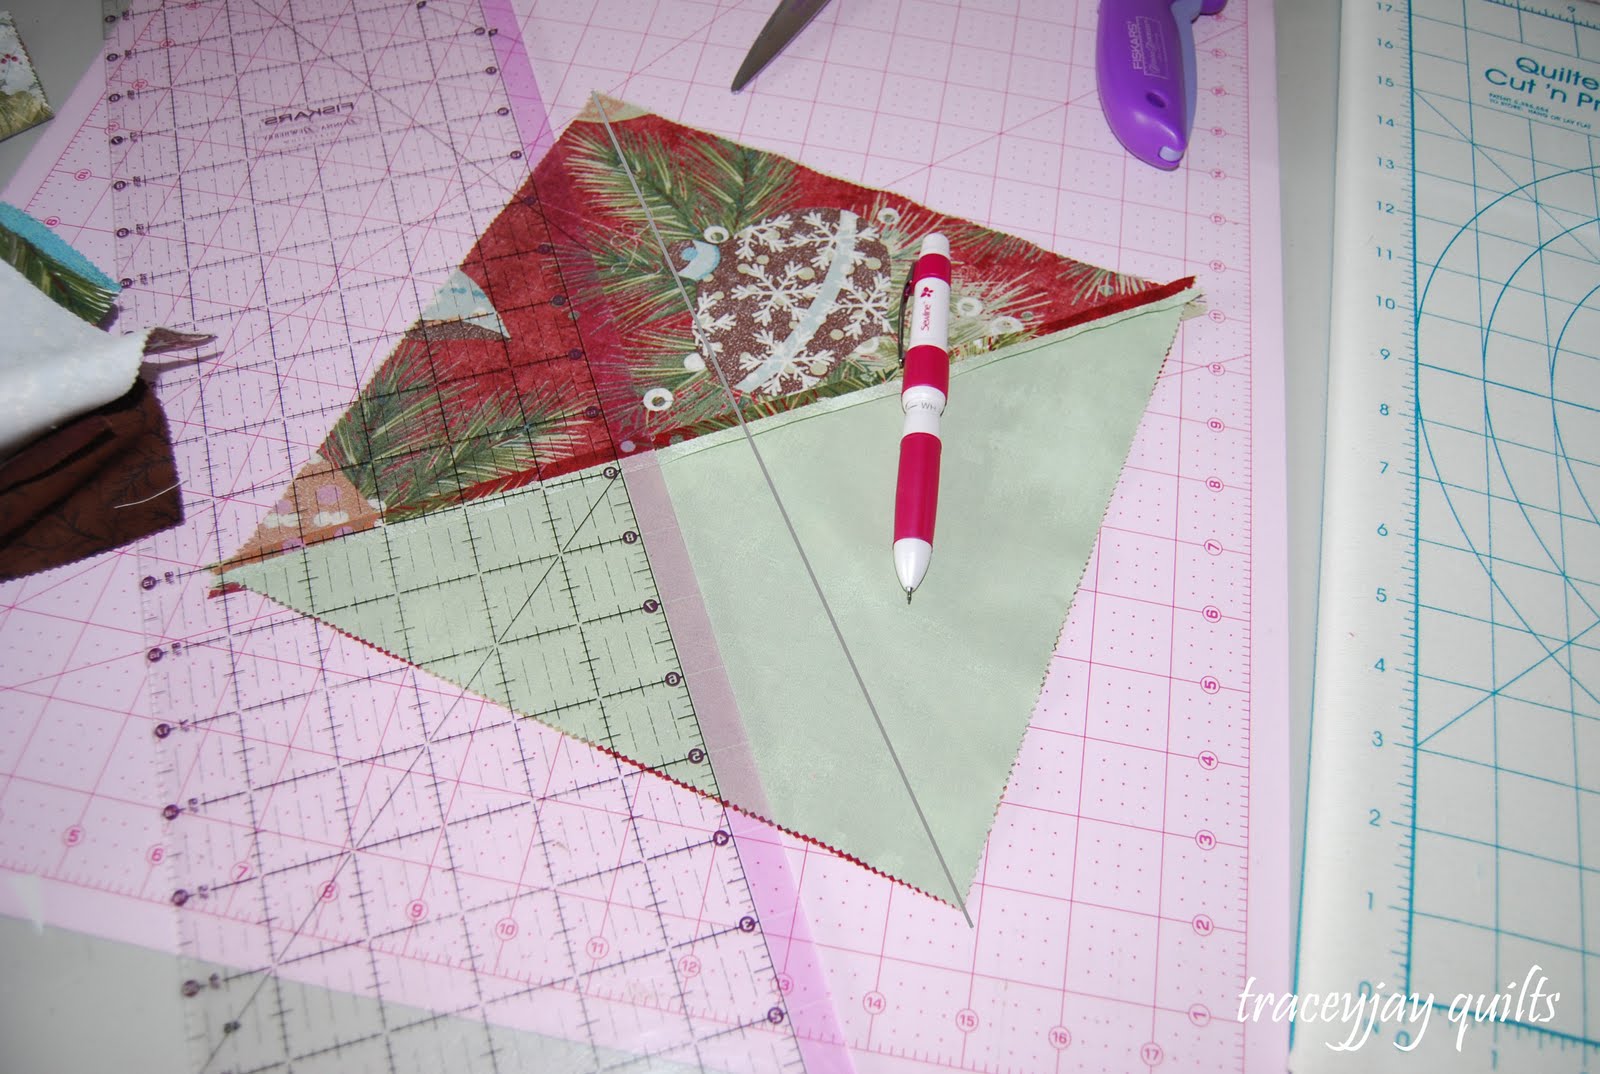
8. Place the finished top and bottom pocket pieces on top of a 5″ x 5″ foundation square with the right side facing up. Make sure the bottom edge of the top pocket and top edge of the bottom pocket meet. Baste pockets at both sides of pocket opening to secure the pocket to the 5″ x 5″ foundation square.

9. Turn pocket over and trim any excess to match the 5″ x 5″ foundation square.

10. Repeat this process for the remaining 24 advent pockets.
Part Three:
Adding the Borders to Pockets

1. Divide your advent pockets into two groups. Group One will have 13 blocks with red borders and Group Two will have 12 blocks with white borders. Remember when it comes to dividing the blocks into groups that it’s important to have contrast between the advent pockets and the border fabric. For example, you wouldn’t put a red advent pocket with the red border fabric but, you would pair it with the white border fabric. The same holds true for the light advent pockets. The other 3 colors (teal, brown, and green) can be paired with either the white or the red borders.
2. The red border strips measuring 2″ x 5″ are sewn to the left and right sides of the advent pockets and the 2″ x 8″ border strips are sewn to the top and bottom of the red blocks.
3. The white border strips measuring 2″ x 5″ are sewn to the top and bottom of the advent pocket and the 2″ x 8″ border strips are sewn to the left and right sides of the advent pockets.

4. All seams are sewn using a 1/4″ seam allowance and seams are pressed outward, away from the advent pockets.

Part Four:
Finishing the Quilt

1. Take the 25 finished blocks and lay them out in the following order:
- Row One: red, white, red, white, red.
- Row Two: white, red, white, red, white.
- Row Three: red, white, red, white, red.
- Row Four: white, red, white, red, white.
- Row five: red, white, red, white, red.
2. Sew blocks and rows together using a 1/4″ seam allowance. Press the block seams toward the red blocks and the row seams can alternate up then down on each row.
3. Now measure across the top row of blocks (it should be 37 1/2 inches). Cut two borders measuring 6 1/2″ x 37 1/2″ out of the brown fabric with snowflakes and two smaller borders measuring 3″ x 37 1/2″ out of the brown polka dot fabric.
4. Cut two pieces of Red Jumbo Ric Rac measuring 40.” This will allow for any fraying that can be trimmed off later.
5. Baste Ric Rac in place, making sure to line up Ric Rac so that when you baste it onto the fabric, the stitching line will barely cross over the curves in the Ric Rac. Trim off the tops of the Ric Rac as seen in picture.

6. Place smaller binding on top of the Ric Rac with right sides together. Sew seams using a 1/4″ seam allowance. Press seams toward the darker fabric making sure the Ric Rac lays on top of the polka dot fabric. Repeat for both bottom borders.

7. Take the two finished borders and sew one to the top of the quilt and the other one to the bottom of the quilt using a 1/4″ seam allowance. Press seam toward the brown polka dot fabric.
Attaching the Numbers

I used 4 different colors of Moda Wool but you are NOT limited to using wool if you don’t have access to wool in your area. You may use any leftover layer cake squares to make the numbers in place of the wool.
I used a heavy duty Heat N’ Bond for the wool but I would use a lighter weight or medium weight if you decide to use fabric for the numbers. I tried to use the color of wool on each pocket that gave the best contrast. You can do the same if you use fabric. Remember that contrast is important.
To make the numbers, I used my Sizzix Die Cut Machine (an older version) along with a set of number dies (that are no longer available) to cut out the numbers. I realize that most of you won’t have access to a die cut machine so, I’ve included 4 different fonts that are very similar to the dies that I used. I’ve included the numbers in the pdf download file for this pattern. You may also choose to create your own numbers by using any computer program like WORD or PAGES. You will want the numbers to be approximately 1 1/4″ in height.
1. Follow the instructions for using the Heat N’ Bond product especially if you haven’t used it before. In the printer friendly version below, you will see that I’ve already flipped the numbers so you can easily trace the numbers to the paper side of the Heat N’ Bond.
2. Cut around the outside of each number (NOT on the traced line).
3. Press each number(s) with shiny side down on the wrong side of fabric or on either side of the wool.
4. Using sharp scissors now cut out each number on the traced line.
5. Center the number(s) in the middle of the bottom half of the pocket, then press the numbers with your heated iron to activate the Heat N’ Bond.
6. Now it’s ready to take to the Quilter. A special Thank You goes to Kaylene Perry who willingly fit my quilt in to her busy quilting schedule. Kaylene has been my quilter and friend for many years now. Didn’t she do a marvelous job quilting it? I love it!!!

Merry Christmas Everyone!
To CELEBRATE my 50th Birthday. . .
I’m having a giveaway!
So, if you want to play along visit me HERE.
See You There!

1 Advent Pocket Quilt


