Lovely Lattices Quilt

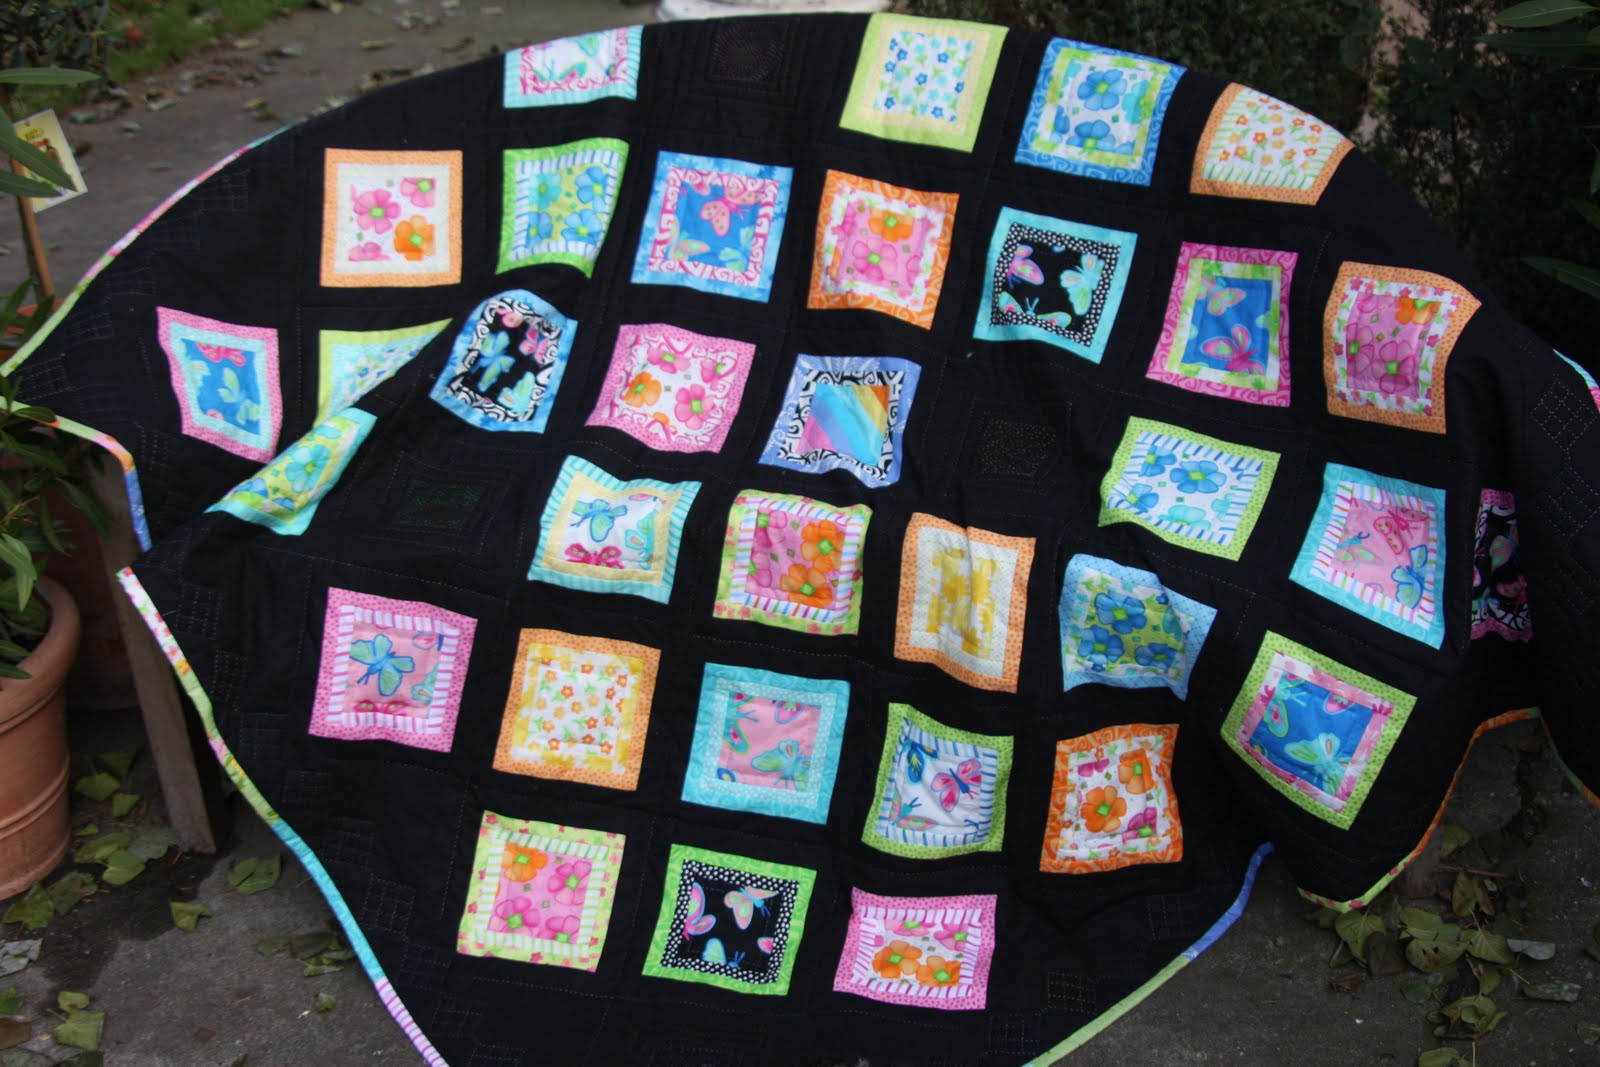
This is Sarah from Thrift Store Crafter here with my first project for Moda Bake Shop.  My favorite block ever is the Broken Dishes block and it just dawned on me one day that it was perfect for charm packs.  It wasn’t long before I had come up with the idea for this Lovely Lattices quilt.

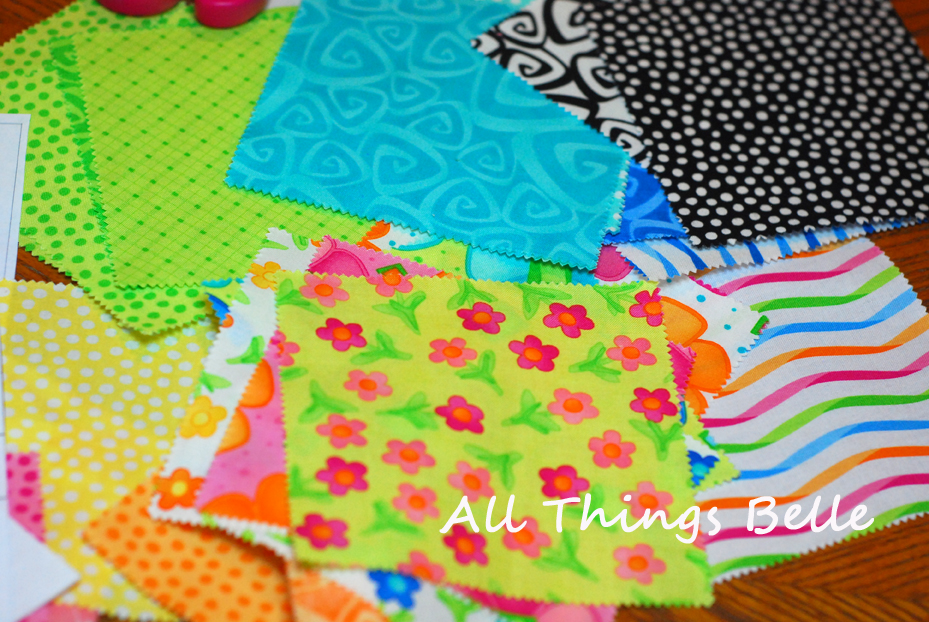
4 Hubba Hubba Charm Packs
4 yards Essential Dots, one yard each in four different colors (I used Baby Pink, Spring Green, Teal and Tangerine)
Backing and Binding – 4.5 yards of Essential Dots (I used Spring Green)


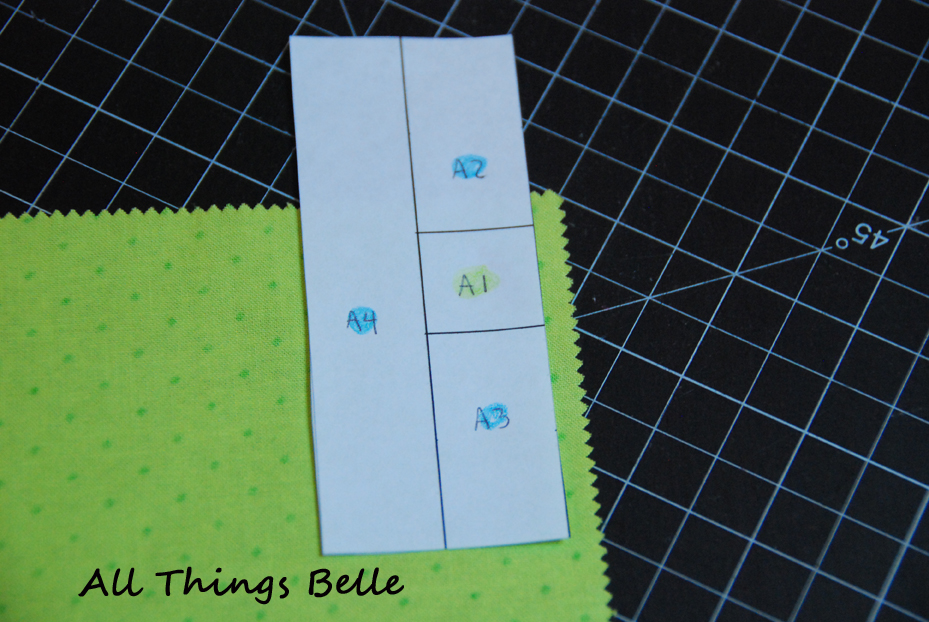
From each of your four Essential Dots colors, cut 42 five inch squares.  Keep the colors separated in four different stacks.

This is the basic block of this quilt, the Lattice block:

 
The Lattice block is comprised of four Broken Dishes blocks, each with a different Essential Dots background fabric and a different Hubba Hubba Charm Square.  This is the Broken Dishes block:


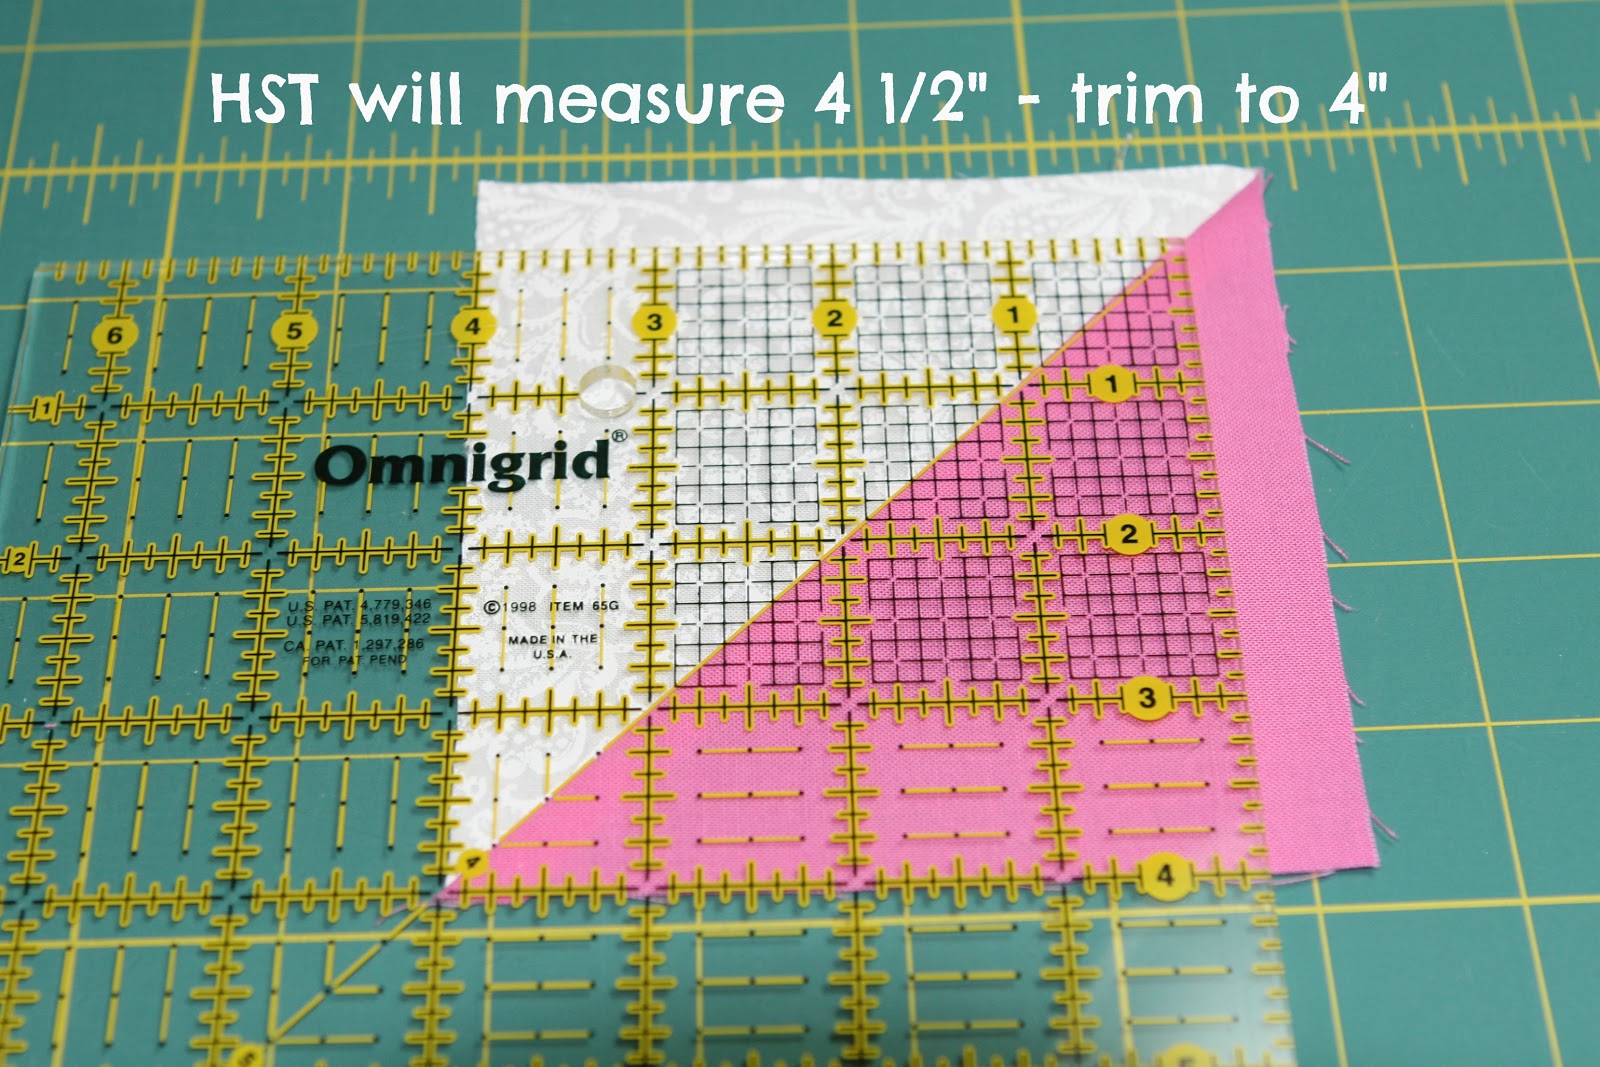
The Broken Dishes block is made up of four half square triangles (HSTs).  We are going to construct the HSTs using the charm squares and the squares we cut.  

Step 1:  Match up each stack of Essential Dots squares with one charm pack of Hubba Hubba. 

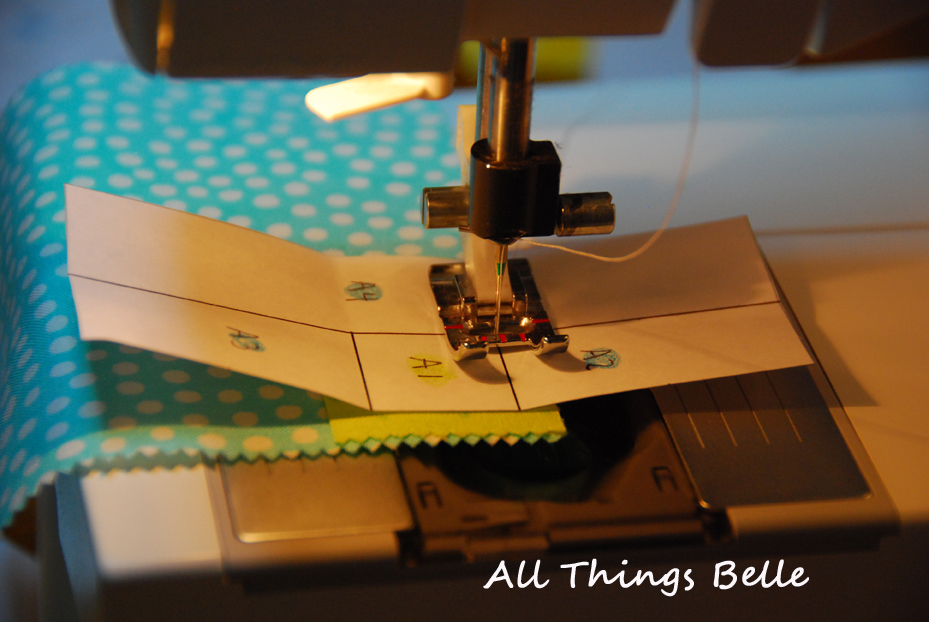
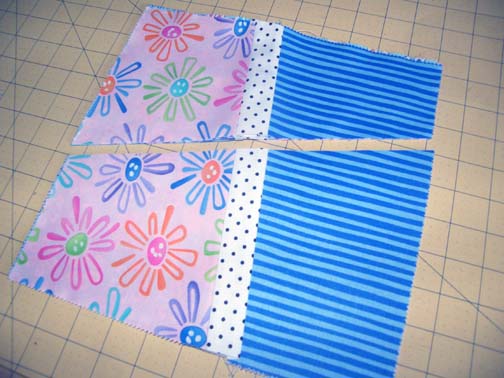
Working from one of your sets, take one charm square and one of the Essential Dots squares you cut. Place the squares right sides together matching up all edges.  

Sew around all four sides with a quarter inch seam.  It should look like this:


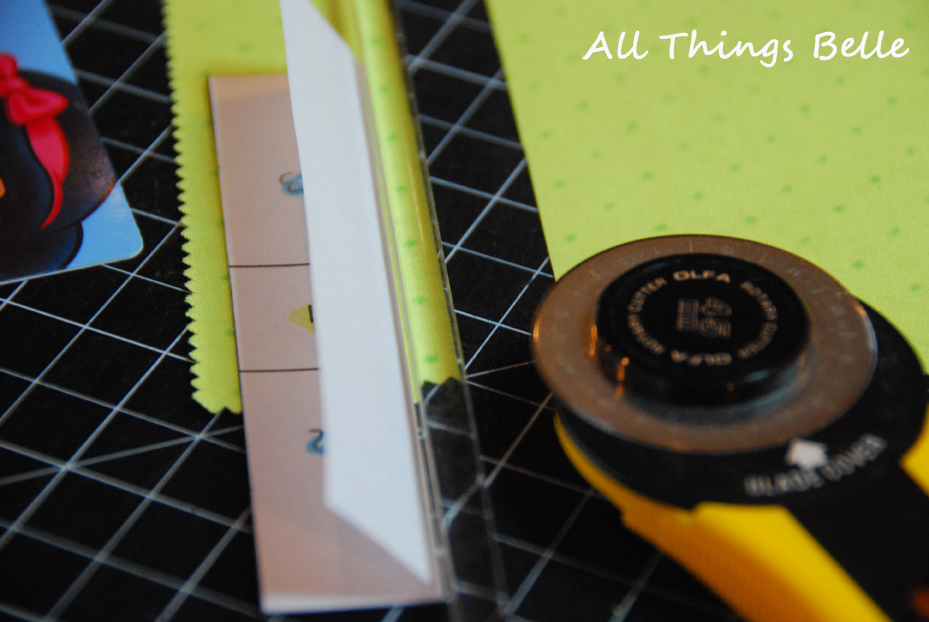
Step 2:  Cut the squares you just sewed together diagonally from the upper left to the lower right:

Then cut from the upper right to the lower left:

 
Essentially, you are cutting an “X” across the square.  It should look like this after you cut:


Step 3:  Press the seams to the dark side of the HSTs and trim the HSTs to 3 inches.


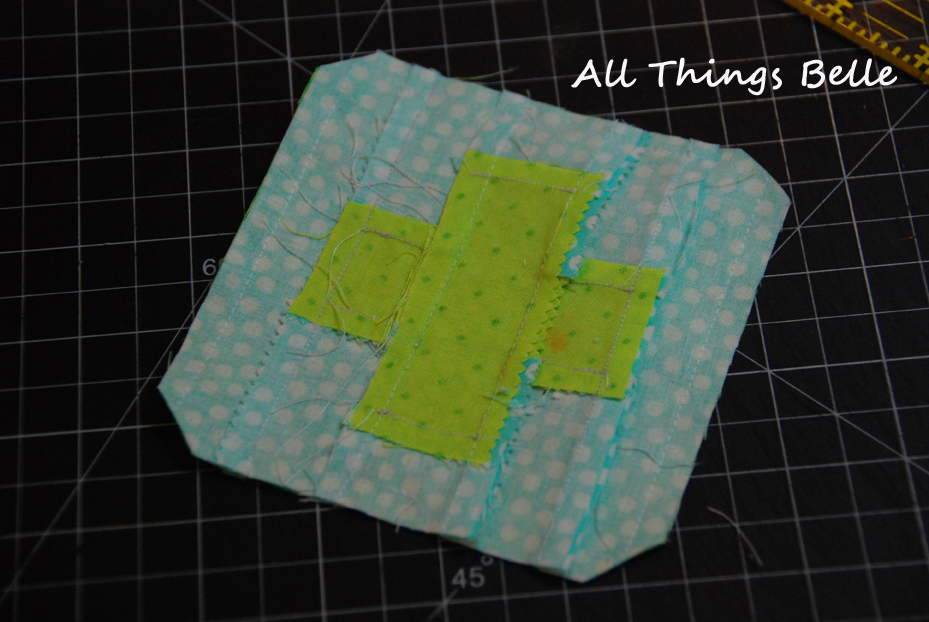
Step 4:  Lay out your four HSTs like this and sew them together:

 
Step 5:  Pinwheel the seams and press.  What do I mean by that?  Moving counterclockwise around the block, press the seam to the left.  It should end up looking like this on the back:


If you do this with each Broken Dishes block, the seams will all nestle together when you sew the blocks together.  

Step 6:  Trim blocks to 5.5 inches.

Let’s stop and talk for a minute about the best way to tackle the 168 Broken Dishes blocks you need to make.  I like to divide and conquer.  I work with one set of charm squares/Essential Dots at a time.  I divide that set into four smaller sets.  I chain piece one smaller set through the HST phase then through the piecing of the Broken Dishes block.  I then take the next set and do the same thing.  Once all 168 of my Broken Dishes blocks are together, I move on to step 7.  Keep the blocks separated by background color.

Step 7:  You should now have four piles of Broken Dishes blocks, one of each of the four background colors.  Lay your blocks out like this:


Make sure when you are sewing your Lattice blocks together that you are consistent in the placement of your background colors.  Each block should have one Broken Dishes block with each background color.

Sew your blocks together.

Step 8:  Pinwheel your seams and press.  This is just like you did in Step 5 only the seam is longer this time.

Step 9:  Trim your blocks to 10.5 inches.

Step 10:  You are now ready to lay out your blocks and sew your quilt together!  You should have seven rows of six blocks each.  Sew the Lattice blocks together into rows, alternating which direction you press the seams from row to row. 


Step 11:  Sew the rows together.


This makes one 60 x 70 inch quilt.  With it’s bright, happy colors, it would be perfect for any girl from a toddler to a teenager.

Sarah Meland
Thrift Store Crafter

Bedazzled Quilt


As I am preparing this pattern for publication much of the United States of America is frozen. There are even rumors to the effect that Niagara Falls has frozen. That’s cold. The next couple of months is bound to be filled with stories of cold and more cold as we nestle in for winter. However, that doesn’t mean we have to be cold or gloomy in the wet and grey.

Where I live, in North Texas, it doesn’t usually get very cold for very long. Our winters last a week here and a week there, buffeting us with cold winds and overly bright sunshine. Even so there are often long stretches of gray wet days. This quilt will keep me smiling well into spring.

Me and My Sister’s latest line “Hubba Hubba” is the perfect remedy for a cold wet winter. Their cheerful pallet and designs are guaranteed to make me giggle and set me to dreaming about spring. Arranged in a happy rainbow and pieced into twinkling off set stars this quilt is perfect for an evening of silly movies and pop corn.


Focus Fabrics

  • 25 fat quarters – 5 each of 5 colorways (Hubba Hubba by Me & My Sister) 

Supporting Fabrics

  • 2¾ yards background & inner border fabric (Bella White | 9900-97) 
  • 1 yard dominant solid (one sashing stripe and binding) (Bella Amelia Blue | 9900-167) 
  • 3 – ¼ yard cuts for sashing stripes (Bella Solids Kiwi | 9900-189, Bermuda | 9900-269, and Yellow | 9900-024) 
  • 4½ yards backing (Tiny Daises in Blue | 22216-16)
  • Miscellaneous fat quarters from bundle for pieced outer border

Supplies

  • 25 large sandwich-sized zip lock baggies – will make it easier to keep your gazillion pieces organized
  • Sand paper – I used a 3 2/3″ x 9″ sheet of fine grade paper that I stole from my husband’s stash in the garage. Place your pieces on top of it when drawing sewing lines, the fabric will not move.

 
Bedazzled is made from a total of 25 10″ finished blocks (they actually measure 10½” x 10½” before you sew them into your quilt), set in a 5 x 5 grid with sashing on two sides. The sashing is offset from row to row to create a twinkling effect. For added twinkle I’ve sorted the focus fabric line by colors and highlighted them with random negative blocks. What can be better than candy colored rainbows of stars?!

NOTE: WOF = width of fabric

CUTTING
From background fabric, cut:

  • 9 strips measuring 3″ x WOF; subcut into 116 – 3″ x 3″ squares
  • 2 strips measuring 10½” x WOF
    • From 1 strip cut 14 – 3″ x 10½” rectangles
    • From the 2nd strip, cut an additional 11 –  3″ x 10½” rectangles
    • From the remnant of the 2nd strip, cut 4 – 5½” x 5½” squares
  • 6 strips measuring 5½” x WOF
    • From 5 strips, cut into 14 – 3″ x 5½” rectangles (total of 70 rectangles)
    • From the 6th strip, cut an additional 6 – 3″ x 5½” rectangles (for a total of 76 rectangles)
    • From the remnant of the 6th strip, cut 1 – 5½” x 5½” square
  • Set aside remaining background fabric for the inner border. You will need 8 WOF strips but you will need to have the blocks pieced and assembled so you can calculate the dimensions. I will walk you through this step below. 

 From 25 fat quarters (FQs):

  • Select one FQ from each of the 5 colorways to be a negative block. These fabrics will become backgrounds instead of stars. From each of these negative FQs, cut:
    • 4 – 3″ x 3″ squares
    • 4 – 3″ x 5½” rectangles
  • From each of the remaining 20 FQs, cut:
    • 1 – 5½” x 5½” square 
    • 8 – 3″ x 3″ squares 
  • Select a 26th FQ that is more more like your initial background fabric, but not solid. From this FQ, cut:
    • 4 – 3″ x 3″ squares 
    • 4 – 3″ x 5½”” rectangles 
    • 1 – 3″ x 10½” rectangle (for 1/4 sashing on one block) 

From remaining (and randomly chosen) FQs, cut:

  • 60 – 5½” x 5½” squares for the pieced outer border

    From each of the sashing solids, cut:

    • 2 strips measuring 3″ x WOF (a total of 8 strips)

    From binding fabric, cut:

    • 8 strips measuring 2½” x WOF

      Break time. Really, if you have just cut all of those pieces out it is time to take a break. Pour yourself a glass of something cool and sparkling, take a walk in the fresh air, clear your mind. That is where I am headed right now….and I haven’t even cut out the fabric yet, I just wrote about it.

      PIECING

      • Block kits
        • The directions are written as if you were making one block at a time.  When I want my projects to be more unified (less scrappy) I make them this way.  It is easier to keep all of the same colors together.  If you want a more scrappy project make all of the flying goose units at the same time, randomly selecting squares and rectangles.
        • It might be helpful to sort your stacks of fabric into block kits containing the following pieces
          • 1, 5 1/2″ x 5 1/2″ square for star center
          • 4, 3″ x 5 1/2″ rectangles background for edges
          • 4, 3″ x 3″ squares background for corners
          • 8, 3″ x 3″ squares for  star points
          • 1, 3″ x 10 1/2″ rectangles for 1/4 sashing
        •  Not all of the backgrounds are the same color.  Your sets should break down as follows
          • 5 kits
            • stars pieces cut from regular background fabric
            • backgrounds are cut from fqs
            • 1/4 sashing cut from regular background fabric
          • 19 kits
            • stars cut from fqs
            • background pieces are cut from the regular background
            • 1/4 sashing cut from regular background fabric
          • 1 kit
            • star pieces are cut from a fq
            • background pieces are cut from a fq
            • 1/4 sashing cut from fq
      • Block construction
        • The blocks in this quilt finish at 10″ square.  (10 1/2″ x 10 1/2″ actual before sewn into the top)
        • Each block is made from 4 flying goose units, 4 small square patches, and 1 large square patch.
        • Before you call the block done you will also add sashing to 1/4 of it.
        • For each of the 25 kits you need to complete the following steps  (Yes, I have recycled the pictures from another bakeshop project that I did.  The blocks are constructed the same way as the blocks in Midwinter Cozy.  They are however, larger.  The fabrics pictured in the diagrams are from Midwinter Reds by Minick and Simpson)
      • Flying Goose Units
        • Gather from kit
          • 8, 3″ x 3″ squares
          • 4, 3″ x 5 1/2″ rectangles
        • Draw a diagonal line on the wrong side of each 3″ square (Get out the sand paper.  Place your fabric wrong side up on top of the paper.  The sandy grit will keep your piece from moving as you draw on it.)
        • With right sides together align one square atop one rectangle.
        • Sew along the line but just to the outside. (on the side toward the smallest part of the rectangle
        • Iron flap open – pushing the triangle lying over the larger part of the rectangle up and over the seam.
        • Trim the excess fabric from the back of the patch, or leave it there to help your patch keep it’s shape.  The choice is yours.
        • You now have a rectangle with one corner different.
        • Repeat the process on the opposite side of triangle.
        • Be careful to get the seam going in the right direction.  It should be perpendicular to the seam you already made.
        • Trim unit back to 3″ x 5 1/2″ rectangle
        • Again, you choose to trim the seam allowances or not.
        • Repeat 3 times for a total of 4 units.
      • Block
        • Gather
          • 4 flying goose units
          • 4, 3″ x 3″ background squares
          • 1,5 1/2″ x 5 1/2″ star square
        • Sew Rows
          • Top and bottom
            • Sew patches together as shown
            • Iron seam allowances towards the background squares
          • Center
            • Sew patches together as shown
      
            • Iron seam allowances towards the center
          • Sew rows together to form square.
          • Iron seam allowances away from the center block
            • NOTE: If you chose to not to trim the extra fabric from your goose units you will need to clip the seams to make them lie flat.  Clip the seam allowance ONLY, at the 4 intersections.  This will allow you to iron the bulky seam allowances to remain flat.  They will fall away from the goose units.)
          • Trim final block to 10 1/2″ x 10 1/2″
        • Add the 1/4 sashing piece, 3″ x 10 1/2″  to one side of the block
        • Iron seam allowance towards the sashing
        • Repeat process 24 more times for 25 blocks.
      • The top
        • Rows
          • Gather
            • 25, 10 1/2″ x 12 1/2″ blocks (5 in each color way)
          • Arrange blocks.
            • This is where a design wall comes in handy.  If you don’t have one, no worries, I don’t have one either (no walls in my studio…really).  You can use the floor, or your bed, or even the curtain on your shower.  You just need a place where you can lay out your pieces.
            • Once you are satisfied with the layout take a quick picture with your phone.  This will do two things for you
              • It will help you remember where the pieces go.  AND
              • It will give you a different perspective – one last peak at the arrangment to make sure you like it.
            • The blocks should be arranged in 5 rows of 5 with all of the same colorway in the same row.
            • Alternate rows should have alternate the side of the block where the 1/4 sashing is.
            • If your rows differ in length – they shouldn’t, but sometimes things happen – you can trim them to equal lengths.  Do this on the  1/4 sashing end of the row.  (The stars are supposed to be offset, no one is going to notice if an end 1/4 sashing is slightly smaller.) 
            • Sew blocks together to make rows
            • Iron seam allowances towards the 1/4 sashing.
      • Sashing
        • Gather 
          • 5 rows with 5 blocks each
          • 8 – 3″ x WOF strips from solids (2 of each color)
        • Sew solid strips together in matching sets.
        • Iron seam allowances open
        • Sew solids rows between pieced rows.
        • Irons seam allowances towards the solid rows.
      • Inner Border
        • The purpose of this inner border is to make the pieced outer border fit the pieced center.
        • The exact dimensions of the border will vary a little bit from one sewist to another.
        • Record the length and width of your top below.
          • Length = ___________  (mine was 60″) b
          • Width = ___________   (mine was 61 1/2″) a
      • Outer Border
        • Gather 60, 5 1/2″ x 5 1/2″ squares
        • Randomly sew 4 sets of blocks
          • 2 rows of 14
          • 2 rows of 16
        • Irons seam allowances open.
        • Record the length of each row
          • 14 block row =  _____________ (mine was 64) A
          • 16 block row =  _____________ (mine was 72 1/2″) B
      • Inner Border
        • The finished width of the inner border needs to be the difference between the length one side of the top and the corresponding length of the outer border, divided by 2 (because we want it evenly spaced on two sides of the quilt).  Add 1/2″ to this number to get the width you need to cut your strips. 
      • Please don’t be turned off …. this is easy math… you can do it.
      • For the short side (labeled A and a in the picture) you need to figure out x.
        • NOTE: A does NOT include the corner squares.  This is the short side of the quilt.
        • A – a = x = the finished width of this strip
          • mine was 64 – 61.5 = 2.5
        • (x/2)+ .5″ = the width to cut your inner border
          • mine was 2.5 / 2 + .5 = 1.25 +.5 = 1.75″
        • Cut 4 strips this wide x WOF
      • For the long side (labeled B and b in the picture) you need to figure out y.
        • B does include the corner squares.  They are already attached to your strip, but they do not effect the width needed for your inner border.  Subtract 9.5″ from B.
        • (B – 9.5″) – b = y = the finished width of this strip
          • mine was (72.5 – 9.5) – 60 = 3
        • (y/2) + .5″= the width to cut your inner border
          • mine was 3/2 + .5 = 1.5 + .5 = 2″
        • Cut 4 strips this wide x WOF
      • If you have any trouble figuring this out for your quilt please contact me.  I would be glad to help you.
      • Attach inner borders
        • Short sides first.
        • Iron seam allowances towards the inner border
      • Attach outer borders
        • Short sides first
        • Iron seam allowances towards the inner borders.
      • Layer and quilt as desired.


        One super fun quilted throw measuring approximately 71″ x 73″.

        It is the perfect place to sit and gather giggles with your favorite girl. I’d love to see your finished quilt. Please send me a picture, or add it to the Tops to Treasures flickr group.

        Cindy Sharp
        {topstotreasures.blogspot.com}

        Sassy Lattice Pillow


        Hi, I’m Stacey and I blog over at The Tilted Quilt ~ I’m thrilled today to share with you my first project for the Moda Bake Shop, a quick pillow that’s sure to add a little sass to any room. I think Shades of Black will be the “Little Black Dress” of fabrics this year – there are so many great black, white and gray prints in this collection, you will find a million uses for them. I wanted this pillow to have a pop as well, so I chose a high contrasting pink solid to enhance the lattice effect of the pattern. I hope you enjoy!

        1 charm pack in Shades of Black by Me and My Sister Designs

        3/4 yard Bella Solids in Peony (updated)
        1/2 yard coordinating black print from Shades of Black
        18 x 18″ square muslin or neutral colored fabric (will not be seen)
        18 x 18″ square of batting
        18″ pillow form

        1. Sort the charm pack by color – you will need 8 charms from white prints and 12 charms from black prints.  Cut 12 – 5″ squares from the solid pink fabric.

        2. Pair a white charm and a pink charm, right sides together.

        3. Make 2 Half-Square Triangles (HST) by sewing on 1/4″ on either side of the diagonal.  Each pair of charms will result in 2 –
        4 1/2″ HST.  Sew 4 pairs of white/pink charms to create 8 HST.  Trim to 4″.

        4. Trim 8 black charms to 4″ square. Pair a pink/white HST with a black charm square.  Draw a line across the diagonal as shown – sew directly on the line.  
        5.  Next, trim away 1/4″ past the sewn line to create Unit A.  This can be tricky – you want the remaining portion exactly as shown below – with the white quadrant along the top of the unit and the pink along the right hand side.  Layout is important here.  Make 8 Unit A blocks.

         6.  To create Unit B, follow the same process as above – beginning with 4 black charms and 4 white charms to create 8 black/white HST’s.  Trim to 4″ and match with a trimmed pink charm to create 8 Unit B blocks.

        7.  Now, it is time to lay turn your units into blocks. Arrange 2 Unit A’s and 2 Unit B’s as shown. Join together to create a block.
        8. Create 4 – 4 unit blocks.

        9.  Once your center is sewn together – add borders.  For the first border, from the pink solid, cut 2 – 2″ strips by the width of fabric. Add to the top and bottom first, then the sides.  For the outer border, cut 2 –  1″ strips by the width of fabric from the backing fabric.  Add them in the same manner as the first border. 
        The finished pillow top should be 18″ x 18″.

        10.  Create a quilt sandwich with the pillow top, batting and a layer of muslin or neutral solid.

        11.  Quilt as desired – I opted for an angular design throughout to complement the blocks.

        12.  For the backing fabric, cut 2 rectangles 18″x 14″. On each of the rectangles, fold one long edge back 1/4″ and then another 1/4″ and topstitch along the folded edge.

        Lay the pillow top facing up, then lay one piece of backing facing down with the folded side to the left, and then the second backing fabric facing down, with the folded side to the right.

        13.  Stitch 1/4″ around the entire pillow and flip right side out.  Insert pillow form. Enjoy!

        One 18″ square pillow

        Wiggly Whimsy Quilt

        Hello All! Rebecca Silbaugh from Ruby Blue Quilting Studio back for another recipe! This time I combined two of my favorite precuts – a Charm Pack and a Jelly Roll to create this adorable lap quilt! It’s constructed very simply, but the design makes the fabrics appear to wiggle around. I love these types of quilts that are really easy to make, but look slightly challenging. Want to learn the secret to this simple wiggle? Let’s go!

        You will need:

        One Charm Pack for the Colored Squares (I used Good Morning by Me & My Sister)

        One Jelly Roll of a Solid for the Background (I used Bella White #9900JR 98)

        4 Yards of backing fabric (I used the Yellow with Flowers #22180 15)

        5/8 Yard of binding fabric (I used the blue stripe #22184 16)

        \

         To get started, you’ll need to choose 37 Charm Squares. I used most of the colors and took out the lightest fabrics from the pack so they wouldn’t blend in with the background fabrics later on.

         From those Charm Squares, cut each one in half twice yielding 4 equal 2-1/2″ squares.

         Throw all of the cut squares into a bag and mix them up (I love this part!)

         From your Jelly Roll, cut 10 strips into 147 squares 2-1/2″ x 2-1/2″. Also cut 98 pieces 6-1/2″ long from 17 of the strips. Set the rest of the strips aside for now.

         Now that most everything is cut that we’ll need, we can start the construction process. Reach into the bag of cut squares and pull out 98 of them. Make sure the colors and patterns are well mixed. Shake the bag from time to time if you think it needs it.

         Onto each of the colored squares, stitch a background 2-1/2″ square. Press all of the seams to the colored squares. Then separate the units into 2 piles of 49 pieces each.

         Onto one pile, stitch another background square. Press the seams to the colored squares.

        Onto the remaining pile, stitch on another colored square. Make sure the colors and patterns in these pieces are well mixed. Press the seams towards the colored squares. You should now have 49 of each unit.

        Onto each of the pieces made above, stitch a 2-1/2″ x 6-1/2″ background strip. Press the seams towards the background strip.

        Then sew one of each type of units together as shown above. Press the seams towards the background fabric. You should now have 49 blocks, each measuring 6-1/2″ x 8-1/2″.

        Stitch seven strips of the blocks together end to end as shown, seven blocks in each strip. Make sure the blocks are all pointing the same direction in the strips. Layout the strips and then…

        Switch the direction of every other strip. This is how you get the random-looking pattern which no muss, no fuss.

        To complete the quilt top, take 4 strips and cut each one in half, creating 8 pieces roughly 2-1/2″ x 22″. Sew 7 of these pieces onto the end of 7 remaining full length strips.

        Trim each strips to measure 56-1/2″ long (this should be the length of your pieced strips). Stitch 6 of the strips between each of the pieced rows.

        The final strip, cut in half lengthwise creating 2 strips 1-1/4″ x 56-1/2″. Sew each of these thinner strips on the outer edge of the quilt top. This will make your top finish at roughly 56-1/2″ x 56-1/2″.

        To finalize prepping the pieces needed to finish the quilt, cut your backing fabric into 2 pieces 2 yards each and stitch them back together selvage to selvage. Cut the binding fabric into 7 strips x 2-1/2″ or whichever width you prefer.

        One quilt, 56-1/2″ x 56-1/2″. Perfect for a lap quilt for anyone. With the selection Bella Solid Colors of Jelly Rolls, you could get a completely different look by switching the background and Charm Squares.

        Since I chose to use Good Morning my Me & My Sister (Hi Barb & Mary!!!) I decided to quilt this with flowers all over.

        Oh, and I love how the stripe worked as the binding. Now, I could’ve gotten a completely different effect by cutting the binding on the bias, but I’ll save that for another quilt (it gives this candy-cane effect that’s so cool!)

        Sooooo, I know many of you have been showing your stashes here on the Bake Shop. Who has a Jelly Roll and a Charm Pack laying around begging to be used? (Me, I’m guilty) Remember this project one of those nights when you can’t sleep and the Local Quilt Shop is closed. You probably have most everything you’ll need to make this already!

        For more tutorials like this one, head on over to my blog at rubybluequilts.blogspot.com. I’m working on all sorts of wonderful right now, and I’d love to share it with you.

        Speaking of sharing, if you’ve made any of my tutorials, I’d love to see pictures! Go ahead and e-mail them to me at rubybluequilts (at) gmail (dot) com and I’ll be sure to post them on my blog! Have a great day!

        Rebecca Silbaugh
        {rubybluequilts.blogspot.com}

        Oh My, Shabby Butterflies! Quilt

        MBS SB 1


        Oh My, Shabby Butterflies was designed with the young girl {who is not the princess type} going into her first twin bed. The rough edge applique gives these whimsical butterflies their shabby chicness. This project gives the beginner quilter a way to dip her toes into applique.

        1 Twirl Layer Cake
        1 White Bella Solid Layer Cake
        5 yards 22176-19 (green) for inner rectangles and boarders
        3 1/2 yards of 108 in wide muslin for backing
        1 yard 22175-19 (rainbow strips) for binding
        4 1/2 yards of one-sided fusible interfacing (light weight)
        Cut out butterfly wings and bodies templates (added in the PDF of this pattern.) Must print out pattern to get them. You will have a choice of different sizes and varieties to work with.


        All seams are 1/4″ unless indicated otherwise.
        Please read all directions and instructions prior to constructing this quilt!
        wof – Width of Fabric
        lof- Length of Fabric

        Quilt

        Cutting Directions:

        • From the 5 yards of 22176-19 (green) cut into strips of 4 1/2 in x wof (19 total strips)
        • Cut the 4 1/2″ x wof strips into 4 1/2″ x 8 1/2″ rectangles. You will get 2 cuts per strip with a total of 4 rectangles. You will need a total of 74 rectangles.
        • From the remaining 5 yards of  22176-19 (green) cut 2- 10″ x lof. You should have 4- 10″ x lof strips for your boarders.   
        • From the White Bella Solid Layer Cake cut 2- 4 1/2″ x 8 1/2″ rectangles. You will need a total of 70 rectangles.
        • Set aside leftover material for the scrap bin or the trash bin.

        White Bella Solid Layer Cake Cutting Sample

        Cut block directions

        Quilt Assembly

        • Take the green and white rectangles and alternate them 7 rectangles wide. Start by placing a green rectangle with right sides together with a white rectangle.
        • Stitch on the 4 1/2″ edge.
        • Make sure to press seams as you go.
        • Keep alternating colors until the end of the row.
        • The next row start with a white rectangle, stitch with right sides together with a green rectangle in the 4 1/2″ edge and alternate until the end of the row.  
        • Keep alternating rows until you reach a total of 20 rows. 
        • Once all 20 rows are completed, start stitching alternating rows together. Make sure right sides are together while stitching.
        • When center of quilt is finished add the 10″ x lof strips to all four sides. Be sure to start stitching on with the length of the quilt first. Trim off any excess material then add the width to the quilt. Trim off any access material and set quilt top aside.  

        Finished Quilt Top Before Butterflies
        Oh My,...Shabby Butterflies!
        Butterflies
        • Choose 32 Twirl Layer Cake Squares of your liking.
        • Line up 2 squares side-by-side on ironing board, rights side facing down.
        • Take the 4 1/2 yards of single-sided interfacing and place over the squares (fused side to the fabric).
        • Press until fabric and interfacing are fused.
        • Continue adding squares until finished.
        OMSB 4

        • Cut out the butterfly wings and bodies template from the PDF print outs of this pattern.
        • Arrange desired templates on the interfacing side of each block.
        • Trace each desired template.
        • Be sure to flip templates over if you want to alternate colors to match the butterfly’s body and wings.
        • Cut out traced wings and bodies.
        Tracing wings

        • Once butterflies are arranged, start placing then on the quilt top.
        • It is optional to have butterflies placed where ever you want them.
        • Templates can be used as a guide to place butterflies anatomically correct if desired.
        • Once in place, pin each wing and body to the quilt top with safety pins.
        OMSB 6
        • If placing wings on the outside be sure to cut a curve at the end of each wing. This will give the effect that butterfly is working hard to flutter those wings!
        OMSB 5

        • With a darning foot, stitch each butterfly wing and body with a free motion technique. 
        • Be sure to start with the bottom layers first.
        • Best to stitch around the body/wing first then go for the decorative stitching.
        OMSB 3
        OMSB 2
        • Once all butterflies are stitched on, prep for quilting. Quilt and bind the quilt.

        One Twin size quilt 78 in x 102 in
        MBS SB 1
        Thank you!
        Jennifer Overstreet

        Plus Kisses Boo Boo Pack


        1 Twirl charm pack
        A few cups of uncooked medium grain rice
        Hi there! I’m Jennifer Rodriguez from All Things Belle.  I post about quilting, crochet, and life with our crazy daughters. Even though it’s snowing outside here in Utah, I’m dreaming of hot summer afternoons playing in the yard. I don’t know about you but when my girls play in the summer, we tend to need boo boo packs for skinned knees and more.
        I absolutely adore the Twirl charm pack: it’s full of assorted fun colors and is perfect for a summer project. With just one charm pack, I’ll show you how you can create a rainbow assortment of Plus Kisses Boo Boo Packs.  The design is paper pieced which is my favorite way to quilt. This tutorial will include a brief segment on paper piecing and I have a more in depth instructions here.
        Step One: Print out the paper piece design {included in the Printer Friendly Version}. I suggest lightly coloring in the pattern as a reminder for the fabric you want use.

        Step Two: You will then need to cut the lettered sections from each other: A, B, and C.

        For paper piece foundation quilting, I recommend the following tools:

        *old credit card or something of that shape and weight

        *rotary cutter
        *cutting mat
        *extra fine seam ripper
        *tape
        *iron
        *add a 1/4″ ruler
        *tweezers
        *glue stick

        Step Three: Pick out fabrics from the charm pack that you would like to use in the design. You will need 2 charms of the same design for the background and 1 for the plus sign. Place a small dab of glue on the wrong side of the fabric for A1 and adhere to the back of the paper. The fabric will always be worked on the back of the paper and sewn from the top. 

        Then using your 1/4″ ruler, trim down the piece following the pattern grid.

        Step Four: Reduce your stitch length to 1.5 – this will make it much easier to tear off the paper later.
        Step Five: Line up the fabric for A2, seams matching A1 and right sides together. Then sew exactly down the line that borders A1 and A2. Press seam and trim A2 with the 1/4″ ruler.


        Step Six: Sew the sections together in alphabetical order (A to B, AB to C). Press and you can now remove the paper pattern from the back.

        Choose another charm to use as the back of the boo boo pack.

        Step Seven: Pin the front and back together with right sides together.

        Step Eight: With a 1/4″, stitch around the perimeter and leaving a 2″ space open. Clip the corners close to the stitches.

        Step Nine: Pull the right side of fabric out through the 2″ opening and press. 
        Step Ten: Place a funnel into the opening and fill with rice.
        Don’t stuff it too full. Leave about 1/2″ of space at the top of the pack.

        Step Eleven: Close the opening by hand with a ladder stitch or you should be able to top stitch it closed on your machine since the pack is not completely full.

        One Twirl pack will be enough to create several boo boo packs. The exact number will depend on your fabric selection for the top. 

        I hope that you have fun making these boo boo packs. You can use them for so many things! You can pop them in the microwave for about 1 minute for some warm soothing or place them in freezer to cool down skinned knees. In addition to using them as pain relief, they are a fabulous way to warm or cool down your bed before bedtime. We love to use ours when we camp to heat our toes in the sleeping bag.
        Thank you again and I would love for you to stop by my blog, All Things Belle, for more quilting fun!
        Jennifer Rodriguez
        {All Things Belle}

        Little Have Grown


        Hi my name is Heike Pier and this was my first time to make something from a layer cake! I thought it would be challenging to make a large project and I didn’t know how I could make something so large with 10” squares.

        I named my quilt Little Have Grown as the little squares grew into a large quilt with the help of some black solid fabric.


        1 layer cake – Twirl by Me and My Sisters Designs
        4 1/2 yards of black solid
        4 yards of backing fabric
        70” x 76” of batting


        Cutting Instructions:

        Sort your layer cake into squares you will use for the centre of the blocks and squares you will cut into strips for the borders of the blocks.

        You will need 9 squares for the centre of the blocks and the rest of the squares for the borders and binding. I selected all the squares with large motifs for the centre squares and small prints for the borders.

        Cut the squares for the centre of the blocks into 4 squares 4 ½”.

        Cut the remaining layer cake squares as follows:
        Cut 27 of the squares into:

        1 strip 2 ½” x 10”
        2 strips 1” x 4 ½”
        4 strips 1” x 5 ½”
        2 strips 1” x 6 ½”

        Cut 3 of the squares into:

        1 strip 2 ½” x 10”
        4 strips 1” x 4 ½”
        6 strips 1” x 5 ½”
        2 strips 1” x 6 ½”

        Cut 3 of the squares into:

        1 strip 2 ½” x 10”
        2 strips 1” x 4 ½”
        6 strips 1” x 5 ½”
        4 strips 1” x 6 ½”

        From the black solid cut:

        20 squares 6 ½”
        55 strips 2 ½” x 6 ½”
        2 strips 4 ½” x 62 1/2” (*approx for top and bottom – measure your quilt)
        2 strips 4 ½” x 60” (*approx for sides – measure your quilt)
        strips 2 ½” x width of fabric for sashing (cut as needed)

        Make the Blocks
        Each block has 2 colour borders.

        For the first border you will need 2 strips 1” x 4 1/2” and 2 strips 1” x 5 ½” from the same fabric.

        For the second border you will need 2 strips 1” x 5 1/2” and 2 strips 1” x 6 ½” from the same fabric.

        Distribute your centre squares and border strips until you are happy with the combinations. I tried to make sure at least one of the borders was the same colour as part of the centre square.

        Sew the first border by sewing the 1” x 4 ½” strips to the top and bottom of one of the 4 ½” square and the 1” x 5 ½” strips to the sides of the square.

        Sew the second border by sewing the 1” x 5 ½” strips to the top and bottom of one of the square and the 1” x 6 ½” strips to the sides of the square.

        Repeat to make 36 blocks.

        Add the Sashing
        The blocks in the quilt are on point but are pieced in strips. To make the layout more interesting, and to make a larger quilt, intersperse the pieced blocks with black solid squares. You will need 9 black 6 ½” squares in addition to the 36 pieced blocks, to make the quilt.

        Arrange your blocks and black squares into strips of 2, 4, 6, 8, 9, 7, 5, 3, and 1 as shown.

        Sew blocks into rows by sewing the black 2 ½” x 6 ½” strips between the blocks and at both ends of the row.

        Cut the remaining black 6 ½” squares in half diagonally and sew to the end of each row.

        Sew 2 black half square triangles to either side of a black 2 1/2″ x 6 1/2″ strip for the top left hand corner of the quilt.

        Use the black 2 ½” x width of fabric strips to sash the rows. Let the end of the sashing hang over each row and be sure to line up the squares in the rows as shown.

        Finishing
        Square up the quilt top by trimming the edges of the sashing so the squares are on point.

        Measure your quilt top along the top and sides. Add ½” to the measurement for the sides of the quilt for seam allowances and cut 2 black strips 4 ½” x this measurement.

        Sew the side strips to the sides of the quilt top.

        Add 8 ½” to the measurement for the top and bottom of the quilt to allow for seam allowances and the side borders and cut 2 black strips 4 ½” x this measurement.

        Sew the top and bottom strips to the top and bottom of the quilt top.

        Layer the quilt top, batting and backing fabric and baste in place. Quilt as desired. I like to hand quilt.
        I quilted inside the centre of each square about ½” from the edge. I also quilted through the centre of each sashing strip and added decorative quilting in the black solid squares. I used a variegated thread that matched the colours in the layer cake.

        Sew the 2 ½” x 10” strips into one continuous strip to use for binding the quilt.

        I hope you have fun making this quilt!


        One quilt 62″ x 68″

        Heike Pier

        Hot Cross Buns

        Hi everyone, it’s Wendy from Sewing in the Wendy City, back with my third Moda Bake Shop post!  

        I’m thrilled to bring you a pattern for a child-sized quilt — not quite a lap size, but bigger than a baby quilt and long enough to cover the toes of your grade-schooler.  For fabric requirements for a larger sized quilt, please visit my blog.


        1 Layer Cake of Amelia by Me and My Sister Designs
        1.5 yards of sashing (white with black dots, # 22167 17)
        0.5 yards of binding (purple stripe, #22165 14)
        1.5 yards of backing (flannel purple flowers, #22161 14F)


        Cutting:


        from sashing:
        cut 18 strips Width of Fabric (WOF) that are 1.5″ wide
        cut 5 strips WOF that are 2.5″ wide


        from binding:
        cut 5 strips WOF that are 2.5″ wide


        Choose 20 of your layer cake squares to go in the quilt.  Since my sashing had a white background, I avoided the layers with a white background.


        Separate them into 5 piles of 4 squares each.  Each of the 4 squares should be a different color or background.


        Start with your first pile.  Stack the 4 squares on top of each other.  Take them to your cutting mat and cut a straight line on the diagonal.  No need to measure, you can’t do this wrong!


        Just make sure you are cutting all 4 at one time — very important!


        Now you are going to sew a piece of 1.5″ sashing to all 4 of the left pieces (the larger piece).  Leave a little extra at the top and the bottom.  Press.  Trim even with the edge of the block.


        Next, sew a matching piece to the other side.  You will have 2 groups when you do this, so your 4 blocks will look like this:


        Notice that the purple and teal florals are paired, and the blue and pinks are paired.  This is on purpose so that it all goes together nicely at the end and each finished block has all 4 prints in it.

        Stack all 4 blocks and make another cut crossing the first one as shown.


        Again, be sure you are cutting all 4 blocks at once.

        Sew a piece of 1.5″ sashing to all 4 of the top pieces.  Leave a little extra at the top and the bottom.  Press.  Trim even with the edge of the block.


        Finally, match up the other side of the block so that each block has all 4 prints in it and sew.


        You will end up with 4 blocks, each with all 4 prints.

        Repeat for the 4 other piles of 4 blocks each until you have 20 total blocks.

        Trim all to 10″ square.


        Lay them out in a pleasing design.


        From your 1.5″ sashing strips, subcut into (16) 11″ strips.  These will be sewn to the bottom edge of 16 of the blocks.  


        Then sew into columns as shown.


        Add in a 1.5″ sashing strip between the columns as shown.


        Finally, add the 2.5″ strips of sashing to all 4 sides of the quilt top.


        Trim the corners, quilt and bind as desired.


        I used a flannel print from the Amelia line for the backing, and I love how pretty and soft it turned out!


        1 beautiful child-sized quilt, measuring approximately 43″ x 53″


        Boy do I love a striped binding!


        Edited to add…
        If you wanted to make the same quilt larger, you could make it from 30 squares.
        To do this, you’d need 2 3/4 yards sashing and 1/2 yard of binding.
        Finished size would be approximately 65″ x 73″.
        Make 5 columns of 6 blocks each.


        Want to see what I made with my leftover layer cakes?  Head on over to Sewing at the Wendy City to see!


        As always, I am honored to post on Moda Bake Shop.  Thanks for reading, and have a lovely day!


        With love,

        Wendy Poling

        Reversible Swim Cover Up

        Summer fun! Can you tell I’m ready? These easy to make swim cover ups are reversible and easy for little ones to put on themselves. Cute and practical? Sign me up, baby.

        I hope you enjoy the recipe. Feel free to stop by my blog for loads of tutorials and more than you’d ever want to know about these two cutie pies!


        – 1 Marbles jelly roll
        – 1/4 yd to 1/2 yd (depending on size) of 2 Happy by Me and My Sister prints
        – 1/2″ wide elastic

        * unless noted, seams are 1/4″ *

        1. Take measurements for desired size cover up. Measurements for my 15 month old daughter are in red so you can follow along.

        Measurement “A” =(chest circumference / by 2) + 6
        = (21 / 2) + 6
        = 10.5 + 6
        = 16.5″

        Measurement “B” =(distance from armpit to knee)
        = 13″

        Measurement “C” = Measurement “B” – 8.5
        = 13 – 8.5
        = 4.5″

        2. Cut 2 polka dot panels for front of cover up: Measurement “A” x Measurement “C
        = 16.5″ x 4.5″

        3. Sew 2 jelly roll strips RST lengthwise. Press open.

        4. Trim strip set to Measurement “A” (16.5″). Repeat until you have 4 sets.

        *The number of jelly roll strips you need to sew together depends on the size garment you make*

        5. Sew a jelly roll set RST to top and bottom of each rectangle from Step 2. Top stitch seams.

        6. Cut 2 rectangles the same size as the pieced rectangles from Step 5 for reversible side of cover up.

        7. Trim a blue jelly roll strip to Measurement A (16.5″). You need a total of 4 trimmed jelly roll strips.

        8. Sew a blue jelly roll strip RST to the top of each rectangle (4 total). Top stitch.

        You will have 2 pieces like this:

        And 2 pieces like this:

        9. Layer 2 matching rectangles RST. Sew side seams with 3/8″ seam allowance to create tube. Repeat with other matching rectangles.

        10. Press seams open. Iron 1/2″ fold to the wrong side of the top of both tubes.

        11. Place one tube in the other RST, matching side seams. Pin bottom edge. Stitch 1/4″ seam around perimeter.

        12. Turn right side out, press, and top stitch bottom edge.

        13. Pin top edges together. Edge stitch, leaving a 1″ opening to insert elastic.

        14. Stitch 3/4″ below edge stitch line along the entire perimeter.

        15. Cut elastic 3″ less than chest circumference. Thread elastic. Zig zag ends together to secure.

        16. Check fit. Edge stitch 1″ opening closed.

        One sassy and sweet reversible cover up!

        Enjoy,


        jennygarland.com

        Baby Doll Bunting

        Looking for a quick handmade gift for a little girl?
        I have just the project for you.  In as little as 45 minutes you can whip up one of these cute little buntings.
        Baby Doll Bunting 12 X 19 inches
        Moda Spring Fever Layer Cake by Me & My Sister or 9 {10 inch squares}
        • Batting 19.5 X 24 inches
        • 3/4 yard lining fabric Spring Fever or other Moda basic cut to 19.5 X 24 inches
        • basic sewing supplies, needle, thread etc.
        • walking foot
        • Choose 9 layer cake squares {10 inch squares}
        • cut each square into 8.5 inches X 7 inches rectangle
        • arrange and sew  the pieces in a nine patch similar to this, alternating lights and darks
        • if you haven’t already, cut the lining and batting 19.5 X 24
        • layer lining right side up, bunting top right side down and batting as shown. 
        • starting in the middle of what will become your ‘bottom’ sew 1/4 seam around the perimeter of the quilt sandwich.
        • Stop about 4-5 inches from your starting point to leave an area for turning. 
        • Clip corners to reduce bulk
        • After sewing your ‘quilt sandwich’ should look similar at the opening.
        • turning it out
        • clipped corner
        • Once piece is turned, iron to smooth edges.
        • Pin the opening closed as shown.
        • Sew a 1/4 inch top stitch around the perimeter of the quilt being careful to catch your opening to finish the edge.
        • Quilt center using a walking foot to help prevent shifting.
        • Consider quilting an X through the centers of the rectangles or meander edge to edge.
        • This project would be a great way to practice your machine quilting technique.
        • Here’s a view of the lining.
        • Next lay the piece on your work surface with lining facing up.
        • Fold in the sides of the bunting to meet in the center.
        • Overlap the center front about 1/4 inch and carefully pin together about 6 inches from the top all the way to the bottom. 
        • You do you not want to catch the fabric underneath.
        • Next, top stitch over your original top stitching slowly. 
        • You do NOT want to catch the fabric underneath.
        • In order to achieve this, roll the quilt piece as you stitch to ‘take up’ the bulk. 
        • near the top you may have to stop and stitch from the opposite direction due to the bulk of the piece.
        • you will end up with a ‘tube’.
        • Pin across the bottom edge and sew over the original top stitching if possible.
        Fold down the top edge to expose the lining a bit.
        And there you have it, only 45 minutes later, a quick, easy, baby doll bunting that any little girl will love.
        * Happy Holidays *

        Vickie E