Steps To The Sea Quilt


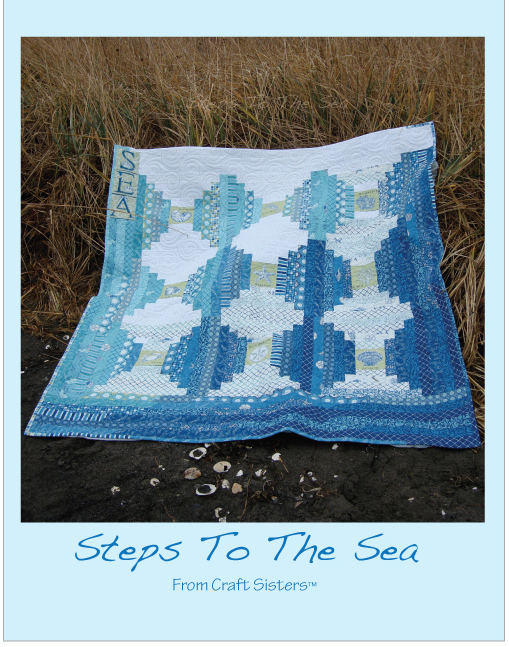
Hello from Robin at Craft Sisters. It’s great to be back at the Bake Shop sharing a new quilt. The pattern is a simple log cabin block variation – Courthouse Steps and uses Deb Strain’s beautiful “Seascapes” Jelly Rolls and Panel. Thanks Deb and Moda for all the beautiful colors.  


1 Seascapes Panel 19610-12
1 Bella Solids Jelly Roll White 9900JR-98
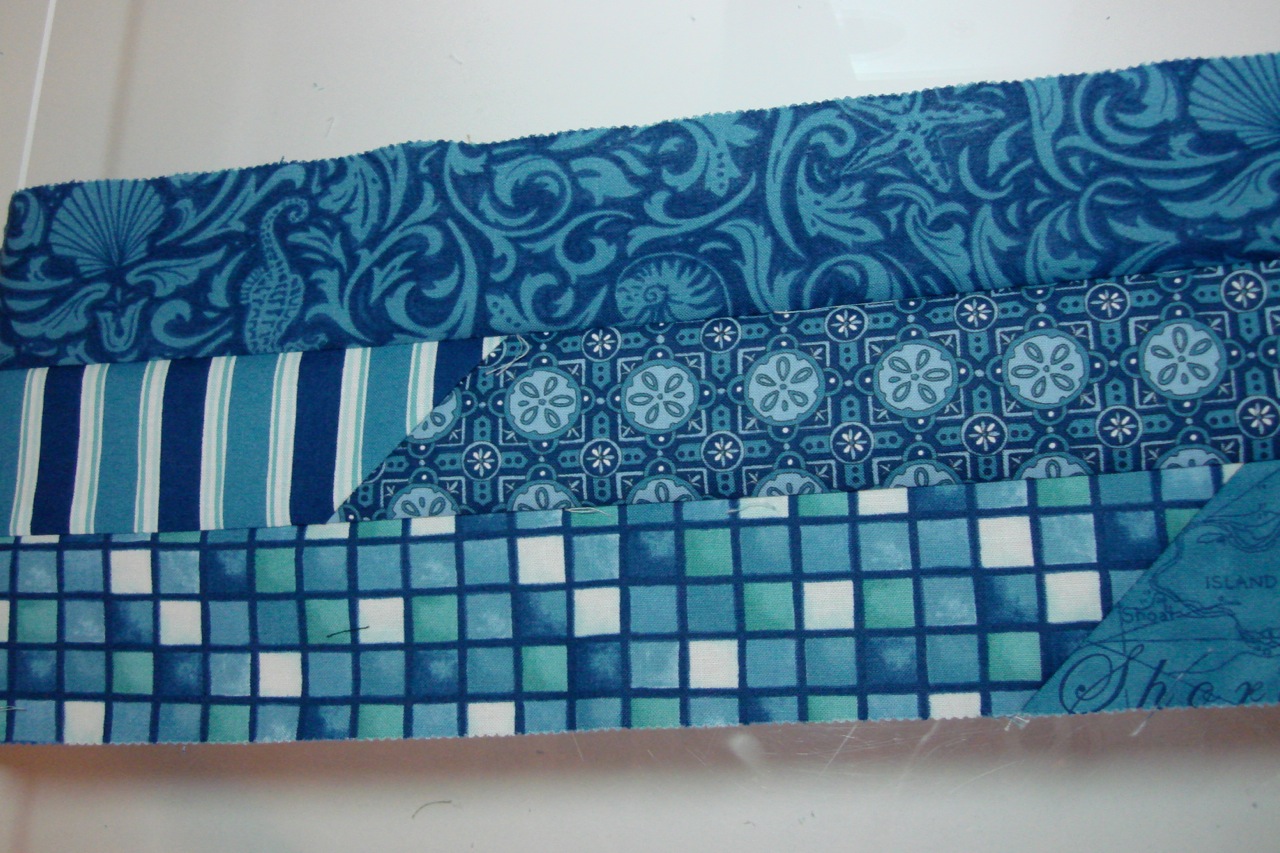
2 Seascapes Jelly Rolls 19610JR
5 Yds. Backing fabric
Batting 79” x 85”

Just a note that one Jelly Roll will make six blocks.  This quilt could be made with 2 Jelly Rolls if you are OK without borders or smaller borders. I added the white, Bella Solid to get more contrast.  There are only a few light strips in the Seascapes Jelly Roll.

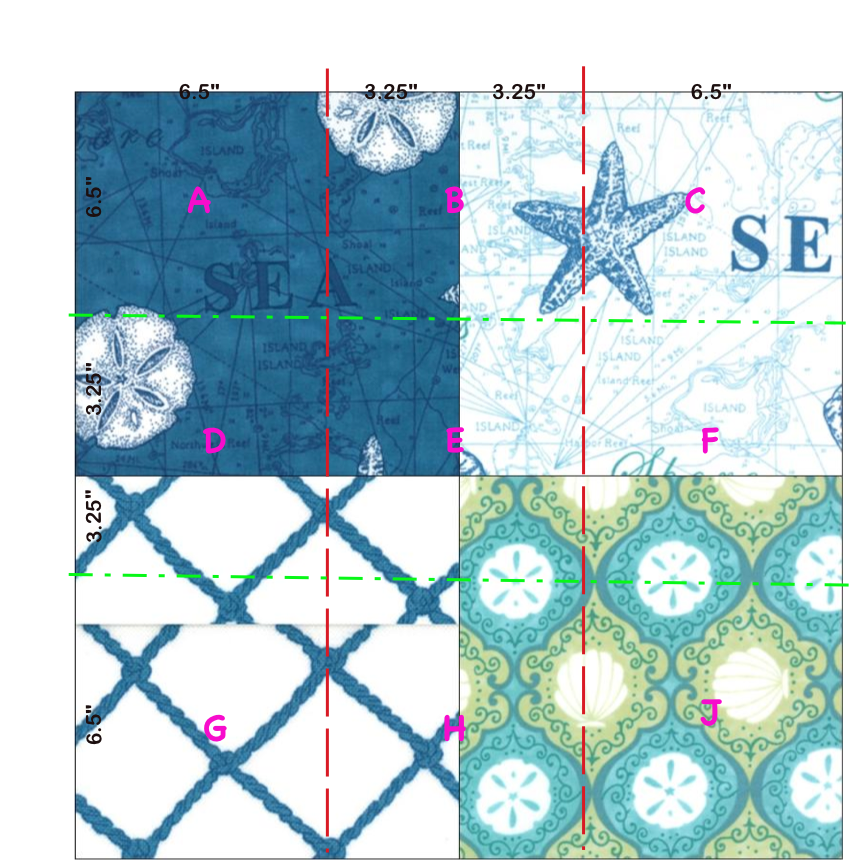
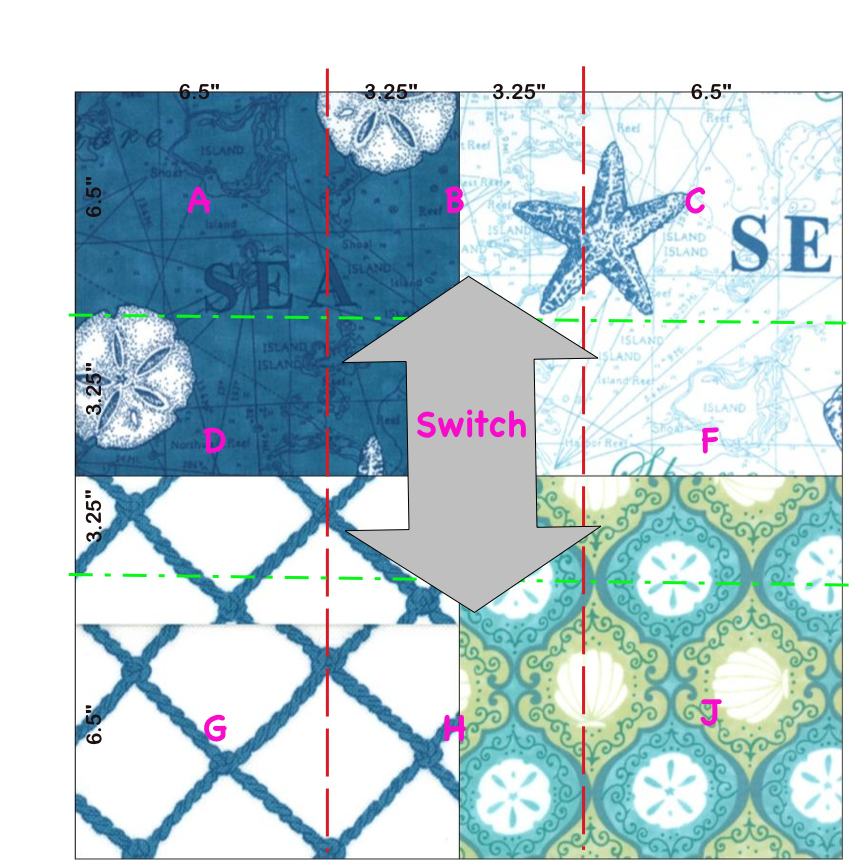
Step 1 – Cut the panel squares using a square ruler
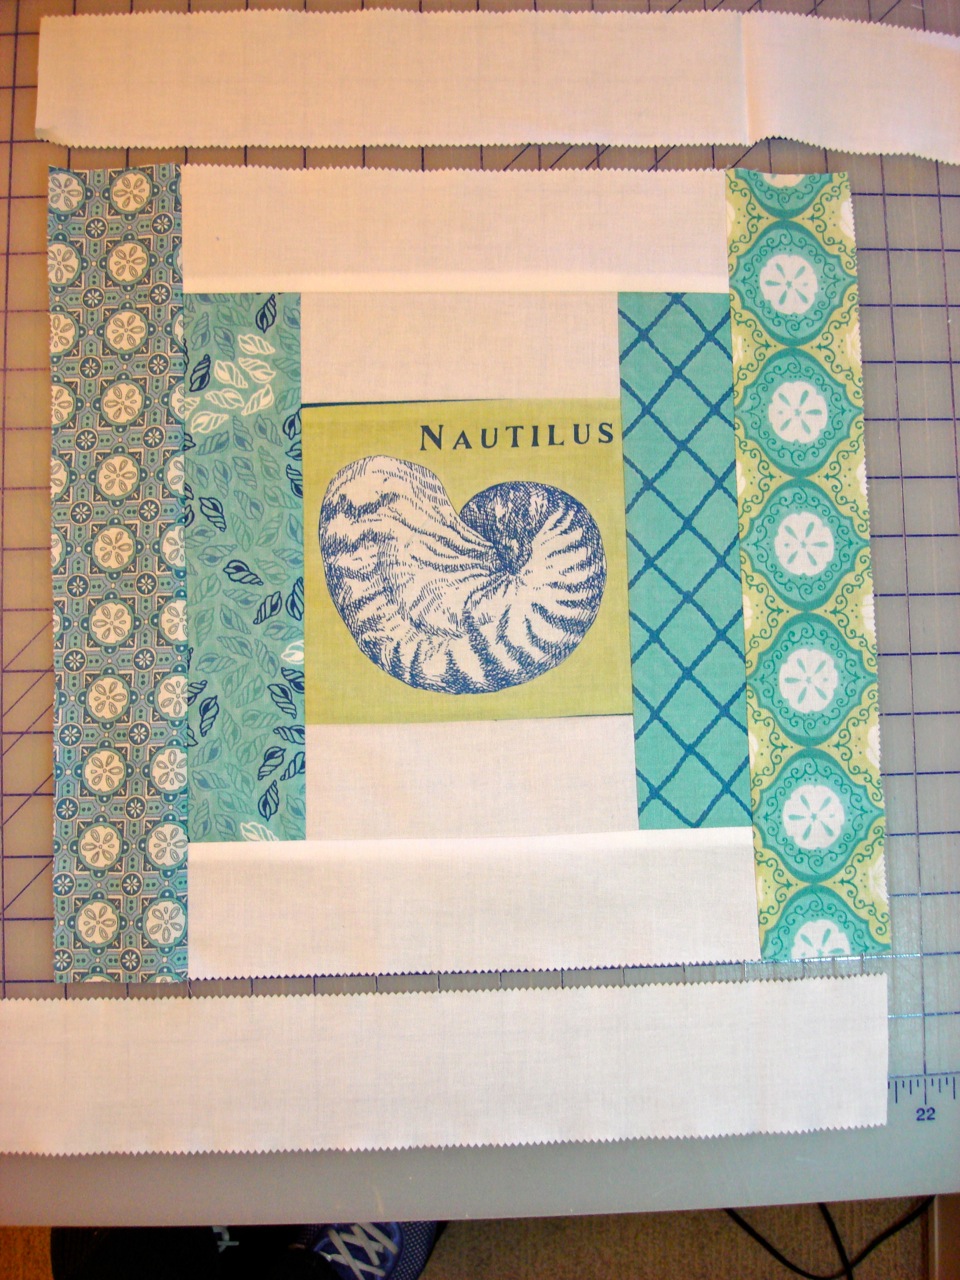
Center a ruler over each letter and trim to 6-1/2” square 
Center a ruler over each shell and trim to 6” square
Step 2 – Separate the Jelly Rolls by color from light to dark.  Light strips were used at the top and bottom of the block, med for the left side, and dark for the right side. Strips were sewn, trimmed, and squared as I went instead of cutting all the strips for the blocks in advance. If you cut in advance, I recommend making one sample block before cutting everything. Everyone sews a little differently. 

6” long            2 light
9-1/2”              2 light, 1 med., 1 dark
13-1/2”            2 light, 1 med., 1 dark
17-1/2”            2 light, 1 med., 1 dark
21-1/2”            1 med., 1 dark


Step 3 – Block assembly   
One block uses 16 strips – 8 light, 4 med, 4 dark and a shell center square
The block finishes at approx. 21-1/2” square
a. Sew 1 light strip to the top and 1 light strip to the bottom of a shell square. Press 

b. Sew 1 med strip to the left side and a dark strip to the right side – Press


Step 4 – Lay out the blocks in rows of 3 in the color arrangement you like the best.

Step 5 – Sew the blocks in to rows.  Press
Step 6 – Sew the rows together.  Press


Step 7 – Borders
Use remaining strips and letters to make 4 borders.
a. Layout strips around the edges of the quilt, auditioning for color.  I chose to put white at the top, med down the left side, dark down the right side and the bottom. Pretty much like the block. Place the letters of the word Sea in different places in the border to see where it reads best to you, vertical, horizontal… 


c. Sew 3 of these long strips together to make each border strip set and add letters to two of the 4 sets.


d. Sew the side borders to the quilt top – sewing from centers out.  Press seams out and repeat this step for the top and bottom borders.  Measuring and then sewing from the center out helps to avoid wavy borders and the quilt to lay flat.
Step 8 – Quilt and bind
I used a swirl pattern called “Nesting Waves” by Ellen Munnich for the quilting on this one. Use more of the remaining strips to bind your quilt.   


One beachy quilted throw of a generous size, approx. 73” x 79”
Hope you have fun making this one. Be sure to stop by my blog in the next few days and get your name in for the giveaway (Thanks Moda).  Leave a beach related comment and we’ll put your name in the hat for a beautiful Seascapes Jelly Roll. Thanks so much. Robin   Craftsisters.com

Robin Nelson
{www.craftsisters.com}

Landlocked Sea Lover’s Quilt


I was born near Boston, Massachusetts and grew up in the Northeastern United States.  I remember summers spent combing beaches and watching yachts glide in and out of the harbor.  I day-dreamed about one day sailing on my own.  Then life happened and my family  moved to Dallas, Texas.  Dallas is hundreds of miles from the nearest beach.  Occasionally, if there is a big storm brewing out in the Gulf of Mexico and the winds are just right you can smell salt on the air, if by occasionally you are good with once in thirty years.  Living where I do it is easy to forget the grandeur that is the ocean.  The sights and sounds of the beach begin to fade like last summers tan….or more likely the tan from the summer of 1984 which is the last time that I spent very much time out in the sun.  It is just too hot in Texas during the summer to do anything but hunker down and enjoy some air conditioning.

Leave it to Deb Strain to bring the ocean back to me.  Her latest line, Seascapes, is everything I remember about summers at the beach and rustic sea ports…minus the salt water taffy and sand in my swimsuit.   I am delighted to play with it and thrilled to bring you this simple pattern.

Landlocked was born of inspiration I had while on a recent shop hop with my Mom.  (Ya, she quilts too!  How awesome is that?!)  We were at Stitchin’ Heaven in Mineola, Texas and they were demonstrating the disappearing 4 patch.   What a concept!  Take that block, make it bigger, be selective in your color placement and you get the following.  I hope you like it.

  • 2 layer cakes*
    • *What you need is 40, 10″ squares that are light and 40, 10″ squares that are dark.
      • Check the fabric line that you are thinking of using.  Count the number of lights you have.  Subtract that number from 42 (the number of pieces in a Moda Layer Cake) and you know the number of dark and light pieces you have.  Seascapes has 7 prints with white backgrounds.  I have 7 lights and 35 darks.  Two layer cakes more than covers the darks, but leaves me short on the lights.
      • If you have fewer than 40 of either one you need to add some fabric to supplement the layer cakes.
      • 1/3 yd yields 4, 10″ squares.
      • I need 26 more 10″ squares of light colored fabric.
      • 26 squares / 4 squares/1/3 yard = 6.5 1/3 yard cuts are needed
  • Supplemental yardage for contrast in pattern
    • I used
      • 1/3 yd #19611-11 white with blue maps
      • 1/3 yd #19614-11 white with blue netting
      • 1/3 yd #19614-12 white with aqua netting
      • 1/3 yd #19617-11 white with shells
      • 1 yd #9900-97 Bella white
  • 1/2 yd for inner border
    • I used #19615-15 navy with waves
  • 1 yd for outer border
    • I used #19618-12 tile print with green
  • 3/4 yd for binding
    • I used # 19619-15 dark stripes
  • 5 3/4 yd for backing
    • I used #19612-17 aqua on navy tapestry print
  • Masking tape is helpful but not necessary

    Landlocked is made from 20, 18″ finished disappearing four patch blocks, set in a 4 x 5 grid.  It has  NO sashing and two simple borders.  The finished quilt measures 80″ x 98″ and is big enough to cover a full sized bed.

    Cutting Instructions:

    • For blocks:
      • The goal is 80, 10″ squares, 40 dark and 40 light.
      • If you needed to supplement the fabrics in your layer cake,
        • cut 1/3 yd supplement fabric into strips 10″ x wof
        • sub cut each strip into 4, 10″ squares
      • Make two piles – one light, and one dark
    • For inner border:
      • cut 8, 1 1/2″ x wof strips
    • For Outer border:
      • cut 9, 3 1/2″ x wof strips
    • For binding:
      • cut 9 strips, 2 1/2″ x wof

    Sewing Instructions:

    • Make 20 4 patch blocks
    • HELPFUL HINT: Big blocks mean you finish a large quilt quickly, they also mean that there is more weight pulling on your fabric as you maneuver it around your machine.  Try putting your needle in the down position when you sew.  This way every time you stop, the needle will stay in the fabric and help hold your work on the table where you want it to be.
      • Gather 10″ squares (40 dark and 40 light)
      • Sew 40 sets of one dark to one light square
      • Iron seam allowances to the dark side
      • Sew 20 4 patch blocks – make certain that the darks and lights align on the diagonal.
      • Pop center seam and twirl seam allowances.
      • Iron flat.
    • Make 20 disappearing 4 patch blocks
      • I recommend that you make one block at a time.  This is the easiest way to keep everything in the right place.
      • The goal is to cut each one into 9 pieces and then reassemble them with the pieces moved around.
      • Gather
        • 20, 4 patch blocks
        • A rotary cutter
        • A ruler, at least 3 1/4″ x 20″
        • Masking tape
        • A rotating, self healing, cutting mat.  You don’t have to have one, but you will need to cut each 4 patch, 4 times, without moving any of the pieces.  A rotating mat will expedite that process.  If this is not available try using a corner for your cutting space.  If you can’t turn the fabric, you can move yourself.
      • Mark ruler with masking tape to remind you where to align for cutting.  I don’t usually do this, but the ruler I am using is big.  Big blocks + big ruler = room for BIGGER mistakes.  I put the tape on the ruler so that it marks a point 3 1/4″ from the cutting edge.  I align the tape with the center seam each time I make one of the following cuts.
      • With 4 patch block directly in front of you,
        • Cut 3 1/4″ to the left of the center seam.
        • Cut 3 1/4″ to the right of the center seam.
        • See red lines on diagram.

      • DO NOT MOVE FABRIC
      • Rotate cutting mat 90 degrees, or step to the other side of your corner.
        • Cut 3 1/4″ to the left of the center seam, perpendicular to previous cuts.
        • Cut 3 1/4″ to the right of center seam, perpendicular to previous cuts. 
        • See green lines on diagram.

      • Imagine your pieces, labeled  as follows…. (see bright pink letters)
      • Keeping the pieces oriented in the same direction, swap piece B with piece H
      • Keeping the pieces oriented in the same direction, swap piece D with piece F.
    
    
      • The corner and center pieces should be in the same place they were originally.
      • Sew pieced back together in their new arrangement.
        • HELPFUL HINT:  When you are sewing the pieces back together note that the big square and little square of the same fabric always line up on the diagonal.  The rectangles of the same fabric are always one patch away from the little square in the same row or column.
      • Iron seam allowances toward rectangle shapes.
      • Trim block to 18″ square.  Really, do this.  It will make all the difference when you piece the blocks together to make your top.
        • HELPFUL HINT:  I do not have a squaring ruler that is this big.  I didn’t want to go buy one either (do they even make one?!) What I did was utilize the lines on my cutting mat.  Line up the center seam of your block with one line on the mat.  Measure 9″ to the left of center seam and trim.  Measure 9″ to the right of center seam and trim.  Turn the block 90 degrees and repeat the trimming process.  Voila!  You now have an 18″ square.
      • Repeat 19 times for a total of 20 blocks.
    • Piece center of top
      • Gather
        • 20, Disappearing 4 patch blocks
        • inner border strips
        • outer border strips
      • At this point it is helpful to use a design wall.  That is, find a place where you can  arrange your  blocks and step back from them to evaluate the distribution of colors.  You probably have a preference…..my guess is towards an equal distribution of all of the fabrics.  
      • Arrange the blocks in a 4 x 5 block grid, turning the blocks so that dark patches touch dark patches and light touches light.

      • When you are happy with the arrangement record it.  This can be done with a quick snap shot with your cell phone or by numbering the blocks with sticky notes.  Do what works for you.
      • Sew 4 blocks together to make 1 row.
      • Repeat 4 times for 5 rows.
      • Sew rows together to make center of top.
    • Add borders
      • Gather
        • 8, 1 1/2″ x wof inner border strips
        • 9, 3 1/2″ x wof outer border strips
      • Sew Inner border
        • Narrow ends
          • Sew two sets of two strips together at the skinny end
          • Iron seams open
          • Attach to narrow ends of top
          • Trim excess and set aside.
          • Iron towards inner border
        • Long ends
          • Sew two sets of two strips together at the skinny end
          • Add one remnant from short end to each set.
          • Iron seams open
          • Attach to long edges of top
          • Iron towards inner border
      • Sew Outer border
        • Narrow ends
          • Sew two sets of two strips together at the skinny end
          • Iron seams open
          • Attach to narrow ends of top
          • Trim excess
          • Iron towards outer border
        • Long ends
          • Cut one of remaining strips in half (across the short dimension)
          • Sew two sets of two and a half strips together at the skinny end
          • Iron seams open
          • Attach to the long edges of top
          • Trim excess
          • Iron towards outer border.

    Sandwich layers and quilt as desired.
    Don’t forget to take a photo of your finished quilt an add them to the Tops to Treasures Flickr group.

    An 80″ x 98″ quilt, a.k.a. magic carpet, pirate ship sails, desert island, or place for wonderful adventures to transpire.  Is also good for late night conversations and snuggling.  A good place to dream about the sea.

    Cindy Sharp
    {topstotreasures.blogspot.com}