Little Lady Ragged Bags


Today we are making a ragged tote bag that is the perfect size for little girls. It’s easy to make and fun to use.  I often give them for gifts filled with little toys or coloring books.

*2 packs of Moda Candy
*1/2 yard of white fabric (or coordinating fabric of your choice) for the lining
*1/2 yard of natural colored felt 

#1.  From your white fabric cut 66 squares that are 2 and 1/2 inches.
#2.  From your felt cut 66 squares that are 2 and 1/2 inches.
#3.  Open your Moda Candy packs!
#4.  Layer your squares for your bag.  Put 1 white square on the bottom, a piece of felt in the middle, and your printed fabric on the top.  (With the right sides facing out on both the white and the printed fabric.)
#5.  Choose two squares that you would like to place next to each other.  Place them (still stacked with the felt and white fabric) with the white fabric together in the middle.  Now your stack is 6 pieces deep!  (But don’t worry…your machine can handle it! 🙂
#6.  Once you are all stacked up sew down one side of your stack.  Then open it up!  (Your seams will be on the OUTSIDE and it will look crazy but that is ok…that is how you want it to look for this project!)
*Note:  For this project use a generous quarter inch seam.

#7.  Repeat the process for the 2 squares that you would like to attach underneath the pair you just made.  Once you are done place your two pairs of squares together with the white in the middle (your prints facing outward) and sew them together.

#8. Unfold and see the cute little 4 patch you just created!  Now repeat this process 13 more times.  (So that you have a total of 14 little 4 patches!)

#9.  Now select the 4 four patch squares that you would like to use for the front of your bag.

#10.  Sew the 4 squares together in the same manner you’ve been sewing thus far.  (With the white fabric in the middle and the printed sides out).  Once you are finished repeat this process for the back side of your bag.

#11.  Now we just need to sew up the two side pieces and the bottom piece for the bag.  Both the sides and the bottom are made up of 2 four patch squares sewn together.  The only difference between the sides and the bottom is just making sure any directional prints are going the right way on the pieces you choose for the sides.  So put together 2 side panels and one bottom panel. 

#12.  We have all of our pieces ready so now it’s time to construct our bag.  Put your front panel and your side panel WHITE sides together and sew it up!

 #13.  Next put that same side panel and your back panel WHITE sides together and sew it up as well!
 #14.  Now, I know what your thinking…it’s time add the other side panel.  But it’s not.  I mean I guess you could but I wouldn’t and don’t.  I add the bottom panel next.  So you will be sewing the bottom WHITE sides together in one long line across the front, pivot, down the side, pivot, and along the back side. 
#15.   Now add you last side panel…white sides together…sew down the front, pivot, across the bottom, pivot, and up the back.  Now your bag is completely formed.

#16.  We need to make the strap/handle now.  Sew together 10 fabric and felt sandwiches (exactly how we did in steps 4 and 5 only now we are sewing 10 together in a long strip instead of just 2).

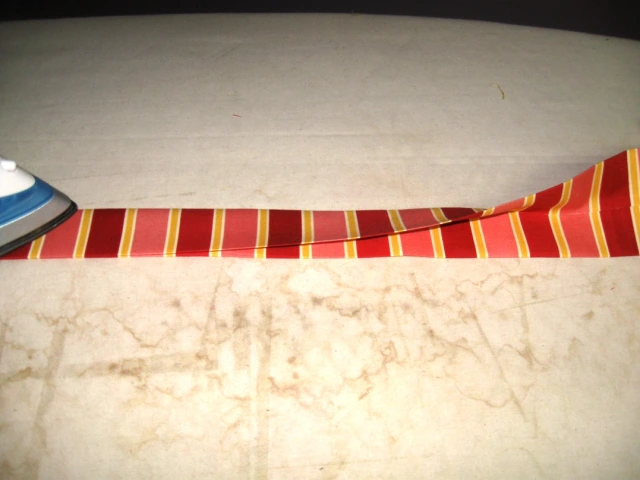
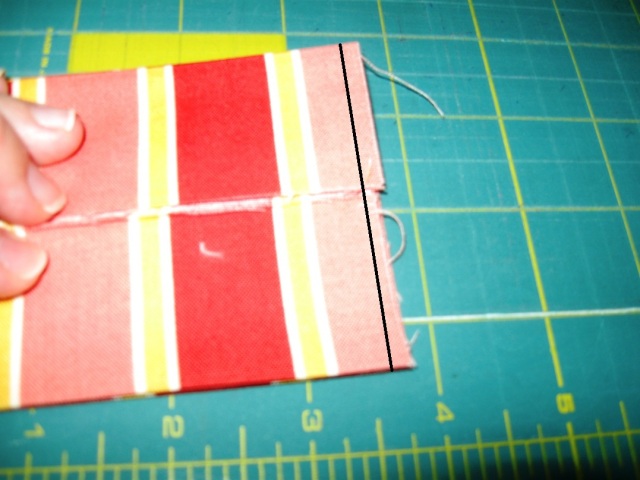
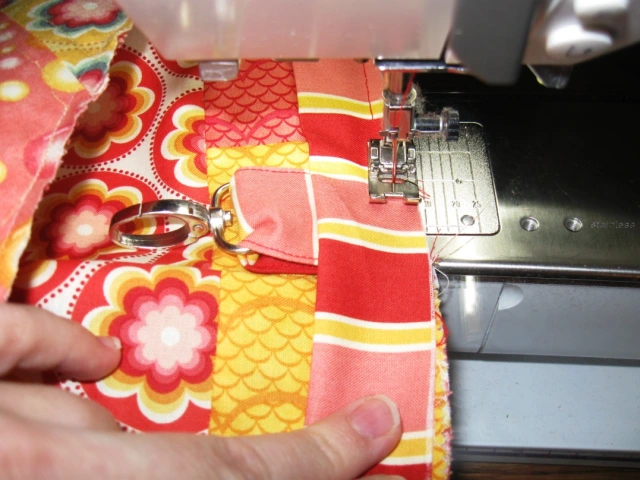
#17.  Now sew a 1/4 inch seam down each side of your strap like shown in the photo below.
#18.  We are ready to attach the strap now!  Position it on the side panels right between the 2 small squares making up the top of the 4 patch squares as shown in the picture below.  I place the strap right behind the side panel and down inside the bag about 1 inch.  Then I sew the first strap on and continue stitching around the entire circumference keeping the 1/4 inch seam until I get to the next strap, which I sew on, and continue around the bag until I come back to the place where I began.

#19.  The only thing we have left to do is clip our seams.  Snip along all seam lines about every 1/4 inch like shown in the photo below.  Clip to the stitching but NOT through the stitching!!

#20.  When I finish my bags I always throw them in the washing machine on the rinse cycle and then into the dryer.  This will fluff up all those clipped and snipped seams and make them soft and cute.  This last step isn’t necessary but I always do it.

***NOTE***
There are other ways that these bags can be assembled.  However, I’ve made over 500 of these little guys and this is the way that I’ve found to have them best hold their shape and be the easiest to sew.


*1 little girls tote bag
(And 1 big disagreement if you happen to have more than 1 little girl!)

 Simple Simon & Co.
{www.simplesimonandco.com}

120-Minute Gift: The Queen Bee Bag


Hello, again!  I’m Polly Monica from Aunt Polly’s Porch blog. I am so pleased to be back at the Moda Bake Shop with a large mat and ruler tote bag designed just for quilters like you to use when you go to bee or a quilt class!!

Believe me when I say you will certainly be The Queen Bee when your friends see your new bag!!  And it would sure be a favorite gift for a quilting friend this holiday season!


DSCN2268
1 charm pack ( I used A Stitch in Color)
2 yards coordinating solid (I used Moda  Bella slate grey)
1.5 yards print from same collection (I used the Spectrum print from the A Stitch in Color collection)
2  small gold decorative buckles (about 3/4”)
10” of matching Velcro
batting, matching thread
 

Cutting Directions-
From the solid grey fabric-
cut four 4.5” strips the full Width Of Fabric (WOF) for the straps
cut a strip 22.5” by WOF, then sub cut it into
    one 22.5” by  28” piece for bag front lining and
    one 18.5” by 14” piece for the tall ruler front pocket
cut another 22.5” strip by WOF, then sub cut it into
    one 22.5” by  28” piece for bag back lining and
    one 14” by  9.5” piece for short ruler front pocket and
    two little  1  3/8”  by  5  1/4” rectangles for buckle straps on mini pockets
cut one strip  9.5” by WOF, then sub cut it into
    two 9.5” squares for inside pocket linings

From the print yardage-
cut a strip 14” by WOF, then sub cut it into
    one  14” by 18.5” piece for bag front (behind the ruler pockets) and
    one  14” by  18.5” piece for the tall ruler pocket lining
cut a strip 14” by WOF, then sub cut it into
    one 14”  by 22.5” piece for the back pocket lining and
    one 14”  by 9.5” piece for the short ruler pocket lining
cut a strip 22.5” by WOF, then sub cut it into
    one 22.5”  by  28” piece for bag back

From the 42 Charm Squares in the pack-
    select 18 charms squares for the bag front
    select 15 charm squares for the back pocket
    select 4 charm squares for the 2 front mini buckled pockets

From the Batting-
cut two  22.5”  by  28” pieces for bag front and back
cut one  18.5”  by  14” piece for the tall ruler pocket
cut one   9.5”   by  14” piece for the short ruler pocket
cut one  22.5”  by  14” piece for the back pocket 
cut two  80”  by   1.5”  strips for the straps (these can be pieced or fused together from smaller pieces)
 
Sewing and Assembly Directions- 
 
Straps-
Sew two  of your  4.5”  by  WOF  grey strips together on the short end.  Press the seam open.   Next, press both long sides under 3/4”.

Slip one 1.5”  by 80” batting strip under one of the folded in long sides. 

DSCN2302

Bring the other long edge over to meet the folded edge and pin all the way to edge.

DSCN2308

Stitch the two edges together 1/4” from edge.  Stitch to end, turn and stitch across the raw edged short end, then back up the other side.

DSCN2309

Repeat this topstitching again 1/8” from the edges.

DSCN2311

SAFN!!  (Set Aside For Now!)
 
Bag Front–  (using the 18 charm squares and one 18.5” by 14” print piece)

image

Select 4 of the charm squares, sew them together to make a strip. 
Press seams however you prefer, then sew the strip to one 18.5” side of the print piece.
Repeat this process with 4 more charms squares sewn together then sewn to the opposite 18.5” side.
Take 5 of the charm squares and sew them together in a horizontal strip, press seams all one way
Take another 5 charm squares and repeat the process but press the seams in the other direction.
Sew the two rows together, nestling the seams at each intersection.
Now sew this piece to the top of the previously pieced front, press well.

DSCN2296

Pin it to the front batting  piece and quilt as desired.  I used a sort of zig zaggy stitch to quilt it. 
Here’s a look at it from the batting side…but you can quilt it however you prefer!

DSCN2297

SAFN!  (Set Aside for now.)
The same process is used to make both the tall and short ruler pockets on the front of the bag.
With right sides together, match up the solid grey tall ruler pocket piece with it’s matching print lining piece and it’s matching batting piece.  Pin and stitch across one 14” side.

DSCN2285

You want the lining to show a tiny bit across the top of the pocket at the seam line from the front side, so you will not press the sewn seam as you normally would, but allow the actual seam to be about 1/4” down from the pressed top edge… which means that the bottom edge of the lining will be a tad short…  about a 1/4”…so no big deal!   This is hard to explain in words but look at the photos and you’ll see what I mean.

DSCN2286

Quilt the pocket as desired.  I used a bright variegated thread with an simple meander design.  Repeat this process with the second smaller ruler pocket.  SAFN!

Next we make the 2 mini buckled pockets!  Take the two grey  1  3/8” by 5  1/4” pieces and press them in half lengthwise.  Open up the pressed piece and now fold the long raw edges into the center fold and repress.  Now the raw edges are enclosed inside.  Topstitch down each long side .  Slide the buckle and center it onto the strap.

DSCN2276

Pin and stitch it to one charm square. Do the same with a second charm square.

DSCN2277

Using the remaining two charm squares as pocket linings, place them right sides together with the two charms you just sewed the buckle straps on.

DSCN2280

Remember to leave an opening in one side as you stitch around them, so that you can turn them right side out!

DSCN2282

Turn them right sides out, press and topstitch across the top edge of each pocket.

DSCN2283

Now center and pin one buckled mini pocket on top of the small quilted grey ruler pocket as shown in the photo.

DSCN2288

Stitch it down on three sides.  Now lay the small grey ruler pocket on top of the larger one and baste the side seams together with a scant 1/4” seam allowance.

DSCN2291

Now center and pin the remaining mini buckled pocket onto the taller ruler pocket and stitch it down on three sides as shown.

DSCN2292

Place the double ruler pocket piece onto the quilted front,  centered left to right and having the bottoms aligned together.  Baste the pockets down using a 1/4” seam allowance.

DSCN2313

Take one prepared strap and with the raw end of the strap even with the bag bottom, pin it up and over one side of the ruler pocket piece, and then bring the other raw end of that strap back down the other side of the pocket to end at the bag bottom.

DSCN2314

Slowly stitch through the strap, pocket and bag front all at one time.  Start stitching at the bag bottom/raw end of strap, and stitch up until you are about 5” below the top edge of the bag, turn and stitch across the strap at that point, then turn again and stitch right back down the other side of the strap, thus enclosing the raw edges of the ruler pocket. I stitched the straps on using matching grey thread and stitched between the 2 lines of top-stitching previously done with the bright variegated thread.

DSCN2316

Repeat this now on the other end of the strap … up the other side of the ruler pocket.  SAFN!
 
Bag Back-
Pin the print bag back piece to it’s matching batting piece and quilt as desired!

Back Pocket-
Arrange the 15 charm squares into three rows of 5 squares each and stitch them together.

DSCN2273

Pin the matching batting piece to it and quilt as desired.  I used the bright variegated thread and did a simple meander!

DSCN2293

With the matching print pocket lining piece, place right sides together, pin and stitch across one 22.5” side.  Do the same thing with pressing that seam as you did on the front ruler pockets… as you want to see a bit of the lining from the front side.

Lay the second completed strap on the back  pocket- over the first seam line from each side of the pocket, with raw short end edges even with the bottom of the pocket.

DSCN2318

Pin the strap in place up over that seam on one side of the pocket, over the finished top edge of the pocket and then back down the other side of the pocket, ending with the other raw edged end even with the bottom of the pocket.

DSCN2317

I again used matching grey thread to sew the strap onto the pocket, stitching between the rows,  previously topstitched.   Sew up one side from the bottom of the pocket to the top, turn sew across the strap to the other side and turn again and then sew down the strap to the bottom.

DSCN2319

Lay the completed pocket on top of the bag back with sides and bottom even.  Baste around the pocket using a 1/4” seam allowance.  SAFN! 
 
Inside Pockets-
Use the leftover charm squares, cutting a few more from the leftover printed yardage scraps, to make up 2 sets of 4 charm squares arranged and sewn together like a four patch.

DSCN2327

Put these two four patches together with the pocket lining pieces previously cut from the grey yardage with right sides together and stitch all around the edges with a 1/4” seam, remembering to leave an opening for turning!

DSCN2328

Turn them right sides out and press.  Top stitch across the top edge of each pocket.  At this point, sew one 5” piece of Velcro (soft side) on the inside of each pocket, near the top.

  DSCN2331

Center the two pockets on one of the print yardage lining pieces as shown below, and pin in place.

  DSCN2332

Unpin just the top of each pocket and fold  it down so you can sew the other side of the Velcro where it needs to be in order to match the Velcro on the pocket itself.

Now,  bring the pocket tops back up and repin, then stitch around all three sides of each pocket.

DSCN2333

Lay the two grey bag lining pieces, right sides together, matching the sides and bottom and pin.  Stitch the three sides with a 5/8” seam allowance, remembering to leave a 5” opening in the bottom for turning.

Now pin and stitch the outer bag sides with right sides together, using a 1/2” seam allowance.
 
DSCN2335

Turn the bag lining right sides out and push it down into the outer bag with it still right sides IN…which means they are right sides together!!

Match the side seams and pin all around the top edge, making sure you don’t accidentally catch any of the two straps in that top edge seam.  Sew the top edge seam with a 1/2” seam allowance.

DSCN2336

Turn the bag right side out through the opening you left in the bottom of the lining.  Sew that opening closed, then push the lining down into the bag.

DSCN2338

Again, as in the top edges of the pockets, you want some of the grey lining to show at the top edge of the bag, so manipulate the edge that way and pin it all around the top.

DSCN2340

I “stitched in the ditch” – in the seam line between the grey lining and outer bag to hold the top edge as I liked it with the grey lining showing a bit on the outside, then I topstitched it twice with the bright variegated thread.

DSCN2344

And finally, VOILA!!  all done!  YAY!!  Smile

DSCN2350
DSCN2351
DSCN2364
DSCN2366
 

one 22” by 26” quilter mat and ruler tote bag
Time to put your mat and rulers in the new bag and get on your way to bee or quilt class!!
 
Yogi's bed
 
Yogi and I hope you like the Queen Bee Bag quilting tote and will enjoy making one for yourself or for a gift for a quilter friend!

Come visit us soon, over at my blog- http://www.auntpollysporch.blogspot.com/
We hope you have a wonderful holiday and a most blessed New Year!!

  1signature
Polly Monica
{auntpollysporch.blogspot.com}

120-Minute Gift: Zen Tote


8 strips from your favorite jelly roll (or 24 12” sections of jelly roll strips if you prefer a scrappier look)
½ yard of fabric for lining
Wooden handles
Fusible or sew-in interfacing
¼” steam-a-seam double-sided fusible tape

Step 1. Select 8 strips for your tote exterior panels. Cut each Jelly roll strip into three 11.5 ” segments. If you prefer a scrappier look for your tote, select 24 different 11.5” segments of 2.5” strips.


Step 2. From each 11.5” segment cut one 6.5” rectangle and two 2.5” squares.

Step 3. Arrange your tote exteriors. Create the plus sign layout by overlapping the squares as shown and alternating squares and rectangles across columns.

Step 4. Continue to build your layout until you have a square made from 8 columns. As you get to the top and bottom of your columns, you may have pieces of rectangles that extend beyond your panel and will require trimming. Once you have an arrangement you are happy with, sew together the patchwork to make the exterior panels.

Step 5. Line the exterior panels with fusible or sew in interfacing and trim to 16.5” square. Next cut two 16.5” squares from your lining fabric. Shape both exterior and interior panels by rounding the bottom corners and narrowing the top 6” of the square to fit the width of your wooden handles.

Step 6. Use your double sided fusible tape to fold down a ¼” seam along the 6” which you narrowed to accommodate the wooden handles for the left and right side of all panel pieces.

Step 7. Sew the exterior panels, right sides together beginning from the bottom of the narrowed seam on one end and ending at the bottom of the narrowed seam at the other end. Leave the top 6” of the panel which you’ve folded over with fusible tape open. Repeat this step with the interior panels right sides together.

Step 8. Turn the exterior of the tote right side out and place the lining inside. Align the seams which have been fused together and topstitch all around to secure the lining to the exterior of the bag.

 
Step 9. Bring the top of the bag through the opening of your wooden handles about 1” and fold the raw edge under about ¼”. Machine or hand sew in place to complete your tote.


The perfect tote to give or keep for yourself!

Vanesa @ New Nest
{www.newnestdesigns.com}

60-Minute Gift: Christmas Overnighter Cinch Sack


18” X WOF for lining (2 fat quarters in same or coordinating print)
18” X WOF for outside (2 fat quarters in same or coordinating print)
8” X WOF for strap channel  {can be a coordinating fabric}
Ribbon:  8″ X 1/2″
Rope 2– 43″ or longer {you can adjust this length to fit child}
Pre-cut scrap strips in green for tree and brown for trunk


Cutting:
Cut 2 – 18” X  18″  outside fabric  
Cut 2– 18”  X  18″  lining fabric
Cut 2– 4″ X 18″ strap channel
Cut 2– 4″ X width of ribbon
Cut 1/2” X various lengths– green fabric for tree

Rag Christmas Tree:
1)  Cut 3 strips 1/2” X 9” out of green scraps
2)  Fold the front outside piece in half and iron, using this creased iron line to center the tree tip,  pin the 3 strips in the shape of the tree
3)  Cut a brown 2” X 2” square for the trunk of the tree.  Pin in place.
4)  Sew down the center of these strips, and outline stitch the tree trunk
5)  Using the rest of the 1/2” green scrap strips, place on tree and sew down the center – one strip at a time
6)  Overlap additional strips, change their angle, direction to make it interesting
7)  Take a rough toothbrush and dampen the strips and scrub, this will rag the edges just a bit- or scrub with your fingernails. You can snip the edges if you’d like too

Strap Channel:

1)  Cut 2 strips 4” X 17”
2)  Hem both sides (4”) of each strip

3)  Fold in half so they will measure 2”- wrong sides together.  These will be your channels for the ties

Lining:
1)  Pin right sides together both the front and back linings
2)  Sew all the way around the sides and bottom of the bag, leaving a 2 1/2” opening on one side for turning later
Outside:
1)  Fold ribbon in half and stay stitch at bottom of each side of the front outside piece { 1 1/2” from bottom}

2)  Pin right sides together and stitch all the way around the sides and bottom of the bag.
3)  Turn Right sides out and iron
4)  Pin the channels to the top of the bag and stay stitch in place {sew on using 1/8th inch seam allowance so the stitching won’t show} One channel will be sewn to each side

5)  Stuff the outside into the lining, right sides together
6)  Pin along the top edge, matching the side seams
7)  Sew all the way around the top edge
8)  Turn right sides out through opening
9)  Sew opening closed and iron

Rope Strapping

8)  Tie rope to ribbon loop at the bottom of the bag.
9)  Thread through the tube directly above the ribbon loop, going around the whole bag.  The tie will be coming out the same side as it entered

10)  Repeat with rope on the other side of the bag

11)  Pull the rope to cinch the bag at the top


1 super cute cinch sack to Stuff with goodies, games and Christmas jammies!
Finished size:
17″ wide x 20″ long

Have a Merry Christmas Everyone!  Hope your overnighters are full of wonderful surprises!

Becky Jorgensen
{www.facebook.com/patchworkposse}
{patchworkposse.com/blog}

30-Minute Gift: Patchwork Wine Bag


Hey, gang! I can’t tell you how thrilled I am to bring you (TADA!) my first ever project for Moda Bake Shop. My name is Mary Miller and I have a little table in the blogateria that I call Spoolhardy Girl . I hope you’ll come by and visit when you are finished here. (Pssst! Can you smell the giveaway I’ve got cooking? MMMM Modalicious, if you get my drift.)

I don’t have to remind you that the holidays are quickly approaching. Parties, cookie exchanges and chaos will ensue.  I am horrible about planning ahead for hostess gifts. I usually grab a bottle of wine and call it a day.  I happen to think wine is a perfectly lovely gift. If you ever want to give me wine, I’ll be more than happy to accept. But let’s gussy that bottle up a little, shall we?

One Mini Charm Pack of a Moda fabric of your choice. I used Marmalade by Bonnie and Camille.

One 2 1/2″ x 12.5″ (or even a bit more) strip coordinating fabric. I used Bella Solid Sunshine.
One 5″x 5″ square coordinating solid (also Bella Solid Sunshine)
One sharp #2 pencil


One 5″ x 5″ Fusible Fleece
One 5″ x 5″ square of freezer paper
Dritz Elastic Threading Tool
1/4″ presser foot (Highly recommended)

All seams are 1/4″

Let’s begin! Choose 25 individual squares from your mini charm pack and line them up in a 5 x 5 square grid like so:

Sew your rows together this way:

This picture is probably unnecessary, but I just learned how to make
the little arrows and I wanted to show off.

Press your seam allowances open.

Next, sew your rows together, and press your seams open.

Take a minute to admire this pretty panel you’ve made, then set it aside for a bit.

Next we are going to work on your bag bottom. No, not your baggy bottom. I have my own baggy bottom I need to work on, I can’t help you there! Anyway, on to the bottom of your bag!
This is where your #2 pencil and your freezer paper comes into play.
Place your pencil so that it is flat up against your bottle of wine, and the point is headed directly downward.

Thank you to Mr. Wonderful for taking this picture!

Trace all the way around the bottle. Now, you could skip the freezer paper step and do this directly onto your fabric, but I have a heck of a time getting the pencil to write on the fabric, so I do it this way. I also don’t recommend using a washable fabric pen because they tend to be wider than a pencil and that puts the mark too far away from the bottle, making your bottom too big. We all know we don’t want bottoms that are too big!

Once you have your circle made, take a ruler and mark a dotted line 1/4″ away from your original line.

Bring your freezer paper template, your fusible fleece (if using) and your 5″ x 5″ piece of fabric to your ironing board. I really like the idea of using the fleece in this step because it will give your bag bottom added support and a little bit of cushioning (I’m not even going to go for the joke here. It’s just too easy).

Place the freezer paper template shiny side down onto your fabric. If you are using a printed fabric, you want the right side facing up. Press with a hot iron for about 10-15 seconds. turn this unit over so that the fabric is facing up and the paper is on the ironing board. Place your square of fusible fleece adhesive (bumpy) side down and press with a steamy iron for about 15-20 seconds.

You should now have a unit that looks like this:

Freezer paper fused to fabric which is fused to fleece.

Cut around your dotted line and remove the freezer paper. Set aside.

Next we are going to make a band for the top of your bag. Take your 2 1/2″ strip of fabric fold and press it in half lengthwise, WRONG sides together.

Bring your strip back to the panel that you made and lay it out open so that about an inch hangs off of each side.

Fold the short end of the fabric back on itself so that the fold is just barely over the edge of your panel.

Do the same for the other end of your strip. Press at the folds.

Bring your strip to the machine and top stitch both ends barely 1/8″ away from the fold.

Trim excess from the seam allowances.

Please forgive my nasty thread tangles. I was having an argument with my
machine this day!

Fold lengthwise again wrong sides together and press.  Place your folded strip piece right sides together on top of your panel piece with raw edges aligned making sure that you have a bit of the top stitched ends sticking off the ends of your panel. Sew together. Press seam toward the panel.

If you want to give your bag a nice finished look top stitch about 1/8″ away from the seam you just made. This is completely up to you, and will only add decorative appeal to your bag.

Fold your panel in half right sides together and pin raw edges.

Begin stitching down this long side just below the seam created when you sewed your band on. You don’t want to sew the band shut, you’re going to need it in a minute! Back stitch at the beginning and ending of your stitching.

How cute is this sleeve!? If I could sew a shirt I would totally make a patchwork shirt just like this. Only I can’t, sew a shirt. I just took this picture to demonstrate that you have now sewn a nice tube.

Remember that circle we made with the fusible fleece? It’s time to sew it onto your tube. Yes. You are going to sew a circle onto a tube. I’m here to tell you, this is NOT hard. You can do this. Trust me. Take a deep breath and relax your shoulders. You are going to feel like a sewing goddess when I’m finished with you!

You want to pin your circle to the bottom (not the band end) of your bag. Pin it right sides together so that the white fusible fleece is facing out. Make sure that the edges of your circle are lined up neatly with the edges of the bag. I find that 8 pins placed at equal intervals around the circle are about right.

The key to getting this right is to go slowly. Place the bag under the presser foot. This is where a 1/4″foot comes in really handy. Make sure the edge of your fabric is nestled right up against the guide of your foot and slooowwwly begin to stitch. After 4 or 5 stitches lift your foot keeping the needle down, and realign the fabric so that it stays right up against your guide. As you remove your pins, make sure that your fabric edge is still lined up with your fleece edge. Also make sure that the fabric under the foot is laying flat. That’s it. Just work your way around and you’ll be fine, promise!
Cut the excess seam allowance to about 1/8″.

There. You did it! Give yourself a little pat on the back.

We’re in the home stretch now! We just need a pretty tie.

Take the remaining mini squares from your charm pack and sew them together in one long strip.
Press seams open.

Fold your strip in half lengthwise with right sides together.

Sew down the long side and across ONE of the short sides of this strip.

Now we need to turn this tube inside out. There are tools that you can buy to help do this, but I find that a wooden skewer or dowel works just fine. Place one end of the skewer against the sewn end of your tube. I like to place the other end of the skewer on my tummy, or on my work table. Then just begin to slip the fabric down over the skewer.

Continue easing the fabric down the skewer until it is completely right side out. Then press out the wrinkles.

Remember that Dritz Elastic Threader? I have to tell you, I have never once put elastic in one of my projects, but I use this little gizmo all the time. It was a total impulse purchase at Joann’s one day, and it has become one of my go to notions. We are going to use it to get the tie through the band at the top of the bag. If you don’t have an elastic threader, don’t sweat. Just use a large safety pin.

Thread the UNSEWN end of your tie through the top notch on the threader. OR pin your safety pin to the end. Put the threader into the hole on your band and work the fabric through until it comes out the other end. Tug on the tie so that it hangs out of the band equally on both sides.

Let’s tidy up the un-sewn end of the tie. Tuck the end in approximately 1/4″ and topstitch at 1/8″.

Done! Sit back and enjoy your handy work. Maybe pour yourself a glass of wine. Just not from the bottle you’re giving away!


One pretty darn cute wine bag that fits a standard wine bottle.  If you like to give your wine away by the jug or the box, hey, go for it! I don’t judge but, sadly, this project won’t work for you. May I suggest yarn bombing?


 Mary Miller
{spoolhardygirl.blogspot.com}

60-Minute Gift: Christmas Gift Bag

Christmas Gift Bag designed by Cathie Richardson of Country Garden Stitchery

~One charm pack of Fa-La-La-La-La by French General
~Three different fat quarters, two red and one natural, by French General
~Low Loft Batting
~Sewing Thread – I used a coordinating variegated red sewing thread.

For the embroidery:

~6″ x 9 1/2″ piece of coordinating quilting fabric for the embroidery design.
~Embroidery pattern (included in PDF print out)
~Three skeins of embroidery floss: one brown, one red, and one green.  I used hand dyed flosses by
The Gentle Art in Sarsaparilla #7015, Raspberry Parfait #0380 and Forest Glade #0190
~#02 Micron black ink pen.
~Tracing method of your choice.

For the embroidery trace the design onto the 6″ x 9 1/2″ piece of fabric using the method of your choice.  You can embroider the design in all one color for a redwork design or change the flosses to your favorite colors!  I will include here how I made the model.   Use two strands of floss except as noted.  Raspberry Parfait and stem stitch for the border lines, the snowman outlines and his hat.  For his face I used one strand of floss and stem stitch for his nose and mouth.  I used very small cross stitches for his eyes.  I alternated one and two strands for the stars in the sky.  For the dots use two-wrap French knots.  Sarsaparilla and back stitch for the lettering.  Stem stitch for the tree trunks.  Forest Glade and stem stitch for the outlines of the Christmas trees.  For the tree decorations Raspberry Parfait and back stitch.   When embroidery design is complete press lightly and trim the design down to 8 1/4″ x 4 3/4″ to where it has a 1″ border.
Use 1/4″ seams throughout.  Select five charm squares and cut five 2″ wide pieces.  Alternate the pieces to red-green-red and sew.  Press. Cut the sewn piece in half.  Select five more and cut 2″ wide pieces.  Alternate pieces to green-red-green and sew.   Press.  Cut sewn piece in half. 
From one of the red fat quarters cut a 2″ x 8 1/4″ strip.  Sew the embroidered design to a red-green-red patchwork strip, then add the solid strip, then a green-red-green patchwork strip.  Press.  From the same fat quarter you cut the strip cut a piece for the back measuring 6 1/2″ x 8 1/4″.  Sew a green-red-green patchwork strip then a red-green-red.  Press. 
From the other red fat quarter cut two 1 1/2″ x 8 1/4″ strips for back and front pieces and sew to the top and the bottom.  Press.  Cut two 1 1/2″ x 12 1/2″ for each side of front and back and sew.  Press.     
Cut two batting pieces the same size as the front and back and quilt as desired.  I used the variegated red sewing thread and a decorative machine stitch to sew around the edges of the embroidered piece and in between the strips on front and back continuing down the bottom of the back.   
With the third fat quarter cut two pieces the same size as the front and back for the lining.  Sew the outer bag front and back together.  For the lining sew the front and back together leaving a 3″ opening in the middle of the seam on one of the sides for turning.  From one of the red fat quarters cut two handles measuring 3 1/2″ x 18″.  Press the fabric strips in half lengthwise and then press down 1/4″ along the long side.  Sew the pressed edges together with the variegated sewing thread.      
To make the bottom edges turn the outer bag and the lining wrong side out.  Line up the bottom and the side seams on each side of both bag pieces.  Measure in two inches and put a pin in the spot until you have it lined up with the machine needle.  Sew a straight seam making a triangle.  Cut off the triangle pieces leaving 1/4″ of fabric before the seam.   
Turn the outer bag right side out and tuck it inside the lining so the right sides are together and the lining is on the outside.   Place the handles about 1″ from the side seams matching front and back and making sure they aren’t twisted.  Put the handle edges a little bit above the edge of the top of the bag to ensure they are included in the seam.  Pin in place.
Line up seams, edges of lining and outer bag and handles and pin in place.  Sew around the edge making sure to catch the handles.   
Turn bag right side out through the opening.  I always like to check to make sure my handles are secure and all fabrics were included in the seam before I sew up the opening.  Hand sew or machine sew the opening closed after pressing.
With the variegated sewing thread on the top and neutral color for the bobbin thread topstitch around the top of the bag.  Press.

One Snowman Embroidered Christmas Bag
9″  x  10″ x 3″ with 17 1/4″ handles.

Back View
A fun gift bag for the Christmas holiday!  You can adjust the size by adding strips and patchwork pieces.  Fill it with fun things for somone special then it’s useful after they’ve opened their gift! I’d love to see yours too ~ you can contact me with questions or comments through my website or facebook.  Thank you!  
Cathie Richardson

60-Minute Gift: Pet Mesh Bags

Hello all…it’s Jo from Jo’s Country Junction.  Recently I made a couple totes for my son so he could store his jumper cables and keep his league softball goodies all in one place.  Then my teenage daughter wanted a set too.  Being she is a cheerleader and our school colors are red, white and black, Sweetwater’s new fabric line, “Mama Said Sew,” was perfect.  She is using hers a lunch bag and a cheerleading bag. I thought I would share these great versatile bag patterns with you. They make a great gift  for just about anyone on your list!


Momma Said Sew Jelly Roll
Scraps of Deco Bond or heavy interfacing
Zippers  22″ red and 12″ red
Pet Mesh Screen:  This may be hard to find locally.  Here is an Amazon link for it:
New York Wire 70587 Pet D-Fence Screening, 36-Inch by 84-Inch

Let’s start by making the square bag.  Of course you can use it for many different things…storing your  grocery bags, packing a few goodies to take to the park, anything you can think of.

Start by unrolling your pet screening.  This is a plastic product.  Don’t worry about cutting it with a scissors or sewing with it.  It works wonderfully.

Cut:
2 ~ 12″ x 12″ pieces of pet screen
4 ~ 12″ x 4″ pieces of pet screen

Take your 12″ zipper.  Take your favorite black jelly roll strip and cut two pieces the length of the zipper.  Take a different jelly roll strip and cut two more pieces the length of the zipper.

Take one of each of the two different pieces and sandwich the zipper between them as shown making sure the right sides of the fabric face the zipper.  Make sure your favorite fabric piece is on the top of the zipper as it is the only fabric that people will see.


Pin in place as shown.

Sew along the pinned edge.

Press the fabric as shown.

Top stitch along the zipper.

Repeat for the other side of the zipper making sure the fabric that you want to be shown faces the top of the zipper.

Take a jelly roll strip.  Cut four pieces of fabric that are the width of the newly made zipper unit.  Sandwich two the pieces as shown, pinning in place.

Sew along the pinned edge using a 5/8″ seam.  Press and top stitch in place just as you did along the zipper.

Trim the edge of the fabric by placing the ruler along the edge and lining the 1 1/4″ line along the seam as shown.

Take a ruler and measure 10″ (the picture shows 11″ but use 10″).  Mark the line with a pen.

Tack the zipper as shown; sewing on the line previously made.

Trim the extra fabric away as shown cutting through the zipper.  Being the zipper is tacked, it is okay to cut it.

Sandwich the remaining two pieces of red fabric on the end.  Sew using a 5/8″ seam, press and top stitch as you did with the first end.

Trim the pieces so it is four inches wide.  It is easy to do this if you line the 2″ ruler marker along the zipper and trim.

Set this piece aside.  Now onto the handle.

Take a jelly roll strip.  Cut it 13″ long.  Cut a piece of Deco Bond  2 1/2″ x 13″.   Place the Deco Bond on the wrong side of the jelly roll piece and fold in half.  Pin.

Sew along the edge as shown using a 1/4″ seam.

Turn the piece right side out.  Press and top stitch.

Align the handles between the top of the zipper area as shown.  Tack in place.


Sew the 4″ x 12″ mesh pieces and zipper piece together as shown using a 5/8″ seam.

Bring the remaining zipper edge and the mesh edge together keeping right sides together.  Pin.  Sew using a 5/8″ seam.


Take the piece you just complete and one of the 12″ x 12″ mesh pieces.  Align it as shown pinning in place making sure the first and last pin is 5/8″ away from the edge.

Sew BETWEEN THE PINS using a 5/8″ seam.

Align the next edge.  Again pinning in place making sure the first and last pin is 5/8″ away from the edge. Sew BETWEEN THE PINS using a 5/8″ seam.

Continue on each side. Unzip the zipper.

Then repeat adding the other 12″ x 12″ piece.

Trim the corners.  Turn the bag right side out and you’re finished.

To make the long bag:
Cut one piece of mesh 24″ x 26″.

Make the handle using the directions above only this time make it 16 inches long.  Set aside.

Prepare a zipper using the directions above.  Please note that when using a jelly roll to make these, the pieces along the zipper will be different prints.  The zipper for this bag will not need to be tacked and cut.  It is already the right length.

Place the edge of the mesh along the edge of the zipper piece.  Pin and sew using a 1/4″ seam.

DO NOT TOP STITCH.

Bring the opposite edge of the pet mesh around aligning the wrong side of the zipper. Pin and sew using a 1/4″ seam.

Unzip the zipper half way.

Fold the bag as shown.  It should be about 14″ wide when folded so the zipper should line up at the 7″ mark or half the distance.  Pin and sew using a 5/8″ seam allowance.

Do the same for the opposite end.

Now it is time to box the corners.  Start with the end of the bag that DOES NOT have the beginning of the zipper.

Fold as shown,  Place your ruler and measure 2 1/2″ from the tip of the corner.

Cut the corner off.

Do the corner on the opposite side the same way.  The handle needs to be added first.

Now it is time to add the handle.  The handle is added as you box the corner.  Fold the bag the same way you did on the previous end only this time, slide the handle end in place.  Pin and sew.  I back stitched over the handle to make it more secure.  Clip.

If you look closely you can see the handle in between the mesh pieces under the seam.

Do the same for the other side.

Turn your bag right side out and you’re ready to go.

Two bags that are sure to make organizing your goodies just a little easier.

As soon as the bags were finished, our daughter put them right to use!

Stop over to my blog, Jo’s Country Junction, and see what I’m up to now.

Jo Kramer
{joscountryjunction.com}

The Dollhouse Pouch


This sweet little pouch is a fun way to store puzzles, books, and any other of your favorite knick-knacks!

(Vintage Modern by Bonnie & Camille)

  • 1/2 yard Houndstooth in Pebble Gray
  • One fat quarter Floral Dots in Aqua
  • One fat quarter Floral Dots in Cream
  • One fat quarter Floral Dots in Candy Apple
  • One fat quarter Snickerdoodle in Melon 
  • One 20 x 36″ scrap of batting 
  •  One pkg (3 sets) 7/8″ Velcro squares (non-stick)

  • Doorknob embellishment (could be a button, fabric circle, fabric yo-yo, etc.) 

Cutting

  • From the Houndstooth in Pebble Gray, cut two 11.5 x 14″ linings, two 4 x 11.5″ blocks, four 4″ blocks, and two 2 x 4″ blocks. 
  • From Floral Dots in Aqua, cut one 1.5 x 11.5″ strip, five 2.5 x 3.5″ blocks, eight 1 x 5″ strips, and one 10.5 x 11.5″ block.
  • From the Floral Dots in Cream, cut five 2.5 x 3″ blocks. 
  • From the Floral Dots in Candy Apple, cut ten 1 x 3″ strips. 
  • From the Snickerdoodle in Melon, cut one 4 x 11.5″ block, one 3.5 x 5″ block, and one 2 x 4.5″ block.

Assembly–Assume 1/4″ seam allowance unless otherwise stated.

1.  To create each window, sew a 1 x 3″ strip (Floral Dots in Candy Apple) on the left/right sides of a 2.5 x 3″ block (Floral Dots in Cream). Press open the seams.

Photobucket

Sew a 2.5 x 3.5″ block (Floral Dots in Aqua) below each window; press open the seams. Make five total.

Photobucket

2.  Referring to arrangement below, lay out the completed window units, the 3.5 x 5″ block for a door (should be Snickerdoodle in Melon), and the eight 1 x 5″ strips (Floral Dots in Aqua) as sashing. Stitch the “top floor” row together; press open the seams. Repeat to stitch the “bottom floor” together, pressing open the seams afterwards.  Sew the two rows together, lining up the seams and pinning in place beforehand.

Photobucket

3.  To create each roof unit, you will need two 4″ blocks (Houndstooth in Pebble Gray) and one 4 x 11.5″ block (Snickerdoodle in Melon). Draw a diagonal line on the back of each 4″ block; pin right sides together with the 4 x 11.5″ block, as indicated below. Stitch along the drawn line; discard excess 1/4″ outside of the drawn line and press open the seams. Make two total (set one aside for step #5).

Photobucket
Photobucket

4.  To finish the house facade, sew a roof onto the house with the 1.5 x 11.5″ strip (Floral Dots in Aqua) between them, as indicated below.

Photobucket

For the house backside, simply sew the 4 x 11.5″ block (Houndstooth in Pebble Gray) to the 10.5 x 11.5″ block (Floral Dots in Aqua).

Photobucket

5.  For the flap exterior, first you will need to sew together the two 2 x 4″ strips (Houndstooth in Pebble Gray) with the 2 x 4-1/2″ block (Snickerdoodle in Melon) in the order indicated below.  Attach the finished strip to the top of the second roof from step #3. 

Photobucket

6.  Baste the house facade, house backside, and flap exterior to the batting piece using a sticky basting spray (or fusible batting) and insert safety pins to prevent the layers from shifting during quilting.

Photobucket

7.  Quilt as desired (mine was very minimalistic). Trim away the excess batting.

PhotobucketPhotobucket

8.  Time to add a doorknob embellishment.  If it weren’t a choking hazard, I would have added a decorative button. Instead, I made a small fabric yo-yo from the Floral Dots in Candy Apple and stitched it on by hand. 

Photobucket

9.  To add a velcro closure, you will need the [quilted] house backside and the 4 x 11.5″ flap lining (Houndstooth in Pebble Gray), a measuring tape, the Velcro squares, and the Super Stik glue stick. (The reason I discourage Sticky Velcro is because it will ruin your sewing machine needle when you stitch it in place.)

Photobucket

Line up the measuring tape along the seam of the house backside.  Apply glue stick to the back of the scratchy-half of the Velcro squares. Place the squares at the 3-1/4″, 5-1/4″, and 7-1/4″ points above the seam.

Photobucket

Apply glue to the back of the remaining Velcro pieces.  To the flap lining: lay the measuring tape 2″ down from the top and place the squares at the 3-1/4″, 5-1/4″, and 7-1/4″ marks.

Photobucket

Stitch the velcro pieces in place using a zigzag stitch around the perimeter.

Photobucket

10.  To finish the flap, bring the flap exterior and lining right sides together, the Velcro-end of the lining should be together with the widest part of the roof.  Pin in place.

Photobucket
Photobucket 

Stitch along the perimeter, leaving the non-Velcro side of the lining unstitched.

Photobucket

Trim at the corners and turn right-side out.

PhotobucketPhotobucket

Press the flap with an iron. Lay the flap (Velcro-side up) onto the house facade, aligning raw edges and pin in place.  The flap should be centered, about 1/2″ in from the sides.

Photobucket

Lay the house backside on top (right sides together) and sew along the sides using 1/2″ seam allowance. Be careful not to get the flap sides caught in the seam.

Photobucket

Press open the seams and turn right-side out.

Photobucket

Stitch the 11.5 x 14 lining pieces right sides together using 5/8″ seam allowance and press open the seams.

PhotobucketPhotobucket

Slip the house into the lining, right sides together, making sure the side seams line up, and pin in place.

Photobucket

Stitch along the top using 1/2″ seam allowance.

Photobucket

Remove the pins and turn right-side out.

Photobucket

Tuck the lining to the inside and iron the pouch

Photobucket

Top-stitch along the top (flap out) using 1/4″ seam allowance.

Photobucket

Turn the whole thing inside-out again and pin the bottom closed. Sew along the bottom using 1/2″ seam allowance.

Photobucket

Remove pins and turn right-side out again. Voila!

Vanessa Goertzen
{lellaboutique.blogspot.com}

Take It All Tote


Hi everyone!!  It’s Melissa from Happy Quilting and I am so excited to get to share another fun-filled tutorial with all of you MBS Fans 🙂  Some of you may know that I have a large family (7 of us).  Every time we go swimming, to the beach, on a picnic, or whatever . . .  I end up taking so many tote bags to carry all of our stuff.  With summer coming up and lots of outings planned, I decided it was time to make my own custom tote bag that will “Take It All” (and not to mention look pretty awesome!!!).  What fun to get to share it all with you!!!

Leah from Burgundy Buttons with her mad skills has made up an adorable “Take It All Tote” Kit so you can have yours all done in time for some summer outings!!  Hurry, supplies are limited 🙂

If you do whip up your own Take It All Tote for your family I would love it if you added it to my Inspired by Happy Quilting Flickr Group or emailed me a picture at happyquiltingmelissa (at) gmail (dot) com.  I so love to see your work!!!!   And, if you have any questions please don’t hesitate to send me an email.  I would be happy to help in any way I can 🙂

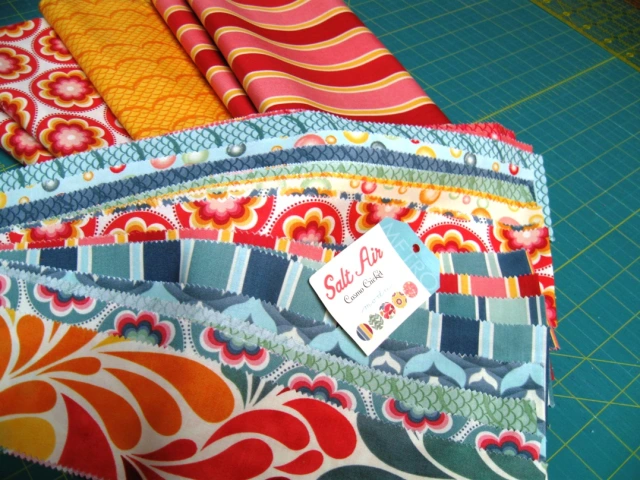
I Used Salt Air by Cosmo Cricket for my tote because I just loved the beach themed fabrics and they fit perfect for all our summer outings!!!  You will need:

1 Salt Air Jelly Roll –  You will use 22 strips
1 Yard for the handles, binding, and applique – I used 37027 12
3/4 Yard for the lining – I used 37023 12
1/3 Yard for the pockets – I used 37025 14

Additionally – You will need some Non-Fabric Supplies.  They include :

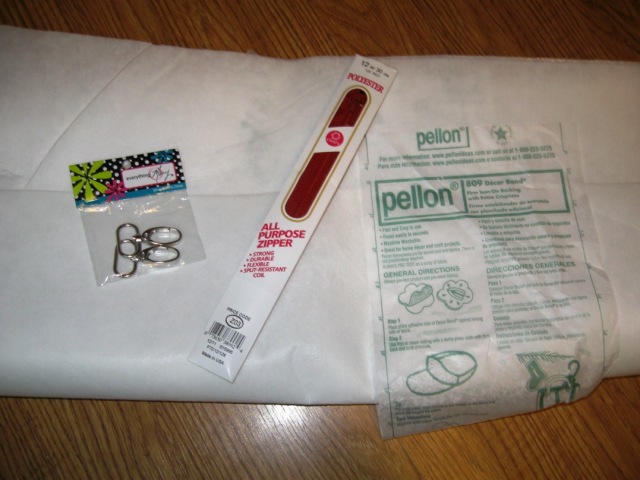
2 Yards of Interfacing – I used 809 Decor Bond (It is iron-able and a good weight)
1 Key Ring Hook
1 12″ Zipper

STEP 1 – CUTTING

So . . . Let’s get started with cutting up our yardage so it is ready when we need it 🙂  First well cut the 1 yard piece.  Begin by cutting the selvage from your yardage.  Then cut (2) 2 1/2″ x WOF strips for the binding, (4) 6″ x WOF strips for the handles, and set the remaining piece aside to be used for the applique.

Onto the 1/3 yard piece.  From this piece cut (1) 12″ x 18″ rectangle that is cut on the fold.  So you will be cutting 9″ up from the folded line.  Then cut (2) 11″ x 12″ rectangles.  This will leave you with the selvage that you can scrap.

And lastly, take your 2/3 yard piece and cut it into a 26″ x WOF fabric piece.  This should just be squaring it up and cutting an inch off the back.  Go ahead and cut off the selvage at 21″ when your fabric is folded.

And that is all the cutting.  Set these cut pieces aside for later.

STEP 2 – PIECING THE CHEVRON OUTER BAG

To start . . . Grab 5 strips from your jelly roll.  Strip piece the entire strips together into a set of 5 but staggering the strips by appx. 2″ to form upward steps.  Clip your threads and press.

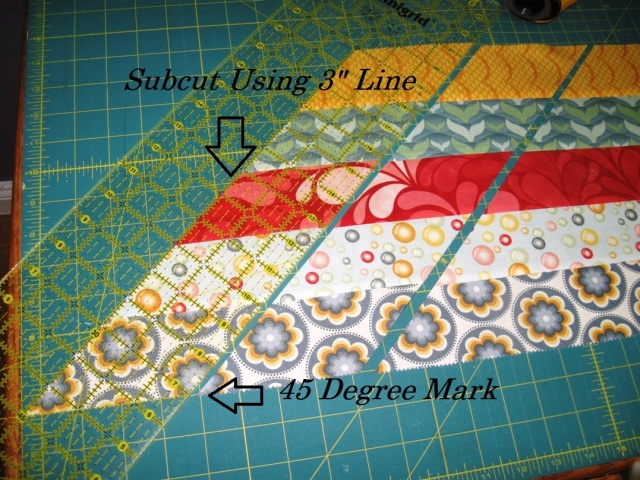
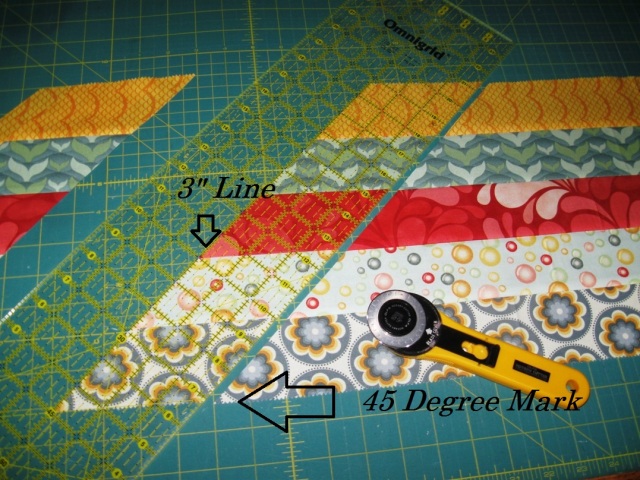
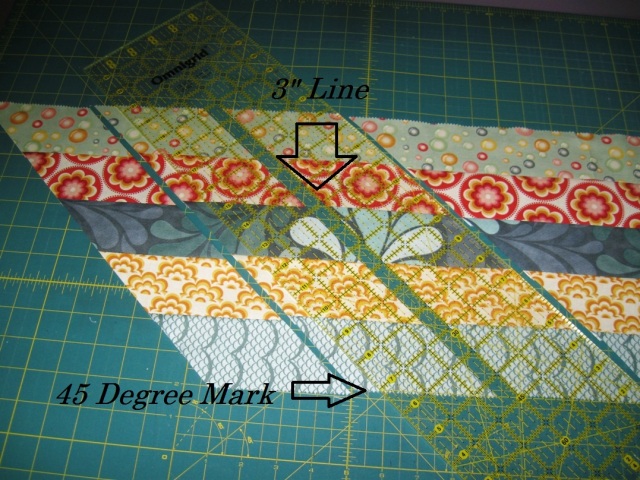
Lay your strip set out onto your mat with the bottom strip aligned with a horizontal strip on your mat.  Place  a long  6″ wide ruler so that the 45 degree mark is aligned with the bottom of your first strip and the edge of the ruler is as close to the edge of your “steps without including selvage.  Cut along either side of the ruler.

Now, go back and align the 45 degree mark again with the bottom of the piece you just cut.  Align the 3″ line of your ruler with the cut line of the fabric.  Sub-cut your pieced unit into 2 units.

Now line up your 45 degree mark with the bottom of your pieced strips and the 3″ line of your ruler with the cut edge of your fabric.  Cut.  Continue to cut this way across the striped piece of fabric until you have sub-cut 9 total pieces.   There will be a little scrap at the end.

Now, grab an additional 5 jelly roll strips and repeat this process to make a total of 18 sets of 5 in 2 different print patterns.

And now we will repeat the process but make downward steps instead of upward steps.  So grab 5 additional jelly roll strips and strip piece the entire strips together into a set of 5 but this time staggering the strips by appx. 2″ to form downward steps.  Clip your threads and press.

Once again, lay your strip set out onto your mat with the bottom strip aligned with a horizontal strip on your mat.  Place  a long  6″ wide ruler so that the opposite 45 degree mark is aligned with the bottom of your first strip and the edge of the ruler is as close to the edge of your “steps without including selvage.  Cut along either side of the ruler.

And again, go ahead and using your 45 degree mark aligned with the bottom of your pieced strips and the 3″ line of your ruler with the cut edge of your fabric, Sub-cut your first piece and then continue to cut 3″ pieces across the striped piece of fabric until you have sub-cut 9 total pieces.   Put the scrap in your scrap bin.

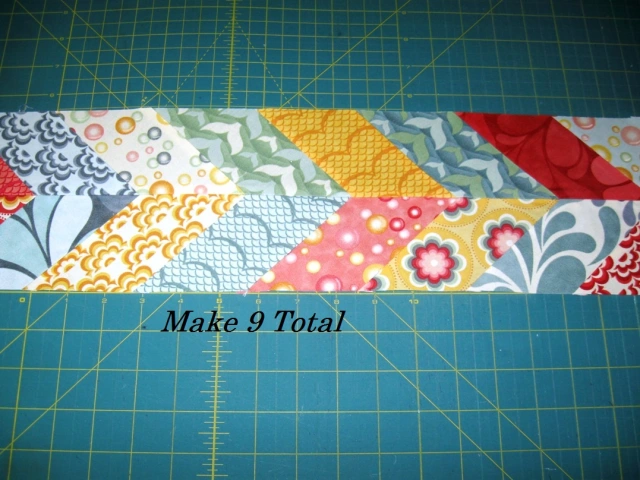
Repeat the downward step process with an additional 5 jelly roll strips.  You will now have 18 sets of 5 of Upward angled pieces and 18 sets of 5 of downward angle pieces.  Perfect for making 9 Chevron rows.

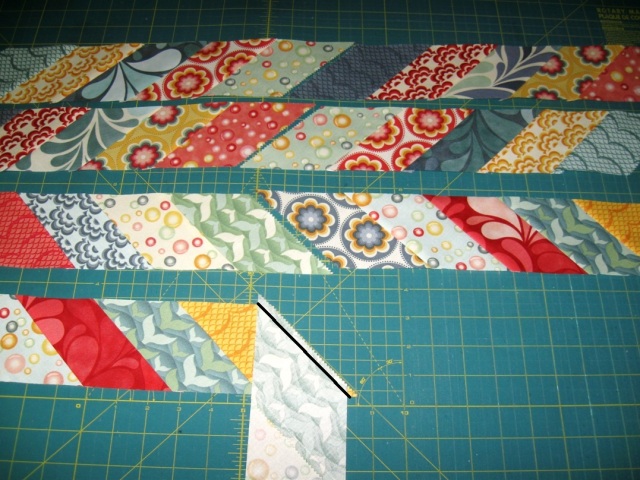
So, Lets get to making the rows.  Taking 2 upward angle rows (one from each set) make one long row.  You can mix and match the patterns as much as you like to get some variance.  Lay the second piece onto the first piece with right sides together and the pieces at a 90 degree angle.  The corners will overlap 1/4″.  Sew a 1/4 seam along the edge.  Press.  Repeat to make 9 Upward Angled long rows and 9 Downward Angled Long Rows.

Now that you have your long rows you can make your chevron points.  Take 1 Upward angle row and place it on top of a Downward angle row with right sides together.  To get really nice points take care to nest your seams and pin at each seam intersection. Go ahead and stretch a little or ease fabric in to get your points lined nice and perfect.

Stitch a 1/4″ seam along your pinned edge removing pins as you go.  (Where they are angled they will really want to throw your 1/4″ off.) Press your seam and admire your beautiful chevron points!!   Repeat to make 9 sets total.

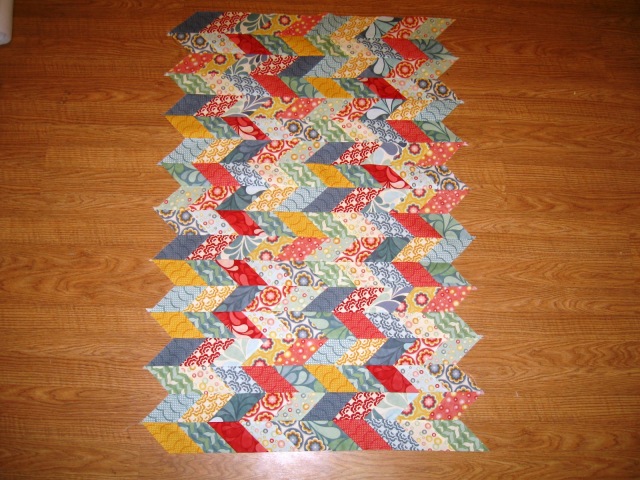
Stitch your 9 sets together.  Lay out the rows as follows making all the points on on side and the arrow tails on the other.  Stitch the rows together the same way you stitched the sets together taking care to line up and pin each seam.  When all 9 rows are sewn together it should look like this.

Now fold the entire pieced work in half and lay it on your cutting mat aligning the folded edge with the 0 horizontal line of your mat.  Cut along each edge so that you have a 26″ wide piece remaining.  Discard cut pieces.

Now grab your interfacing and cut a piece the same size (26″ x 45″) as your pieced fabric.  Adhere the interfacing to the wrong side of your pieced fabric.

Optional – If you would like, you can do a little free motion stitching on the outside of your bag if you like.  It adds a fun little detail and helps to give the piecing a bit more strength 🙂  I did a fun free motion straight line.  I liked how the free motion allowed it to look a bit wavy, matching the theme of the bag 🙂

STEP 3 – ADDING THE FRONT POCKET

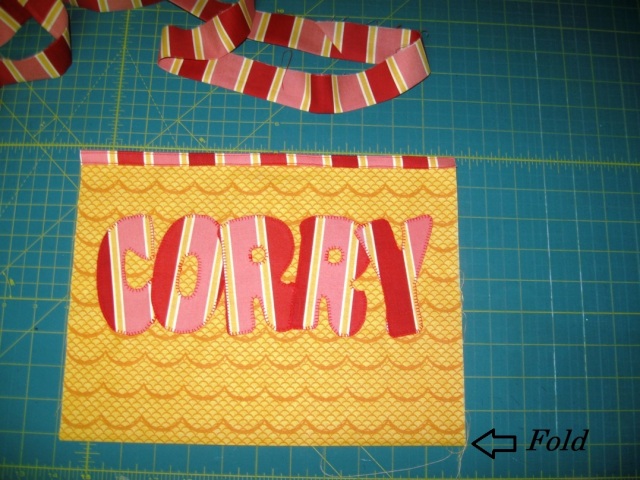
Now you are ready to add some of the detail to the outside of the bag.  First lets add the front pocket.  So grab your folded 12″ x 18″ rectangle and your remaining applique yardage.  Applique your Family Name . .  or whatever you would like for that matter, on to the top half of the pocket taking care to leave at least 1/4″ from each edge and staying above the folded line.  If you have never appliqued or need help, you can see my video tutorials on Applique here that will walk you through the process step by step.

Now, go ahead and grab your 2 1/2″ x wof strips and turn the 2 strips into a continuous folded binding strip. (Moda has a great tutorial here on how to do that if you are not sure 🙂  Cut a 12″ piece of binding.  Fold your pocket back in half.  Machine bind the top of the pocket with the 12″ strip.  I went back and added a decorative straight stitch along the top of the binding as well so it would match the handles.

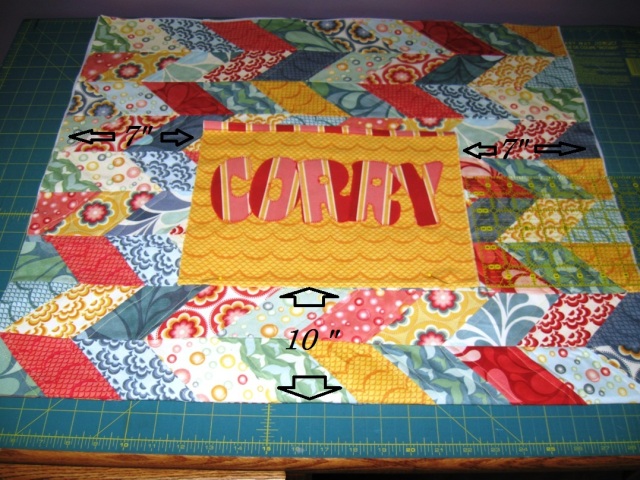
Now, to align the pocket onto the bag.  Place the pocket 10″ up from the folded line of the bag and 7″ in on either side.  Stab 2 pins in on either  to mark the place.

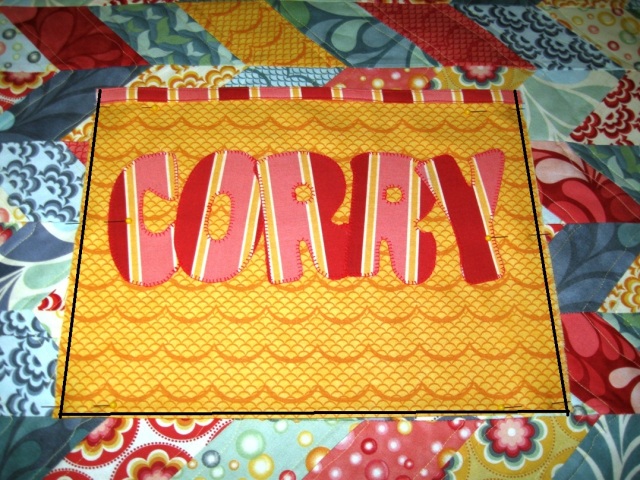
Now unfold the chevron piece and pin the bag in place through 1 layer, we don’t want to be sewing any bags shut 🙂  Stitch along the edge of the pocket starting at the top left hand corner and going around the pocket to the top right hand corner. Remember to back-tack at the start and finish.   Do not stitch across the top.   And don’t worry about those raw edges hanging out, we will cover those with the handles 🙂

STEP 4 – ADDING HANDLES

So, let’s get making the handles.  These are made double thickness so as to give them lots of strength.  So. Start by taking your 4 6″ strips and sewing them into 1 long strip.  You don’t need to sew these on an angle like you do your binding strip, just 1/4″ seams along the edges is fine 🙂  Then go ahead and press the entire strip in half.  Open the pressed strip up.  You will have a crease down the center.  Now Fold the top half of the strip over and press down to the crease across the entire strip.  Then similarly fold the bottom half over and press up to the crease across the entire strip.

Lastly, go ahead and fold the entire strip in half and press.  Now your super strong handles are ready to be attached!!!

Lay your pieced chevrons out on a flat surface.  Start with the edge of your handle at the center of the pieced chevrons and the open side facing inwards.  Place the handles about 6 3/4″ in from the edge so that the edge of the  handle will overlap the raw edge of the pocket.  Go ahead and play with the size of the handles that you would like.  Trim any excess handle at the center leaving a 1/2″ overlap.  Set the excess aside to use a little later.

Now sew the 2 ends of the handles together by opening the center seam and placing right sides together.  Sew a 1/4″ seam along the raw edge.  Fold the handle once again and press.

Now, go ahead and pin your continuous handle in place where you had lined it up before.  You are now ready to stitch your handles down. On the first handle start stitching  1/2″ in from the edge of the top of the bag.  Sew in 1/8″ from the edge of the opened side of the handle.  (Using a walking foot really helps from keeping this from wanting to shift)  Stitch the 1/8″ line down the entire handle ending 1/2″ from the bottom of the bag and back-tacking.  Now stitch on the other side of the handle (unopened end) in the same fashion leaving the 1/2″ at the top and bottom.  Then repeat with the handle on the other side.
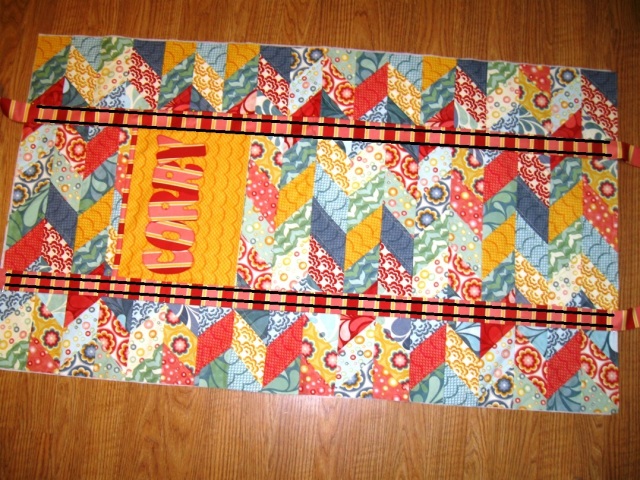
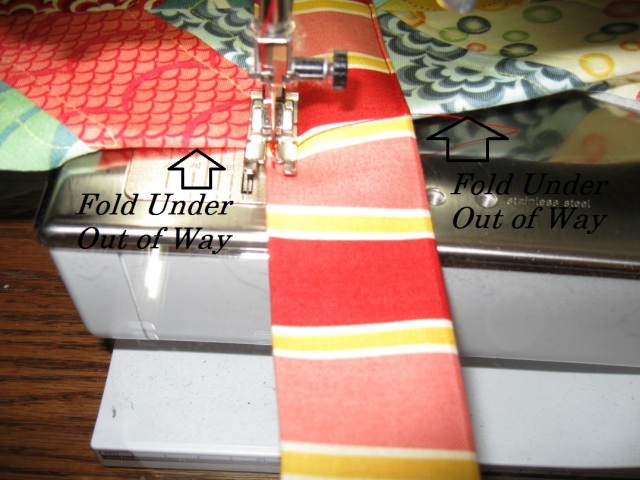
Now just to finish up those handles.  Start by folding the pieced chevrons under so that they are out of the way.  Place the needle right next to where you stopped sewing before on the open side of the handle.  Stitch a few stitches and then back-tack, being careful to only sew the handle and not the pieced chevrons.  Continue stitching an 1/8″ seam along the edge of the handle until you get back to the pieced chevrons.  Once again, fold the pieced chevrons under and out of the way and stitch right up to the previous stitches.  Back tack.  Now you can do the same on the folded side of the handle.  Done, now just repeat both steps on the other side of the bag 🙂

STEP 5 – MAKING THE BASE AKA GUSSETS

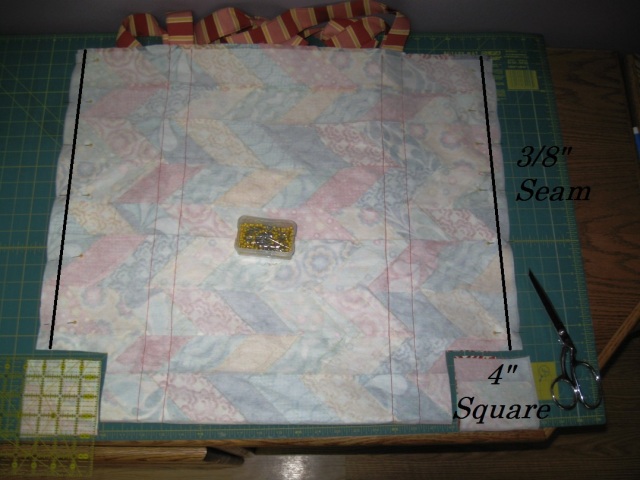
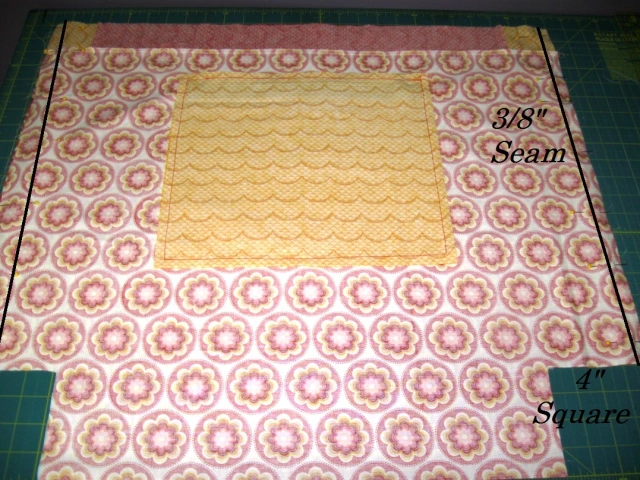
And now with your handles all added, you are ready to add a base to your bag.  We do this by adding gussets, at least I think that is what they are called. Lay your pieced chevrons with right sides together aligning the top and bottom and the sides.  Pin along the sides of the pieced chevrons.   Cut a 4″ square out of the bottom of each side.  The easiest way is to just lay your square ruler on the corner, mark the 4″, and then cut it out with your scissors.  Now go ahead and stitch a 3/8″ seam along the 2 pinned sides back-tacking at the beginning and end of the seams.

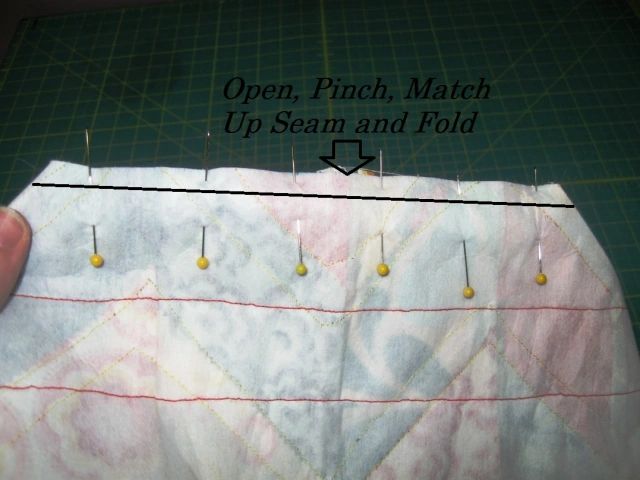
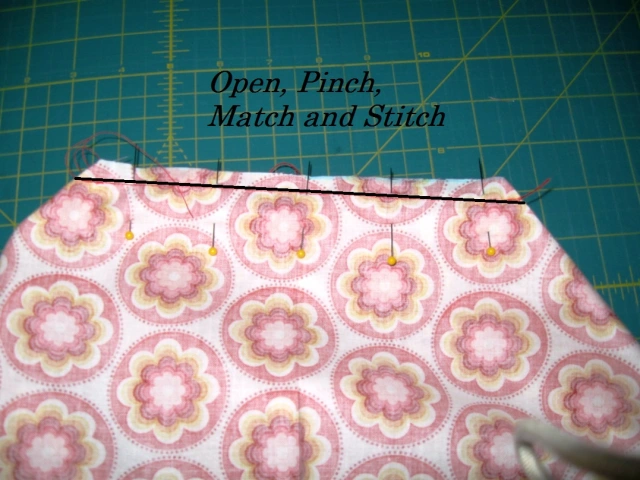
Now for the gusset.  This is a lot easier then it sounds.  Open the corner and then pinch down so that you line up the seam you just made with the fold at the bottom of the bag.  It will make a nice straight line like this.  Pin along the  raw edges.  Now just stitch a 3/8″ seam along the raw edge.  Repeat for the opposite corner.

Now turn it right side out, push the corners out with your hands,  and you have the outer part of your bag all done!!!  Yippee Skippee!!!

STEP 6 – MAKING THE LINING

Onto the lining.  The lining needs to be just a big longer than the 42″ we cut earlier.  So grab 2 more jelly roll strips and from the first one cut (2) 2 1/2″ x 21″ strips and from the second one cut  (4) 2 1/2″ x 3″ strips.  Piece the 3″ squares onto either side of the long strips to make 2 strips as follows.

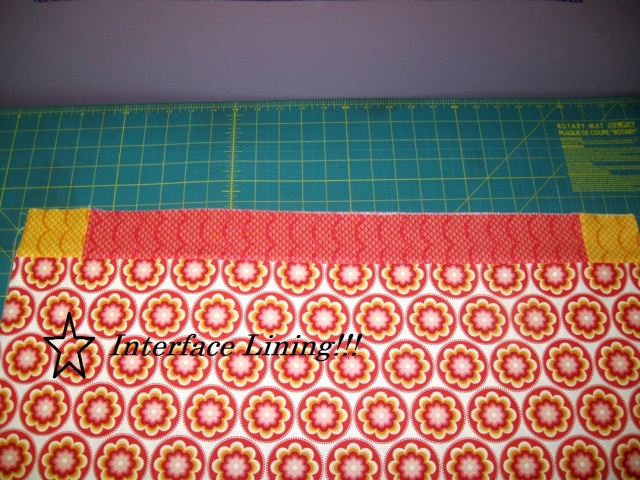
Attach the long strips onto each side of the top of the lining with a 1/4″ seam.  Then go ahead and cut a piece of interfacing the same size as the lining and adhere it to the wrong side of the lining.  (Somehow, I had a major forgetful moment and totally forgot to add the lining to my interfacing,  Le Sigh).

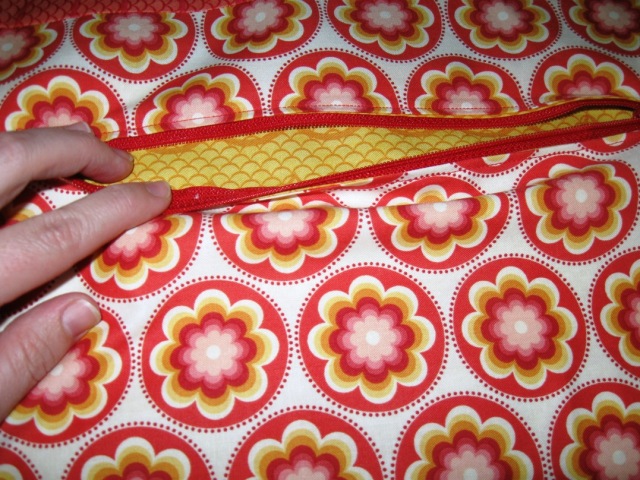
Now, go ahead and grab your zipper and your 2 remaining 11″ x 12″ rectangles to make a hidden zipper pocket in your lining.

If you have made a hidden zipper pocket before go ahead and add it into your lining placing it 2″ down from your added jelly roll strip and centering it from side to side.  If you have never made a hidden zipper pocket you can see my  tutorial for Adding a Hidden Zipper Pocket here 🙂

Now with your zipper pocket added you are ready to add the gussets into your lining.  Do this the same way you did your outer tote.  Fold the lining with right sides together and pin along the sides of the lining.  Cut a 4″ square out of the bottom corners and then stitch along each of the sides.

Once again, Open, Pinch, Match your Seams, and Stitch a 3/8″ seam along the both corners. Open it up and your lining is done!!!

STEP 7 – FINISHING THE TOTE

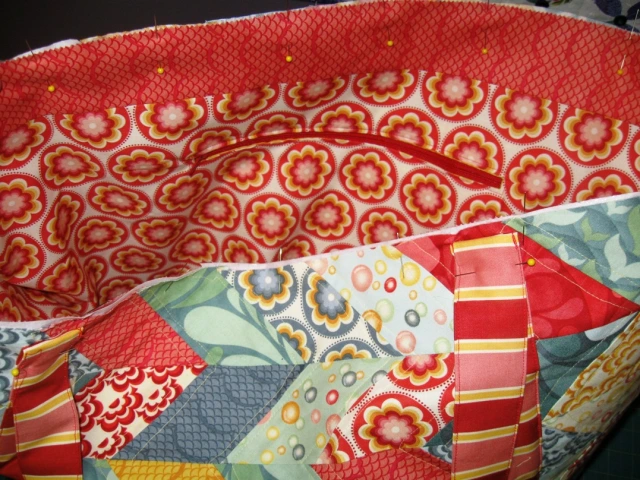
This is where it gets really fun because it actually looks like a tote bag!!!  Go ahead and place your lining inside your outer tote bag piece.  Align the tops of each piece and pin along the edge.  It is easiest to align the side seams first and then the centers.  Then work out.  (If your interfacing does not want to align with the edge of your tote you can trim as needed 🙂

No go ahead and pin your handles back out of the way so you won’t stitch over them.  With the handles out of the way stitch a large basting stitch along the raw edge about 1/8″ in.  This just holds everything together nice to bind it 🙂

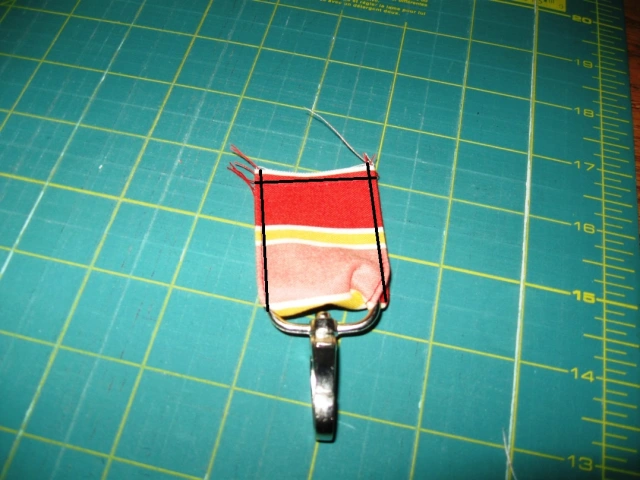
Now, the easiest, and for me, most important part.  I hate losing my keys in the bottom of my bag.  So . . .  My bag totally needs a key holder.  So grab that little bit of handle excess you set aside.  Stitch 1/8″ seam along either side to close the piece up.  Now wrap it through the metal loop of the key holder and then stitch the end close.  Don’t worry about that raw edge, it will get put in the binding 🙂

Onto the binding.  You are going to bind the bag the same way you would machine bind a quilt.  So start by attaching the raw edge of the binding to the raw edge of the bag with a 1/4″ seam. Remember to leave about 6″ unattached at the start.   Add your key holder in wherever you would like it (I did it near the side seam) by inserting it under the binding and then stitching over it as well.  And watch out for those handles wanting to creep in your way.  Be sure not to sew over them 😉

Continue stitching until you get to the end.  Overlap your binding pieces 2 1/2″, cut, and then sew at a 90 degree angle  and then clip and finish sewing down the inside of the binding.  (Once again, if this is new to you, you can see this tutorial).

Now, simply fold your binding over and stitch along the edge to secure it down.  (Aka stitch in the ditch).  You want to try and align your binding with the edge of the pinned down handle so that when it is open it matches up.  Stitch the binding down all the way around the top of the bag. (if you like, you can add a second decorative stitch along the top of the binding so that it matches your handles and pocket 🙂

Then just unpin your handles and you are done!!!  Yippee Skippee!!!

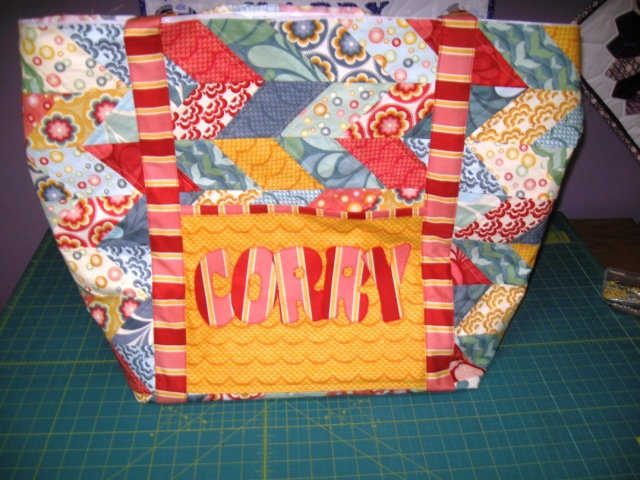
Now you have one fabulous Summery Tote measuring 25″ wide, 17″ high, and 8″ deep!!!  Now that is a bag that you can load up with everything and then some!!!

Seriously, That is a lot of stuff!!

And yes, your bag will be the most fantastic bag on the beach.  So you might just want to stay all day!!!

Melissa Corry
{happyquiltingmelissa.blogspot.com}

Ruby’s Party Bag


I’m very excited  to be posting over here at the Moda Bake Shop, it’s been awhile.  I’m so in love with this fabric by Bonnie and Camille, I couldn’t wait to get my hands on it.  Come visit me over at my blog for a chance to win some of this super cute fabric for yourself!  Our Cozy Nest

3 Fat Eighths  (or 3 –  9″ x 22″ pieces of coordinating fabric)
1/2 yard of fast to fuse fusible interfacing or a similar stiff interfacing
Pattern Pieces – included in Printer Friendly Version at bottom of post.


Step One:  Pick three of your favorite coordinating pieces from your fat eighth bundle. Not easy to do since they are all so dang cute!

Step two:  Decide which piece of fabric you want to use for the body of your bag.  Iron it onto the fusible interfacing.

Step three:  Cut out pattern pieces, trace onto fabric, and cut out. You will need to cut two purse pieces.   The pattern for the sides and bottom of the purse will need to be traced and then flipped over and traced again on the other side since the fabric will be too stiff to fold.

Here is what you should have:

Step 4 – Do the same thing in step three for the lining of the bag.  Note – Be sure and layout your pattern pieces so you have that extra fabric on the right side.  This piece of fabric will be used for the “binding” at the top of the purse.  You will need to make sure there is 1 1/4″ of extra fabric on the right side.

Step 5 – Lay one of the purse pattern pieces down with print side up.  Lay your piece for the sides and bottom on top of it with the print side down (like in picture below).  Starting on the right side, begin sewing the two together, making sure to back stitch at the beginning and end.  Note:  Use 1/4″ seam allowance on the entire project unless noted otherwise.  I’m not much of a pinner and honestly this fabric is going to be so stiff, I’m not sure you could pin it.

I just sew a little at a time, sort of curving the sidepiece to the fabric piece as you go.  I kept my needle down when I lifted up the presser foot to move the fabric.

Step 6 – Now sew the other side of the purse on starting on the right side again.  Don’t worry too much about having to bend and move the fabric, I just used an iron when I was finished to smooth it out.

When you’re done sewing the body of the bag together, trim the edges of the bag down to about 1/8″.  
Follow steps 5 and 6 for the lining of the bag.  Turn your bag (not the lining) right side out and place the lining inside so that wrong sides are together.  Stitch the two together by sewing around the top of your bag using a 1/4″ (or a little less) seam allowance. It’s embarrassing that it took me a while to figure this out, but it’s much easier to do this if you remove the extension table from your machine (that blue plate you see on mine).

Step 7 – Make the ruffle for the top of the purse.  Out of you third coordinating piece of fabric, cut a strip of fabric that measures 2 1/2″ wide by 22″ long.  Iron the fabric in half with the print on the outside. If the raw edges on the end of the ruffle bother you, just fold it over 1/4″ before ironing it in half lengthwise and stitch. To make the ruffle I just sew along the length  of the fabric (raw edges on the inside) and about every  3/4″ make a pleat by folding the fabric up about 1/4″ inch and then back down again.  The picture below shows it much better than I can explain it.  When you are done making the ruffle, sew it to the top of your bag. Finished off the edges by overlapping the two ends about 1/2″.

Step 8 – Making the bag handle.  Cut a piece of fabric that is approximately 2″ x 11″ out of the same fabric as your ruffle.  Iron the strip of fabric in half, unfold and then iron the outside edges into the center like pictured below.  Iron back in half (should be 1/2″ wide) and stitch 1/8″ in on both sides.

Step 9 – Pin handle to purse like pictured below and tack into place.

Step 10 – Binding around top of bag.  I apologize for this very poor picture, I couldn’t get my flash to work. I did this the same way I would bind a quilt.  This is where you will use that little 1 1/4″ wide piece of fabric that you saved from the lining.  You will need to sew the two pieces together end to end, it should be about 16″ inches long although you wont need nearly that much. Iron fabric in half lengthwise and then unfold and iron one side into the center (just like you did for the handle, but only one side).

Sew onto the top of your bag by placing the side of the binding that is not folded onto the top of your bag with print side down.  Fold the very edge of the binding over about 1/4″ to give the edge a finished look.  Sew around entire opening of bag and when you get to the end,  overlap the pieces 1/2″ to 1″ folding the very end over 1/4″ before stitching down.  Now the fun part (at least to me).  Fold binding over onto the inside of bag an hand stitch down.  If your bag is wrinkly when you’re done, take a hand towel and wrap it around your hand.  Put your wrapped hand inside of the bag and apply a warm iron to outside of bag until you are happy with how it looks.
 

One super cute party bag, for your little princess!

Nicole Willmore