
![]()
Hi, I’m Dawn Cornell and today I have a cute quilt for you. It’s made with American Jane’s new line, Ducks in a Row. I call this quilt “Finding the 4-Patches” because it has a series of 4-patches in the main and secondary blocks. It’s all surrounded by a fun piano key border, making the most of two layer cakes and some beautiful Bella Solids.
Ready? Let’s sew!

2 Layer Cakes (I used “Ducks in a Row” by American Jane)
⅔ yard Bella Solids Lemon 9900-131, Green 9900-101, and Orange 9900-80
1 yard Bella Solids Cayene (red) 9900-256 and Cobalt (blue) 9900-227
1½ yards Bella Solids Black 9900-99 for sashing, border and binding.
5½ yards for Backing (21650-11 multi is a good choice)


Large 4-Patches
Cutting
From the Bella Solids (except the black), cut:
- 2 – 10″ x width of fabric (WOF) strips from the Lemon, Green and Orange
- 3 – 10″ X WOF strips from the Red and Blue
Sub-cut these strips into 10″ squares, yielding 4 squares from each strip (for a total of 8 each lemon, green, and orange squares and 12 each red and blue squares)
Cut all the leftover Bella Solids from this step into 2″ x 10″ strips to use in the border.
Piecing the Large 4-Patches
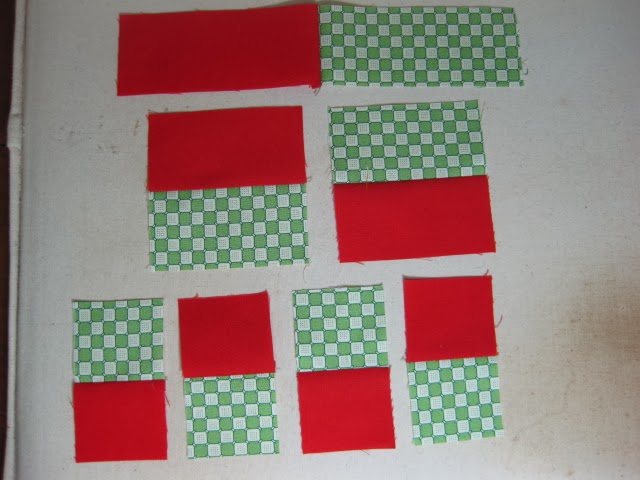
Pair layer cakes with the solids as pictured below (each Layer Cake piece will yield 2 blocks).
 You will make:
-2 red/green dot and 4 red/lemon floral
-2 blue/red dot and 4 blue/red floral
-4 orange/blue floral
-4 lemon/black floral
-4 green/orange floral
This combination will make a total of 24 large 4-patches.
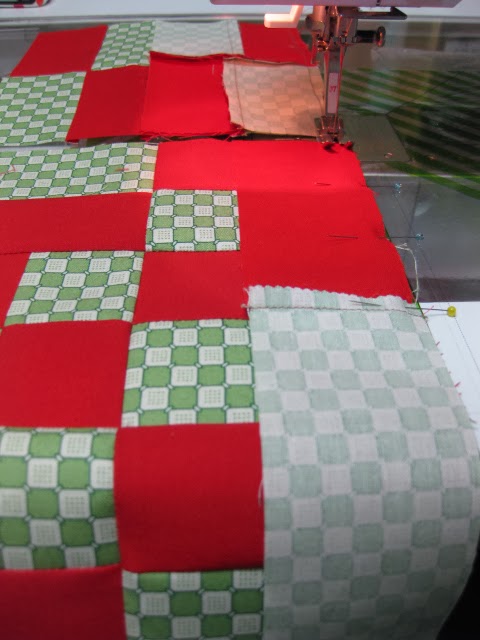
This quick piecing method for large 4-patches yields two 4-patches from each set you sew…With right sides together and the solid on top, stitch along the two side raw edges. Cut in half (5″ from the raw edge, not the sewn edges) and press to the solid.
Lay the two halves right sides together with the opposite fabrics touching and the center seam locking. Draw a line down the middle across the seam (5″ from the raw edge). Sew 1/4″ seam on each side of the drawn line. Cut on the line and voila you have two 4-patches. Press to one side and square to 9″.


NOTE: If you set your ruler on the center seam at 4 1/2″, trim top and side, turn block 180 degrees and do the same, the block will square evenly.
Pieced Blocks
Cutting
Pair the layer cakes with the solids as pictured below (each layer cake piece will yield 2 blocks).
Make:
2 blue/red check and 4 blue/red multi print
2 red/green check and 4 red/green multi print
4 lemon/black multi print
4 orange/blue multi print
4 green/orange multi print
This combination will make a total of 24 pieced block units.
Layer right sides together, solid on the top, cut each double layer into 2″ strips (each set will yield 4 strips 2″ x 10″)
Repeat with each pair.
From these strip sets you will sub cut:
A – 2″ x 5″ strips
B – 2″ x 3½” strips
C – 2″ squares
 |
A segments: Right sides together and solid on top, sew each segment on the short end as shown in photo above. Press to the solid. Should measure 2″ x 9½”.
B segments: Right sides together and solid on top, sew each segment on the long side as shown in photo above. Press to solid.

Sew these segments together with the print on top and under the needle first.This makes an elongated 4-patch. Press to one side. Should measure 3½” x 6½”
You will have a total of 48 – 4-patches when all sets are sewn
C segments: Right sides together, solid on top, sew each segment together press to the solid. Now sew two segments together with the print on top and under the needle first to make a 4 Patch. Press to one side. Should measure 3½” square.

You will have a total of 48 – 4-patches when all sets are sewn.
Sew two 4 Patch units together with the solid on top and under the needle first. Press to one side. Should measure 3½” x 6½”

Sew B units to top and bottom of C units, right sides together along the 6½” side.
Note: The two fabrics under the needle should be the same and the center seam should lock.
Press to one side. Should measure 6½” x 9½”.
 Sew A units to each side of the above units along the 9½” side.
Note: The two fabrics under the needle should be the same and the center seam should lock.
Press to one side. Should measure 9½”. If not square up the same way you did the large 4-patches.
Extra Large (XL) 4-Patches
Make XL 4-patches using the Pieced Blocks and the 4-Patch Blocks. Are you keeping up with how many 4-patches we’ve made so far?
Each of these 4-patch units should measure 17½” square and you will have a total of 12 XL 4-patches.
Sashing and Borders
Cutting
Cut the Bella Solids black into 2″ x WOF strips. You will use 17 strips: 9 for sashing and 8 for the first border. Set aside the 8 border strips. Sub cut the 9 sashing strips into 2″ x 17½” strips. Yields 18 but you will only use 17.
From the layer cake print (white with black and red dots) cut 6 – 2″ squares for the corner stones.
Piecing
Assemble the blocks, sashing, and corner stones in rows as shown below.

When assembled should measure 73″ x 54½”.
Making the First Border
Sew 8 Bella black border strips in sets of 2 to make 4 strips measuring 2″ x approximately 86″. Cut 2 strips 73″ long and 2 strips 58″ long. Attach the long strips to the sides of the quilt top first. Press towards the strip. Add the top and bottom borders strips and press towards the strips. The quilt top should now measure 76½” x 58.
Making the Second/Outer Border
From your remaining fabrics, set aside 2 white with black and red dots layer cake pieces and 1 black WOF strip for the corner blocks.
Cut all remaining 10″ squares from the layer cake and the solids into 2″ x 4½” strips. Piece together along the long sides of the strips, starting with red solid and ending with red solid.
Solid + Print + Solid + Print etc.
Piece together 51 total strips for each side and 39 total strips for the top and bottom. You may need to trim a little from each end to fit. Press strip sets and set aside.

Making the 4-Patch Corner Blocks
Cut the white dot and black dot layer cake squares into 2″ x 10″ strips (total of 5 strips from each layer cake square).
Sew a white strip to a black strip along the 10″ side. Make 2 of these units. Press towards the black strip. Sub cut into 2″ x 3½” segments. Sew together in pairs to make 4 – 4-patches. (More 4-patches! Are you counting?)
From the solid red, cut 4 strips measuring 2″ x 3½” strips and 4 strips measuring 2″ x 5¼”. Sew a short strip to the bottom of a black and white 4-patch and along strip to one of the sides as shown in photo above. Square to 4½”, trimming only on the red solid fabric. Make 4 of these units.
Attach the corners to each end of the top and bottom pieced border strips with the red to the outside.
Sew the long pieced border strip on the quilt first and press to the first border. Add the top and bottom borders.
If you are machine quilting, I suggest you stitch ⅛” seam around the out side edge of the border to stabilize the seams.
Quilt, Bind, and Enjoy!

76½” x 85″

Oh, by the way, how many 4-patches did you find in this quilt?
Dawn Cornell
![]()


