
Hello, I hope that you enjoy this tutorial on how to make a quilter’s ironing pad. My inspiration for this project came after getting annoyed with having to drag out my big ironing board every time I just needed to iron a few seams. This project is great for ironing quilting projects, it stores easily, and it is very portable. Hopefully this project will save you some time and ironing board frustration. It would make a great gift too!


16 Charm Squares (I used Sugar Pop by Liz Scott)
1/8 Yard of Coordinating Fabric (for binding)
1/2 Yard of Thermal Fabric (ironing board fabric)
1/2 Yard of batting (or insulated batting–preferably heat resistant)

Step One: Layout out your 16 charm squares in a 4 by 4 square. Maintaining the order of your pattern, take the two charm squares of the first row and align them together with right sides facing each other. Align the other two charm squares in the same fashion and repeat for the remaining three rows. Sew each set of two charm squares on one side using a 1/4 seam allowance (all seams will be 1/4 inch throughout). You should now have 8 sets of two charm squares sewn together.

Step Two: Press open seams.

Step Three: With right sides together, sew one set of two charm squares to another set of two charm squares to make a row of four charm squares.

Step Four: Press open seams. With right sides together sew one set of four charm squares to another set of four charm squares.

Step Five: Press open seams and then with right sides together, sew one set of eight charm squares to the other set of eight charm squares to complete your back of the ironing pad. Press open seams.
Step Six: Cut a piece of thermal fabric to match the size of the back you just made.

Step Seven: Cut a piece of the batting to match the back as well.
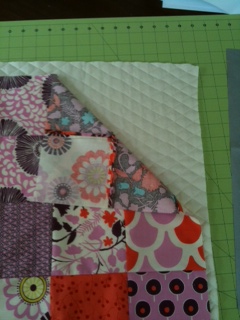
Step Eight: With the wrong side of the back facing up, place the batting on top of the back. Be careful to line up the edges. Then place the thermal fabric on top, right side facing up, and line up all edges then pin.

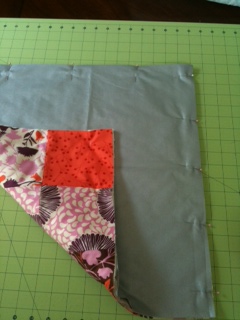
Step Nine: Sew the entire perimeter of the new stack with a 1/4 inch seam allowance.

Step Ten: Add a binding using your favorite method or try my binding tutorial.
Presto!!! You are done!!! Enjoy your new ironing pad and the relief from not having to drag out the old ironing board just to iron a seam or two.

One ironing pad to either use for your own quilting needs or to give to a fellow quilter.
Thanks for looking!
Kathy Davis
![]()
