Table Top Turkey Trot

Hello! Merry Christmas, Happy Holidays, and a Joyous New Year to you! Things have been quiet recently at my online home at Sewing by Moonlight, but I hope you will come visit anyway.

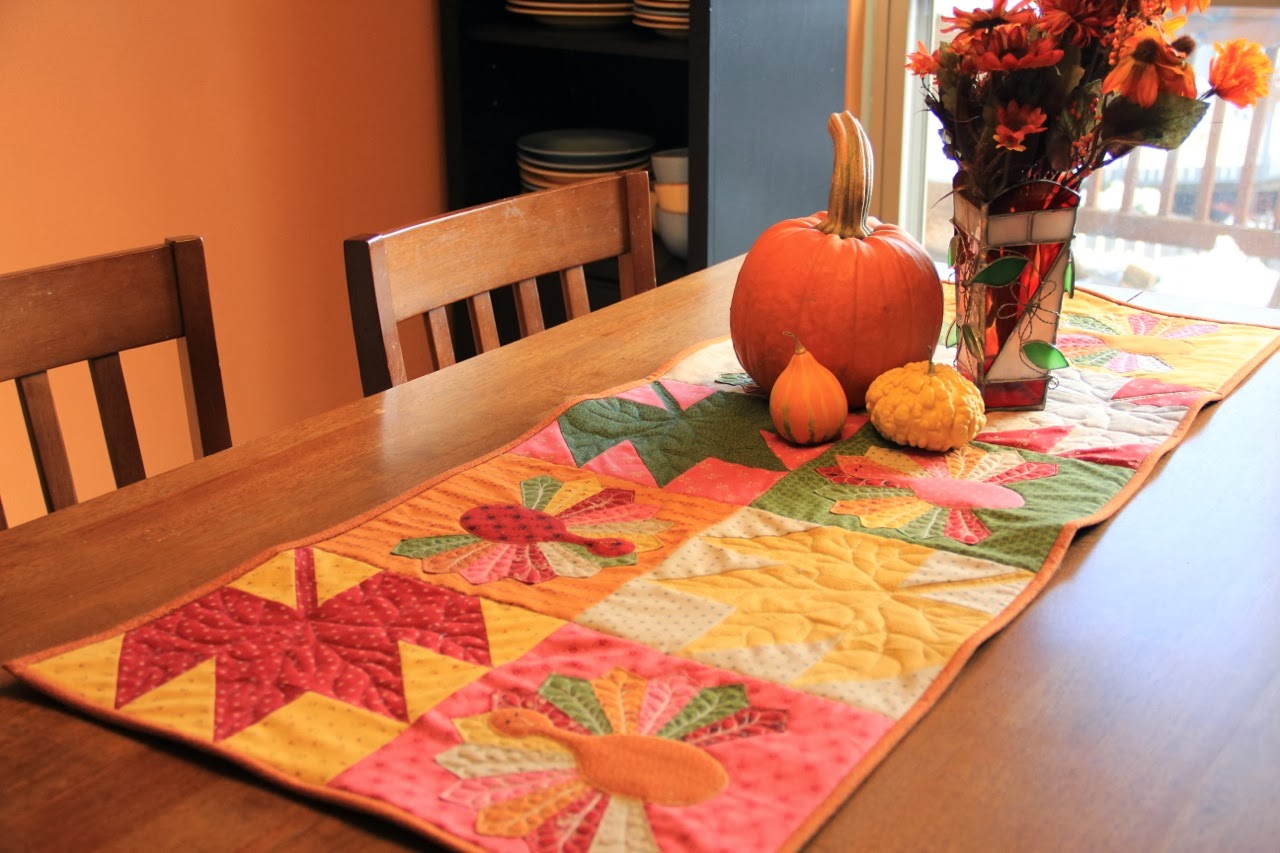
I had hoped to have this project ready to post for you by Thanksgiving, but it seems my reality does not allow for a one week project turn around time. So, here we are, just in time for Christmas, a Thanksgiving table runner.

The turkey is ready. She even wore her Santa hat for the festivities!

1 Layer cake – I used Floral Gatherings by Primitive Gatherings for Moda
1 1/4 yards backing fabric
1/2 yard of coordinating fabric for binding
Fusible web for appliqué
20″x47″ piece of battting
Template for dresden feathers and turkey body

Click {here} to dowload dresden feather and turkey body templates. The templates are also available in the Printer Friendly Version at the end of the post.

Embroidery floss for turkey eyes and beak, and embroidery needle

1. Determine the layout of your table runner. 
Alternate placing two squares together (these will be the maple leaf blocks) with single squares (these will be the background color for your dresden turkeys. This table runner has 5 turkey dresdens and 5 maples leaves, but you could easily make it longer or shorter.

2. Cut the fabrics for your maple leaf blocks.
Stack the two fabrics for the maple leaf block together, and cut as shown in the diagram below. Following this cutting diagram will ensure that you maximize the fabric in each 10-inch square.

2a. Begin by cutting a 3.5 inch strip from one side. Sub-cut two 3.5 inch squares from this strip. Save the remaining 3.5 x 3 inch piece to use for dresden feathers. 

2b. From the remaining 6.5 x 10 inch piece, cut across the width 5.5 inches from the edge. Sub-cut this piece into a 5.5 inch square and a 1 x 5.5 inch strip.

2c. Finally, cut one additional 3.5 inch square from the last piece of the layer cake square. Save the leftover 3 x 4.5 inch piece to use for dresden feathers. Add the final 3.5 x 1 inch strip to your scrap bin.

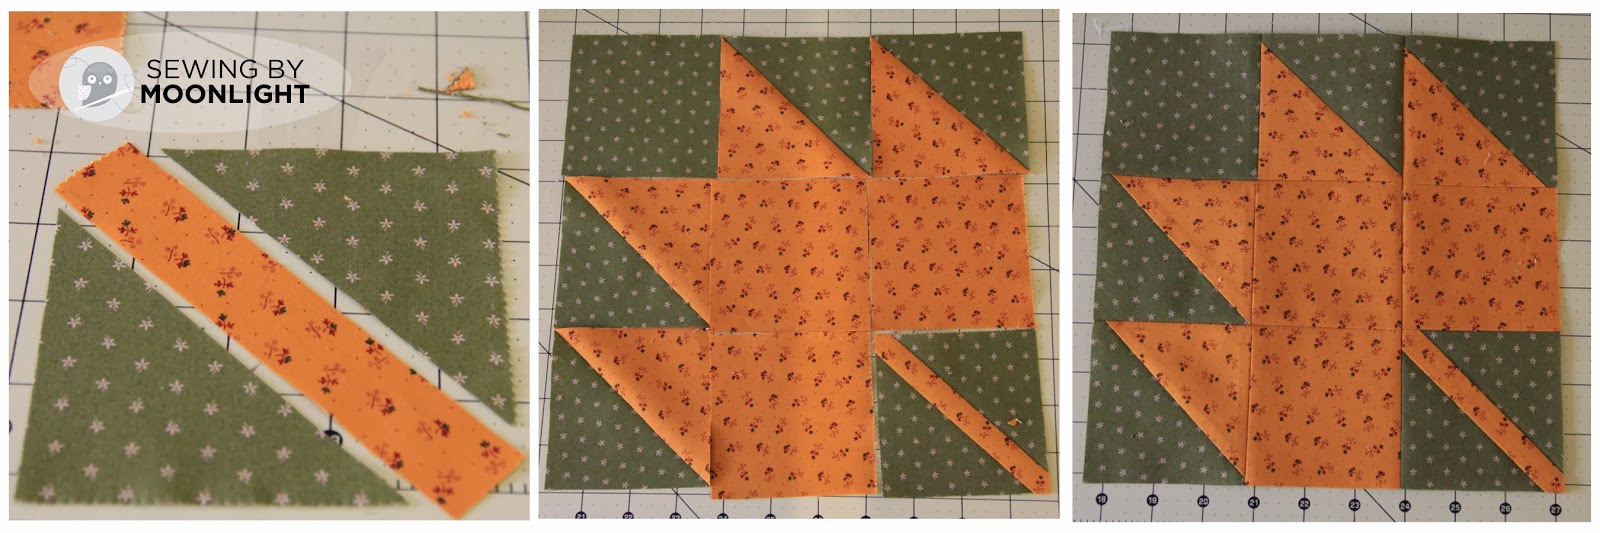
3. Create the maple leaf block. 
Use the pieces you just cut for the maple leaf block.

3a. Place the two 5.5 inch squares right sides together. Sew 1/4 inch from the edge all the way around the perimeter. Cut the square apart along both diagonals into four sections. Iron each piece open and trim the half square triangles to 3.5 inches.

3b. Cut one of the 3.5 inch squares of the leaf background fabric in half along the diagonal. Sew the 1 x 5.5 inch strip of leaf foreground fabric into this piece for the leaf stem.

3c. Arrange the block units into a maple leaf shape. Sew the block together and trim to 9.5 inches.

4. Create the dresden feathers
Using the template you downloaded above (under Ingredients), cut out the dresden pieces. Each turkey will require 12 dresden feathers. Since we have 5 turkeys in this table runner, I needed 60 dresden pieces. Use the unused pieces you saved from cutting out the leaves as well as additional layer cake squares.

4a. Fold each dresden piece length-wise and stitch 1/4 inch from the edge of longer width (not the longest side, that’s the length. Rather the longer of the two shorter sides. Clear as mud? See below.) This is an excellent opportunity for chain piecing.

4b. Trim the corner of each piece, flip the stitched side toward the inside to create a point and iron the piece flat so the point is centered.

4c. Sew 12 dresden pieces into a partial circle. Press the two raw edges 1/4 inch in to the wrong side.

4d. Trim the background square for the turkey to 9.5 inches. Fold in half and press. Open the square, fold in half the other direction and press again.

4e. Align your partial dresden circle so it is centered horizontally on the background square and two dresden pieces on each side fall below the horizontal center line. Pin the dresden in place and edge stitch all the way around.

5. Add a turkey body appliqué to your dresden feathers. 
Using the template, create an appliqué body for each turkey. Follow the manufacturer’s instructions on your fusible web and arrange the body so the head is centered and the body covers the raw edges at the center of your feathers dresden.

Use a tight zigzag stitch around the turkey body, or use another appliqué method of your choice.

If desired, add features (eyes, beak) to your turkey faces with embroidery floss or your sewing machine.

6. Arrange your maple leaf and turkey blocks in an alternating pattern. Stitch together. 

7. Use 10 of the remaining layer cake squares to create a backing for your table runner. 
Layer the runner top, batting, and backing together. Quilt and bind as desired.

One autumn appropriate table runner, made up of ten 9-inch finished maple leaf and dresden turkey blocks, measuring 18 x 45 inches.

Em Komiskey
{sewingbymoonlight.com}

Charming Wonky Diamonds Quilt


I’m thrilled to be making my first appearance as a chef here at Moda Bake Shop! This project has been in the works for some time, but a new baby and a cross country move totally messed with my sewjo and time for blogging. We’re in our new place now, and I get to set up a new sewing space. I want you join me for a Sewing Room Clean-up Along as I get my space in order, so please come visit me at Sewing by Moonlight.

Because this design repeats the same shape, it would be easy to add in another charm pack and some more background fabric to make this larger, or leave off a couple rows to make it smaller. Because of the scrappy look, you could use charm packs from two different, coordinating fabric lines for the diamonds. Or you could make the background scrappy with white diamonds.

2 charm packs for the diamonds and border – Snap Pop by Sandy Gervais
3 charm packs + 4 additional charms for the background

2.5 yards for the quilt back
1/2 yard for the binding

*set aside 22 colorful charms for the outer border*
*set aside 6 background charms for the inner border*

Cut the remaining charms from your fabric collection into 8 sections. Using your rotary cutter, first cut the charm twice corner-to-corner to make four triangles. Subcut those triangles through the middle to make 8 pieces.

Cut the remaining background charms into quarter from edge to edge, resulting in 2.5 inch squares.

You will have 496 squares of background fabric and 496 triangles of colorful fabric.

Pair up each colorful triangle with a square of background fabric.

Place the triangle right side down on the square of background fabric so that the long edge of the triangle is off-set to the right side of the background square (see first photo below). The triangle must be at least 1/4 inch to the right of center so that when you sew the pieces together, your triangle will complete a 2.5 inch square. note: you do not have to place each piece exactly the same. Variable placement will make your diamonds wonky. Tilt some triangles slightly to the left or to the right. Place them farther to the right side of the the square. 

This is a great time to chain piece. Now trim off the extra bit of background fabric, and cut your triangles apart. Iron the seam open.

Now comes the tedious task of trimming 496 squares back to 2.5 inches. I lined up several rows on my cutting mat and trimmed several at a time with my rotary cutter. Just be careful that your squares don’t slip.

Match the squares into pairs so that the colorful corner triangles are touching. Sew them together using a 1/4 inch seam allowance. 
*set aside 14 pairs to use in the inner border*

Sew the remaining pairs into units of 6 pairs, as shown in the photo below. Two pairs will form a diamond and the third will have a half diamond facing the edge. 

Use these 6-pair unit to make three block types, as shown below. You will need six of Block A, six of Block B, and three of Block C. Trim Blocks A and B to 12.5 inches square and Block C to 12.5 x 4.5 inches.

Sew each block type into rows of three, matching up the 1/2 diamonds on the edges to form complete diamonds.

Create the inner borders. This border will complete the half diamonds along the long edges. Cut the six background charms you set aside in half, then trim 1/2 inch off one end. You will have 12 rectangles 2.5 x 4.5 inches. 
Use 6 of these for an inner border on each long edge of your quilt. Alternate a half diamond pair with a rectangle of background fabric. Sew the borders along the edges, matching the half diamonds in the border with the half diamonds on the edges of the quilt top. 
Create the outer borders. Cut the 22 colorful charms you set aside in half. Sew 9 of the 2.5 x 5 inch rectangles together using 1/4 inch seam allowance at the short sides. Sew this border along one of the short sides of your quilt. Repeat with another 9 rectangles and sew that border along the opposite side. Now sew 2 border pieces made of 13 triangles each and attach them to the two remaining sides of the quilt. You will have an overhang of 2.5 inches along each long side. 

I used those two overhanging squares with a strip of the binding fabric to piece the back.

I knew I wanted to quilt this with the dogwood free motion pattern found at Oh Fransson! The grid pattern of the quilt top lends itself perfectly to this technique. But when it came to what thread to use, I was at a loss. I visited my friend and quilting mentor and she asked me one very simple question: “Do you want to emphasize your quilting or your piecing?”

Since this is a project for Moda Bakeshop, I wanted to highlight precuts and let the quilting be secondary. The solution was Aurifil 50 wt thread in a color numbered 2021, which is white, but not bright white (you might call it winter white) so it fades into the background without standing out against the bright colors of Snap Pop.

Try this quilting pattern, or let your creativity guide you in another direction. Trim, bind (I tried machine binding for this one), and you’re finished. 

One quilt, 44 x 56 inches, perfect as a large baby quilt or a small throw.

Em Komiskey
{www.sewingbymoonlight.com}