Paint Chip Placemats


For each placemat you will need:
1/2 yard Ombre Solid by V and Co. for Moda Fabrics
6″” x 42″ of Moda Bella solid white
1 fat quarter coordinating print

Embroidery floss and supplies

 
Press your 1/2 yard ombre fabric and lay out on your cutting mat horizontally.

Trim the selvedge from the darkest end and cut a strip 4 3/4″ wide.
(Your piece will be 4 3/4″ x 18″)

Next find the lightest part of the fabric. It should be right on the fold. With the lightest color of fabric in the middle, cut another strip 4 3/4″ wide.
Using the fabric between the two strips you just cut, find the area of fabric with the biggest color difference. I eyeballed this and then cut two 4 3/4″ strips- one from each area.
(There was anywhere from 1 1/4″ to 1 3/4″ between each each strip)
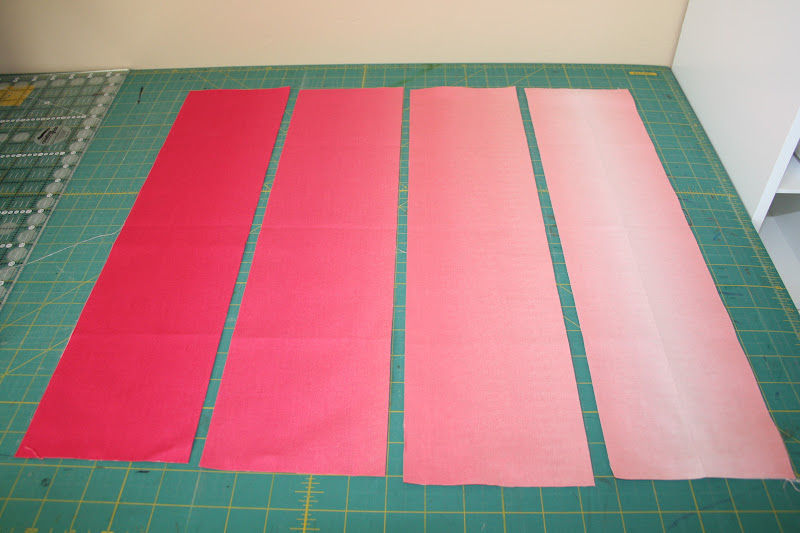
Trim each strip to 14″ in length then lay out your 4 strips in order from darkest to lightest. 

From the white fabric cut (2) 2 1/2″ x WOF strips and (1) 1″ x WOF strip.
Set aside the 2 1/2″ strips for Binding. Cut the 1″ strip into (3)  1″ x 14″ strips
Begin sewing a 1″ white strip to the right side of 3 color sections as shown above. Use a 1/4″ seam. Press towards the Ombre fabric.
Making sure the colors stay in order, continue sewing sections until all are together.
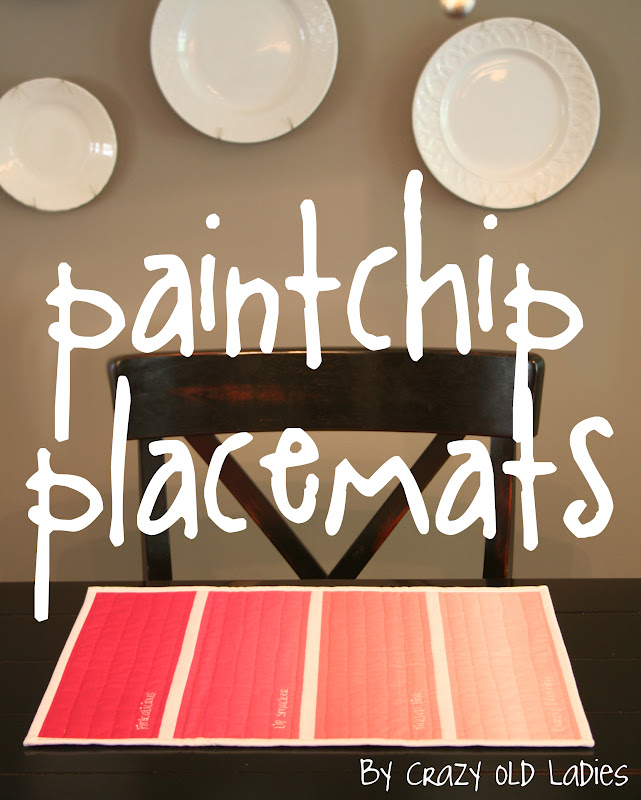
After the placemat top is together you can add “color names” if you want. I designated a placemat for each member of my family and then chose color names that fit that person. My daughter has the pink placemat so I used color names such as “Lip Smacker” and “Pinkalicious” to personalize it for her. Use your creativity or find color names online from a paint store.
Write the names in the bottom left of each section using a Frixion pen (the kind that disappear when ironed). Layer with a 80/20 batting and embroider using a backstich and thread of your choice.
(I used white thread and the color names are hard to read in the lighter colors)
 
Finish the placemat by sandwiching the placemat top, 80/20 batting, and coordinating fat quarter for the back. Baste or pin then quilt. I used not-so-straight line quilting in each section.

Bind using the 2 1/2″ strips cut earlier from the white fabric.
And you’re done!  :o)
Now you can go back and make one from each color!!!


1 gorgeous Paint Chip Placemat!

Thanks for joining me!  Don’t forget to come visit me on my blog: Crazy Old Ladies Quilts.
 
Credit for inspiration of this fabulous project goes to Avril Loreti. Visit her Etsy shop to see her other amazing creations.

Emily Herrick
{crazyoldladiesquilts.blogspot.com}

Scrap Bag Baby


I am so excited to be posting on MODA BAKE SHOP! I never thought, in a million years, that I would be able to add an “I was featured on Moda Bake Shop” button on my little ol’ blog. But here I am! Come visit me at my blog: CrazyOldLadiesQuilts.blogspot.com


– 1 ‘Scrap Bag’ from Moda
– 1/2 yd. coordinating fabric for the border
– 1/2 yd. coordinating fabric for the Binding
– 1 2/3 yd. fabric for the back

(required yardage for the border/binding/back may vary depending on contents of your Scrap Bag)


-Open your scrap bag and dump out the contents.

-They’re ususally rolled together nice and neat, but I fluff mine up so I can get a good idea of the fabric contents.

-Take each strip and fold in half lengthwise.

-Line up the selvage side.

-Use a c-thru ruler and rotary cutter to trim the strip so that it is the same width the entire length.

-It doesn’t matter what the width is, they will all vary.

You just want a nice, even strip.

-Do this for all the strips.

-Choose two strips that you want to start with.

-Lay the strips next to eachother, right sides up, selvages to the right.

-Next, move one strip so that it’s selvage is overlapping the raw edge of the other strip by 1/2″ (About the width of the selvage itself.)

-Sew the strips together by top-stitching just less than 1/4″ from the outside edge of the selvage.
-I would recommend using pins to ensure a straight connection.
(I didn’t use pins and my quilt top got a little lopsided.)
-Don’t worry if the strips aren’t the same length- we’ll take care of that later.
-Don’t be too concerned with seam allowance on the top because the selvages won’t fray.

-But it is a good idea to check the back every once in a while to make sure you’re including enough of the raw edge from the other strip inside the seam.

-Continue adding strips until all the strips are used.

ISN’T IT CUTE!?

-Press your quilt top, then fold in half width-wise

(So all of your strips are running left to right).

-Use your c-thru ruler and rotary cutter to trim the sides of the quilt so that all the strips are the same length and the sides of the quilt are straight.

Now it’s time for the border!

-Use a measuring tape to measure the length of your quilt.
-Take this measurement from the center of the quilt.
-This measurement will tell you how long to cut your SIDE borders.

-Cut your border strips into 4 1/2″ widths.
-The length of my quilt was 41″, so I cut (2) 4 1/2″ strips to the length of 41″.
-Cut (2) of your strips to the length of your quilt.

(If the length of your quilt is longer than the length of your strips, you will need to piece 2 strips together, then cut them to the length you need.)

-Pin your strips to the sides of your quilt top (right sides together) and sew using a 1/4″ seam.

-Now you’ll need to measure the width of your quilt (including borders).

-Again, take this measurement from the center of your quilt.

-My quilt width (including borders) was 41″.

So again, I cut (2) border strips to the length of 41″ and attached them to the top and bottom of my quilt.

-Attach these border strips to the TOP and BOTTOM of your quilt.

-The quilt top is now complete!

-Quilt and bind using your favorite method.

My finished “Scrap Bag-Baby’ measures 41″ x 49”!
The finished size of your quilt will depend on the contents of your ‘Scrap Bag’ but should be in the Baby Quilt size range.
Thanks!