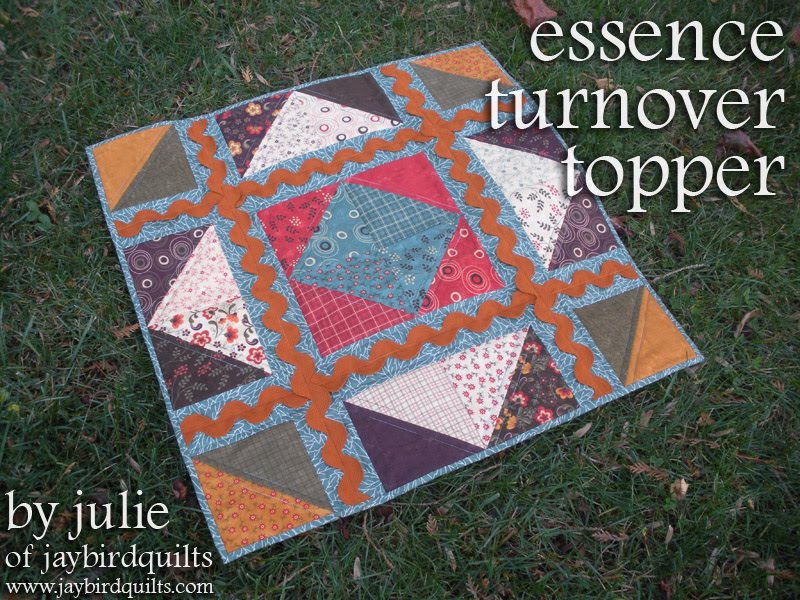

1 Essence Turnover
1/2 yard of sashing & binding fabric {Essence Leaves Teal 17487 11}
5/8 yard backing fabric {Essence Fall Flowers Red 17481 17}
Batting 27″ x 27″
3 yards of giant ric rac
Triangle square up ruler or 6 ½” ruler

This project is super easy… super fast… and is a great last minute gift!
1. Pick 32 triangles and lay them out as shown in the following picture. To create the angles that I did… I choose 4 green, 4 gold, 8 cream, 4 red, 4 blue, and 8 brown or dark purple.
{From here on out I’m going to reference the blocks by letters a, b, & c}
2. Start with block A and sew each pair of green and gold triangles into a ½ square triangle block. Press to the dark fabric. Set aside.

3. Next we are going to make the flying geese blocks which are labeled as B. Sew each pair of cream and brown or dark purple triangles into a ½ square triangle block. Press one to the dark and one to the cream so that you will be able to nestle the seams.
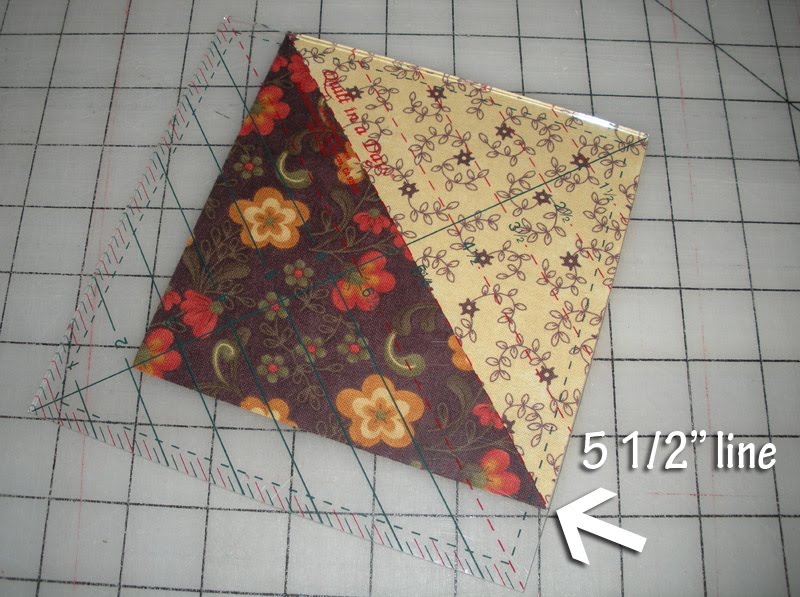
4. Before you can sew them together they needed to be trimmed. I trimmed mine down to 5 ½” so that they would be 5” finished. You can use any ruler but I have found that the Quilt In a Day triangle square up ruler is best. There are no horizontal or vertical lines to distract you. It is as easy as putting the 5 ½” line on top of your seam and cutting the dark purple sides. Then you rotate the block and repeat for the light side.
5. Once the blocks are trimmed sew them together along the cream side to create 4 of block B. Set Aside.
6. The last block to make is C the center. Sew each pair of red and blue triangles into a ½ square triangle block. Press two to the blue and two to the red. Again this is so that you will be able to nestle the seams so you’ll want to make the opposite corners the same way. See the arrows below…
7. Trim ½ square triangle units as shown in step #4 and then sew together into a four patch unit.
8. Lastly Trim ½ square triangle corner units that were made in step #2.
9. Cut sashing strips.
a. 4 @ 3” x 5.5” {small}
b. 2 @ 3” x 10.5” {medium}
c. 2 @ 3” x 25.5” {large}
10. Lay blocks back out with sashing as shown below.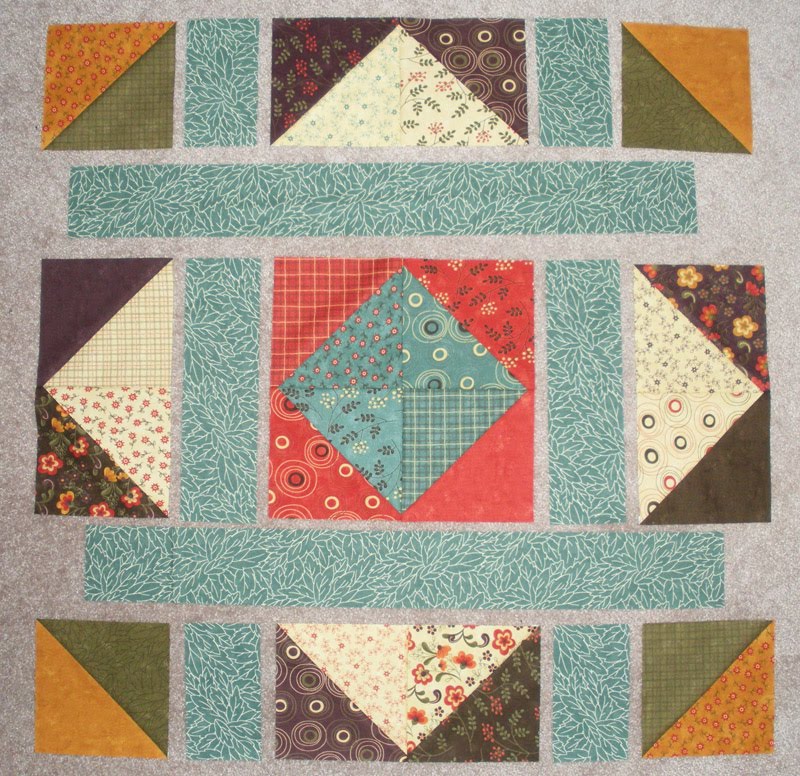
11. Sew horizontal rows together.
a. The first row is block a, small sashing, block b, small sashing, block a
note: be careful to not rotate the blocks
b. The second pieced row is block b, medium sashing, block c, medium sashing, block b
c. The last row is block a, small sashing, block b, small sashing, block a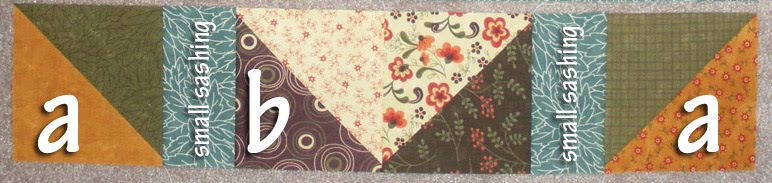
12. The last step in piecing is to put in the large sashing.

13. Layer with batting and backing and quilt as desired. I quilted a ¼” away from the diagonal lines and ¼” in on each side of the sashing using a variegated teal thread. {yes you quilt the piece before the ric rac is added}
14. Before trimming we are going to add our ric rac. Cut the ric rac into 4 pieces each approximately 27″ long. The finished topper should be around 25 ½” long so this you’ll have a bit of overhang at each end. Line up one peice in the center of your sashing.
15. Stitch down the center with coordinating thread. It is especially helpful to use a walking foot as you are stitching through the ric rac and the entire quilt. Repeat for all 4 pieces.
16. Trim quilt top to size and add binding. I cut 3 strips at 2.25” x WOF for my binding
17. A helpful tip is using binding clips to hold your binding in place on the back before you stitch it down.
18. Hand stitch binding.. add a label and you are done!

a super easy last minute project!!
{happy early thanksgiving by the way!}

Enjoy!
by Julie of jaybirdquilts!

 1 honey bun {essence by sandy gervais is featured.}


