This Way Up?? Quilt


Hello! This is Margie from Ribbon Candy Quilt Company with an easy, fun project today. Let’s get started.

{Mixed Bag fabrics}

11 Fat Quarters – 3 for the Center diamonds and 8 for the Arrows
¼ yard orange – top block
¼ yard yellow – bottom block
1¾ yard blue for stop border and outer border
⅓ yard each of 4 fabrics for middle border
½ yard orange for binding
4 yards for backing

Here’s what I used:


CUTTING
From each of the 3 fat quarters that you are using for the center diamonds, cut one 12½” x 12½” square

NOTE: Arrows 1-4 point up and arrows 5-8 point down.

For Arrows 1 and 4, cut one 6½” x 8½” rectangle and one 6½” x 6½” square


For Arrows 2 and 3, cut one 8½” x 12½” rectangle and two 6½” x 6½” squares

For Arrows 5 and 8, cut one 6½” x 6½” square and one 6½” x 14½” rectangle


For Arrows 6 and 7, cut one 12½” x 14½” rectangle and two 6½” x 6½” square

PIECING THE ARROWS
Sew Arrow blocks 1 -4 together in a row as shown and press seams to one side.

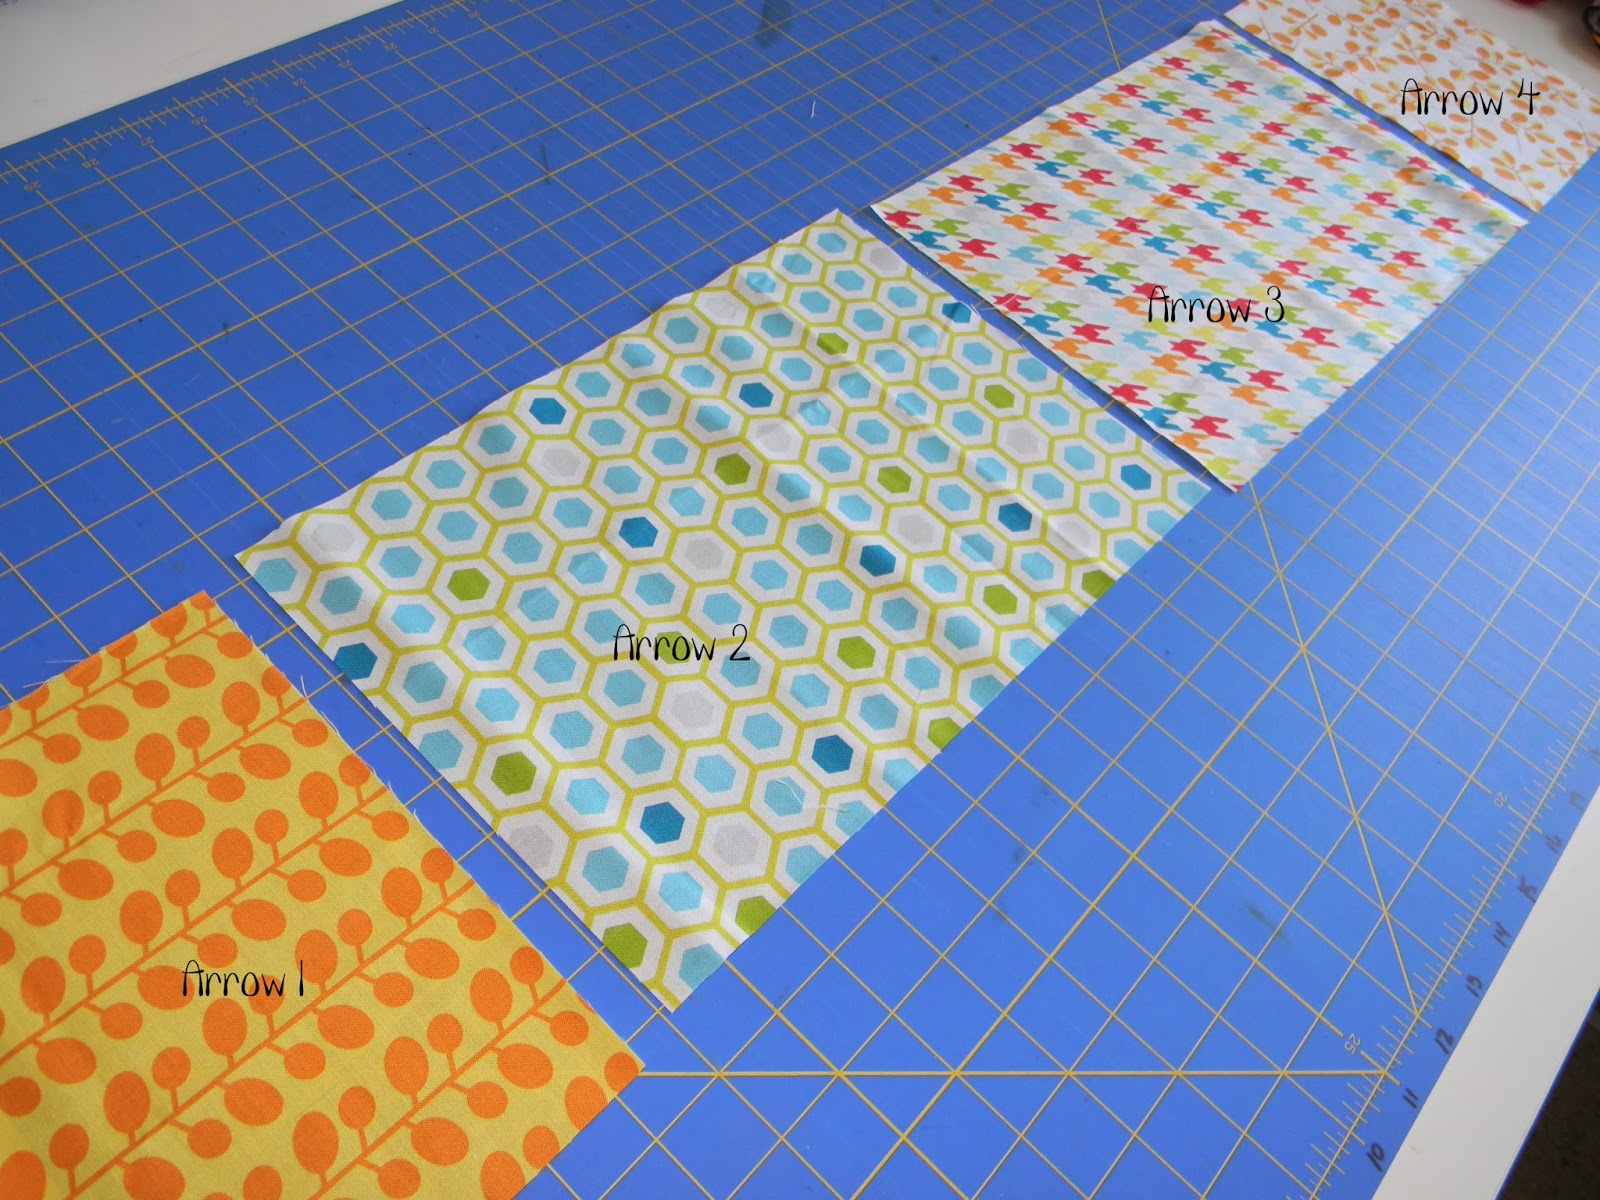
Sew Bottom Arrows blocks 5 – 8 together in a row as shown and press seams to one side.
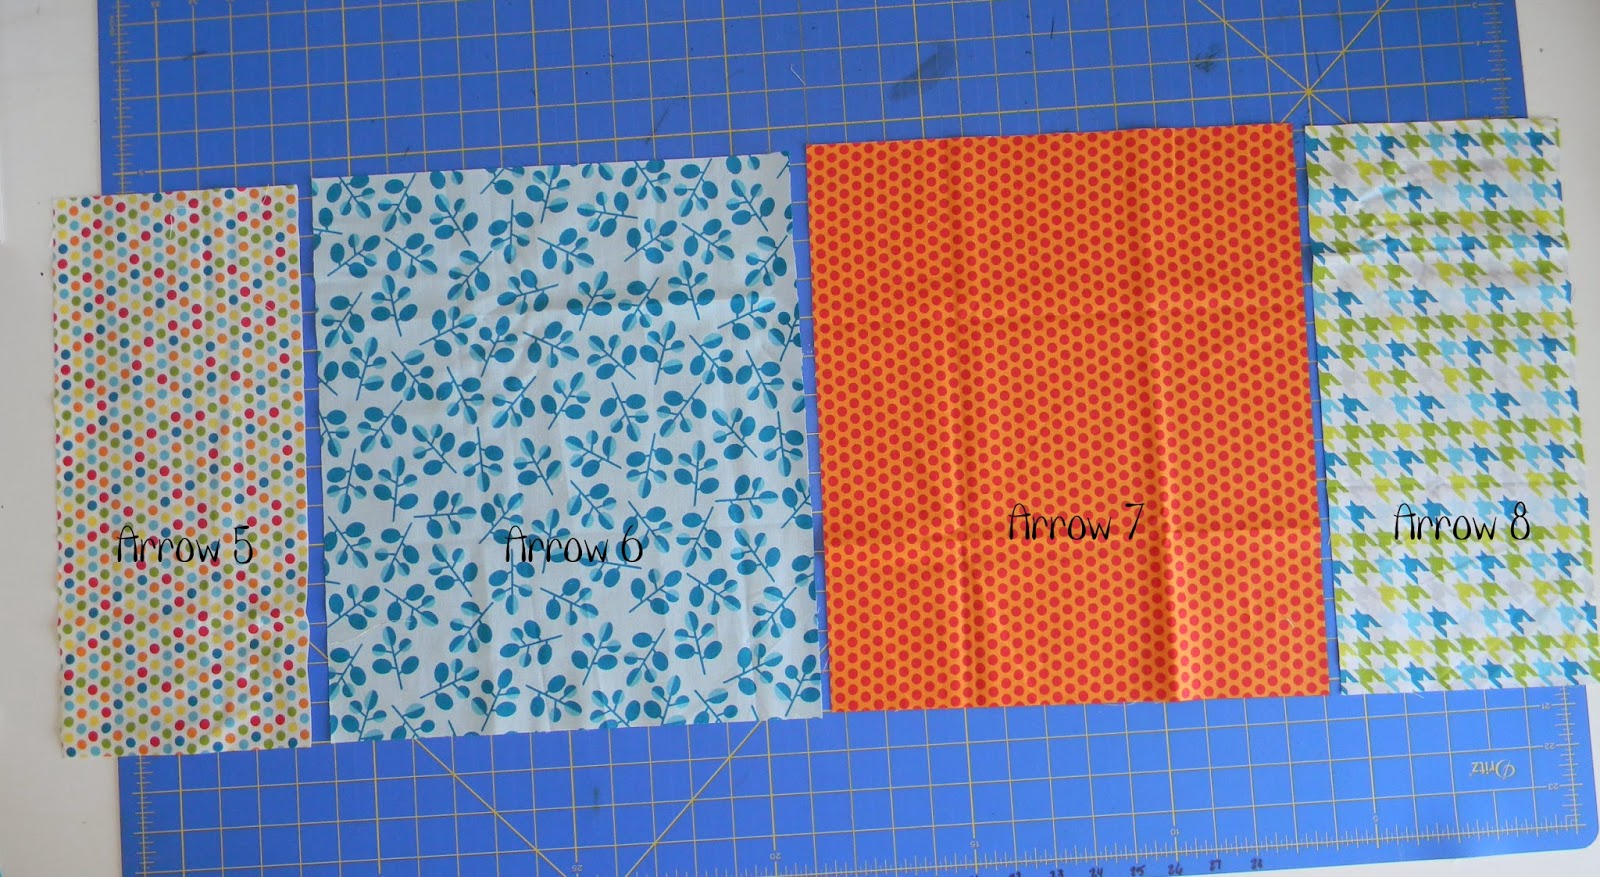
Arrow Block sets:

Now to make the Center Diamonds. Place your Center Diamond 12½” x 12½” squares in the order you wish them to appear in your quilt.

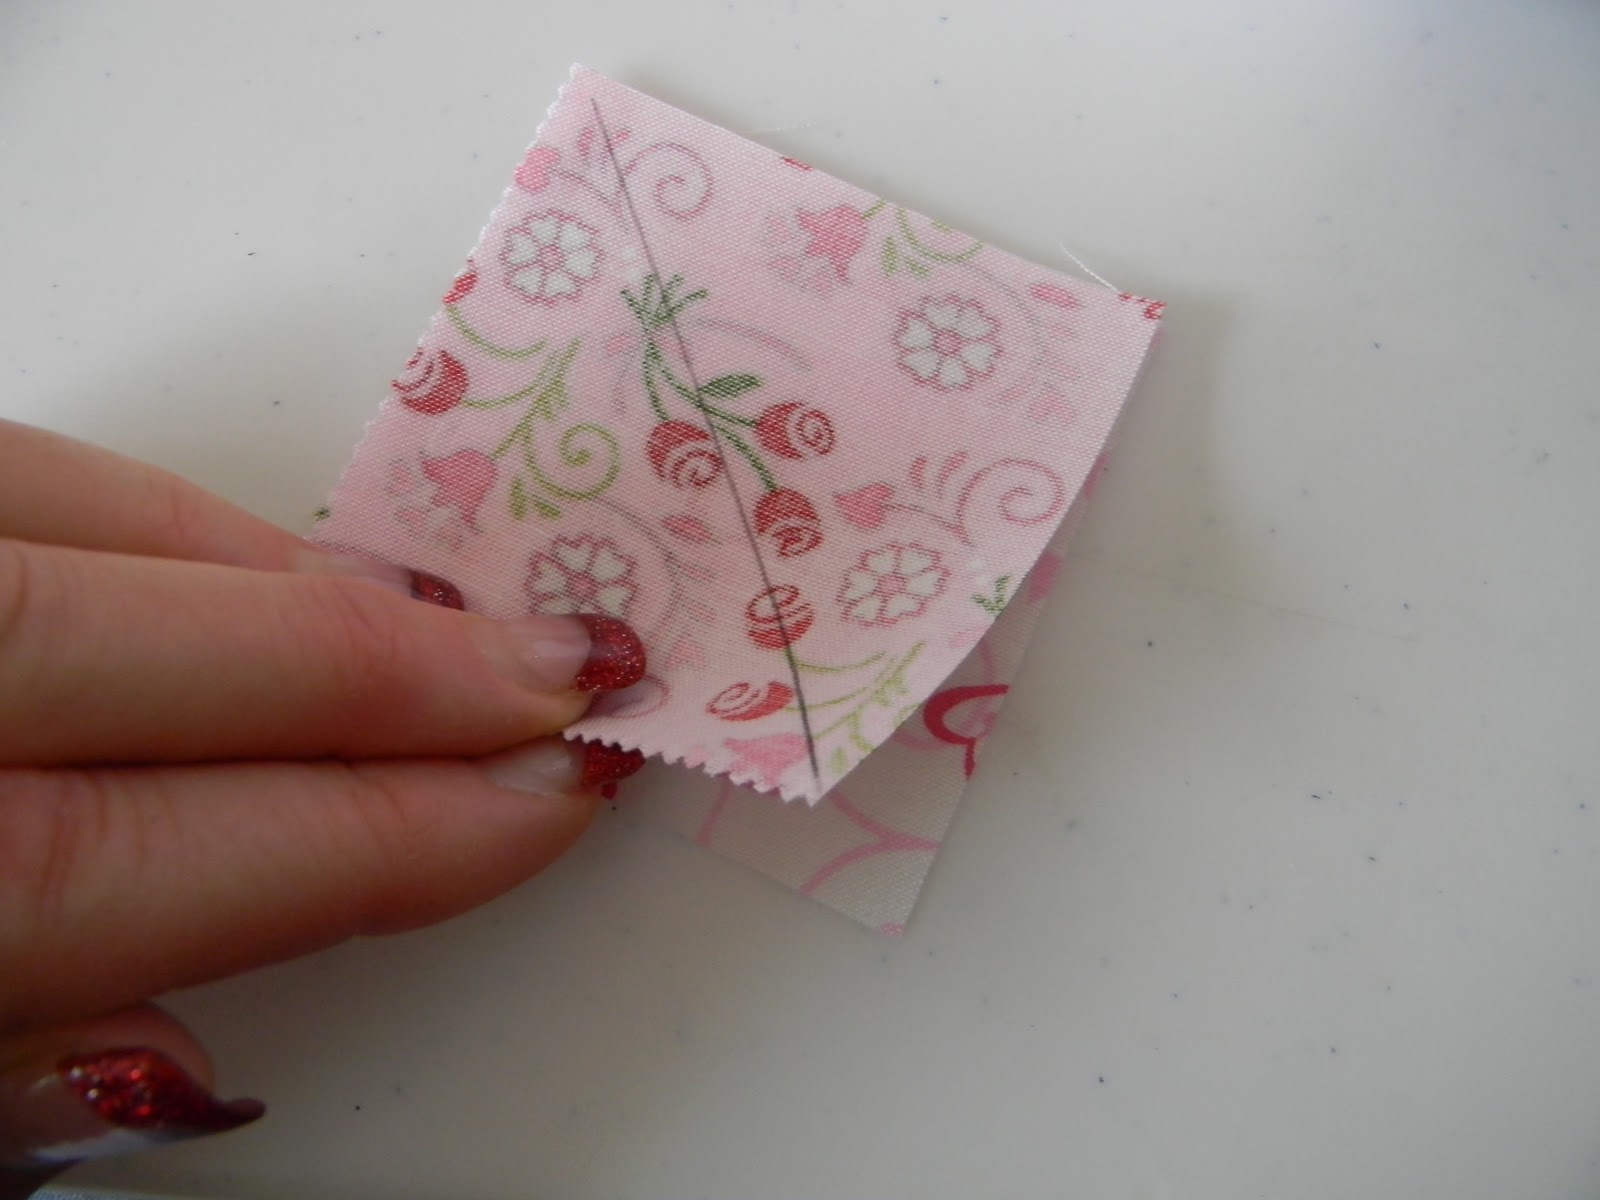
Take your Arrow Point  1- 4….6½” x 6½” squares and lay them out as shown above.  Each Center Diamond will have a different fabric in each corner. Using a pencil, draw a diagonal line from point to point on the wrong side of each  6½” x 6½” square.


Line up the raw edges in the top left corner and pin in place.  Sew on the pencil line. Press the Arrow Point square back and trim excess fabric.

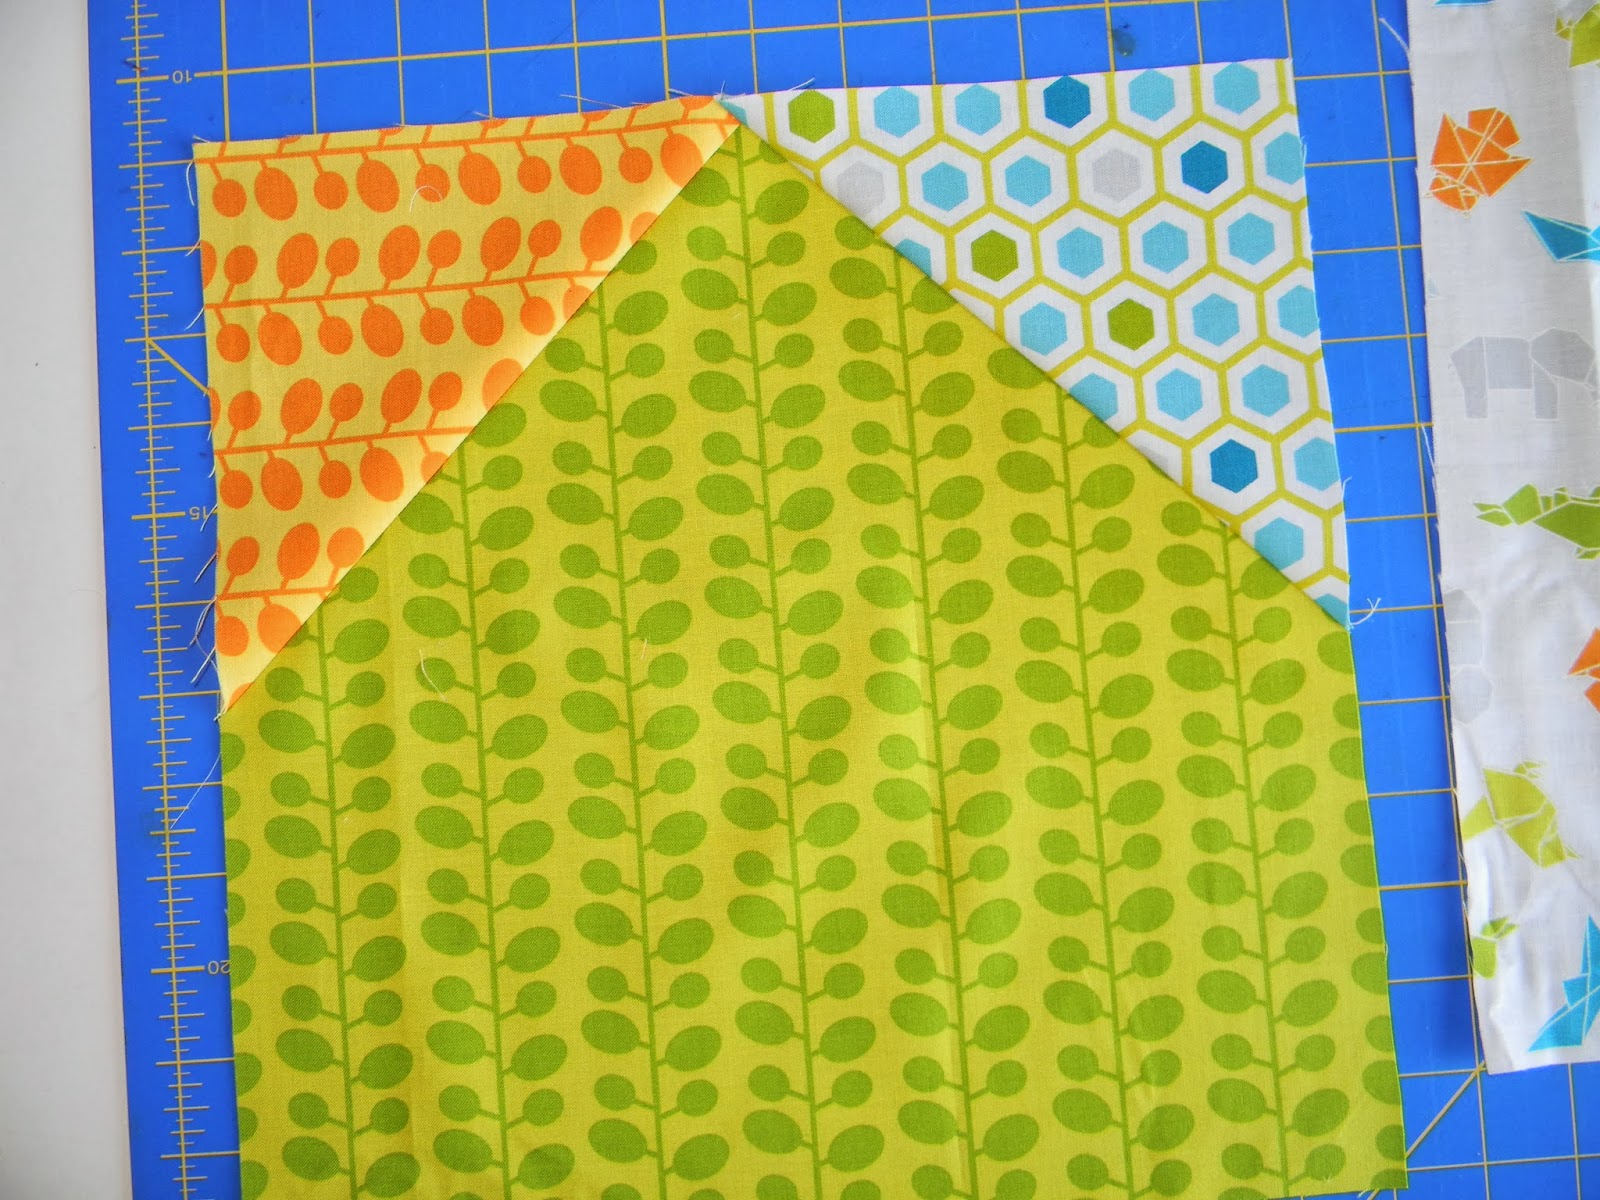
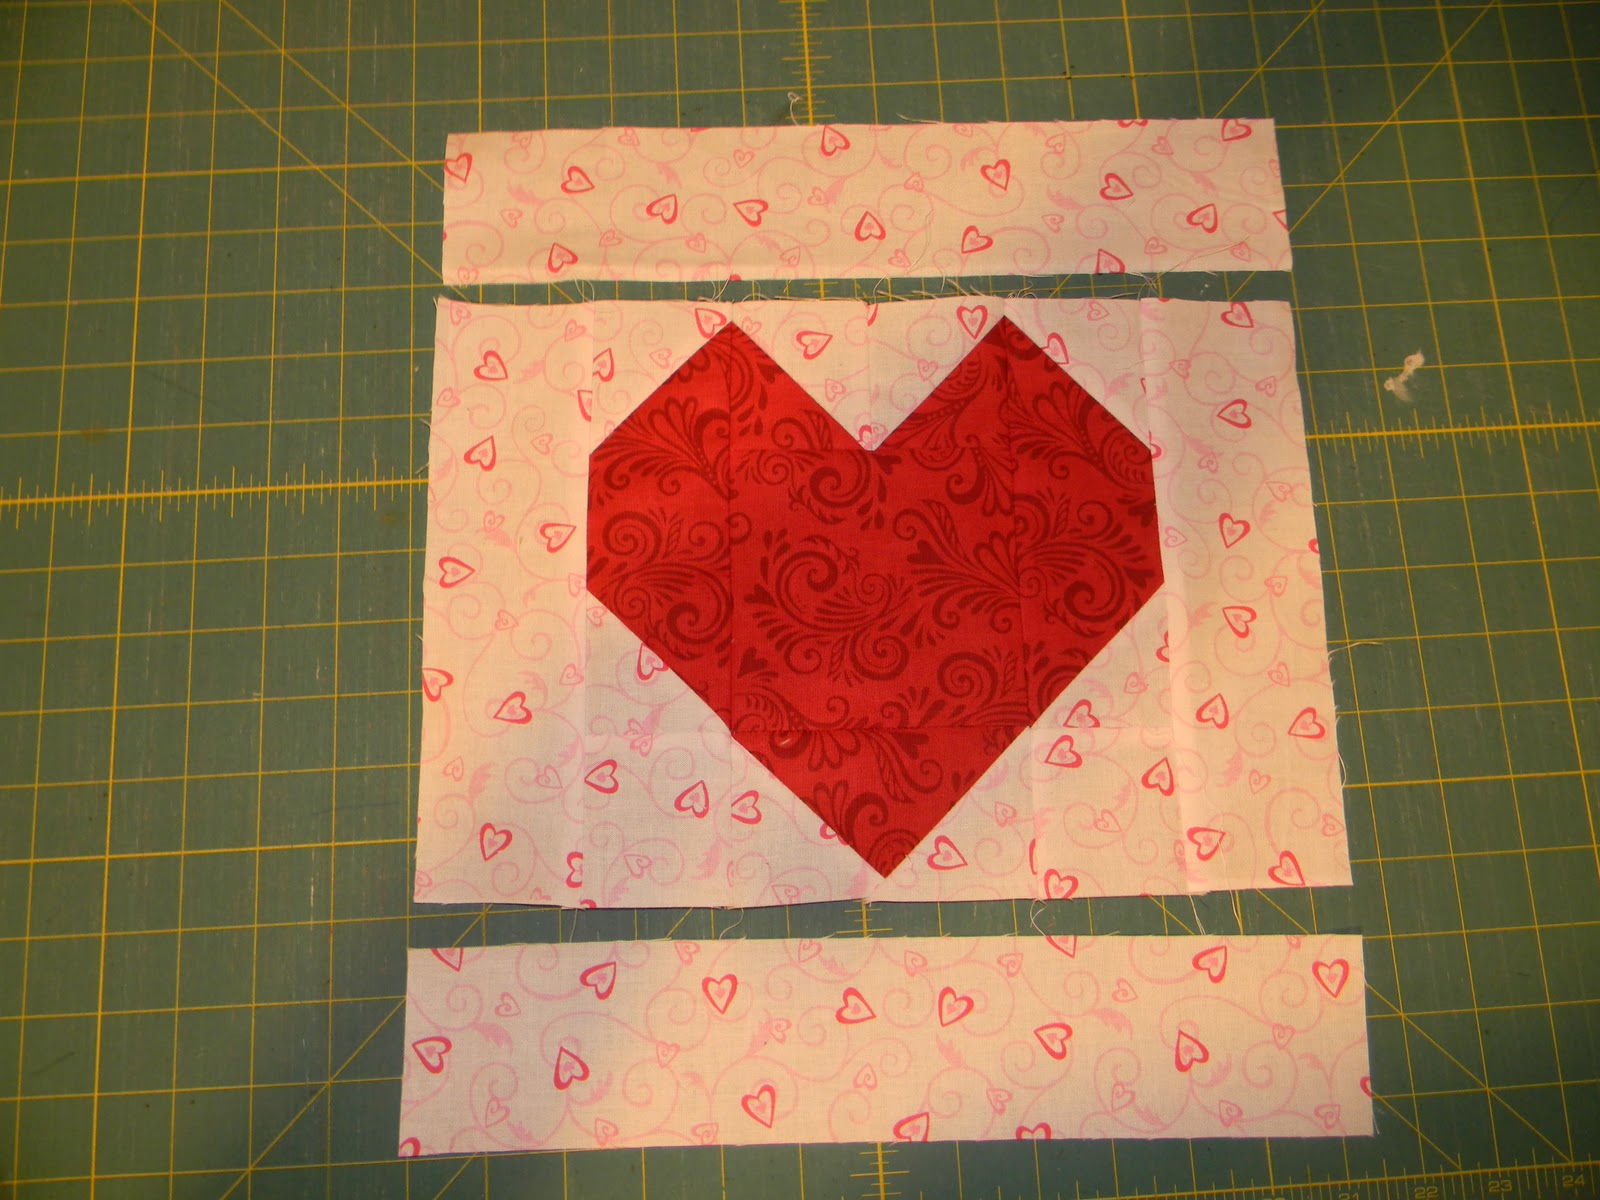
Repeat with all top arrow points. Here’s what your Center Diamonds should look like at this point.

We are now going to work on the bottom half of the Diamonds. Lay out the Arrow Points 5 – 8 …. 6½” x 6½” squares as shown. Make sure you have the Arrow Point squares in order or your Arrows will not turn out.

Repeat the process of drawing a diagonal line, sewing on the line, pressing, and trimming as outlined above.

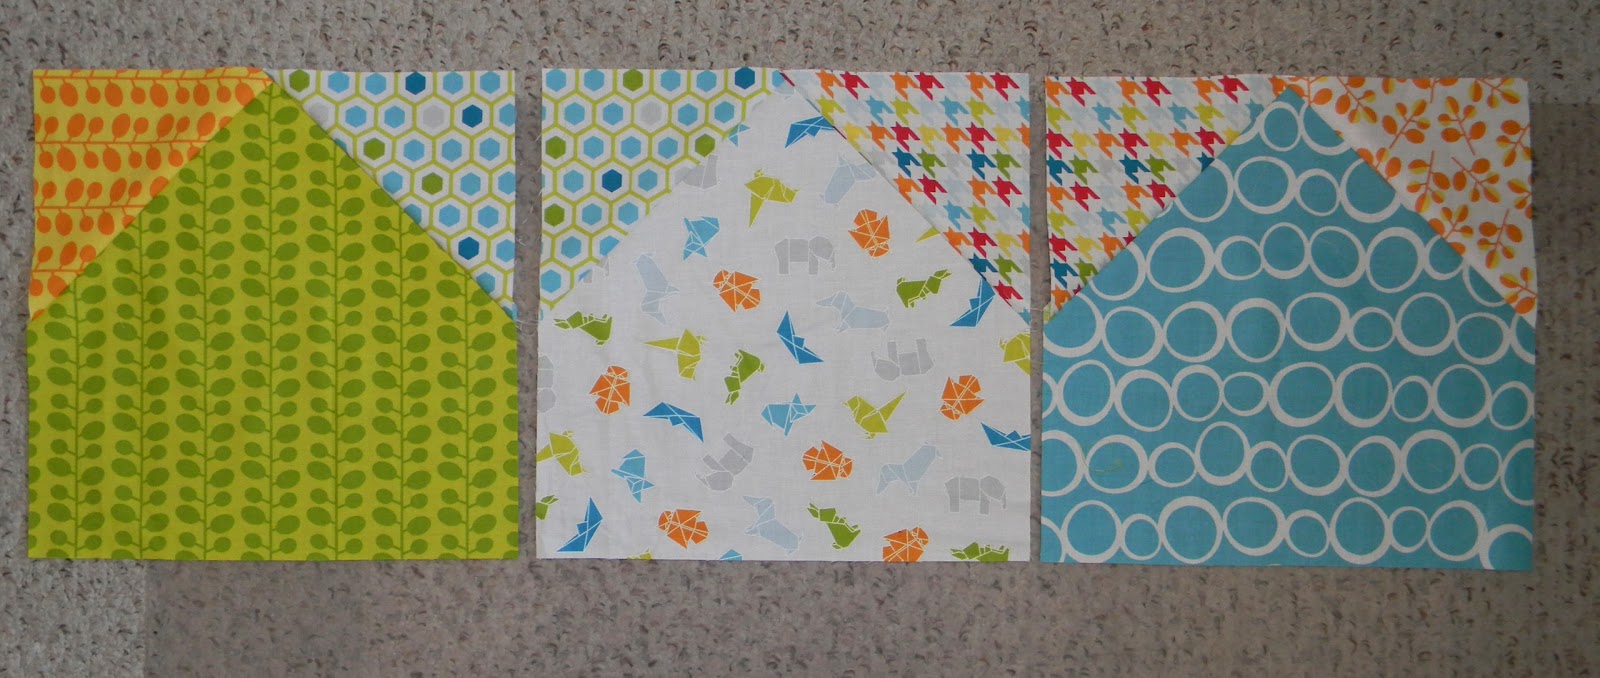
Continue to make your Diamonds and Arrow Points until you have all three Center Diamonds completed.

Sew your Center Diamond blocks together in this order.  Press seams to one side. Layout your Top Arrow Block set and your Center Diamond set. Do you see the Arrows appear? 

Match your seams and pin these sections together. Sew and press seams to one side. The top half is done! Repeat steps to attach the bottom arrow blocks.

BORDERS
For the first border, cut one 8½” x 36½” strip from each of two fabrics.


Sew on the top and bottom borders as shown.  Press seams to one side.

For the second border, cut 5 – 2½” x WOF strips. Set 2 strips aside for top/bottom border. Piece remaining strips end-to-end and cut into 2 strips measuring 50½” long. These are your side borders.

Sew on side borders and press seams. Sew on top and bottom borders and press. At this point the quilt measures 40½”  x 54½”, a great size for a baby, just a thought.)

For the third border, from each 1/3 yard, cut  2 – 6½” x WOF strips. Piece strips together, matching like fabrics. Cut middle borders as follows:

  • Side middle borders measure 6½” x 54½”
  • Top and bottom middle borders are 6½” x 52½”


Sew on side middle borders.  Press seams to border. Sew on top and bottom middle borders.  Press seams to borders.

For the fourth/outer border, cut 8 – 6½” X WOF strips.  Piece strips together end-to-end. Press strip and cut as follows:

  • 2 side outer border strips measuring 6½” x 66½”
  • 2 top/bottom outer border strips measuring 6½” x 64½”

Sew on side outer borders.  Press seams to border. Sew on top and bottom outer borders.  Press seams to border.  DONE!!!

Baste and quilt as desired.  I cut my binding at 2¼” x WOF.  You will need to cut 7 strips for binding.


One Quilt finishes 64½” x 78½”

ENJOY!!!!!

Thanks for stopping by.

Margie Ullery
{ribboncandyquilts.blogspot.com}

Luck of the Irish Table Topper


 Option A – 30″ x 30″  (shown above)

Option B –  12″ x 36″

Option A –
1 green fat quarter for shamrocks
4 fat quarters for pieced border
3/8 yard solid green for the scallop edge (optional)
3/4 yard cream background
1/4 yard green binding
1 yard back
5″ x 7″ piece of Steam-a-Seam

Option B –
1 fat quarter for shamrocks
1/4 yard binding
1/2 yard background
1/2 yard back
5″ x 7″ piece of Steam-a-Seam


Quick Points Ruler, Scallop Ruler model S1for scallop border

Table Topper A – 30″ x 30″

From your green fat quarter, cut twelve  4 1/2″ squares.
These are your shamrock leaves
Cream Background:
Cut three 2 1/2″ x 42″ strips
take two strips, from each strip cut:
one  2 1/2″ x 18 1/2″
one 2 1/2″ x  22 1/2″
From the third strip cut:
one 2 1/2″ x 18 1/2″
two 2 1/2″ x  8 1/2″
Cut two 1 1/2″ x 42″ strips
cut these strips into 1 1/2″ squares, you need 36 squares
Cut one 4 1/2″ x 42″ strip
Cut this strip in to four 4 1/2″ x 4 1/2″ squares
With a ruler and pencil, draw a diagonal line on the wrong side of each 1 1/2″ square.
Place three 1 1/2″ background squares in the three corners of the green 4 1/2″ square,
right sides together.  Sew on the pencil line.
Trim seam to 1/4″.
Press background pieces open.  This makes your shamrock leaf. 
 Repeat until you have 12 shamrock leaves. 
Take 3 shamrock leaves and one 4 1/2″ background square and lay them out as shown. 
Sew together as shown.  To applique the stem, use the stem template and follow manufactures directions on tracing and fusing the stem in place.
  Note: you can use ric-rac or some other trim if you choose.
Blanket stitch or zig zag around the stem.
Sew the center seam.  Press.  Your first shamrock is done.  Give yourself a pat on the back.  Now repeat these steps until you have four shamrock blocks.
OK, shamrock blocks done, lay them out as shown.  Placing the 2 1/2″ x 18 1/2″ background strip down the center  and the 2 1/2″ x 8 1/2″ background strips between the blocks
Sew the 2 1/2″ x 8 1/2″ strips to the shamrock blocks as shown.  Press your seams to one side.
Sew the 2 1/2″ x 18 1/2″ center strip to the shamrock block sections as shown.
 Press your seams to one side. 
Layout your border strips.  Side border strips are 2 1/2″ x 18 1/2″
Top and bottom border strips are 2 1/2″ x 22 1/2″
Sew on side border strips first.  Press seams to one side.
Sew on top and bottom borders.  Press seams to one side. Now for the borders.
OPTIONAL Scallop edge
if you don’t want the scallop, skip down to the next section, Pieced Outer Border


Cut three 4 1/2″ x  42″ strip from the green solid border fabric.  Take one strip and cut it in half, so you have two 4 1/2″ x 21″ strips.  Sew one of those strips to one end of the 4 1/2″ x 42″ strips. 
Do this to both strips. 

Now you have two 4 1/2″ x 63″ strips.

 With right sides together lay your Quick Points Scallop Ruler S1 on top and trace around the scallops with a pen.  Moving the ruler down until you have traced the scallops the length of your fabric.  Marking in all the small circles for the center lines and sewing lines. 

Sew 1/4″ from your pen line all the way down both sides.

Trim your seam to 1/8″. Lay the fabric out flat and with a ruler, draw a pen line down the center of the scallop section as shown.

With your rotary cutter, cut down the center line. 
Turn each scallop and press.  Trim the raw edge of your scallop strip to 1/4″ from the low point of the scallop.
Cut two strips that have 9 scallops each for the sides of your quilt. 
Pin in place, leaving 1/4″ space at each end. 
 Sew in place using a 1/4″ seam. 
Cut two more  9 scallop strips for the top and bottom of your quilt top. 
Pin in place.  Leaving a 1/4″ space at each end.
Sew in place.  Be sure not to catch the scallops on the end in your seams.
Your scallop edge is done. Yeah!  Moving on.
Pieced outer border
Take the remaining four fat quarters.
From each fat quarter cut 11,  2 1/2″ x  4 1/2″ rectangles.
Make four sections with 11 rectangles each. Sew together as shown. 
Press seams to one side.
Take one of the fat quarters you used and cut four 4 1/2″ squares.
These are for the corners on the border.
Layout your borders with the corner squares. 
 Sew one corner square on each end of the top and bottom border, as shown.
Sew on side borders.  Press seams. 
 Press out the scallop edge so it lies on the pieced border.
Sew on top and bottom border.  Press seams. 
Press out the scallop edge so it lies on the pieced border
You’re done!  Great job!!!  Quilt as desired and bind.  Cut your binding 2 1/4″
Option B
Table topper 12″ x 36″

1 green fat quarter for shamrocks
1/4 yard green binding
1/2 yard cream background
1/2 yard back
5″ x 7″ piece of Steam-a-Seam for stem
Cutting
Cut nine 4 1/2″ green squares for shamrocks
Cut one cream 1 1/2″ strip.  Cut this into 27 – 1 1/2″ squares
Cut three cream 2 1/2″ x 42″ strips
strip one cut:  two 2 1/2″ x 8 1/2″ strips
strip two cut: one 2 1/2″ x 36 1/2″
strip three cut: one 2 1/2″ x 36 1/2″
Cut one 4 1/2″ x 42″ cream strip, from this strip,
cut two 4 1/2″ x 8 1/2″ and three 4 1/2″ squares
With a ruler, draw a pencil line on the wrong side of the cream 1 1/2″ background squares.
Place three 1 1/2″ background squares in the three corners of the green 4 1/2″ square,

right sides together. Sew on the pencil line.
Trim seam to 1/4″
Press background pieces open. This makes your shamrock leaf.
Repeat until you have 9 shamrock leaves. 
Take 3 shamrock leaves and one 4 1/2″ cream background square and lay them out as shown.
Sew together as shown. 
To applique the stem, use the stem template and follow manufactures directions on tracing and fusing the stem in place.  Machine blanket stitch or zig zag around the entire stem.
Sew the middle seam. Press.
Your first shamrock is done for this table topper.  Only two more to go.   
 Now repeat these steps until you have three shamrock blocks.
Once you have all three shamrocks done, lay out your table topper like this.
The 2 1/2″ x 8 1/2″ go  on each end, side borders.
The two 4 1/2″ x 8 1/2″ cream rectangles go in the middles
The 2 1/2″ x 36 1/2″ cream strips are the top and bottom border
Sew the shamrocks section together as shown.
Sew on the top and bottom borders.   You’re done!!
Quilt as desired and bind. 


30″ x 30″ and 12″ x 36″ Luck of the Irish Table Toppers.

Ribbon Candy Quilt Company
{ribboncandyquilts.blogspot.com}

Hearts Galore

One table runner and 6 placemats
Table runner 18″ x 48″
Placemats 12″ x 16″

Ingredients:
1 Layer cake: Always and Forever by Deb Strain
1 3/8 yard background, light fabric
7/8 yard binding
Choose 11 Layer Cake squares you want to use for your hearts

From your background fabric cut:
1 – 2 7/8″ x 45″ strip
1 – 4 1/2″ x 45″ strip
15 – 2 1/2″ strips
From your 4 1/2″ x 45″ strip, cut 5 – 4 1/2″ x 8 1/2″ rectangles
From your 2 7/8″ x 45″ strip cut 11- 2 7/8″ squares
Take 6 of your 2 1/2″ x 45″ strips and cut 16 – 2 1/2″ squares from each strip. You will have 96.
You will use 88 of them.
Now take 4 more 2 1/2″ x 45″ strips. From each strip cut 5 – 2 1/2″ x 8 1/2″ strips
You will have 20, you will use 17 of them.
Take 4 more 2 1/2″ x 45″ strips. From each strip cut 3 – 2 1/2″ x 12 1/2″ strips.
You will have 12 strips and use all of them
From your last 2 1/2″ x 45″ strip, cut 2 – 2 1/2″ x 14 1/2″ strips.
You use both of these.

Cut your layer cake square as shown
Cut a 4 1/2″ strip

Now from your strip cut
one 4 1/2″ square
one 2 1/2″ x 4 1/2″ rectangle
one 2 7/8″ square
from the other part of the layer cake cut
two 2 1/2″ x 6 1/2″ rectangles

Take one 2 1/2″ x 6 1/2″ rectangle of your heart fabric
and two 2 1/2″ squares of your background fabric. 
Draw a diagonal line from corner to corner on the
wrong side of your background squares as shown

With right sides together, place the background squares on top of the 2 1/2″ x 6 1/2″ rectangle. 
Sew on the pencil line

Trim down to 1/4″ seam

Press open.  This is the side of your heart.  Make 2 of these blocks
Take one 2 7/8″ heart square and one 2 7/8″ background square
Draw a diagonal line from corner to corner on your heart square.

Place right sides together as shown.

Sew 1/4″ on either side of the pencil line

Cut on the pencil line.  Press open.  You now have your half-square-triangles
Now get one 2 1/2″ x 4 1/2″ rectangle of your heart fabric and
 one 2 1/2″ square of your background fabric.
Draw a diagonal line on the wrong side of the background square.  With right sides together, line up the raw edges of your pieces as shown.
Sew on the pencil line.  Press.

Cut down the seam to 1/4″.  Press open.

Get another background 2 1/2″ square and repeat on the other side,
sewing on the pencil line and pressing.

Cut the excess off down to 1/4″ and press open.

This make the bottom tip of your heart.
OK, now you have the pieces ready to put your heart block together.
Take the pieces that you have just created and lay them out as shown.
  The middle square is 4 1/2″ x 4 1/2″. 
The two background pieces at the bottom are each 2 1/2″ squares.

Using a 1/4″ seam, sew the middle section of your heart first, as shown. 
Sew the half-square-triangles together first and then sew them to the 4 1/2″ square. Follow with sewing the bottom tip of the heart on.  Then sew the side sections as shown. 
 Press your seams.

Now sew the side sections to the middle section, use 1/4″ seam.  You now have your first heart!  Repeat these steps until you have 11 hearts just like this one.  Your doing great so far!
Once you have all 11 heart blocks sewn together, it’s time to make the table runner and placemats.
We are going to make the table runner first.  Get 5 of the 4 1/2″ x 8 1/2″ background rectangles
 and  5 of the 2 1/2″ x 8 1/2″ background rectangles.

Choose 5 hearts that you want to have in your table runner.
Lay your block out as you see here.  Sew the 2 1/2″ x 8 1/2″ strip to the top of your heart.
 Sew the 4 1/2″ x 8 1/2″ strip to the bottom of your heart.
Press your seams.  Repeat on the other 4 hearts.
Arrange your heart blocks as shown. 
Sew them together using 1/4″ seam.  Press your seams.

At both ends of the table runner,  sew on  a 2 1/2″ x 14 1/2″ background strip. 
Press your seams.  Now set your table runner aside and we are going to work on the placemats
You have 6 heart blocks left for your placemats.   Take your first heart and 2 – 2 1/2″ x 8 1/2″ strips these go on the sides of your heart. 
Now take 2 – 2 1/2″ x 12 1/2″ strips, these are for the top and bottom of your heart.

Sew the sides on first.  Press your seams.

Sew on the top and bottom background pieces.  Press your seam. 
Repeat with the other 5 hearts. 
With remaining layer cake squares, choose 10 that you want to use on the borders of your
table runner and placemats.
Cut each layer cake square into 4 – 2 1/2″ strips like so.
You now have 40 strips.  Make sets of 6 strips.  You will have a few strips left over.
Sew your set of 6 strips together as shown.  Press your seams. 
  OK, now cut your strip block sets into  2 1/2″ sections.
Cut four sections.
Out of a couple of scraps, cut 2 – 2 1/2″ squares.  You need to have these for the
 side borders of your table runner.
Take a 6-pieced border section and one 2 1/2″ square and sew the square to one end of the 6-pieced border section as shown.  Do this for both sides of your table runner.
Sew the side border onto the table runner.  Press your seams.  Take 8 more 6 pieced border sections and lay them out as shown.  You need to have 4  – 6 pieced sections for the top and 4 more sections on the bottom.  Sew the sections together.  Press seams.
Sew on the section border pieces to the top of the table runner. Now sew the border to the bottom of the table runner.  Press.
Your table runner is now ready to be quilted and bond. Perfect!!
Now for the placemats. 
 For each placemat, you need to have 2 – 6 pieced border sections 
Sew on the borders as shown.  Press your seams.  Repeat for the remaining 5 placemats.  Now that you have all the placemats done, you can have everything quilted and bond.  Fabulous job!!!!
Note: The layer cake squares left over can be pieced and used on the backs of your table runner and placemats.  If you don’t want placemats, you can make 2 table runners instead.  Happy sewing!
One table runner and 6 placemats
Table runner 18″ x 48″
Placemats 12″ x 16″
Margie Ullery


Car Organizer

Don’t leave home without this handy car organizer.


8 Fat Quarters
one piece of thin batting 26″ x 22″
a water soluble pen

Take 2 fat quarters: one for the front and one for the back of the organizer. You want your largest fat quarter for the back of your organizer. Sandwich them with the batting. Make sure that the fat quarters are lined up and straight.

Pin your pieces together. Use lots of pins to be sure that the fabrics don’t slip around.

Hand baste your pieces together using long stitches. These will be pulled out once your project is finished.

Cutting your pockets: You have 2 large (brown) and 2 smaller (a blue and a green) pockets and 1 extra long pocket (orange). Take 4 fat quarters (2 brown, 1 blue and 1 green) and cut a 12″ x 14″ rectangle from each.


Here are your 4 pockets ready to be assembled.

Take your blue and green rectangle and fold them with the rights sides together. You now have a folded rectangle that measures 12″ x 7″.

Sew along the short side (7″) using a 1/4″ seam. Sew both 7″ sides on the blue rectangle and on the green rectangle.

Both sides are sewn.

Turn right side out and press.

Take your brown 12″ x 14″ rectangles and fold them the long way, so you have rectangles measuring 14″ x 6″.

Sew the 6″ edges using 1/4″ seam. Do this to both brown rectangles.

Both edges are sewn.

Turn them right side are out. Press both pieces.

Cut your orange fat quarter 12″ x 21″.  Fold in half lengthwise. It should measure 21″ x 6″. Sew both short edges using a 1/4″ seam. Turn right side out and press.

Measure to find the center of the pocket. Mark with a pin at the top edge and at the bottom raw edge. Make about 1″ tucks in the four spots shown. The finished length should be 14″.

With your water soluble pen, draw a line on your background piece that is 1 1/4″ from the bottom edge.

Center your orange pocket on your background piece. You should have 2″ on either side of your pocket. Line up the bottom of the pocket raw edge with the drawn line. Pin in place.

Stitch 1/4″ from raw edge. Back stitch at the beginning and end.

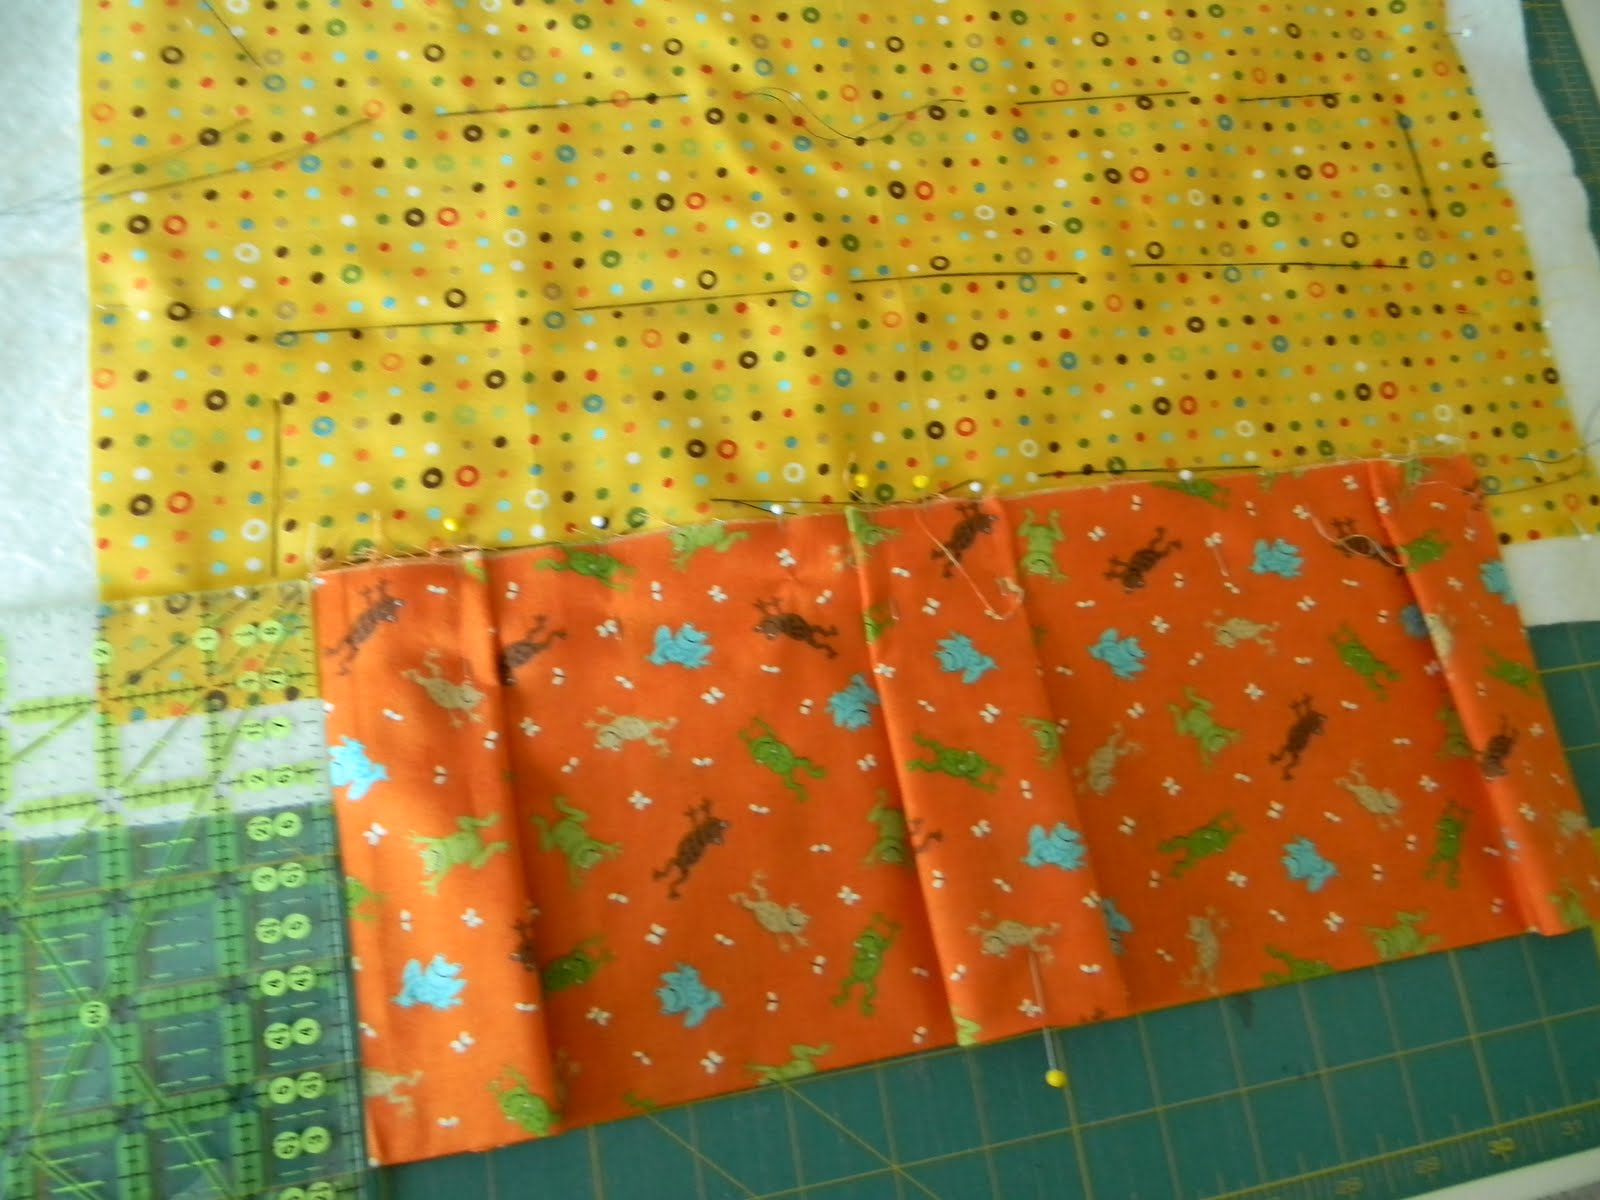
Fold pocket back onto background (this hides your seam). Use a ruler to line up your center pins and draw a straight line down the center of the orange pocket. Pin in place.

Sew on the drawn line. Make sure to backstitch when you begin and end. Remove pins.

Sew 1/8″ from your edges on both sides. Your pocket is now finished.

Take one of the brown pieces for the pockets. Make about a 1″ tuck on the raw edge. Pin the tuck in place. Do the same to the other side. Your brown pocket should measure 9″ wide.

On the green piece for the pocket, make your 1″ tucks on the raw edge. Pin in place. Do tucks on both sides. The green pocket should measure 6″ wide once you have the tucks pinned.

Draw a line all the way across the front, 7 1/2″ from the bottom raw edge of the organizer front with your water soluble pen.


Place your pockets as shown. Line up the raw edge of the pockets on the drawn line. Place the pockets so they are approximately 1 1/4″ from side organizer edges and about 1″ apart. Pin in place.

Sew in place using a 1/4″ seam. Back stitching at the beginning and end.

Fold the pockets back onto the background as shown. This hides your raw edge seams.

Sew down the side edges on both green and brown pockets an 1/8″ from the edge.

Make tucks in the blue pocket same as the green pocket. The finished width should measure 6″. Make tucks in the brown pocket same as the other one with the finished width being 9″.

NOTE: the bottom edges of the blue and brown pockets are at different levels.

With your ruler and water soluble pen, draw a straight line 7 1/2″ from the top edge of the organizer. Line up the raw edges of the blue pocket, pin in place.

Draw a line 6 1/2″ from the top organizer edge. This is for the brown pocket. Pin the brown pocket in place lining up the raw edge of the pocket to the drawn line. Leaving an 1″ in between the pockets and 1 1/4″ on the sides.

Sew the pockets in place using 1/4″ seam. Backstitch at the beginning and end.

Flip the pockets back onto the background and pin in place. Measure to be sure that the edges of the pockets are straight. Leave 1 1/4″ from the side of the organizer.

Sew down the edges with an 1/8″ allowance.

Your pockets are all done. You are now ready to bind your organizer.

From the last brown fat quarter, cut 4 – 2 1/4″ strips. Prepare you binding.

Sew your binding in place using a 1/4″ seam.

Your binding is all sewn on. Remove your basting stitches at this point. Remove all pins.

Trim the excess batting from the edges. Be careful not to cut into the binding.

Hand or machine stitch your binding in place.

From the remaining brown fat quarter, cut 2 – 3″ strips. These are for your ties.

Fold in half as shown. Lightly press.

Sew down the one short edge and the long side using 1/4″ seam. Leave one end open so you can turn your tie right side out.

Turn your ties right side out and press.

Sew the ties raw edge in place at an angle as shown on the top corner of the organizer, .

Fold the tie back and stitch 1/4″ from the folded edge. This covers your raw edge and gives more stability to your tie. Repeat on the other side.

Tie your organizer to the back of the driver or passenger’s seat. Fill with items for your child and you are ready to go.

Another option is to use the organizer pockets to hold baby products next to your baby’s changing table. Or, hang it near your child’s bed so they can keep their books and personal items nearby.


8 fat quarters will make one organizer.

Ribbon Candy Quilt Company
{ribboncandyquilts.blogspot.com}