
Looking for a quick and easy baby quilt? This goes together in no time and uses just 20 Layer Cake squares. That means with some extra sashing and border fabric, you can make two! Know anyone having twins? I used “It’s A Hoot;” such a fun and colorful line.
Let me know if you make one! Visit me at: www.hyacinthquiltdesigns.blogspot.com


Cutting:
 3. Layout the blocks in 5 rows of 4 blocks each. Refer to the finished quilt and turn the blocks so that the center square alternates its position between the lower right corner and the upper left corner. Sew 4 blocks together in rows with the 1 1/2″ x 6 1/2″ sashing strips in between.
 4. Sew the rows together with the 1 1/2″ x 27 1/2″ sashing strips in between and on the top and bottom.
 5. Sew the 1 1/2″ x 36 1/2″ strips to the sides.
 6. Trim the 2 1/2″ Turquoise strips to length for the side borders and sew to the sides of the quilt. Repeat with the top and bottom borders.
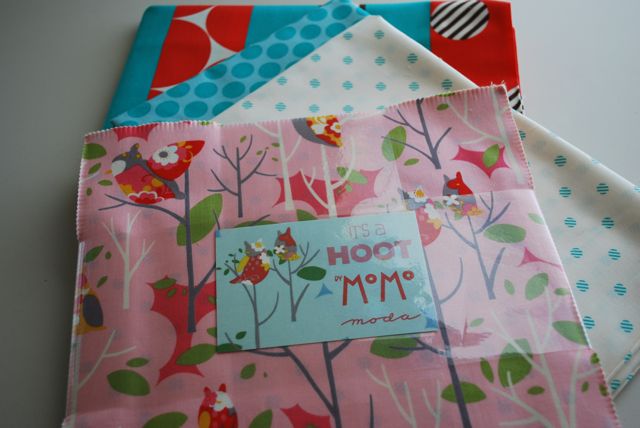
1 “It’s A Hoot Layer” Cake
5/8 yard Marshmallow 32376 18 for sashing
3/4 yard Turquoise 32375 26 for border and binding
1 1/2 yards for backing
Cutting:
Choose 20 of the 10″ Layer Cake squares for the blocks. Pair up the squares into 10 sets that look good together. In each set, one fabric will be the center square and the other will be the outside of the block and vice versa.
From each pair of 10″ squares, cut:
1 strip 2 3/4″; trim to 2 3/4″ x 6 1/2″
1 strip 3 1/2″; trim to one 2 3/4″ x 3 1/2″, one 3 1/2″ x 3 1/2″, and one 1 1/4″ x 3 1/2″
1 strip 1 1/4″; trim to 1 1/4″ x 6 1/2″
 Move the center square to the bottom and you’re ready for piecing!
 From the Marshmallow for the sashing, cut 11 strips 1 1/2″.
 Move the center square to the bottom and you’re ready for piecing!
 From the Marshmallow for the sashing, cut 11 strips 1 1/2″.
 - Use 3 strips and cut 15 rectangles 1 1/2″ x 6 1/2″
- Use 6 strips and cut 6 rectangles 1 1/2″ x 27 1/2″
- Use 2 strips and cut 2 rectangles 1 1/2″ x 36 1/2″
From the Turquoise, cut 4 strips 2 1/2″ for the border and 4 strips 2 1/2″ for the binding.
Piecing the Quilt
1. Sew the 2 3/4″ x 3 1/2″ and the 1 1/4″ x 3 1/2″ pieces to the 3 1/2″ center square.
 2. Sew the 2 3/4″ x 6 1/2″ and the 1 1/4″ x 6 1/2″ pieces to the top and bottom. Make a total of 20 blocks.
 2. Sew the 2 3/4″ x 6 1/2″ and the 1 1/4″ x 6 1/2″ pieces to the top and bottom. Make a total of 20 blocks.
 3. Layout the blocks in 5 rows of 4 blocks each. Refer to the finished quilt and turn the blocks so that the center square alternates its position between the lower right corner and the upper left corner. Sew 4 blocks together in rows with the 1 1/2″ x 6 1/2″ sashing strips in between.
 4. Sew the rows together with the 1 1/2″ x 27 1/2″ sashing strips in between and on the top and bottom.
 5. Sew the 1 1/2″ x 36 1/2″ strips to the sides.
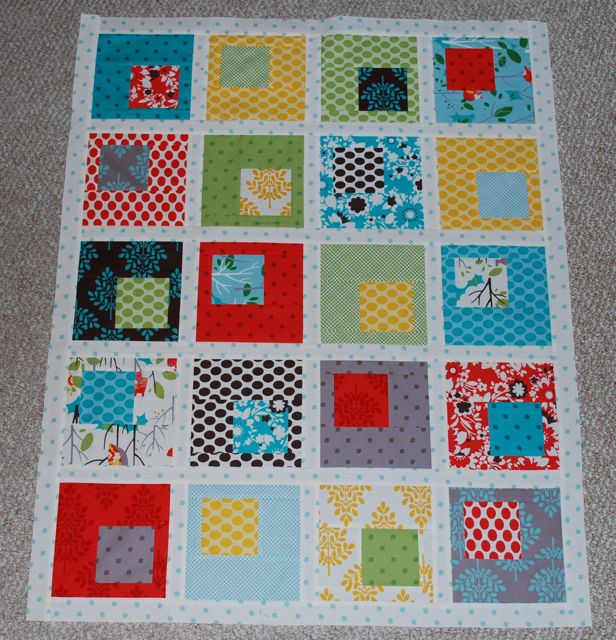 6. Trim the 2 1/2″ Turquoise strips to length for the side borders and sew to the sides of the quilt. Repeat with the top and bottom borders.
7. Layer the quilt top with the batting and backing. If machine quilting is new to you, here’s a tip on creating a custom look with simple quilting. Use any simple quilting design, but change thread colors as you move to different colors in the quilt. I did a simple star motif in the center squares and stippled the entire remainder of the quilt, stopping to change thread color as I went. After quilting, bind with the 2 1/2″ Turquoise strips.


![]()


 Sewing:
 2. Draw a diagonal line on the wrong side of the 52 red 1 1/2″ squares and the four 1 1/2″ squares cut from the charms.


