Pure Emotions


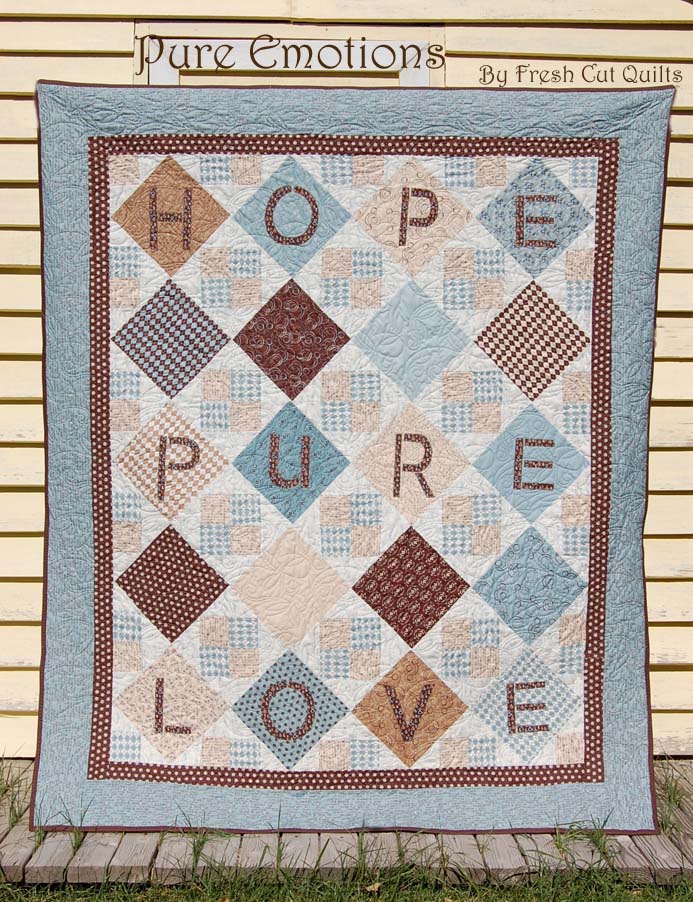
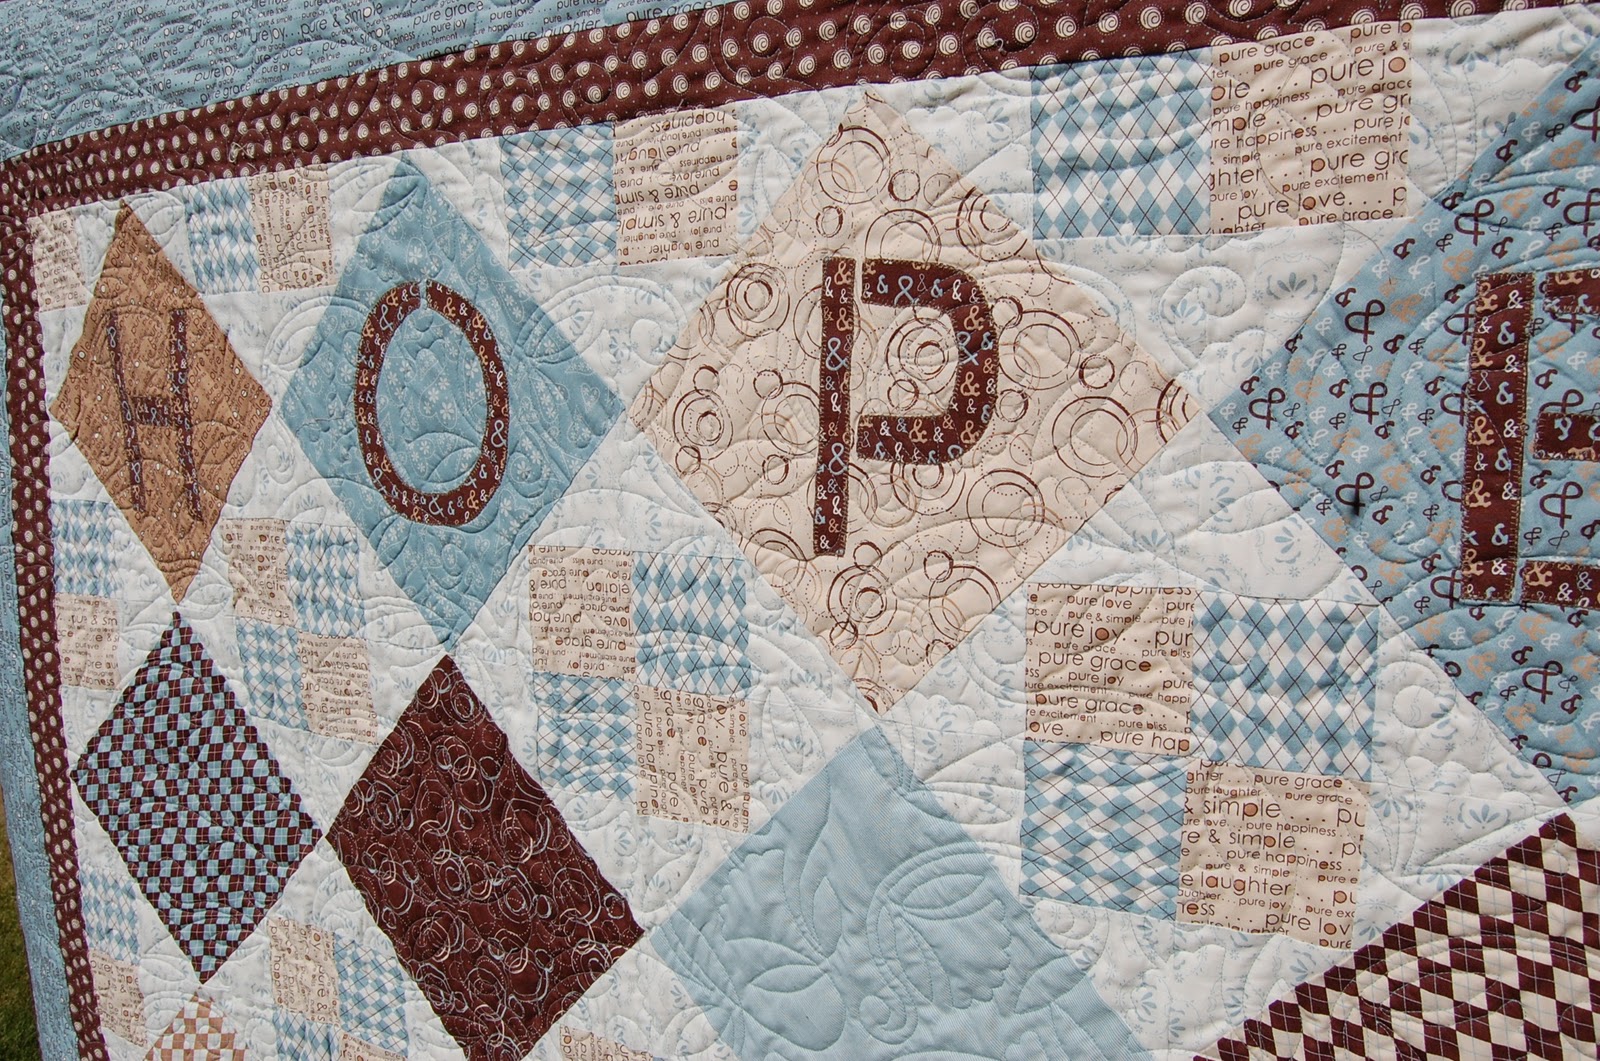
This quilt would be a perfect gift gift for someone who is enduring a challenging time in their life.  The words bring inspiration and uplift everyone.  What is better than pure Hope and Love in hard times?  For me this quilt reminds me of my many blessings and to be ever-thankful.  I hope it does for you as well.

Kits for this special quilt can be purchased HERE through Craft Town Fabrics.

1 Pure by Sweetwater Layer Cake
1 yard Background Fabric White Vintage #5432-11
1/2 yard EACH of 5433-12 Argyle and 5430-14 Simple in Latte for the small squares in each block
1/2 yard Ampersand in Cocoa #5438-18 for block letters
1/2 yard Sweet in Cocoa #5435-20 for the inner border
1 1/4 yards Simple in Splash #5430-17 for the outer border
5/8 yard Baby Dots in Cocoa #5436-20 for the binding
4 yards Snuggle Solid in light Blue for the backing
1 yard Heat n’Bond Lite or Wonder Under fusible web for the Block Letters


Thread to match the letters, Click Here to download or print the Letter Templates

1.  Choose 20 Layer Cake squares to use for the quilt.  These should be a broad mix of colors from the pack.  Then trim to 9″ square. (Set aside the remaining 20 squares.  Those you will not need for the quilt top, but can certainly be used for the backing.)

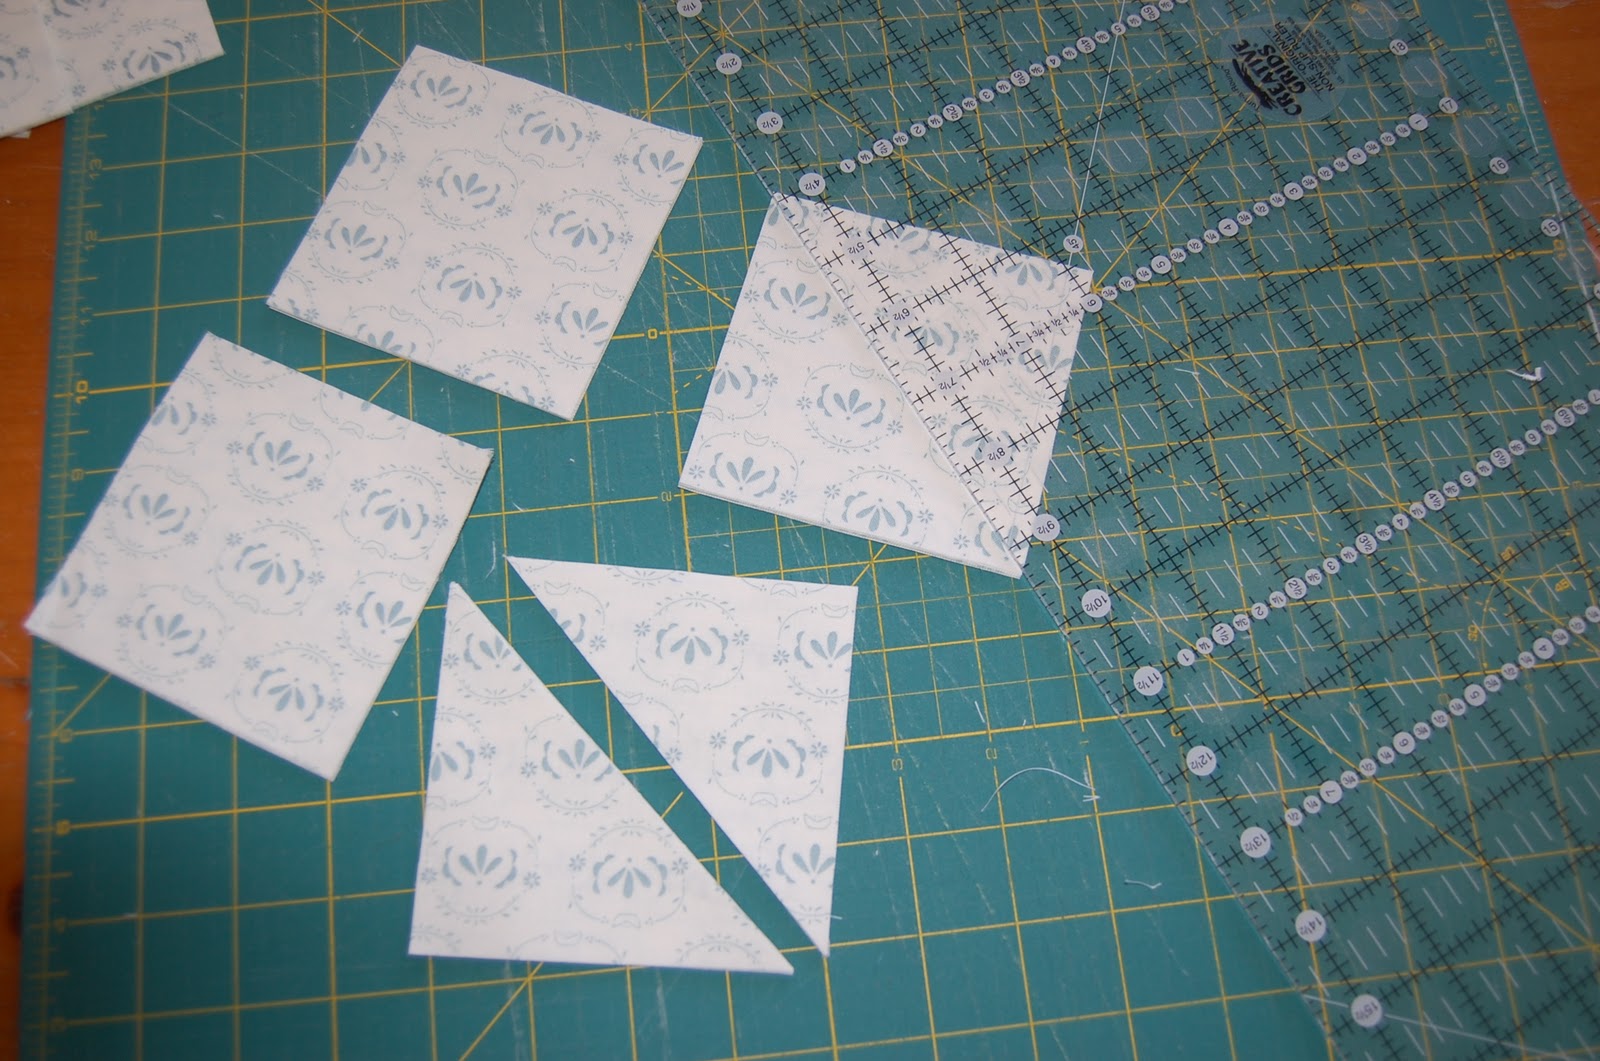
2.  From the white vintage fabric cut (80) 4″ squares, then cut these squares in half diagonally once yielding 160 triangles.  You will use 8 per block.

3.  From the Argyle and Simple fabrics cut (40) 3 1/2″ squares of each.

4.  Choose 12 of the Layer Cake squares to be used for the letters.  These should be lighter in coloring than the Brown Ampersand fabric so the letters stand out a little.  
5.  Trace the letters on to the paper side of the fusible web.     
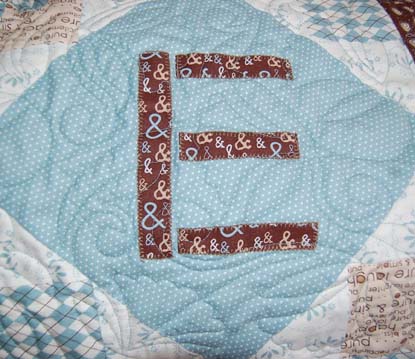
6.  With a hot iron fuse the fusible web on the wrong side of the Ampersand fabric.  Leave the paper in place until you have cut out the letters.  
7.  Remove the paper and center one letter on each of the 9″ squares.  Iron to fuse the letters in place.  Using a matching thread buttonhole stitch (or any decorative stitch will do) around the edge of each of the letters.  Now all your block pieces are ready for piecing.
8. Take 2 of each of the 3 1/2″ squares and 8 triangles.  Lay out 1 triangle on each side of one of the 3 1/2″ squares.
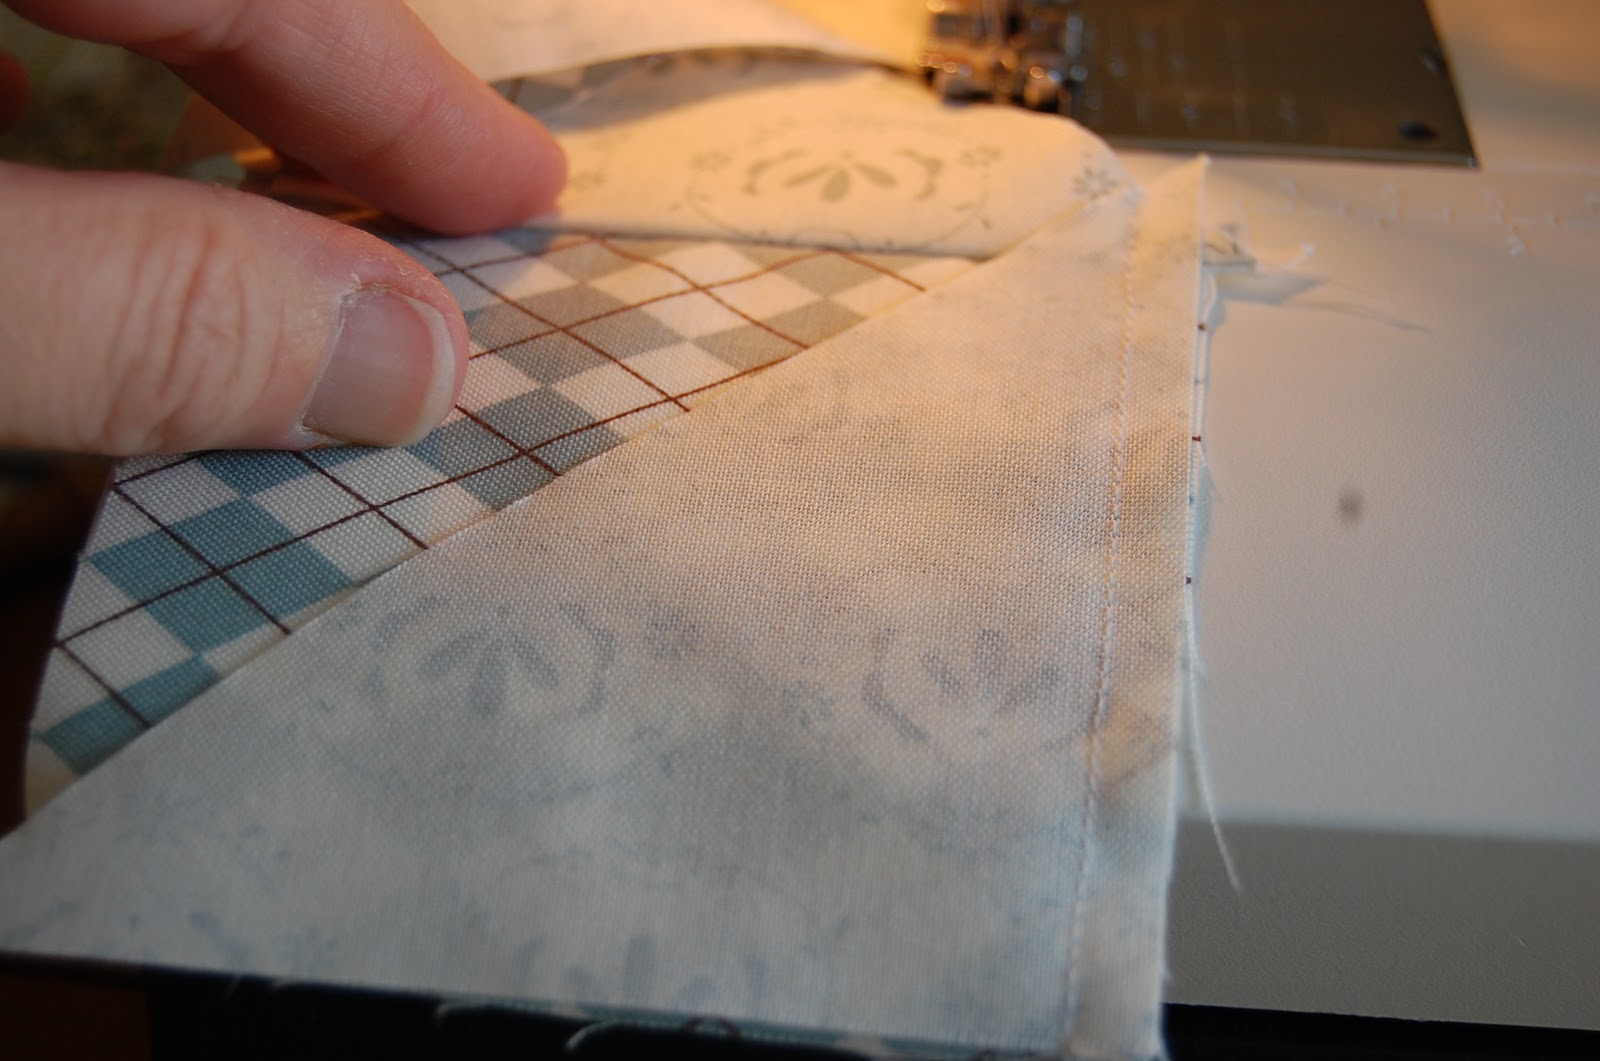
9.  Pin and sew one triangle to the right side of each square.  Press the seams toward the triangle.

10.  Take the 4 triangles and pin and sew to the side of the square as you can see in the photo.  The right angles of the square and rectangle at the bottom of the photo are lined up.  This is important so you keep your 1/4″ seam where the triangles match up.  

11.  Press the seam toward the triangle

12.  You should have 4 setting triangles, two in each color.

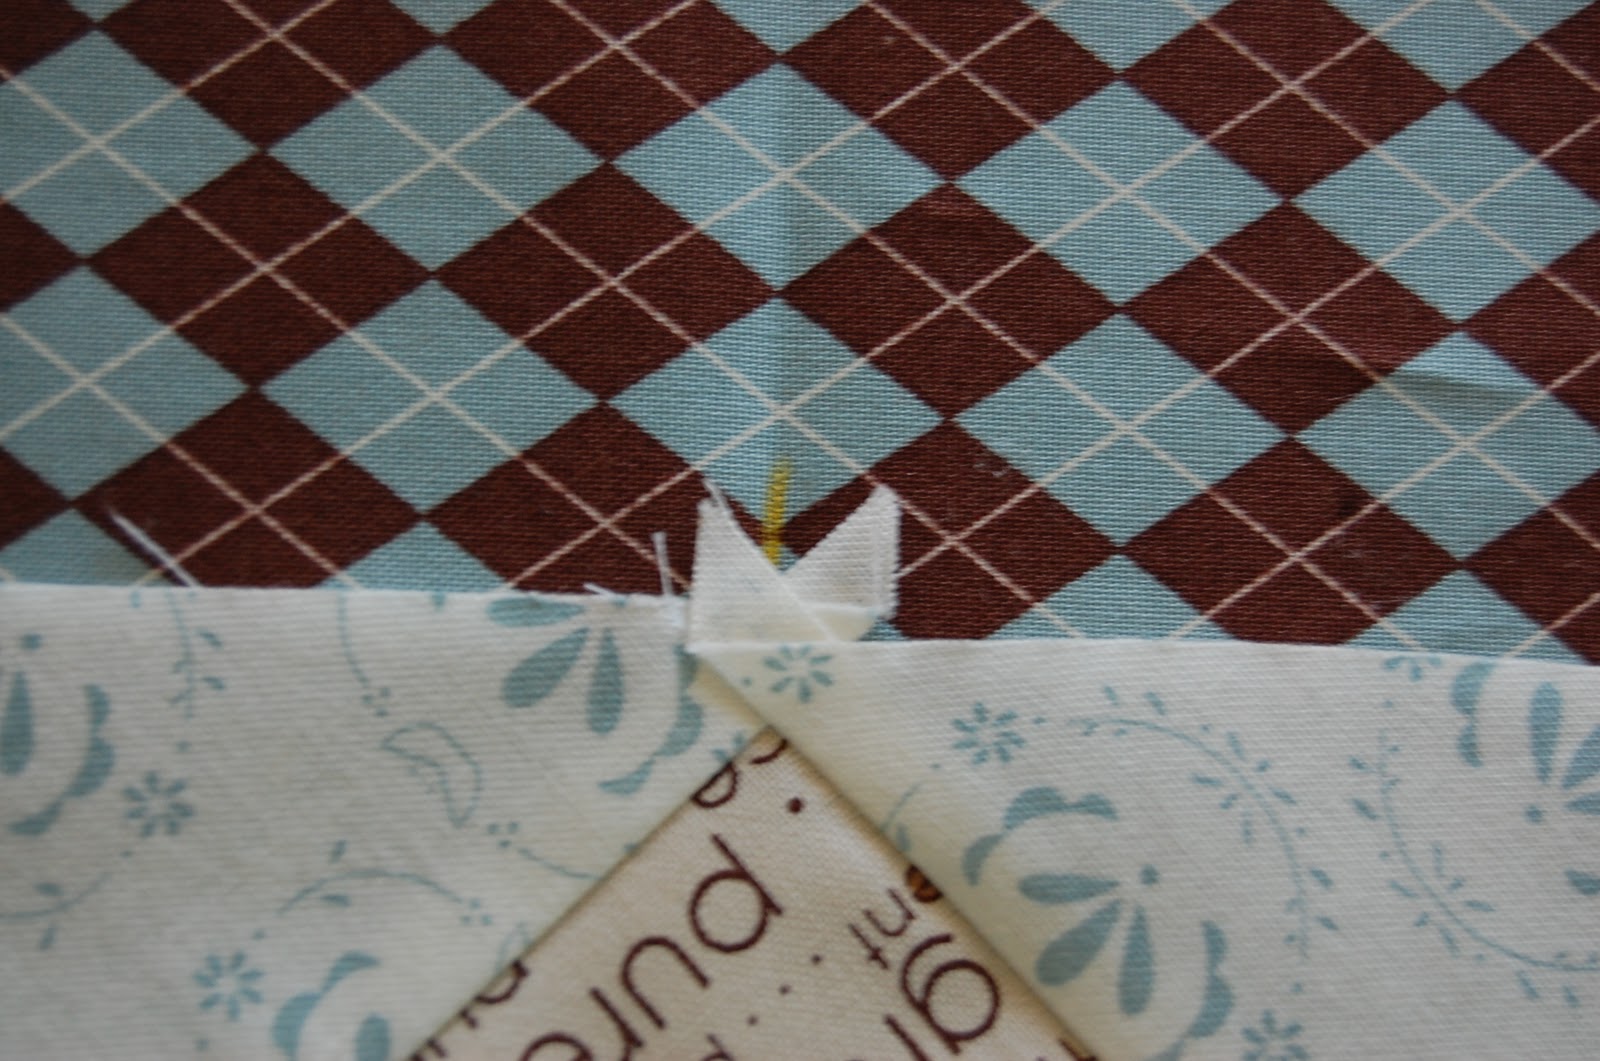
13. Fold the center square in half and then in half again.  Finger press along the folded edges to make a slight crease.  Note the yellow pencil mark in the photo below.  This is the center of one side of the square.
Unfold the square and lay one setting triangle at the center fold of the square.  The point of the square should line up with the crease.
14.  Pin and sew two matching setting triangles on to the square.  

15. Press toward the square.

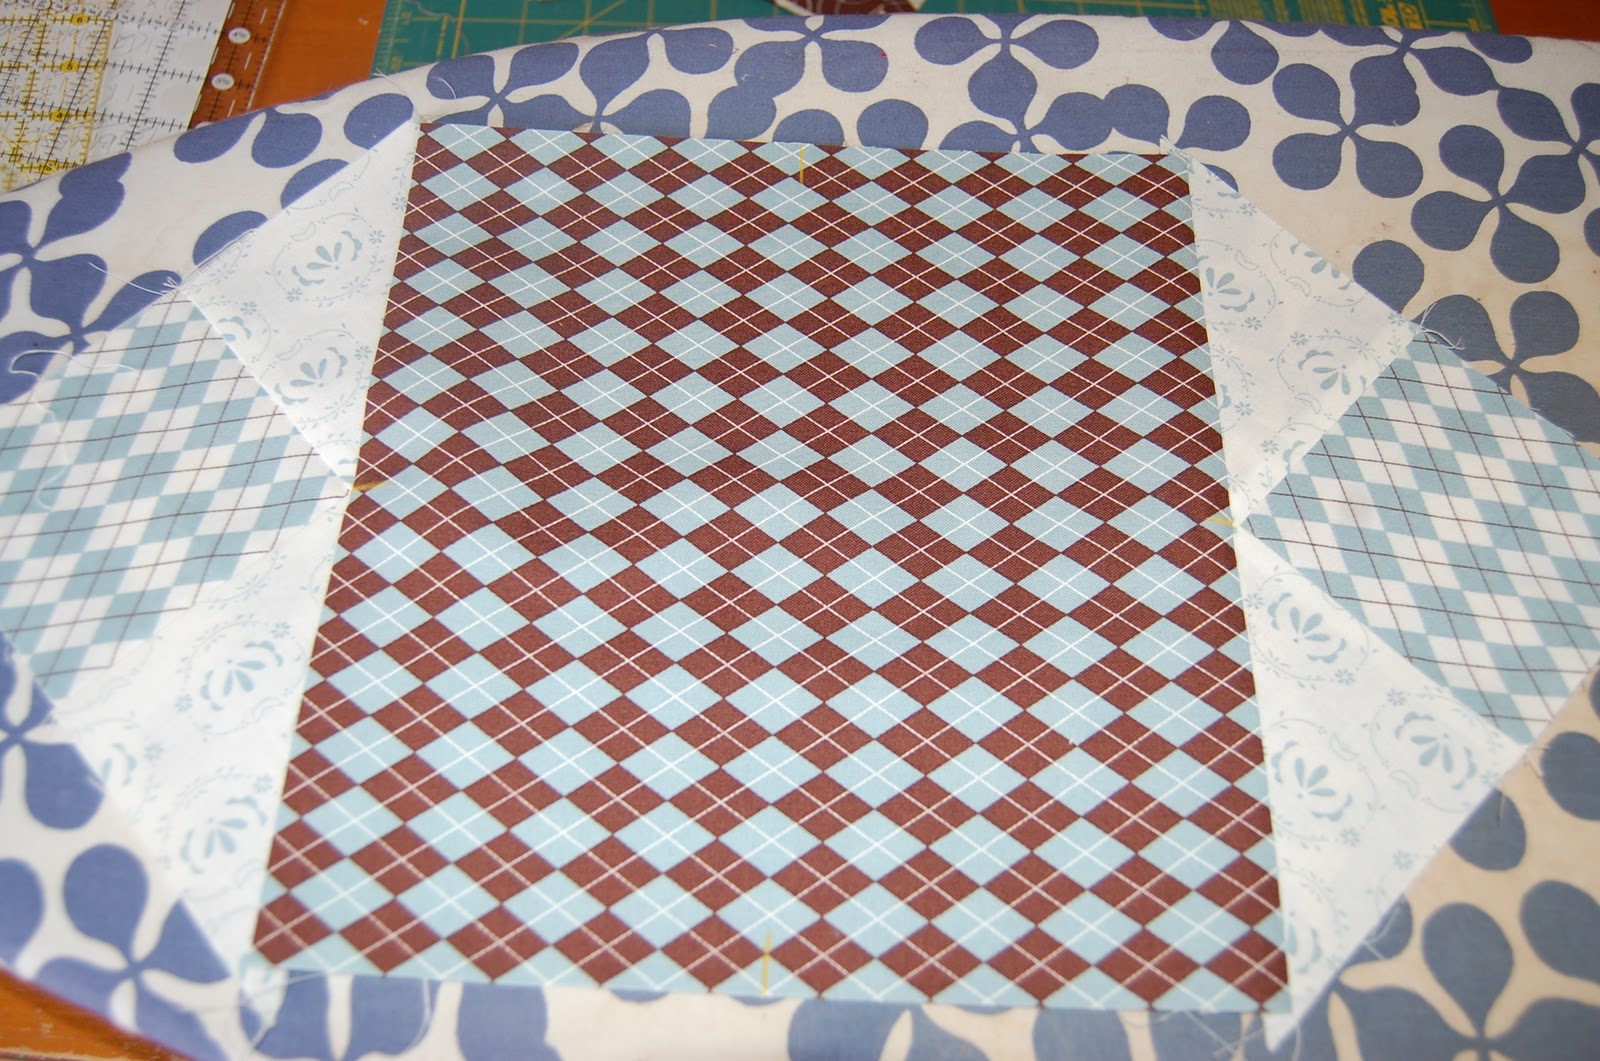
16. Place the 2 remaining setting triangles on to the sides of the square and line up the crease marks with the center of each triangle.  Pin, sew and press.  Make sure the argyle print squares always have the same placement so the secondary design of four-patch blocks comes through.

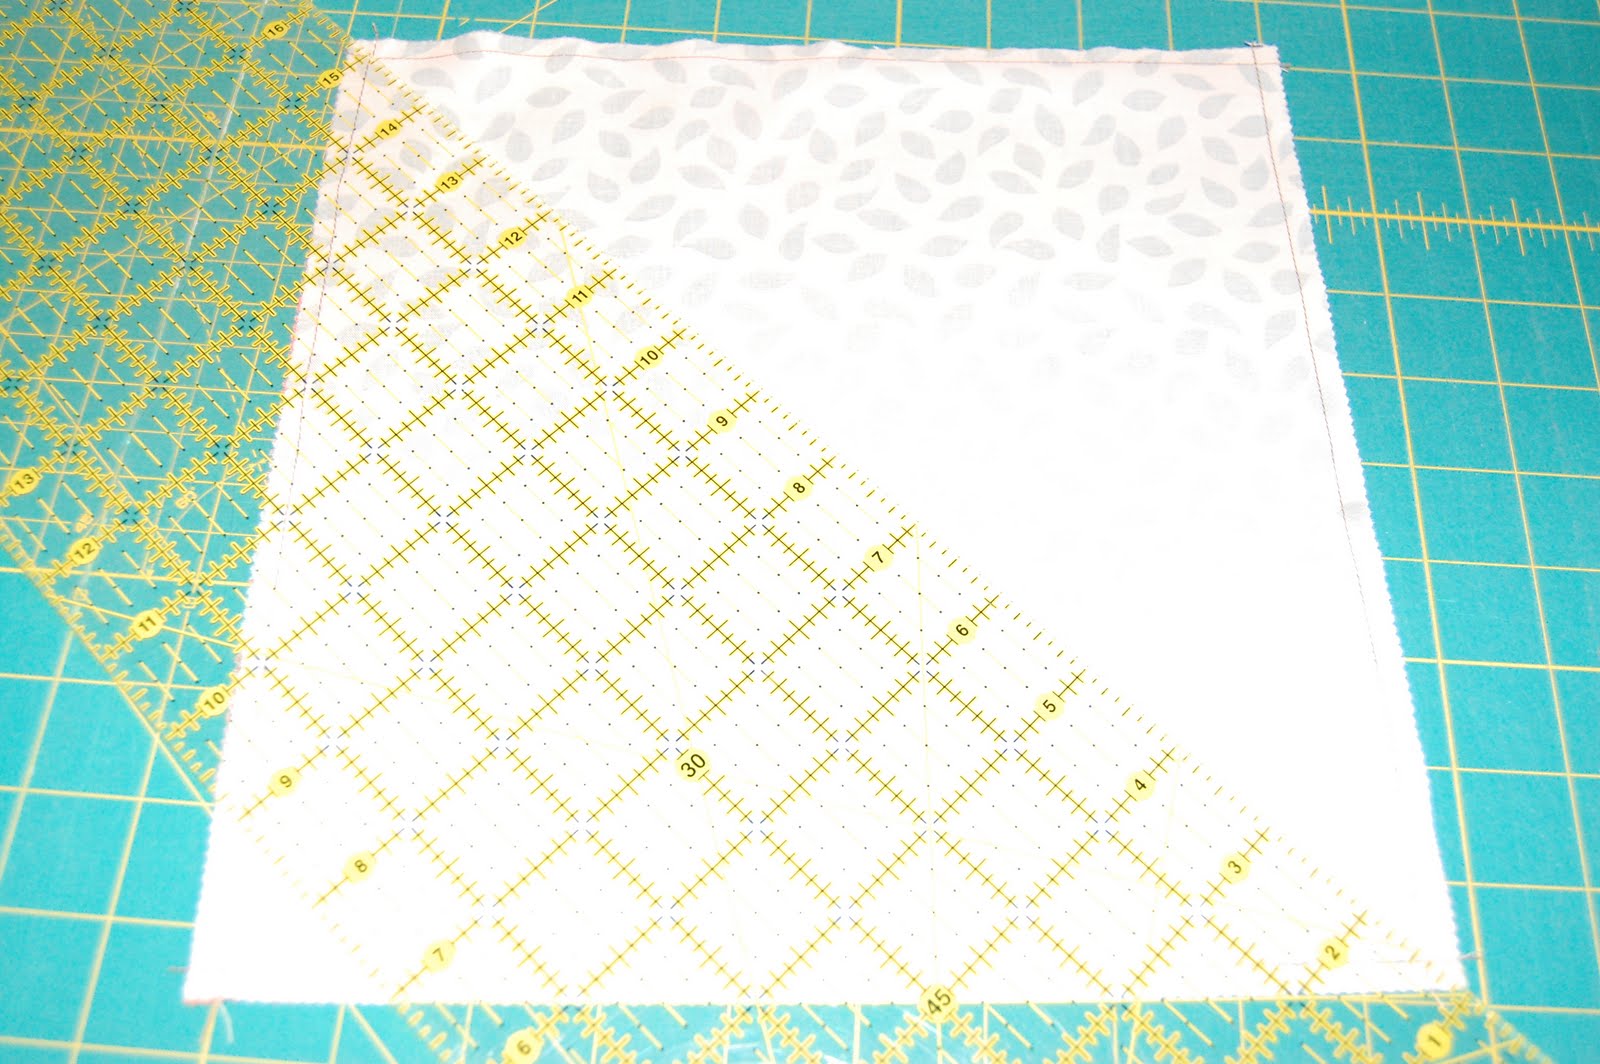
17. Trim the block to 12 1/2″ square.  Repeat steps 8-17 for the remaining 19 blocks.

Layout the blocks in 5 rows of 4 blocks each.  The top row should spell out HOPE, then is a blank row, then the center row spells out PURE, then another blank row, the last row spells out LOVE.    Pin and sew the blocks into rows and then pin the rows together to create the quilt top.

18.  Cut (7) 2 1/2″ x width of fabric (WOF) strips for the inner borders.  Piece the strips together end to end.  Measure the quilt top through the center horizontally to determine the top and bottom measurement.  Cut two inner border strips to that measurement.  Pin and sew to the quilt top.  Measure the quilt top vertically to determine the side measurements.  Cut the side inner borders to that measurement and pin and sew to the quilt top. 
19.  Cut (7) 5 1/2″ x WOF strips for the outer borders. Repeat step 18 in the same manner for cutting and sewing the outer borders to the quilt top.
Now the quilt is ready for quilting and binding!

I chose to use the Snuggle solid in light blue for the backing.
Wendy Nabhan of Eagle Mountain Quilting long-arm quilted this for me using the design Gentleness by Anne Bright.
Thanks for taking the time to check out this tutorial.  If you would like to see more of my designs you can check them out on my blog freshcutquilts.blogspot.com or at www.freshcutquilts.com 


1 Lap quilt measuring 63″ x 75″ to treasure always.

Kari Ramsay

Organic Style

Hello from Fresh Cut Quilts!  It is my pleasure to bring you this simple, yet elegant pattern. This pattern makes a 69″ square lap sized quilt.  I chose to back this quilt in Moda’s Snuggle Solids, because it makes every quilt so cuddly and warm on a chilly day. With fall just around the corner and the winter holidays right after, it will be the perfect quilt to make for your home or for your loved ones this year.

I have partnered with Craft Town Fabrics to make kits available for purchase. Please visit their website to purchase a kit for this darling project!
I hope you enjoy!

Kari Ramsay
Fresh Cut Quilts Pattern Co.


1 Origins Jelly Roll (or Jelly Roll of your choice)You will use (30) 2 1/2″ strips
1 1/4 Yards Bella White Solid or White Graph Paper from Origins
1 1/3 Yards Refresh Dot 30236-11 for outer border
1 yard Onyx Grunge 30150-99 for the circle accents and inner border
1/2 yard Graph Paper Kelp 30239-17 for the binding
4 1/2 yards Snuggle Solid in Cream, Brown or Black for the backing


Heat n’ Bond Lite or Wonder Under fusible web, thread to match circle accents, one 16″ pillow form optional for the extra block, an Olfa circle cutter, or EZ Circle Cutter can be most helpful for cutting perfect circles.


Cut (6) Inner Border Strips 2 1/2″ x WOF (Width of Fabric)
Cut (7) 6″ x WOF Outer Border Strips
Cut (25) 1 1/2″ x WOF White Bella Solid Then cut in half at the fold to yield (50) 1 1/2″ x 20″ pieces

Sort the Jelly Roll strips into 5 groups of (6) 2 1/2″ strips each.  This may help keep the colors sorted for the blocks.

1. Cut all 30 of the Jelly Roll Strips in half at the fold to yield (60) 2 1/2″ x 20″ strips

2. Sew 1 white strip to one side of each of the  2 1/2″ x 20″ Jelly Roll roll strips, then press toward the darker fabric.  Be careful to keep this long strip straight to avoid curvy strips.

3. Sew one Jelly Roll strip to the white strip, and press.   Continue by adding a Jelly Roll strip to each white strip and alternating until there are six “dark” 2 1/2″ strips and five white 1 1/2″ strips sewn together.  The block should begin and end with a dark 2 1/2″ strip.

4. Press the blocks and trim to 17 1/2″ square.

5. Sew the blocks together alternating horizontal and vertical stripes.  You will have one extra block leftover which would make a perfect 16″ throw pillow!

6. Measure the quilt top and using that measurement, trim and then sew the inner border strips to the top and bottom of the quilt top. Measure the quilt top vertically and use that measurement to trim and then sew the side inner borders to the quilt top.

7.  Prepare the circles for appliqueing to the border strips.  For instance, if you are using fusible web as I chose to do, iron the fusible to the wrong side of the circles and then trace the circle and cut them out.  If you are hand or invisible machine appliqueing the circles prepare them as you normally would, then proceed to step 8.

8. Layout the circles on the outer borders in a way you think is desirable. Fuse or pin the circles to the borders.  

9. Pin and sew the borders to the quilt top. Then sew the circles to the borders.
Quilt and bind as desired!

I had mine quilted in canary yellow thread by Wendy Nabhan of Eagle Mountain Quilting


1 lovely Lap Quilt Measuring 69″ x 69″

Kari Ramsay

Blog
Fresh Cut Quilts Pattern Co.

Lap Quilt "In a Jiffy"

My name is Kari Ramsay and I am the designer of Fresh Cut Quilts Pattern Co. I am new to the world of posting Tutorials here, and it is a great pleasure of mine to bring you this one. This is a great lap quilt to make when you need a gift or a fun project in a jiffy! It goes together very quickly, and I think you are going to love it!


1 Arcadia Layer Cake or a different equally cute Layer Cake!
1/2 yard Binding
3 yards backing fabric


6 1/2″ Acrylic square ruler
Mary Ellen’s Spray Starch or other spray starch product


1. Separate your Layer Cake into two stacks of light and dark fabrics. Some may not be considered a ‘dark’ fabric, but if the color has a strong contrast to the light fabrics it will work great.
2. Choose 12 of the light fabric 10″ squares, and 12 dark fabric 10″ squares. Set aside.
3. The remaining 16 squares will be used for the outer border.
4. Take one light and one dark square and place them with right sides together. Pin around the squares in several places to secure the squares.
5. Sew the squares together on one side with a 1/4″ seam.
Then continue to sew around the squares until all four sides have been sewn.

6. Spray both sides of the square with Mary Ellen’s Spray Starch and press the block. This will help keep your bias edges from stretching or moving in the next steps.
7. Take your long acrylic ruler and line it up to cut the square block diagonally from corner to corner. Then make one more diagonal cut from the opposite corner to corner. This will yield four Half Square Triangles that are identical.

Press the seams toward the darker fabric. Repeat steps 4-7 with the remaining squares.
8. Trim the Half Square Triangles (HST’s) to 6 1/2″ square if necessary. (I did not trim mine and all of the blocks came out just right for me.)
9. Choose 4 different Half Square Triangles. Place two of the HST’s with the right sides of the darker fabric facing. Pin into place. Sew a 1/4″ along the raw edge. Repeat with the remaining two HST’s. Press the seams in opposite directions.

Be careful not to push or pull on the triangles when they are moving through your machine. Let your feed dogs do all the work and you won’t have any trouble with the fabric stretching. Also, be sure with these blocks not to use your thread cutter on the side of your machine- that will stress the fabric in the wrong directions.

With these blocks you will be placing all of the darker fabrics to face the center of the block.

10. Place the two halves of the block with right sides together and pin in place along the raw edge. Sew the two halves of the block together. Press the seam.
11. Repeat with the remaining HST’s to create 12 blocks measuring 12 1/2″ square.
12. Sew the blocks together into 4 rows of 3 blocks each.
13. Take the 16 squares set aside for the border and cut each square into (4) 2 1/2″ x 10″ pieces.

14. Pair up different border pieces and sew them together along the 10″ length of the pieces. Press the seam.
15. Sew 5 of these border segments together on the 4 1/2″ side end to end to create one long border piece. Repeat and make one more with 5 border segments, and two more with 7 border segments in each. These are your borders.
16. Measure the quilt horizontally from side to side to determine the top and bottom border lengths. Cut the two borders with 5 segments to that length. Pin and sew them to the top and bottom of the quilt top.
17. Measure the quilt top through the center vertically to determine the side border measurements. Cut the remaining two borders to that length and pin and sew them to the quilt top. Press the seams and you are all done with the piecing! Quilt and bind and enjoy!


1 Lap quilt measuring 45″ x 58″

Thanks for checking out my tutorial and if you want to check out my blog or website, that would be great too!
A special thanks to the great folks at Moda/United Notions for all of your support!