The Zelma Cuff Pincushion
By: Rebecca Roach
I had a fabulous grandmother named Zelma who owned an amazing collection of jewelry. When I was little, I discovered that she kept much of it inside a wooden treasure chest stowed away in the master bathroom. I would lock myself in there, put on every piece I could manage, and prance around the bathroom until someone yelled at me to get out of there! Through the loss of both my grandmother in 1995 and my mother in 2010, I’ve come to inherit a portion of this jewelry collection. However, I’m not remotely the social butterfly she was with endless parties with which to wear these pieces- I’m a pizza and Netflix girl! So, when the Sliced competition called for making a pincushion, my mind instantly thought of my grandmother’s cuff bracelets. I thought if I could design something in the spirit of her jewelry, but functional- something that I could use every day in my sewing room- then I wouldn’t have to keep all those memories hidden away inside the wooden treasure chest that now resides in my closet. I could keep them with me as I sew & who could ask for more than that? Even if this project got me sliced from competition, I still think it’s one of the best things I’ve ever designed. Let’s go make one!

1 Jelly Roll
1 Dark Colored Coordinating Charm Square
1 10” of Bella Silver
Freezer Paper
1 Scrap Piece of Leather
1 Piece Light Gray Felt & 1 Piece Brightly Colored Felt
1 Package Light Gray Pom Poms
1 Package of .75 Inch Wide Velcro
Light Gray or Silver Ric Rac
1 Water-Soluble Glue Stick
1 Bottle of Liquid Stitch
1 Package 3mm White Pipe Cleaners
1 Package Light Gray Piping
2 Small Mother of Pearl Buttons
Fiberfill
Steel Wool (Optional)
Metallic Silver Thread
Silver Rope Cording
Hot Glue Gun
Basic Sewing Supplies- Rotary Cutting Supplies, Iron, Sewing Machine, Thread, Scissors, etc.
Prep Work
Print all of the templates included in the Printer Friendly Version and cut them out. You can trace them onto Freezer paper for ease of use. TIP-Print them out from the start onto letter-sized Freezer Paper sheets to avoid tracing!

The Strap
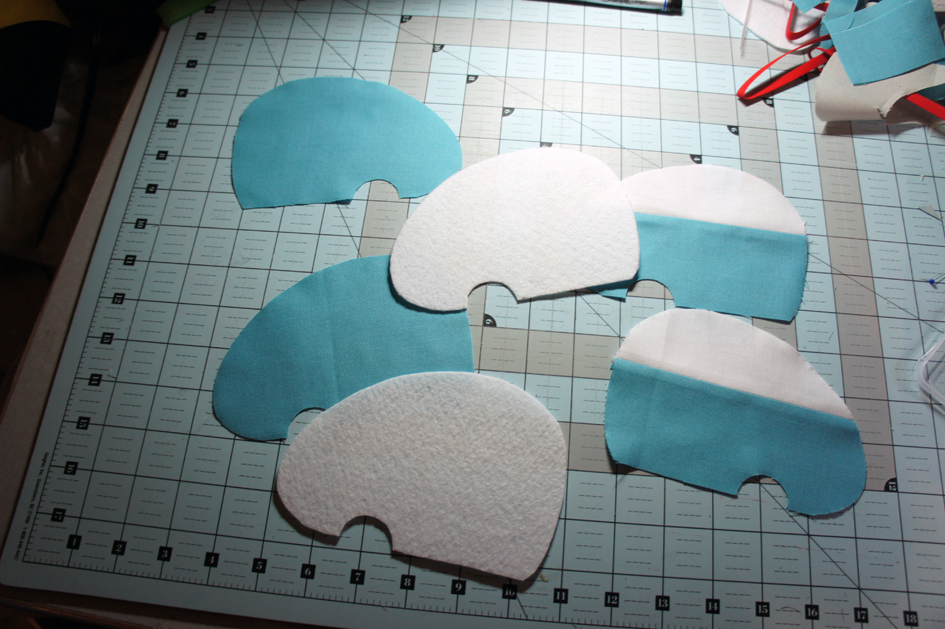
1. Iron on the Top Strap freezer paper template to the Bella Silver fabric & cut out the piece, leaving a rough quarter inch seam allowance.
2. Clip all of the curves & the two V’s, apply Water-Soluble Glue all around the edges of the freezer paper template, & fold the raw edges under. Press with a hot iron to dry the glue.

3. Iron on the Bottom Strap freezer paper template to the Bright Felt. Cut out exactly to size & peel away the template.
4. Stack the Top Strap piece onto the Bottom Felt and pin together to sandwich the raw edges of the fabric. Finish the edges with topstitching.
5. Cut a 1.5 inch long piece of Velcro. Position one of the Velcro pieces at one end of the Top Strap and sew around the perimeter to secure. Repeat for the other Velcro piece onto the opposite end of the Bottom Strap.

The Cabochon
6. Iron on the Cabochon freezer paper template to the Dark Charm Square & cut out exactly to size.
7. Partially lift one corner of the template away from the fabric to expose Cutting Line #1 & carefully cut the freezer paper away.

8. Iron this new template to its corresponding color fabric from the Jelly Roll & cut along Cutting Line #2 to create a finished appliqué piece.

9. Apply Water-Soluble Glue to the inside edges of this piece & place it back into position on the Cabochon. Press with a hot iron to dry the glue. Repeat steps 7-9 for each of the Cutting Lines to create all the appliqué pieces. Note: You can cut out and discard the pieces that say DARK because the dark charm square is already your base fabric.

10. Once every appliqué piece is glued down, carefully peel away all of the freezer paper, cut away any excess fabric from the seam allowances, and finish the raw appliqué edges with your favorite finishing stitch.

11. Turn the Cabochon over to the backside & center the Reverse Cabochon freezer paper template into place. Press with a hot iron.
12. Sew a line of stay stitching just outside of Reverse Cabochon template’s edge. Be careful not to stitch into the paper, so it’s not difficult to remove after you’re finished sewing.

13. After removing the template, pick one of the corner darts and press it in half with right sides together using the stitched lines as guides. Sew the dart just inside the entire length of the guide lines, then turn the piece and sew back up to the start. Back stitch at the end for extra security & trim the seam allowance down to about an eighth of an inch. Repeat this step for the remaining three corners, turn the piece right side out, and finger press the seams.


14. Iron on the Leather Base freezer paper template onto a scrap piece of Leather & cut it out exactly to size. Peel away the template and discard. This Leather Base will keep the needles from poking through to your arm!
15. Except for a one inch long opening on one of the longer sides, run a line of Water-Soluble Glue around the edges of the leather and use it to place the Cabochon edges in prep for sewing.


16. Sew the Cabochon to the Leather base using the stay stitching as a guide line. Leave a one inch opening for stuffing on one of the longer sides and back stitch at both ends for extra security.
17. Stuff the Cabochon firmly with the Fiberfill and place a small piece of Steel Wool in the very center of the Fiberfill to help keep your needles sharp. When finished stuffing, sew the opening shut.

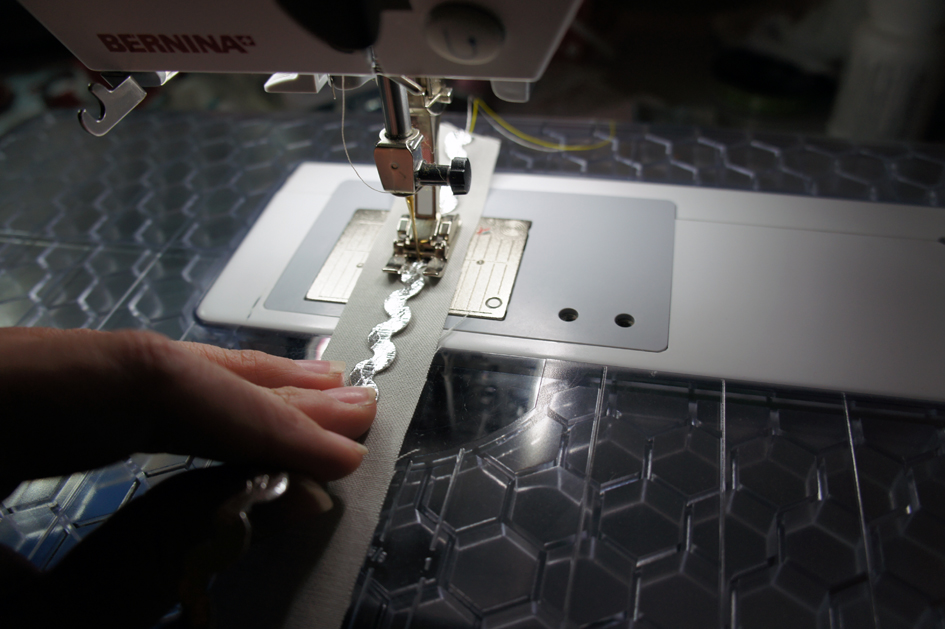
18. Cut a 1 inch wide x 10 inch long strip of Bella Silver and a 10 inch long strip of Ric Rac. Place the Ric Rac in the center of the fabric and sew down the entire length to secure them together. Fold the fabric in half and press to conceal the bottom half of the Ric Rac and create the Bezel for the Cabochon.
19. Wrap the Bezel around the Cabochon and use pins to hold it into place. Determine where your end point will be and mark it with a fabric marker or chalk. Remove the Bezel, place right sides together, and seam together the end using the marked line as a sewing guide. Place back onto the Cabochon and hand sew around the top edge of the Ric Rac to secure.


Decorative Elements
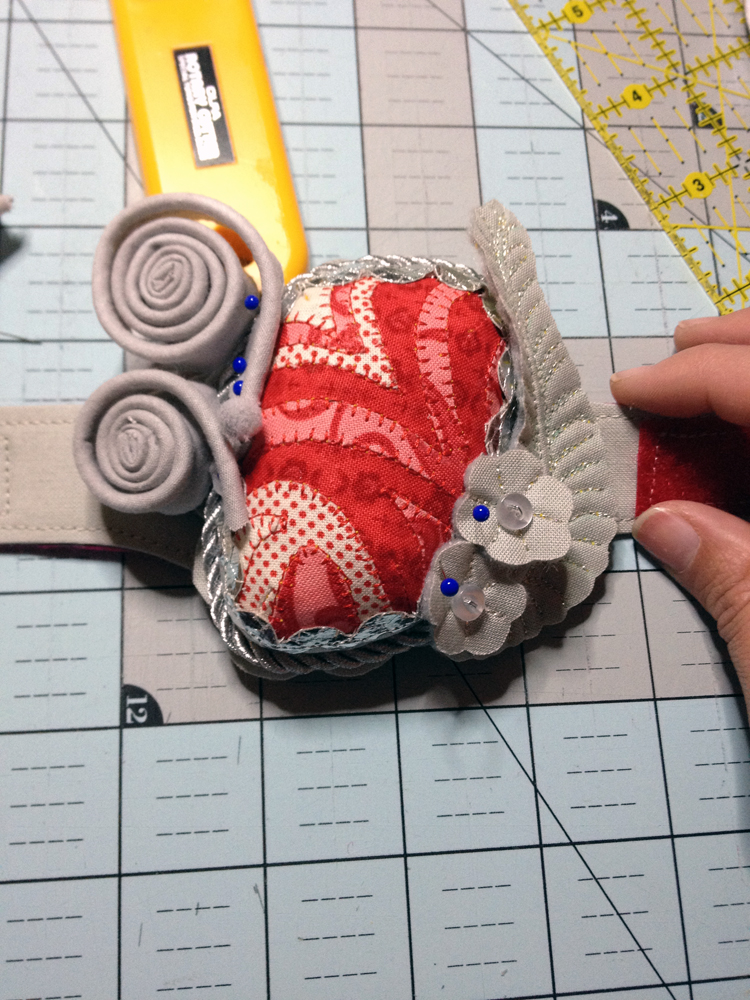
20. Iron on the Scalloped Edges template onto the Bella Silver and cut it out, leaving about an eighth of an inch around the template. Flip over the piece, apply a thin coat of Liquid Stitch all over, and place it onto the Gray Felt. Press with a hot iron to dry the glue and finish cutting the template out exactly to size. Sew decorative stitching with Metallic Silver Thread according to the dashed lines on the template. Repeat this step for both of the flowers, as well as the feather. Stitch the button onto the middle of the flowers to conceal the messy middle.


21. Cut three 12 inch long pieces of Light Gray Piping, pull the cord out from the inside of each piece, & insert a Pipe Cleaner. Roll up two of the pieces to make Swirls and the last one to make freeform stems.

Final Construction
22. Center the Cabochon onto the strap and sew on the sides to secure. Use your edge stitch foot for this work to save you some headaches & back stitch.

23. Trim the Leather Base seam allowance down to an eighth of an inch, and then press the Scalloped Edge piece down over top of the Cabochon to conceal the raw edges and Leather Base. The tension of squeezing it onto the stone should hold it in place. Finish the stone setting by hot gluing the Silver Rope Cording around the perimeter.

24. At this point, you might decide the single Cabochon is pretty enough! If not, decide where you would like to place your decorative elements by pinning them around the bracelet to find a pleasing composition. Try on the cuff, as well, because it can look very different when you wrap it around your wrist! When you’re happy, secure the elements into place with either hand stitches or hot glue. Conceal your stitches and junction points (and indiscretions!) by hot gluing Pom Poms over top of them.


One fabulous pincushion bracelet!
Rebecca Roach
{frybreadquilts.wordpress.com}
![]()