Sweet Baby Diamonds Quilt


For those who don’t know me — I’m Tracey from traceyjay quilts (and traceyjay quilts pattern shop)!  I have one handsome husband, two sweet and adorable children, and I love to quilt when I have the time (which is rare these days!)

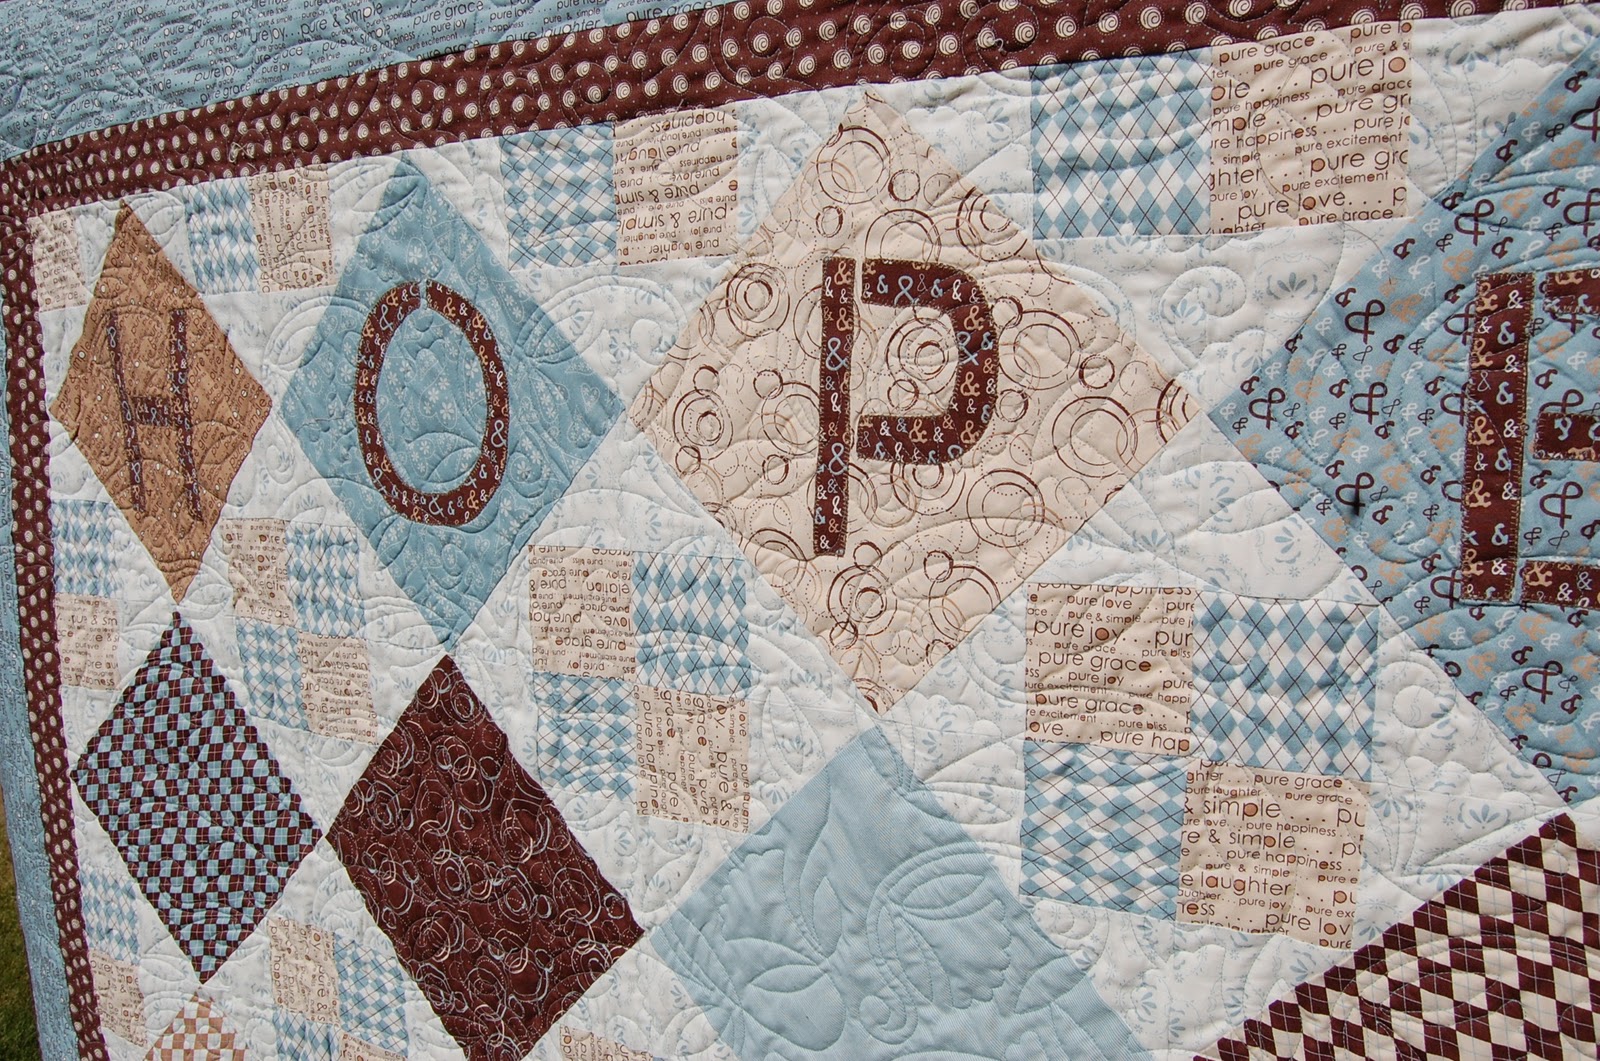
I made these two quilts for two sweet babies in my life (no, not my own).  This little tutorial has been in the works a long time!  I actually finished a second one for my niece (in Sunkissed) before the original was done.  I hope you can forgive the delay; I would personally like to think I have a good excuse.  😉  So — even though these particular lines are now hard to find, I have no doubt this design would sew up beautifully in Reunion, the new Lucy’s Crab Shack or even Mama Said Sew… as it already was adorable in two other Sweetwater lines.

I need to note for those who want to make one of their own — there was a lot of “winging it” while making this quilt, and the measurements are not exact and precise in all ways.  This tutorial is then my attempt to give you a bit of insight in to my (less than perfect, but hey they work) methods.  I would not recommend this design for a first project, because you are working with so many bias edges, as well as oddly shaped setting triangles.  If you’re willing to exercise a little patience, I’m confident though that you’ll love the results.


1 Jelly Roll (Pure by Sweetwater featured)
WIP to be finished

1 yd. contrast for sashing (will have some leftover for binding)
1 yd. for setting diamonds and triangles
1/2 yd. or charm pack for border
2 yards backing (might need more if sending quilt to a long-arm)
leftover jelly roll strips and sashing for binding

– Sort your jelly roll strips by dark, medium, and light value

– Group in to sets of five, following the pattern of dark/light/dark/light/dark and light/dark/light/dark/light.  If your sashing is dark in value, you will need three sets with light on the outside, and two sets with darks on the outside.  Switch if your sashing is light (like in the Sunkissed example), and make more groups with dark on the outside (twenty-five strips total, with thirteen light and twelve medium or dark — reverse if using light sashing).  The picture below shows a set of strips that are dark/light/dark/light/dark.

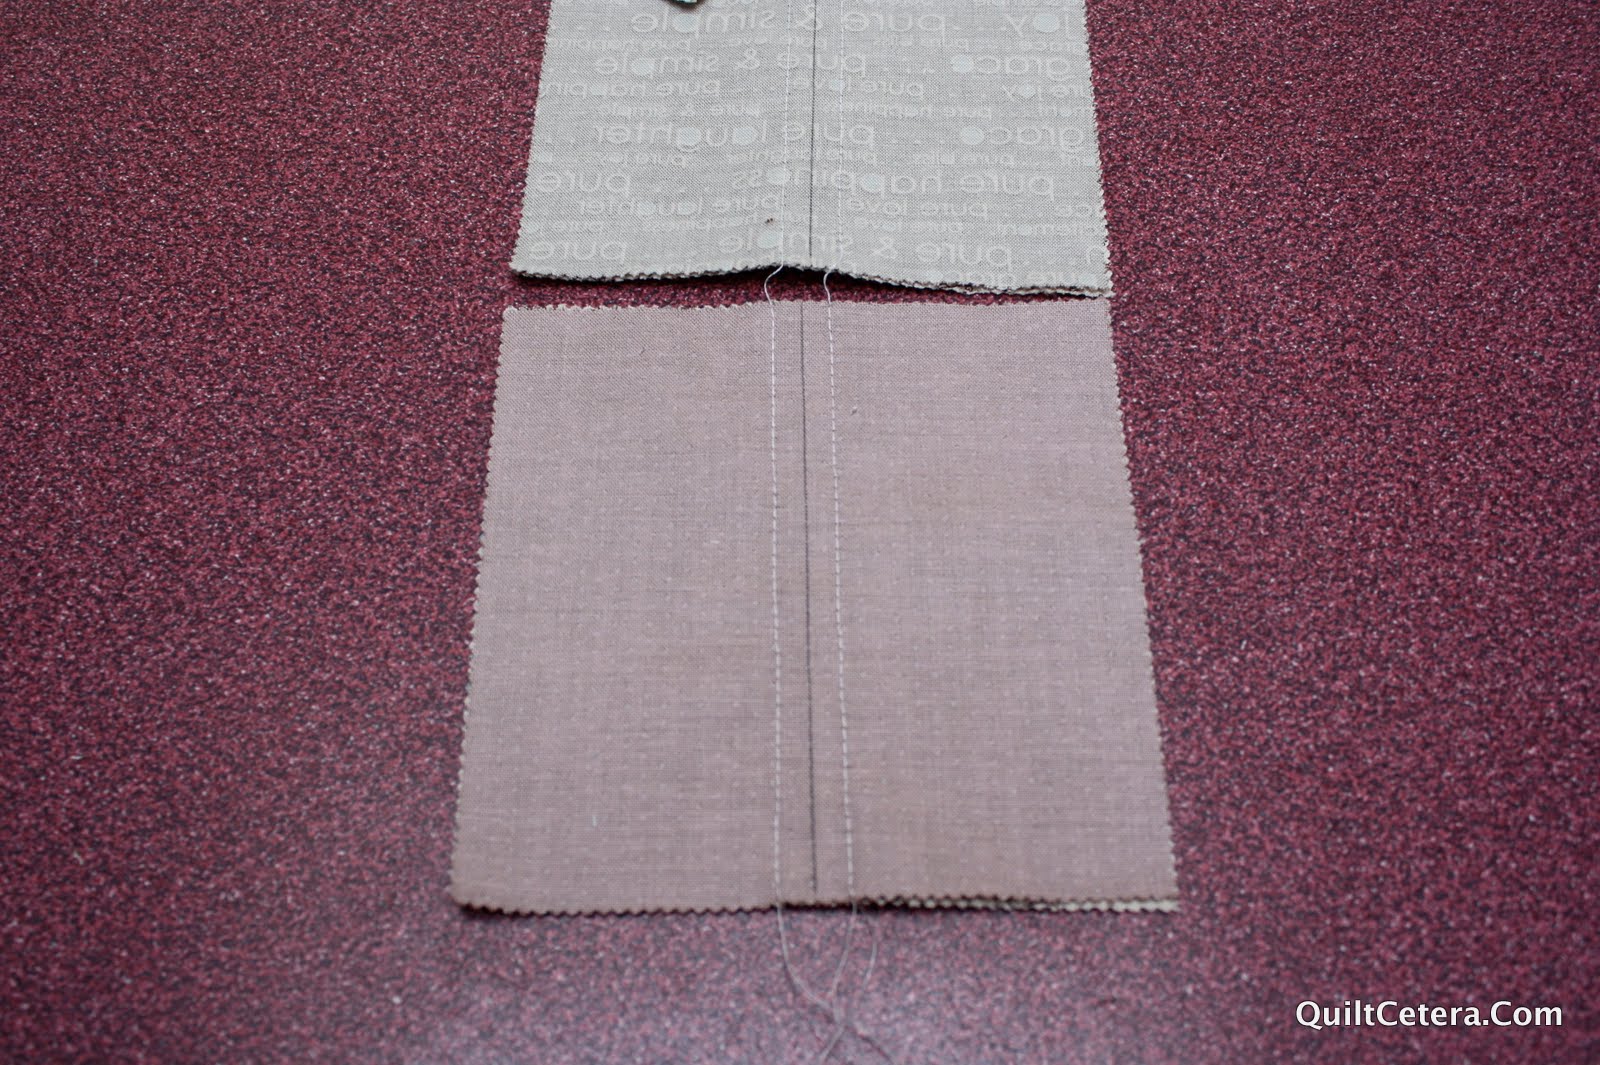
– Sew in to sets with a 2″ off-set for each strip (see picture).  There is no need to trim selvage.  Press very well (either open or to one side; I alternated directions for the dark vs. light strip set)

– Rotate strip set to opposite side (so that the one on top is now on bottom — the green in this picture) and trim at a 45 degree angle.  I use both the line on my quilting ruler as well as the line on my cutting mat, to ensure accuracy and consistency.
– Flip strip set back over, and continuing to follow the 45 degree line, cut 2 1/2″ wide pieced strips.  You can get as many as ten pieced strips per strip set, but you only need to get eight.  Be very careful with your cutting, continuously checking for the accuracy of your angle and 2 1/2″ width and 45 degree angle.

– You will be piecing the strips together like this, alternating a strip with dark on the outside, next to one with lights on the outside.  Here are some tips for helping to ensure good matching points.
– I found that pressing the side down 1/4″ on one of the strip sets was sometimes helpful to see directly where the two sections lined up.
– This picture shows the piece with the 1/4″ pressed over lined up and pinned in place next to the other piece.  You will then stitch directly on the wrong side of the pressed crease.  
This is an up close shot of how it looks at the intersections of your pieces. 


Press seams open when joining sections. 

There is a quarter inch off-set when each section is joined to the next.

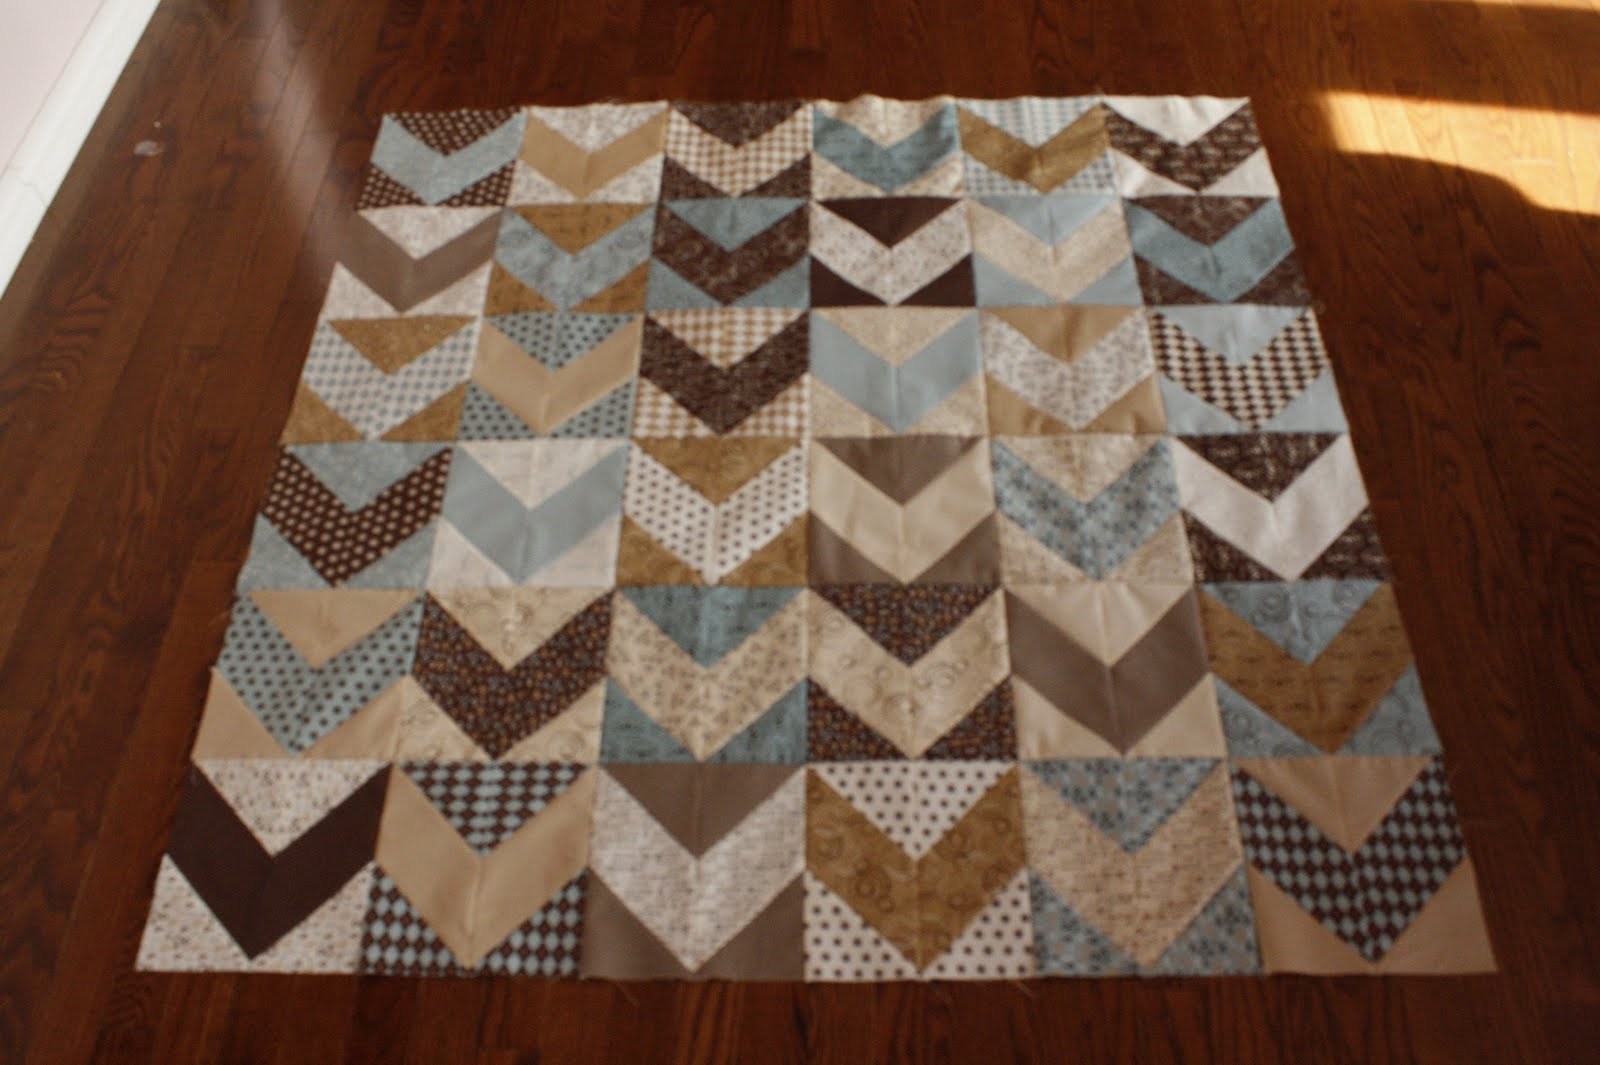
– Make eight diamond blocks (each with five strip pieced sections — see pic directly below for what a finished block looks like)
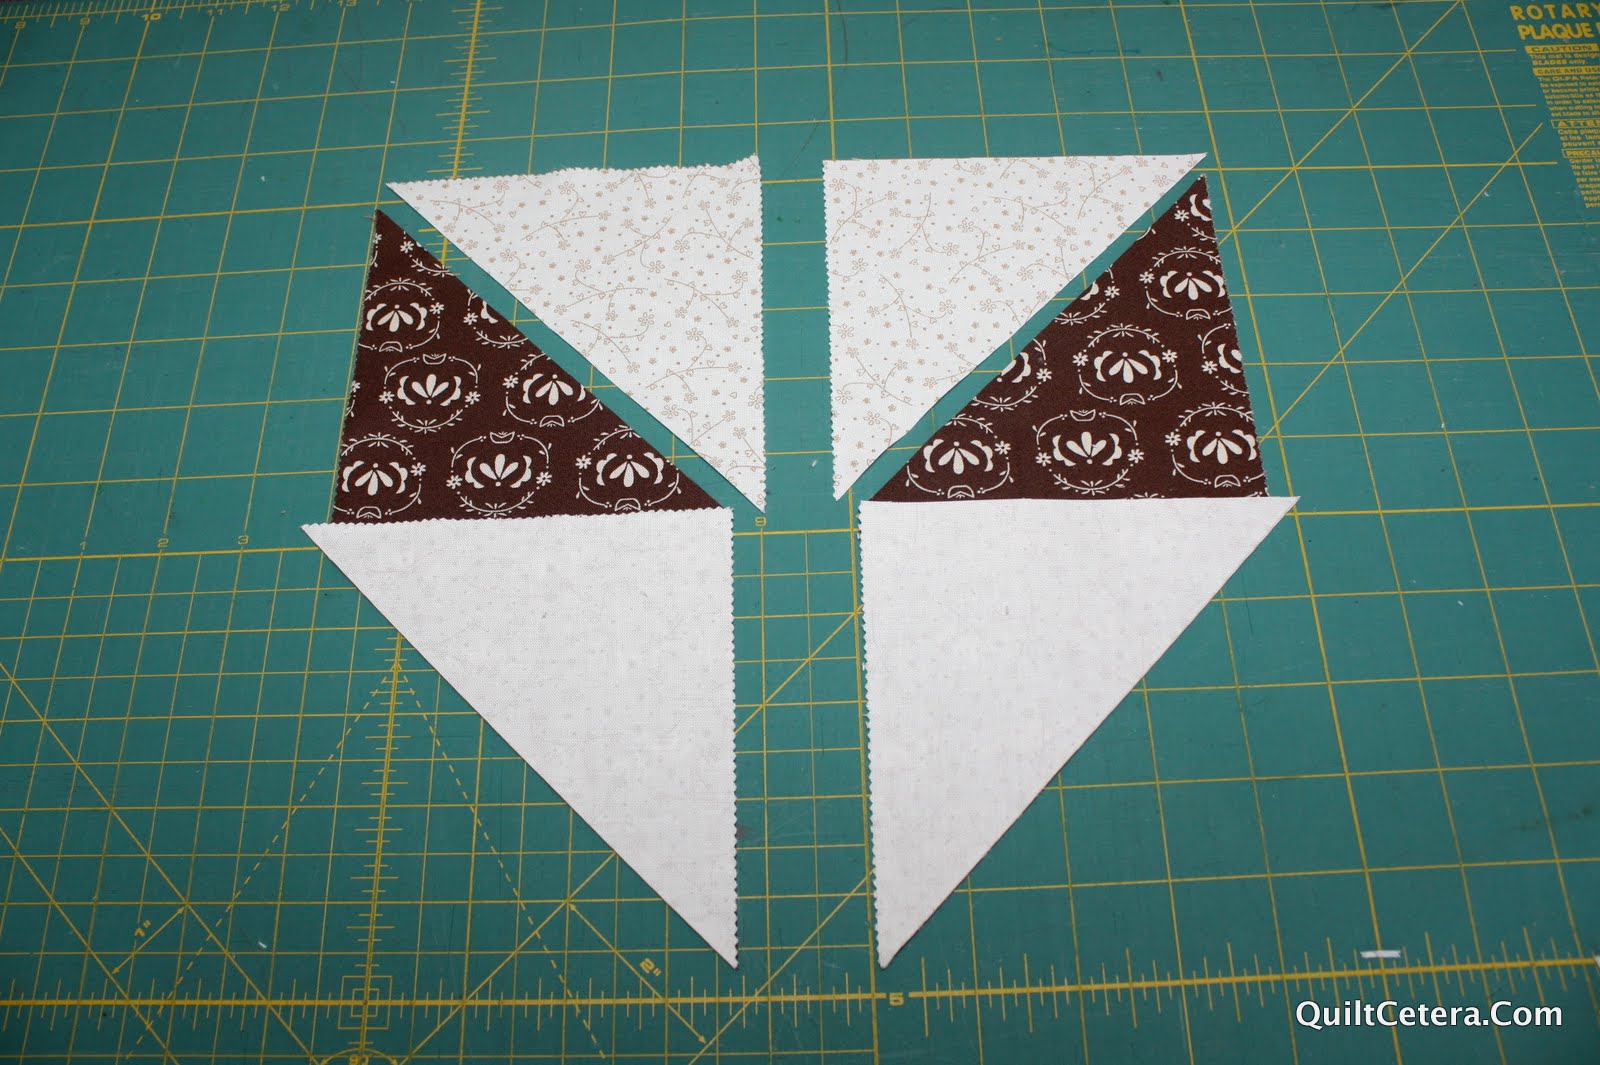
________________________________________________

Setting triangles:

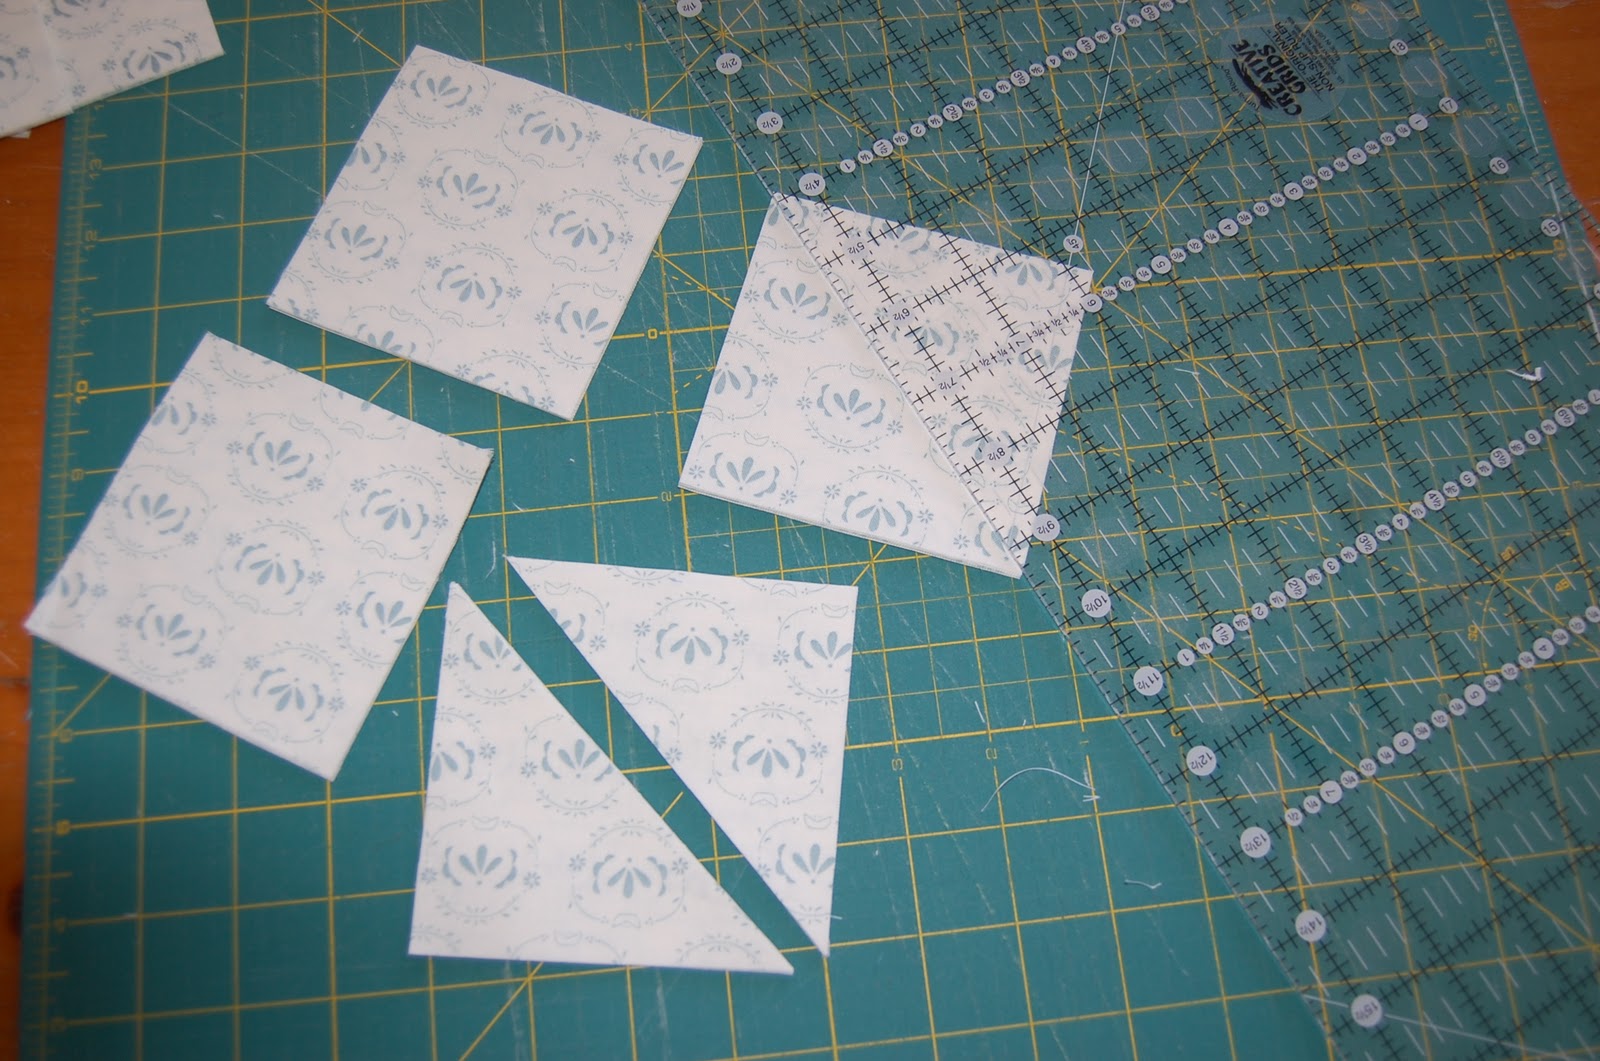
Start by making a template.  I use freezer paper, but regular paper (or something else you choose) would work too.  Trace the diamond on to the freezer paper, and cut it out.


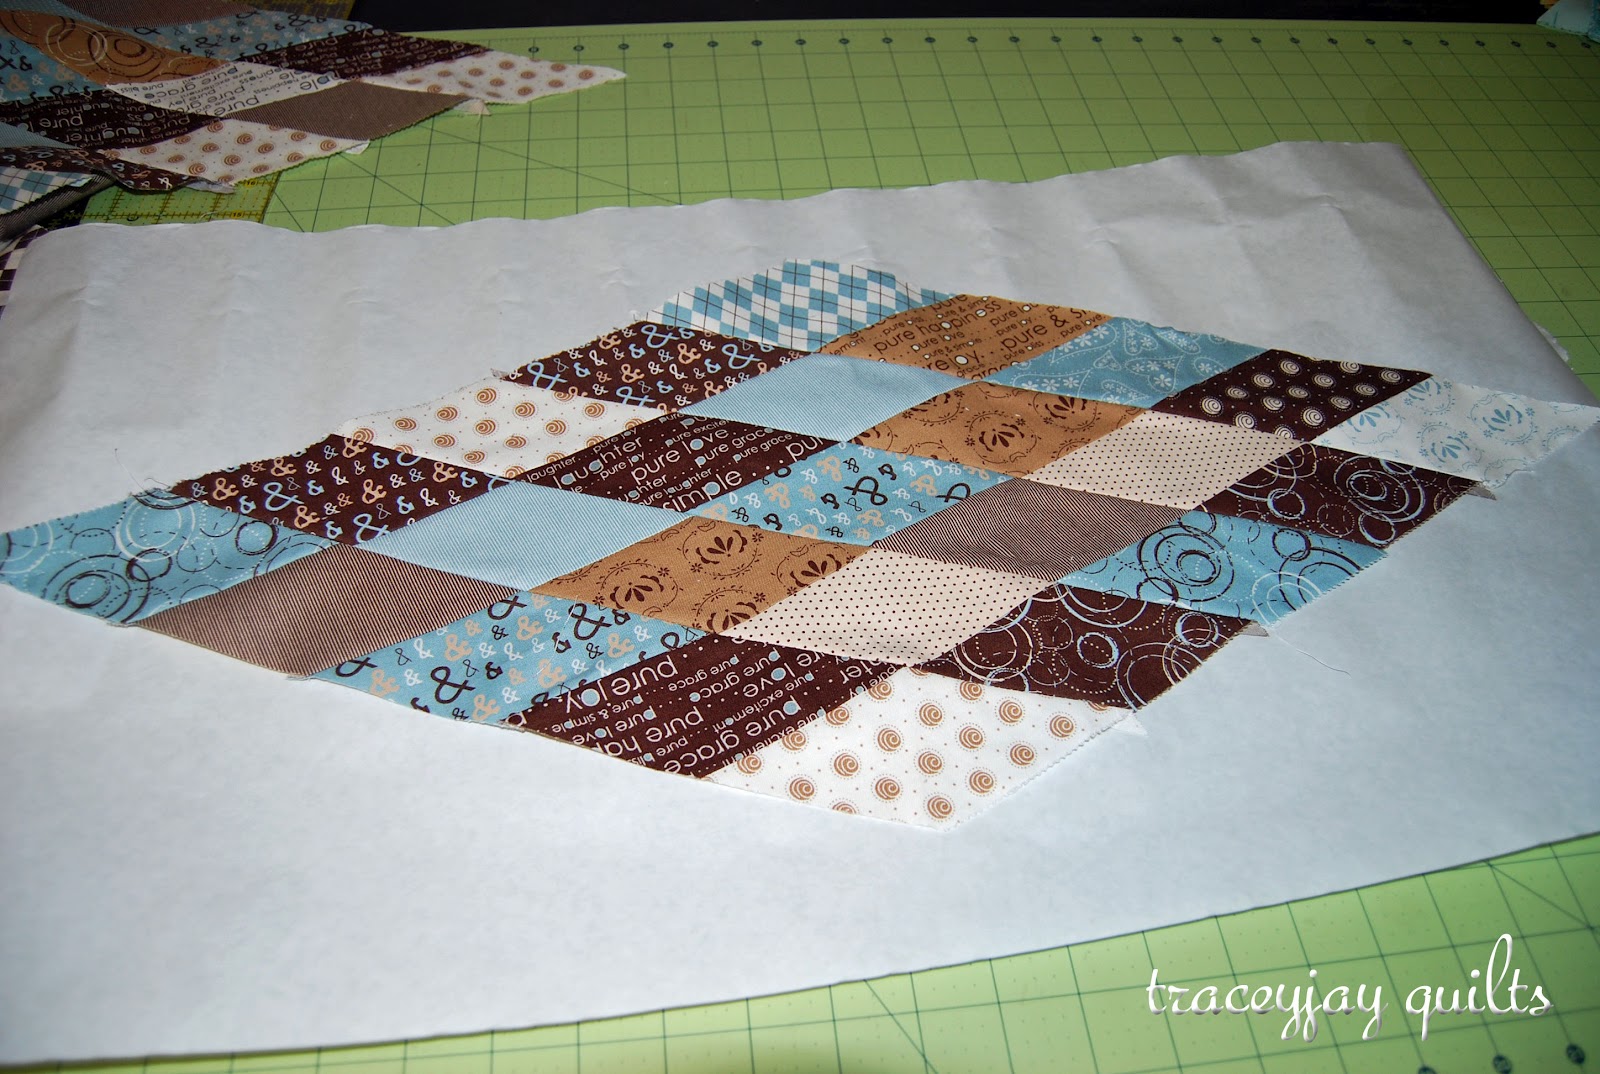
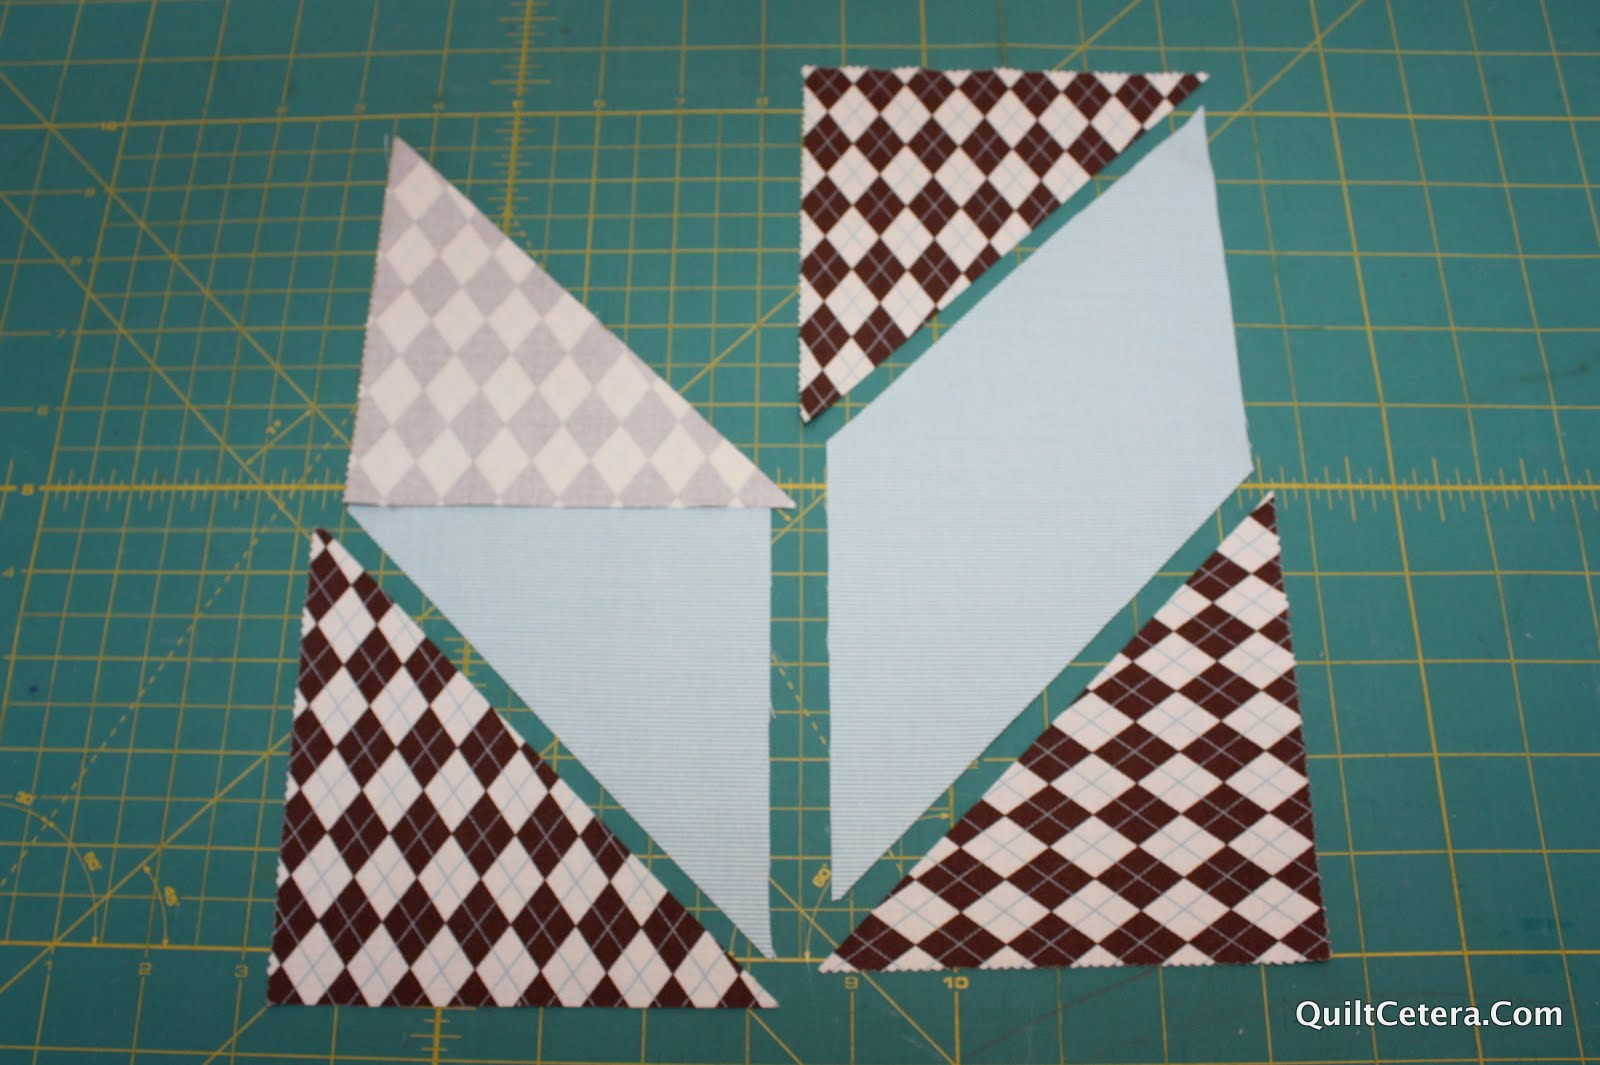
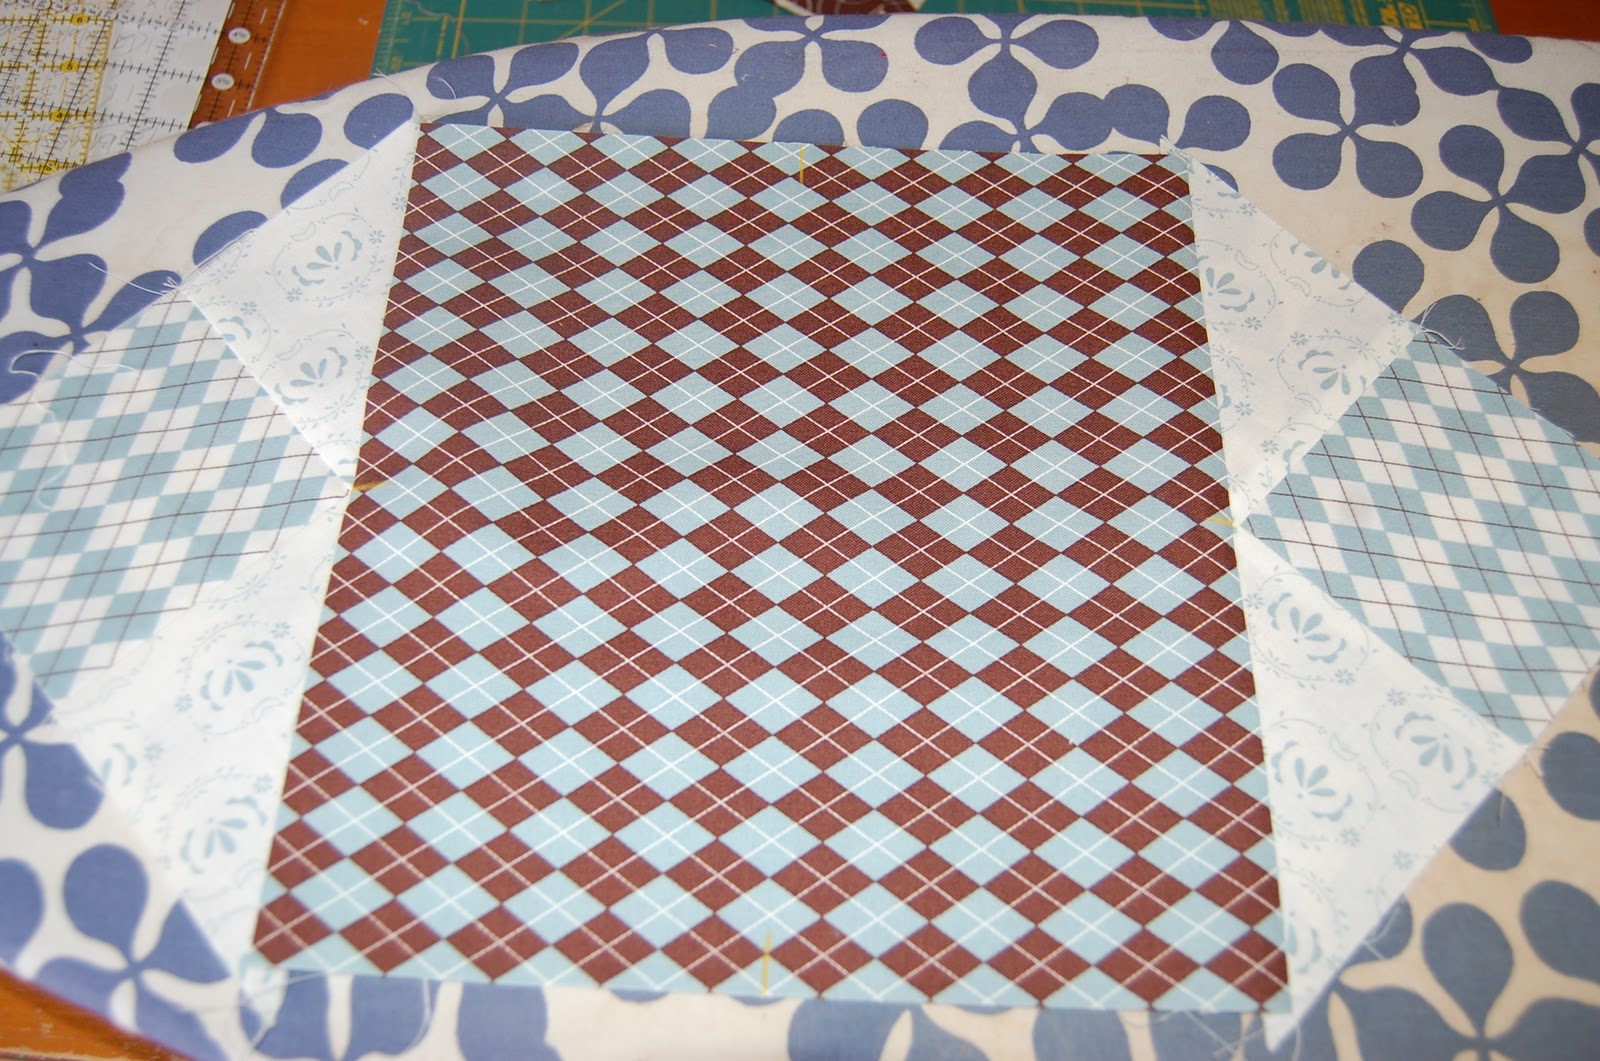
Using the template, you need to make setting triangles for your sides, corners, and top/bottom.  Depending on your fabric choice (if it is directional or not), you will need to pay attention to how you orient your template.  I like freezer paper because I can just iron it down, and then use the rotary cutter to cut my setting triangle.

This is an example of a corner setting triangle (the top right to be specific)  You want the fabric to extend past the mid point of the diamond shape.  It helps to draw midlines on your template (vertical and horizontal through the centers) so that you can make sure your setting triangle is larger than those midlines.

This shows how the template is placed for the bottom middle setting triangle.  When you cut — extend the lines straight at the bottom (rather than cutting along the template edge — the black line in the picture shows the cutting line).
Here is how the side setting triangles will be.  Again — extend the cutting line past the midpoint, and cut straight past the edge of the template like you did with the other pieces.
Lay your blocks out as shown.  If using dark sashing, place the blocks with light at the points for the top three, then dark for middle two, and light again for the bottom row.  You can see how the setting triangles will be arranged with the blocks.  (and yes, having tractors to watch really does help). 😉

This picture also shows how your rows will be sewn together (diagonally).


 Cut and piece 1 1/2″ strips long enough for your length of sashings.  You will need some “short” sashing strips (that go along the edge of the blocks/setting triangles in one direction, and some “long” (that go along the edge of the rows to join the rows together).  Use your template, or measure the edge of your block, and make sure there is enough length to fully extend past the edge, so it can be trimmed later (this is important when dealing with bias edges.

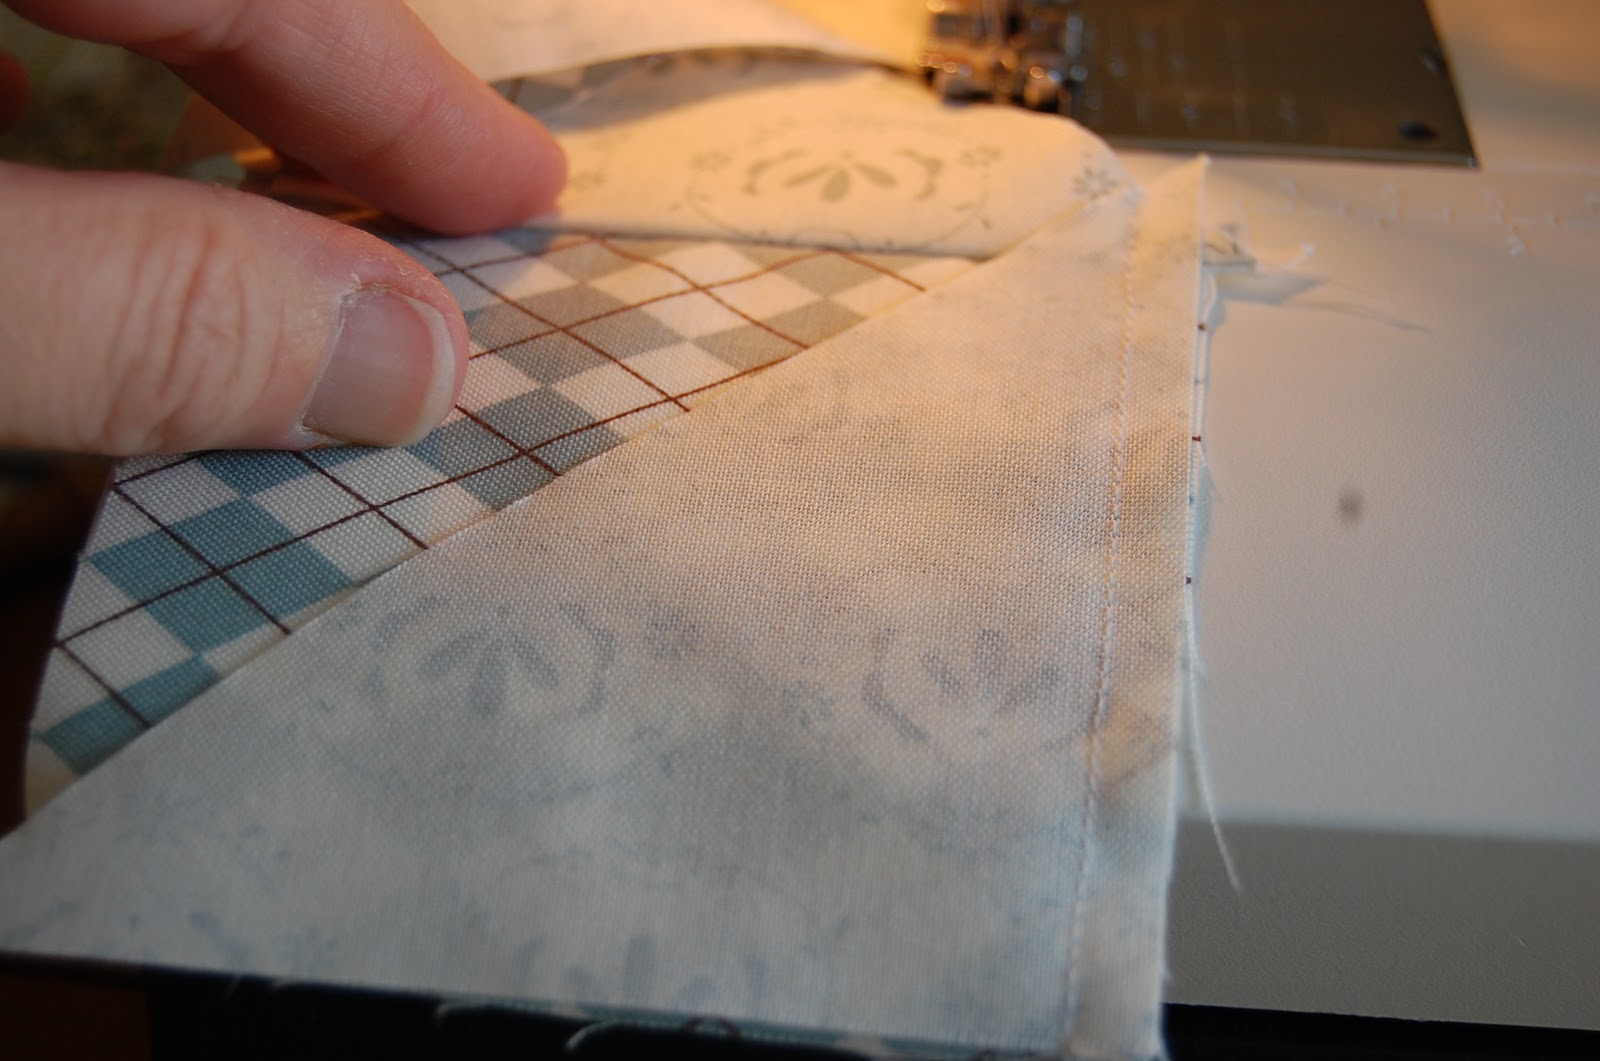
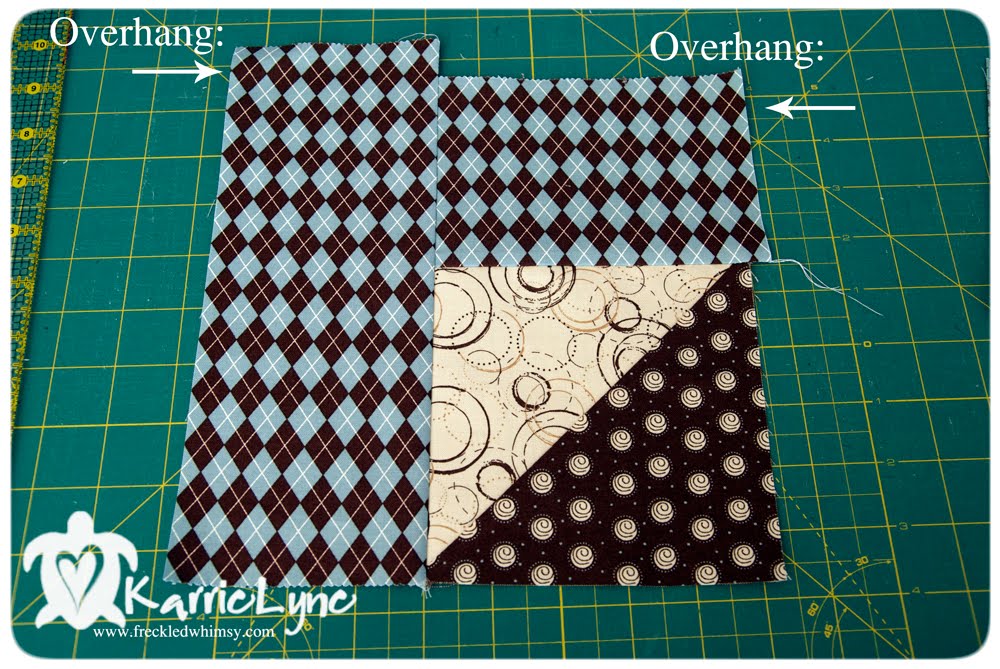
Sew a length of sashing along the “short” edge of your setting triangles or block.  The end of the sashing will extend past the end of the triangle or block.  Use your ruler to trim the edge.

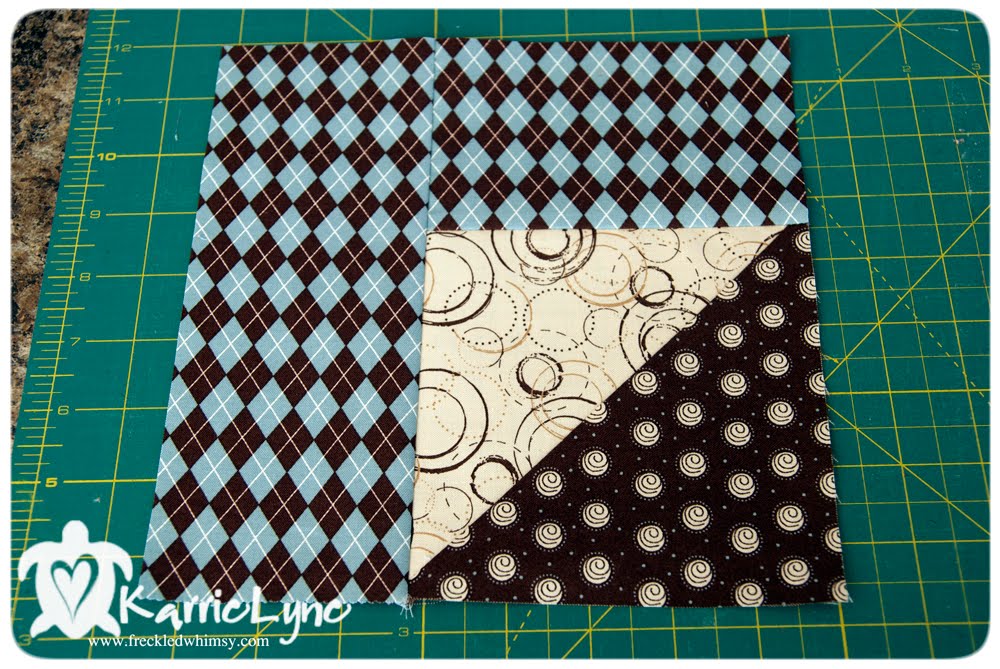
Here is the “short” piece of sashing trimmed.

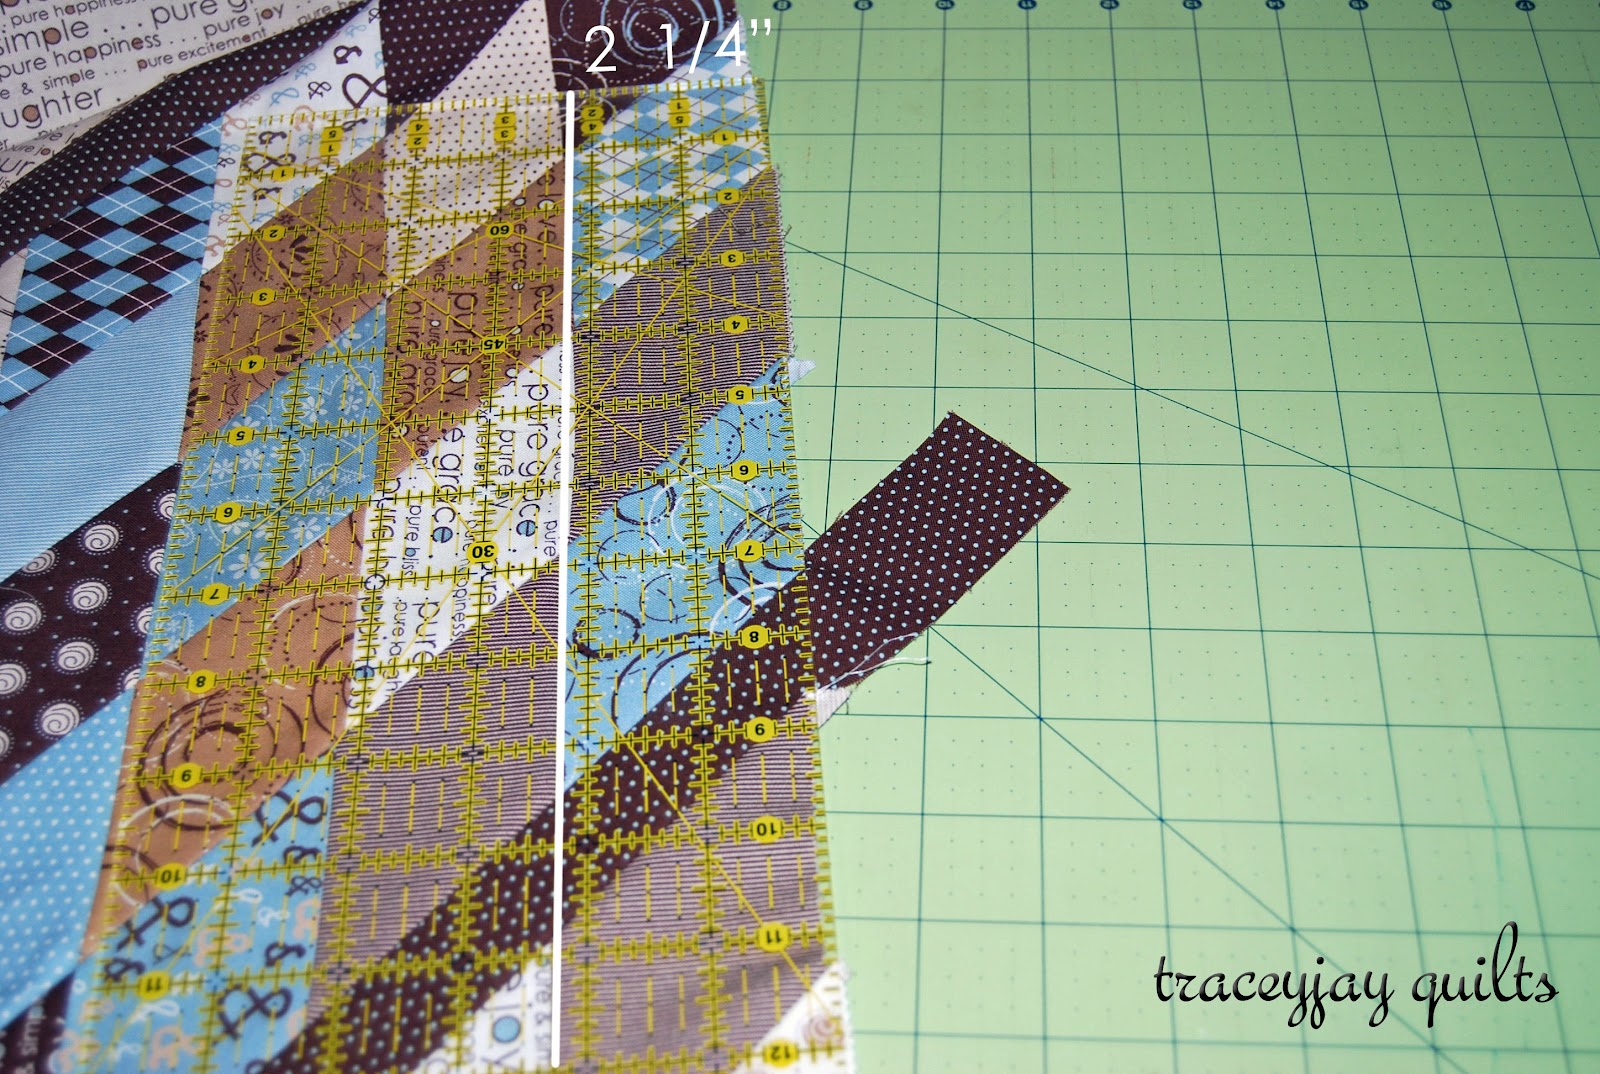
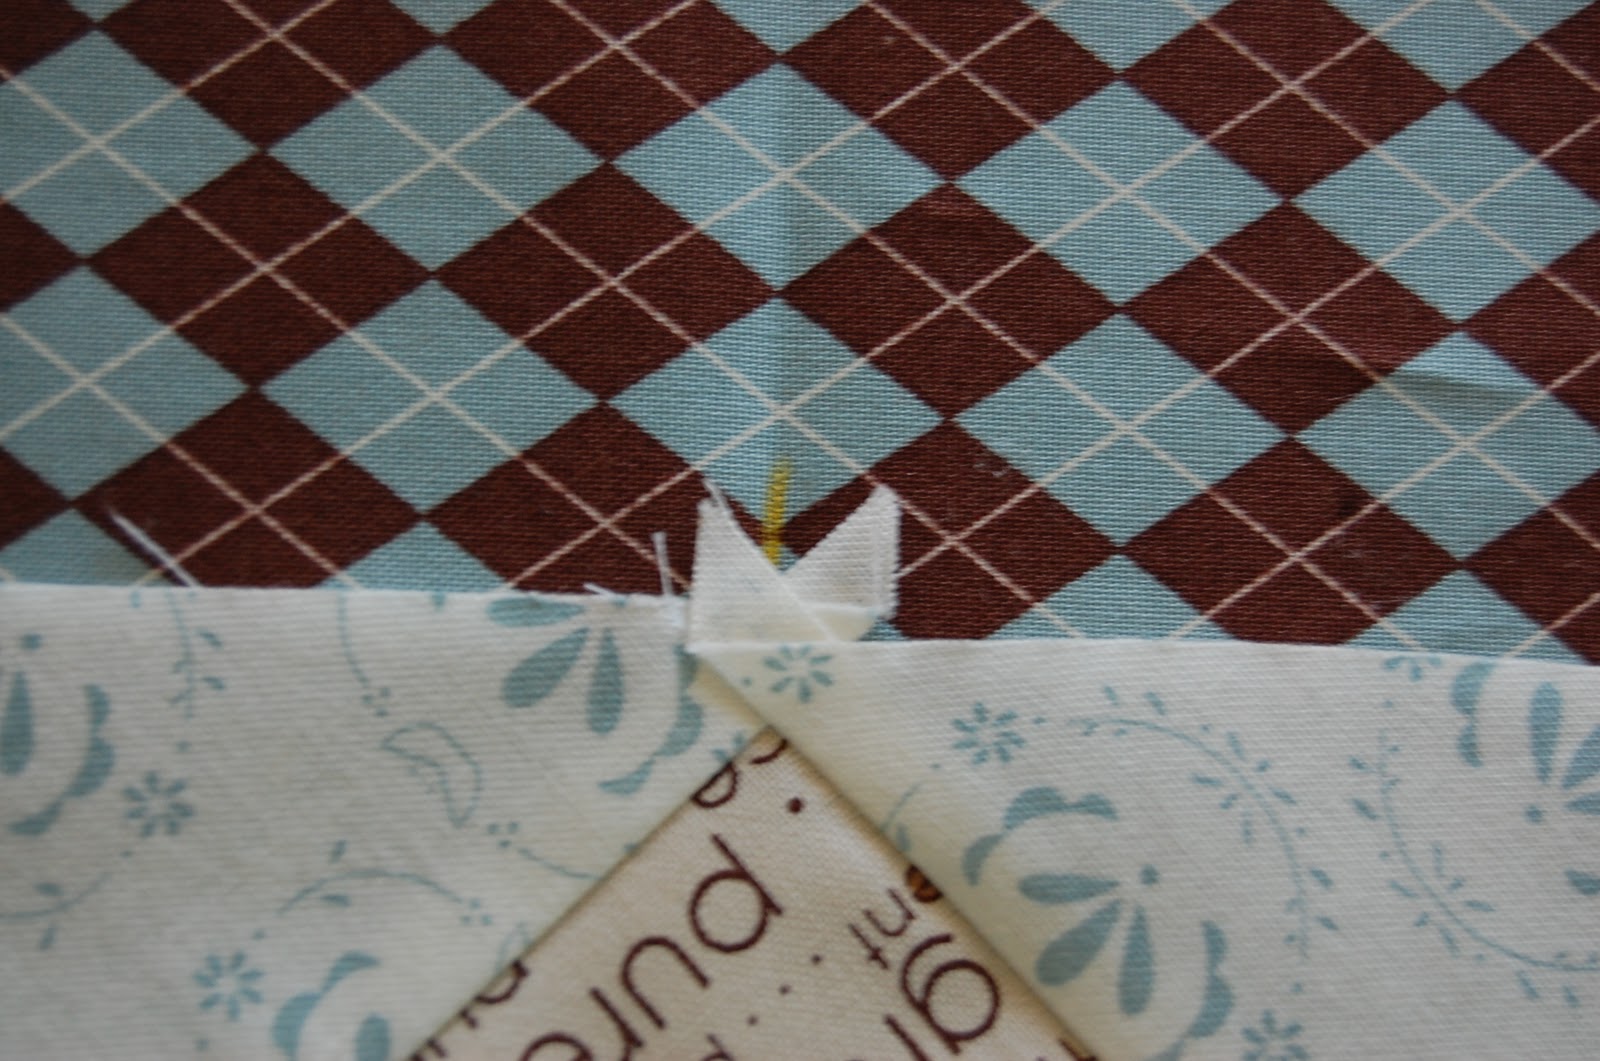
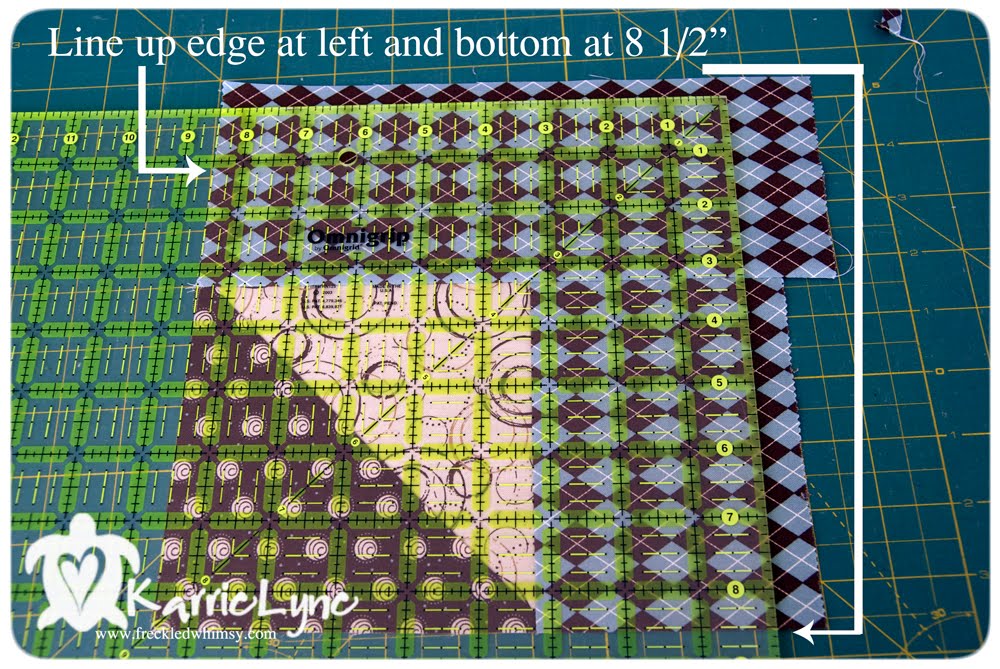
When joining two blocks together along the “short” edges, use your quilting ruler and measure 2 1/4″ from the edge (as shown in picture), and then trim the overhang of the sashing.

Piece your blocks and triangles together in diagonal rows, and then join diagonal rows to one another, with a long strip of sashing in between.

It can be tricky to join the rows of diamonds lined up when adding the sashing — I pressed a 1/4″ seam along one edge (similar to when joining the strip-pieced sections for the blocks), and then used a pencil to mark where the sashing needed to line up in order to make a straight line of the “short” edges.  (This is another one of those spots I mentioned earlier where I did some “winging it,” and you might be able to tell from the picture that particular seam was ripped at least once so I could get it right.)

Square up your top (I did not have precise measurements here — I just did my best to even out all my edges!), add a 5″ strip or pieced charm squares on each side, and you’ve got a quilt top!

Make your backing; Layer; Baste; Quilt; Bind — Done!

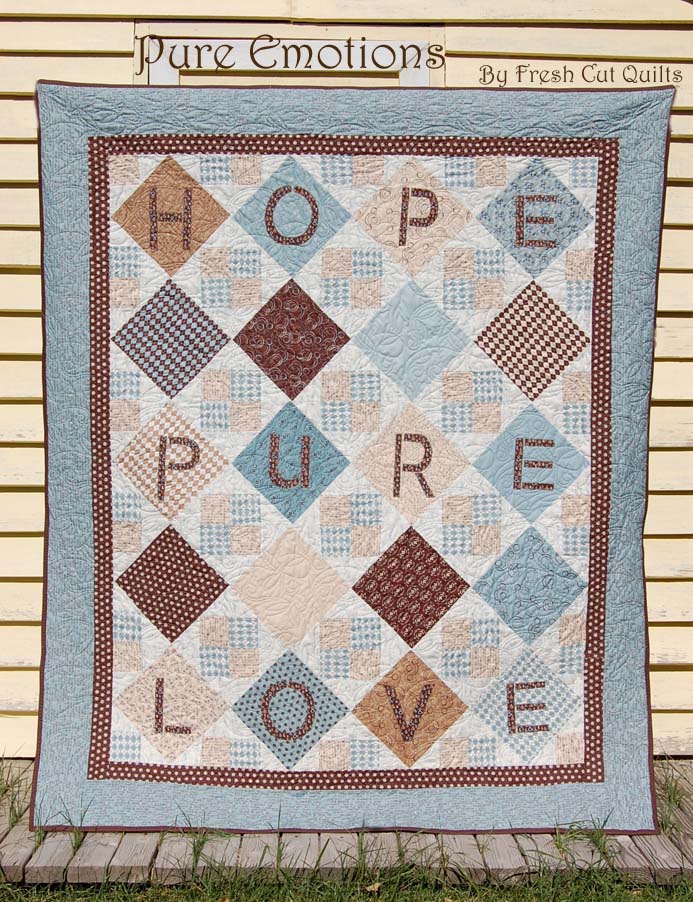
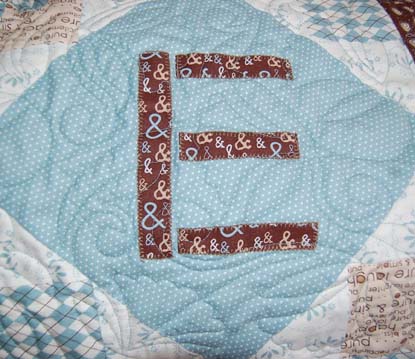
For the variation of this quilt I did for my niece Libby, in Sunkissed, I framed each block with a coordinating solid, then sashed in white, used assorted fabrics for the setting triangles, and used a charm pack for the side borders.  This makes for a bigger quilt overall — just make sure you use the block WITH the framing to make your template for the setting triangles.  The other steps for making this quilt are the same as described in this tutorial here.

Little diamonds for Libby

A very “sweet” quilt measuring about 42″ x 56″

If you decide to make this, I’d love you to stop by my blog and show me!  And please add pictures to my little flickr group!
Tracey Jacobsen

{traceyjayquilts.blogspot.com}


Pure Peaks and Valleys


Hey all you Moda Lovers! It’s Bradie, from A Quilty Kind of Girl here once again to share another Moda Precut pattern. When I first saw this gorgeous line of fabric designed by Sweetwater, I knew it was time to make a boyish quilt. The very next morning I woke with inspiration, and this quilt idea began.
Ready to have some PURE fun? 😉
For this project you will need:
One Pure Layer Cake
TWO Pure Charm Packs
Half yard of Natural and Craft # 5435-13 for inner border
1 3/4 yards Cocoa Baby Dots # 5436-20 for outer border and binding
4 1/4 yards backing fabric.
You may also purchase all the fabrics you need for this quilt from Fat Quarter Shop!
Begin by selecting two layer cake squares with good contrast. Place one on top of the other, both with right sides of fabric facing down. I chose to keep the lighter fabric on top, so the marking lines (explained in next step) will show a little better.

Choose 36 layer cake squares in TOTAL which will yield 36 quilt blocks.
Set aside 2 layer cake squares to use in your borders.

Draw a horizontal line through the center of the layer cake (at the 5 inch mark.) You will use this as a reference line shortly.
Cut the pair of layer cakes in half VERTICALLY. Do not use the drawn line.
Draw four marking lines on the layer cake as shown in the picture. These will be used as cutting lines.
Cut on the drawn lines to separate the outer corners from the diamond shaped center.
Take the diamond shaped centers and trim their width down to 4 5/8 inches. I trimmed them all from the inside (as shown in picture) but also experimented afterwards with cutting the outer edge. I found that it does not matter which side you trim on. The shape will turn out either way.
Just for fun… hard to believe this will become an entire quilt!!
Switch out the center diamonds from each layer cake with the contrasting fabric. I like to lay them out and see how the fabrics look together.
Time to stitch these blocks together! It does not matter if you stitch the bottom corners first, you may stitch in any order you like. What DOES matter, is the triangle overhang. Note in the picture, how the extra length or the bottom corner triangle extends to the outside of the block. Arrange the fabrics as shown and stitch from the outer corner inwards. Also keep in mind that you are stitching BIAS edges (which means they can easily stretch out of shape) so stitch slowly and carefully. No racecar sewing on these seams please! 🙂

When you stitch the top corners, you will leave the overhang in the center, as shown in the picture. Begin your stitching from the inner side to finish at the outer corner.
Once you have attached the four corners, you will have two halves, which you may simply stitch straight up the center….
Which will finish up looking just like this! At this point, it is wise to trim away the excess ‘dog ears’ and trim the block to measure 8.5 inches wide by 8.75 inches tall. Yes. It is true. Your block will not be a square, but slightly rectangular!

Make 36 blocks in total.

Layout the blocks in 6 rows of 6 blocks. I played with the layout a wee bit, but found in the end…. they look good regardless of where they land! Sew your blocks together into the 6 rows. Finish the inner body of the quilt by sewing the 6 rows together.

Cut 3 strips of white inner border fabric which measure 2.5 inches in width. Sew the 3 strips to each other, then cut TWO strips which finish at 2.5 inches by 49.5. THESE WILL BE THE SIDE INNER BORDERS. Pin, and sew to the quilt sides.
Cut 3 more strips of white inner border fabric 2 inches in width. Again, sew the three strips together, and then cut TWO strips which finish at 2 inches by 52.5. THESE WILL BE YOUR TOP/BOTTOM INNER BORDERS. Pin and sew to the quilt top/ bottom.

This difference in strip width will bring the quilt back to a square. Which will make adding the next borders MUCH easier. 🙂

Now to play with our charm squares!
You will 52 charm squares in total. Pair each charm with another high contrasting charm.

Draw a vertical line down the center (2.5 inch mark) of one charm from each pair. Place charms together with right sides facing.
Sew a quarter inch seam on each side of the marked centerline. I chain pieced mine and did all the left side seams first, then turned it around to stitch all the seams on the remaining side.

Here’s a closer look at the chain-pieced charms. Trim apart all your charms.

Cut on the marked line to create TWO (2) color charms.

Sew together 13 two color charms to create a keyboard border. Make FOUR strips in total.
Attach one keyboard border to the top, and another to the bottom of the quilt.

Using one of the reserved layer cake squares from earlier, cut the 10 inch square, into FOUR 5 inch squares. Sew a 5 inch square to both ends of the two remaining keyboard borders. Sew these two borders to the sides of the quilt.
Take the second reserved layer cake square, and cut it into FOUR 5 inch squares. Cut 8 strips of brown outer border fabric, 5 inches wide. Sew the strips together in pairs, and trim each one to measure 5 by 61 inches.
Pin and sew two borders to the top and bottom of the quilt. Sorry you can’t see the borders very well…. they match my hardwood floors quite beautifully don’t you think? 🙂
Attach the 5 inch layer cake squares to each end of the two remaining border strips. Pin and sew these last two strips to the sides of the quilt.

Quilt as desired.

The end result? A beautifully boyish cuddler size quilt which measures 71 inches square.

Bradie Sparrow
{A Quilty Kind of Girl}

Pure Emotions


This quilt would be a perfect gift gift for someone who is enduring a challenging time in their life.  The words bring inspiration and uplift everyone.  What is better than pure Hope and Love in hard times?  For me this quilt reminds me of my many blessings and to be ever-thankful.  I hope it does for you as well.

Kits for this special quilt can be purchased HERE through Craft Town Fabrics.

1 Pure by Sweetwater Layer Cake
1 yard Background Fabric White Vintage #5432-11
1/2 yard EACH of 5433-12 Argyle and 5430-14 Simple in Latte for the small squares in each block
1/2 yard Ampersand in Cocoa #5438-18 for block letters
1/2 yard Sweet in Cocoa #5435-20 for the inner border
1 1/4 yards Simple in Splash #5430-17 for the outer border
5/8 yard Baby Dots in Cocoa #5436-20 for the binding
4 yards Snuggle Solid in light Blue for the backing
1 yard Heat n’Bond Lite or Wonder Under fusible web for the Block Letters


Thread to match the letters, Click Here to download or print the Letter Templates

1.  Choose 20 Layer Cake squares to use for the quilt.  These should be a broad mix of colors from the pack.  Then trim to 9″ square. (Set aside the remaining 20 squares.  Those you will not need for the quilt top, but can certainly be used for the backing.)

2.  From the white vintage fabric cut (80) 4″ squares, then cut these squares in half diagonally once yielding 160 triangles.  You will use 8 per block.

3.  From the Argyle and Simple fabrics cut (40) 3 1/2″ squares of each.

4.  Choose 12 of the Layer Cake squares to be used for the letters.  These should be lighter in coloring than the Brown Ampersand fabric so the letters stand out a little.  
5.  Trace the letters on to the paper side of the fusible web.     
6.  With a hot iron fuse the fusible web on the wrong side of the Ampersand fabric.  Leave the paper in place until you have cut out the letters.  
7.  Remove the paper and center one letter on each of the 9″ squares.  Iron to fuse the letters in place.  Using a matching thread buttonhole stitch (or any decorative stitch will do) around the edge of each of the letters.  Now all your block pieces are ready for piecing.
8. Take 2 of each of the 3 1/2″ squares and 8 triangles.  Lay out 1 triangle on each side of one of the 3 1/2″ squares.
9.  Pin and sew one triangle to the right side of each square.  Press the seams toward the triangle.

10.  Take the 4 triangles and pin and sew to the side of the square as you can see in the photo.  The right angles of the square and rectangle at the bottom of the photo are lined up.  This is important so you keep your 1/4″ seam where the triangles match up.  

11.  Press the seam toward the triangle

12.  You should have 4 setting triangles, two in each color.

13. Fold the center square in half and then in half again.  Finger press along the folded edges to make a slight crease.  Note the yellow pencil mark in the photo below.  This is the center of one side of the square.
Unfold the square and lay one setting triangle at the center fold of the square.  The point of the square should line up with the crease.
14.  Pin and sew two matching setting triangles on to the square.  

15. Press toward the square.

16. Place the 2 remaining setting triangles on to the sides of the square and line up the crease marks with the center of each triangle.  Pin, sew and press.  Make sure the argyle print squares always have the same placement so the secondary design of four-patch blocks comes through.

17. Trim the block to 12 1/2″ square.  Repeat steps 8-17 for the remaining 19 blocks.

Layout the blocks in 5 rows of 4 blocks each.  The top row should spell out HOPE, then is a blank row, then the center row spells out PURE, then another blank row, the last row spells out LOVE.    Pin and sew the blocks into rows and then pin the rows together to create the quilt top.

18.  Cut (7) 2 1/2″ x width of fabric (WOF) strips for the inner borders.  Piece the strips together end to end.  Measure the quilt top through the center horizontally to determine the top and bottom measurement.  Cut two inner border strips to that measurement.  Pin and sew to the quilt top.  Measure the quilt top vertically to determine the side measurements.  Cut the side inner borders to that measurement and pin and sew to the quilt top. 
19.  Cut (7) 5 1/2″ x WOF strips for the outer borders. Repeat step 18 in the same manner for cutting and sewing the outer borders to the quilt top.
Now the quilt is ready for quilting and binding!

I chose to use the Snuggle solid in light blue for the backing.
Wendy Nabhan of Eagle Mountain Quilting long-arm quilted this for me using the design Gentleness by Anne Bright.
Thanks for taking the time to check out this tutorial.  If you would like to see more of my designs you can check them out on my blog freshcutquilts.blogspot.com or at www.freshcutquilts.com 


1 Lap quilt measuring 63″ x 75″ to treasure always.

Kari Ramsay

Blueberry Chocolate Squares

Hello again, my friends!

I am so happy to be back at Moda Bake Shop and presenting you with Blueberry Chocolate Squares! Mmmm…everyone loves chocolate, right? 🙂

This quilt is really simple and it goes together so fast. I actually pieced AND quilted it in 3 days!!(Results may vary. I’ve always wanted to say that…lol)

Once you’re finished here, I’d love for you to come visit me over at Freckled Whimsy! More dorkiness guaranteed. 😀

Also, Leah over at Burgundy Buttons is kitting this up, just for you and at a reduced price!!! Click HERE to snag one up before they are gone!  She also has the backing on sale HERE! Thanks Leah!!!

Isn’t it cute?! 🙂

Enjoy…Blueberry Chocolate Squares….

  • 1 Pure Layer cake 
  • 1/2 yard for 1″ border (I used 5431-12)
  • 1 1/4 yards for 4″ border (I used 5438-18)
  • 1/2 yard for binding (I used 5436 16)
  • 4 yards for backing (I used 5430-21)

Note: All seams are sewn with a 1/4″ seam allowance. 

From  your layer cake, choose 36 squares. The more contrasting they are, the better.

For each of the 36 pieces, follow these cutting steps.

1.  Cut a 5 7/8″ strip from layer cake piece

2. Turn that SAME piece 90 degrees and cut it at 5 7/8″. You should now have a 5 7/8″ square.

3. As you cut each piece, put them in 3 separate piles.  You may want to keep lights and darks separate.

You should have 36 each of:

  • 5 7/8″ squares
  • 4 1/8″ x 5 7/8″ rectangles
  • 4 1/8″ x 10″ rectangles

Note: You *can* cut all pieces of the layer cake this way. (Most will have 40-42 pieces). Doing this will give you some of each fabric and more variety. You will just have extra pieces when you are done. 🙂

Once you have all of these cut, you can start piecing your quarter blocks.

Begin by taking the 5 7/8″ squares and pairing them up. Choose contrasting colors. You need 18 pairs. (Remember if you cut all your layer cake pieces, you may have extras here. Just put those in your scrap bin.)

Taking your first pair, on one side of one of the squares, draw a line from corner to corner on the WRONG side.

Place this piece RIGHT sides together with the contrasting square and sew 1/4″ on either side of that drawn line.

Now, cut on that drawn line, yielding two half square triangles (HST). Press to the darker fabric.

You should now have 36 half square triangles.

Each HST will be paired up with the other rectangles you cut from the layer cake. One in each size in the SAME print.

Choose a HST and the border print. Contrast is good here too.

Take the smaller rectangle and sew it to the top of the HST. Make sure the edges are lined up on the LEFT side. Sew across the top edge. You will have some overhang on the right. This is ok. Just leave it for now. 🙂

Press toward the piece you just sewed on. 

Make sure you mix up the positioning of your HST. Example: In the photo below, the light color fabric is in the upper right corner. Change this up using some lights, some mediums, and some darks, in each of your blocks.

Next you will sew on the larger rectangle. Line up the LEFT and BOTTOM edges. Again, you will have hangover, this time at the top.

Press to the rectangle.

This is what your block should look like.

Next up is trimming.

First, trim the overhang on the right side, lining up your ruler with the edge of the HST. Cut.

Rotate the block 90 degrees CLOCKWISE. (See photos)

Line up the LEFT and BOTTOM edge of the block with the 8 1/2″ marks on your ruler.

Trim the right side and top.

Your quarter block should now measure 8 1/2″ square. 

Repeat until you have 36 of these quarter blocks.

Note: To make this go faster, stack up your HST and chosen rectangles, one on top of each other, still in 3 piles,  until you have all 36 stacked. Then you can chain piece, starting by sewing on all the smaller rectangles to the HST, press, then adding the larger rectangles, press.

Time to arrange your blocks.

Choose 4 of your quarter blocks. Arrange them so the HST are in the center.

Sew the top two blocks together, pressing to one side.
Sew the bottom two blocks together, pressing to the opposite side as the top. 

Sew the top and bottom together.

Repeat this process until you have 9 blocks that measure 16 1/2″ (unfinished).

Arrange in a pleasing order and sew the blocks as a 3 x 3 grid.

From the first border fabric cut 1 1/2″ strips and sew in place.
From the second border fabric, cut 4 1/2″ strips and sew in place.

Now you are ready to sandwich your quilt, baste, quilt, and bind. 🙂


This quilt will measure about 58″ x 58″.  Isn’t it cute? 😀

I hope you have enjoyed this tutorial! If you make this quilt, please oh please share it with me? You can email a photo of it to me HERE or you can add it to my Flickr Group HERE.  I would love to feature them on my blog! 🙂

Much Love and Happy Quilting!!

Karrie Lyne
{http://www.freckledwhimsy.com}

Pure Comfort

Hi everyone! It’s Cara from CaraQuilts and I’ve got a project for all of you who are always chilled, or live with someone like my husband who is always hot, and therefore makes the house cold!!

This is a quilted wrap/shawl, and all it takes is one jelly roll! Very little waste in this one. And it’s easy! And fast! What else could you ask for?? I have to tell you I’ve pretty much lived in this wrap since I finished it.

Like any pattern, please read through it completely before starting. If you have any questions at all, just e-mail/message me over at my blog and I’d be happy to help! Oh, and make sure to let us know if you like the pattern! 🙂


1 Pure Jelly Roll
1 3/4 yards Snuggles Chocolate, backing
1/2 yard binding


3.5 yards Pure twill tape (see option)

Center Section

Separate 29 strips for the center section of the wrap. Cut these down to 25 1/2″. Take the cutoffs and trim them down to 16 ½” and set aside for use in the side sections.

Sew the center section strips together, alternating direction to help prevent stretching. Press well, all in one direction. Clean up the sides so they are even. Measure the length of the wrap; this is how long your sides have to be. It should measure 58 1/2”.

Sides
Take the remaining full length strips and cut them down to 26½”. Attach one cutoff piece to either end of the 26½” strips. Arrange the strips in whatever order you like best and stitch together into (2) 6 strip pieces.

Alternate the strips coloring, both in the middle and end strips.

Note: If making for either a plus size (because I love you all I’ll admit to being a 14, which will give you a perspective) or someone tall (over 5’10’’, again because I love you, I’m 5’8”) you may want to make the wrap wider. To do this, cut two extra 2½” strips from the binding fabric. Trim down to 26½”. Add 16 ½” cutoff strips to either end. Attach to the side sections. This makes the wrap 4½” wider, about 53½”. If you need to go any wider you will have to adjust the backing measurements, so you have room for it to shrink up as you quilt.

Cut 8 of the remaining cut offs to 141/2″. Stitch 4 strips end-to-end so that you have (2) four strip sections measuring 58 1/2″. Press in half, wrong sides together. Press in half again. Pin on the edge of the center section, layering the side sections on top. Stitch through all layers. Press away from the center.
Option: Instead of the folded strips, you could sew the side sections to the center, and press, and then use the twill tape that is available for the line, and place it over the seam, pinning well, and stitch on either side.
Baste and quilt. I would suggest not quilting very heavily as you want it to drape and wrap around you well. Too much thread will make it stiff, and you’ll lose some of the snuggley softness of the, well, Snuggles!

DO NOT BIND…yet anyways 😉

Now to make this a wrap and not a quilt.

Measure the entire piece and find the center, if you don’t have anything this long, just fold in half and press lightly. Mark this with chalk pencil or whatever non-permanent method you prefer.

From that point go up to the 16th strips from the bottom. Mark.

Go back to the bottom mark and measure out 2” on each side and mark.
Draw a line from the mark you just made to the 15th strip mark. Do this on both sides. Sew on the line all the way up, and repeat on the other side.

Cut out the center “triangle” a scant ¼” from the sewing line.

For the binding, you will need about 290″, including the 10″+ extra for corners etc.
I use 2″ strips for binding so if you use wider you will have to recalculate the yardage. Cut 7 strips.

Now you get to bind! Wrap up and enjoy some Pure comfort!

Be sure to take a picture and upload it to Bake Shop’s Flickr page so we can all see!

One adult size wrap/shawl! Get Cozy!

Cara Wilson

Bitty Boy Bean Bags and Backpack

The perfect handmade gift for the little guy who isn’t old enough for school, but loves to learn and play.
Guaranteed to provide hours of beanbag tossing fun.
How many can you hold?

1 Pure Layer Cake
18 inch by 1.5 inch strip of any coordinating fabric
26 small buttons
2 sheets of felt
1 large button
4 D-rings
1 yard of some sort of strap
1 yard of giant ric rac
1 shoestring

We’ll start with the backpack.  Working with a layer cake made this project a whole lot easier.  Take four squares and cut two in half. 

Sew the whole square to the half.  Be sure to leave a quarter inch unsewn at the bottom.
Continue this until you have a tube for the main part of the pack.  Sew a half piece to the bottom where you left the quarter inch unsewn.

Repeat this exact process again, but add your straps this time.  I made the straps about a foot long each and sewed them in at a 45 degree angle.

Now you have your lining and your outside.  (I inserted a piece of think plastic like you’d find on a thin binder, between these two layer to shape the pack a little more.)  Insert the lining.

Let’s move on to the shoulder straps.  Cut one of the squares into fourths the long way.  Add a layer of batting and sew the long sides.  Invert and sew on the rick rack.  Tuck under the fabric to sew one end of the strap closed, but insert a loop of your strap fabric with the 2 D-rings on it.  Do this for both straps.  Pin straps in place and sew the tops of them to the outer layer.

Cut another square in half and sew the edges to create your flap for the backpack.  Sew a loop into it of you want a loop for a buttonhole (as shown below).  Sew this flap across the top as you did the straps.
Create a casing for your drawstring by folding over an 18 inch by 1.5 inch strip (with finished ends).
Next is the tricky pinning part.  Fold over the lining and the outer bag and insert the casing.  Pin all around the back.  (You will have a lot to fold over in the back – the straps and flap.)  Sew it as close to the casing as possible.

Lace the shoestring through the casing and tie.  Sew on your large button.  All done!

Now on to the bean bags.  Cut each square into four 5″ squares.  I prefer to mix up all the different fabrics.  Sew one button onto every other square.

Invert 2 small squares and sew together.  Clip your corners.  Invert the bags and fill.  I use spilt peas, since they are cheap.  Tip: Cut off the corner of the spilt pea bags so you can pour them into the bean bag more efficiently.
Sew them shut.  Take your sheets of felt and cut them into three-inch strips (to make sure all the letters will be the same height).
Cut out each letter of the alphabet.  They don’t have to be perfect, just legible.  Cut slits for buttonholes in each letter.  (Yes, some will end up being off-centered, but that’s okay.  They will still work and look cute).
Button each letter onto a bean bag. 

Not only will this little guy be learning his letters, but he’ll also learn how to button and unbutton.

But best of all, he can lug them around in his own little backpack everywhere he goes.

1 bitty backpack with 26 alphabet bean bags  (if you use the entire pack then one layer cake can make exactly 2 backpacks and 2 full sets of alphabet bean bags)
1 very happy boy (and 1 jealous brother and 1 jealous cousin)

From Cheri at I Am Momma – Hear Me Roar.  Stop in and visit anytime!

Pure Baby Boy


This simple, modern baby quilt uses just one jelly roll and 1 3/4 yards fabric and is put together with a strip piecing technique, making it both affordable and quick to finish. I’m thrilled to be posting my first design with Moda Bake Shop, and I hope you’ll enjoy it!

To see more of my work, please stop by my blog sometime at http://www.teaginnydesigns.blogspot.com/ or my etsy shop http://www.teaginnydesigns.etsy.com/

Thanks!

1 Pure Jelly Roll
3/4 yard of binding fabric, I used 5436 16
1 yard Moda Bella Solids in White
Crib sized batting

Step One

Cut:
2 strips from your binding fabric of 1.5 x 42.5 inches
1 strip 7.5 x 42.5 white
1 strip 15.5 x 42.5 white
Cut the remaining white in half horizontally. My two strips ended up being 6.75 x 44 inches.

Select 24 jelly roll strips for the top of your quilt. Cut them in half vertically, resulting in two strips 2.5 x 22. I just snipped along the crease the fabrics will have from being folded in the jelly roll. Set aside half of each jelly roll strip for another project.

Reserve remaining 16 strips, whole, for the backing of the quilt.

Step 2
Group your 24 half jelly roll strips into four sets of six. Try to get a good mix of colors and patterns in each set.
Step Three
Sew together six strips. Press seams open. Repeat for all four sets of six.Step Four
After squaring up the edge of the stripset, cut 2.5 inch strips. You will need five strips each from three of your stripsets (15 in all) and six from one stripset, totaling 21 strips.Step Five
Lay out your stripsets in a way that pleases you and sew the strips together to result in a rectangle that is 6 squares wide by 21 squares long. Press seams open.Step Six
Join the two pieces of the fabric you cut earlier into 1.5 inch wide strips to either side of your squares for the front of the quilt. Press seams open.

Then join the 7.5 inch wide strip of white onto the left side of the squares and the 15.5 inch strip of white to the right side of the squares. Press seams open. You’ve completed the quilt top!

Step Seven
Sew together the 16 strips you reserved for the back. Press seams open. Sew the remaining white strips to the top and bottom of this stripset. Press seams open. Now the back is done, and you’re ready to make your quilt sandwich and baste.
Note: this makes a back that is wider than the top by the usual amount, but is only about 1 inch longer on the top and bottom. If you prefer more overhang, you have enough fabric for the binding to cut and add one or two 2.5 inch strips to the back when you are making the stripset. I had no problem with just the inch overhang at top and bottom.
Step Eight
Quilt as desired and bind. I quilted it with straight lines about .5 inch apart using white thread. My binding was 2.5 inch double fold binding.
36 x 42 inch baby quilt. You can also easily make some coordinating baby accessories from the stripset trimmings. I made a bib and a burp cloth – perfect for shower gifts.