Trifle Dish Quilt

Today’s instructions give fabric requirements for the entire quilt top plus backing and binding. Remember that there are many options when piecing the Trifle Dish blocks so you can make substitutions using other precuts for a more scrappy look. Several options are given.

  • 1 fat quarter bundle (at least 32 fat quarters) -OR- 52 layer cake squares {1 layer cake plus 5 fat quarters cut into 10 additional layer cake squares} + 12 fat eighths -OR- 5 charm packs + 12 fat eighths 
  • 4¼ yards background + whipped cream fabric
  • 41 layer cake squares for border (optional)
  • ¾ yard binding fabric (370″) | ⅝ yard binding fabric if you omit the borders (306″)
  • 9 yards backing fabric | 5⅛ yards backing fabric if you omit the borders


Links below will take you to the instructions for each individual row. For the entire set in one file, scroll to the bottom of this post for the Printer Friendly Version.

6 blocks measuring 9½” square + (5) 2½” x 9½” sashing strips = 64½” x 9½”

8 blocks measuring 8½” square + 0 sashing strips = 64½” x 8½”
 
{whipped cream}
13 blocks measuring 4½” w x 8½” h + (12) 1 ½” x 8 ½” sashing strips = 64½” x 8½”
6 blocks measuring 10½” w x 8½” h + (2) 2½” x 8½” end sashing strips = 64½” x 8½”
6 blocks measuring 9½” square + (5) 2½” x 9½” sashing strips = 64½” x 9½”
8 blocks measuring 8½” square + 0 sashing strips = 64½” x 8½”

5 blocks measuring 11½” square + (6) 2¾” x 11½” sashing strips = 64½” x 11½”


80½” w x 99½” h with borders | 64½” w  x  83½” h without borders

Today is our last installment of the Trifle Dish series and we want to see what you’ve been sewing! Link up to your blog/Flickr/Instagram at the end of this post to show us your blocks so far. We will leave the linky party open for a week and then choose 3 winners from the list.

Trifle Dish: Brick Borders

Today is the last instructional post in the Trifle Dish Sew-Along. Oda May will return with a full pattern download and a giveaway opportunity on July 7. She’s going to ask to see some of your blocks for the giveaway so start sewing!

 
To make the BORDERS, use charm packs and Moda candy to mix and match for a scrappy version. Layer cakes will yield more repetitive blocks and introduce a secondary pattern.
For EACH brick border block, you will need:
Fabric:
    • ( 6) 4½” x 2½” rectangles
    • (4) 2½” squares
    Block Dimensions: 8″ x 8″ (finished) / 8½” w x 8½” h (unfinished)
    The brick borders are the perfect opportunity to use up the scraps from the rest of the quilt.
    You will need an additional (2) strips of fabric measuring 2″ x 8½” to complete the side borders to the appropriate length.
    Suggested precuts: Charm packs, layer cakes, Moda Candy
     
    1. Arrange fabric pieces as shown below and sew rows together, pressing each seam as you go. 
     
     2.  Join rows to create the block.  Because there are no seams to match, press seams open or to the side (whichever is your preference).


    You will need 8 blocks each for the top and bottom borders and 12 blocks each for the side borders (total of 40 blocks).

    3.  Join 8 blocks to create the top border. Repeat to create the bottom border. Attach to the quilt top.

     
    4. Join 12 blocks to create one side border. Add 2″ strips to each end of the border and attach to quilt side. Repeat to create the other side border.
    4 borders: 
     

    {Top Border}

    8 blocks measuring 8½” square + 0 sashing strips = 64½” x 8½” 
    {Bottom Border}
    8 blocks measuring 8½” square + 0 sashing strips = 64½” x 8½”
    {Side Borders}
    12 blocks measuring 8½” square + (2) 2″ x 8½” end sashing strips = 99½” x 8½”
    {per border}
    Block design by Cheryl Brickey of {Meadow Mist Designs}

    Trifle Dish: Assemble the Layers

     Today we are adding the whipped cream between our trifle dish layers!
     

    • Completed layers 1-8
    • 1 yard whipped cream fabric (sashing fabric for between layers)


    {NOTE: Dimensions of blocks/rows are unfinished measurements.}

    1. Cut off selvedges from whipped cream fabric and cut into 11 strips measuring 2½”  x WOF. Join strips end-to-end and press. Subcut into 7 strips measuring 2½” x 64½”.

    2. Assemble block layers and whipped cream layers. Measurements and block requirements are given below so you can check for accuracy.

    6 blocks measuring 9½” square + (5) 2½” x 9½” sashing strips = 64½” x 9½”
    {whipped cream}

    8 blocks measuring 8½” square + 0 sashing strips = 64½” x 8½”
     
    {whipped cream}
    13 blocks measuring 4½” w x 8½” h + (12) 1 ½” x 8 ½” sashing strips = 64½” x 8½”


    {whipped cream}

    6 blocks measuring 10½” w x 8½” h + (2) 2½” x 8½” end sashing strips = 64½” x 8½”
    {whipped cream}
    6 blocks measuring 9½” square + (5) 2½” x 9½” sashing strips = 64½” x 9½”

    {whipped cream}
    8 blocks measuring 8½” square + 0 sashing strips = 64½” x 8½”

     {whipped cream}
    8 blocks measuring 8½” square + 0 sashing strips = 64½” x 8½”
     

     {whipped cream}
    5 blocks measuring 11½” square + (6) 2¾” x 11½” sashing strips = 64½” x 11½”


    Quilt top measuring 64½” w x 83½” h (a nice size throw quilt!) Instructions for borders will be posted June 27.

    Oda May

    Trifle Dish Announcement

    For those of you sewing along with our Trifle Dish quilt, due to popular demand we’ve added a bit longer break between the last instructions and the final posting. The updated schedule is {here}.

    July 7 is the reveal date with full pattern download plus a link up with a chance to win prizes.

    Keeping sewing,
    Oda May

    Trifle Dish: Butterflies and 4-Patches

     
    To make LAYER 8, use charm packs, Moda candy, and layer cakes to mix and match for a scrappy version. Fat quarters will yield more repetitive blocks.

    For EACH Butterfly and 4-Patch block, you will need:

    Fabric 1/Background

    • (1) 6″ square
    • (4) 2¾” squares

    Fabric 2/Butterflies

    • (1) 6″ square

    Fabric 3/4-Patch A

    • (2) 2¾” squares

    Fabric 4/4-Patch B

    • (2) 2¾” squares

    Block Dimensions: 9″ x 9″ (finished) / 9½” w x 9½” h (unfinished)

    Note that the above fabric requirements won’t yield a completely scrappy block. Mix and match the block components in the row for a truly scrappy look.

    You will need an additional (5) strips of background fabric measuring 2½” x 9½” to complete the row.

    Suggested precuts: Fat quarter bundle, charm packs, layer cakes

     
    1.  Create quarter square triangles/hourglass blocks for the butterflies. Mark a pencil line along the diagonal of 1 background 6″ square. Place right sides together with a butterfly 6″ square. Sew a ¼” seam on each side of the pencil line. Trim along the opposite diagonal and then trim each piece on the pencil line to create 4 hourglass units.

    Piece hourglass units together to create (2) 5″ unfinished butterfly blocks. (Mix and match butterflies between blocks in the row for a scrappier look.)

    make 2 per block

    2. Make 4-patch units. Join 1 background 2¾” square with 1 print 2¾” square to create a 2-patch unit. Press to the darker fabric. Repeat to make one additional 2-patch unit. Flip one 2-patch unit so the background fabric is opposite the print fabric and sew a ¼” seam. Press to the darker fabric.

    Make (2) 4-patch units for this block. They should measure 5″ unfinished.

    3. Join butterfly and 4-patch blocks to complete the block as shown.

    4. Make 5 more blocks to complete the row. Add (5) 2½” x 9½” sashing strips between blocks to make the row measure 64″ wide (finished)


    1 row, measuring 64″ x 9″

    Block design by Trish Poolson of {Notes of Sincerity}

    Trifle Dish: Sponge Roll

     
    To make LAYER 7, use charm packs and Moda Candy (mini charms). For a non-scrappy version, use layer cakes and charm squares.

    For EACH Sponge Roll blocks, you will need:
    Fabric 1/Background:

    • (2) 5″ squares

    Fabric 2,3,4,5/Charms

    • (2) 5″ squares

    Fabric 6,7,8,9/Moda Candy

    • (4) 2½” squares

    Note that the above fabric requirements won’t yield a completely scrappy block. Mix and match the block components in the row for a truly scrappy look.

    Block Dimensions: 8″ x 8″ (finished) / 8½” w x 8½” h (unfinished)

    Suggested precuts: Charm packs, Moda candy, layer cakes

     
    1.  Create half square triangles by matching 1 print and 1 solid charm square with right sides together. Using pencil or fabric marker, draw a diagonal line on the wrong side of each of the solid squares. Following the marked diagonal line stitch ¼” seam either side of the line. Repeat for all charm  squares. cut along the marked line to yield two half square triangle pieces {4 in total}. Press towards print fabric. Trim to 4.5” squares.

    2. Using mini charm squares, mark a diagonal line on the wrong side of each square. Place right sides together against solid corner of HST. Stich on the marked line. Cut ¼” from the line.

    {NOTE: the diagram below shows dog ear corners on two sides of the charm square. For this block, only one side needs a dog ear corner. See block diagram below.}

    3. Sew 4.5” squares together in block layout yielding an 8” x 8” finished block

    4. Make 7 more blocks to complete the row.


    1 row, measuring 64″ x 8″

    Block design by Keera Job of {Live.Love.Sew.}

    Trifle Dish: Posies


    To make LAYER 6, use jelly roll strips, which is particularly useful when using this block for an entire quilt top. The posies block is very precut friendly and you can substitute almost any other cut – fat eighths, fat quarters, and layer cakes. Note that there are two versions of the block, one with top sashing and one with bottom sashing, which gives the posies movement.

    For EACH Posies block, you will need:
    Fabric 1/White Solid:

    • (1) 2 ½” squares
    • (2) 2″ squares
    • (1) 1 ½” x 4 ½” rectangle
    • (8) 1 1/4″ squares

    Fabric 2/Flower Top:

    • (2) 2″ squares
    • (4) 1 ½” x 2 ½” rectangles

    Fabric 3/Flower Bottom (green print):

    • (4) 2″ x 2 1/4″ rectangles
    • (1) 1″ x 3 ½” rectangle

    Block Dimensions: 4″ x 8″ (finished) / 4½” w x 8½” h (unfinished)

    You will also need (12) 1 ½” x 8 ½” strips (one in between each flower) of background fabric to make the row equal 64″

    Suggested precuts: Jelly rolls, fat quarters, fat eighths, layer cakes

     
    1.  Use (2) 2″ flower top squares and (2) 2″ white solid squares  to construct 4 HST’.  Trim to 1 ½” square.  Press toward print fabric.

    2.  Sew an HST onto each end of a 1 ½” x 2 ½” flower top rectangle as illustrated.  Press toward center.  Make 2.

    3.  Sew a 1 ½” x 2 ½” flower top rectangle to each side of a 2 ½” white square as illustrated. Press away from center.  Sew the 2 units made in Step 2 to the top and bottom of the rectangle unit. Press toward center.

    4.  Draw a diagonal line across the back of all the (8) 1 1/4″ white squares.  Use the stitch and flip method to sew (1) 1 1/4″ white square onto the lower left and upper right corners of a green 2″ x 2 1/4″ rectangle.  Make 4, taking care with directional fabric.  Press toward the white.

    5.  Sew together the dog ear corner units made above. Add 1″ x 3 ½” rectangle between them as the flower stem.

    6.  Sew the flower top to the flower bottom.  Press seam toward flower top.   Press toward the white.

    Sew the white 1 ½” x 4 ½” rectangle to the top or bottom of the flower (you will alternate to give the flowers movement in the row). The block should measure 4 ½” x 8 ½”

    Note:  To complete the strip a total of 13 flowers are needed.  7 of them should have the last white rectangle sewn to the top and 6 should have the rectangle sewn to the bottom.  I used a total of (12) 1 ½” x 8 ½” strips (one in between each flower).


    1 row, measuring 64″ x 8″

    Block design by Corey Yoder of {Little Miss Shabby}

    Trifle Dish: Jewel Block


    To make LAYER 5, use fat eighths and layer cakes. For a scrappy version, use a mix of charm square prints for the hourglass and flying geese parts of the block.

    For EACH Jewel block, you will need:

    Fabric 1/Background:

    • (2) 8½” x 1″ rectangles
    • (2) 9½” x 1″ rectangles
    • (2) 2½” x 2½” squares

    Fabric 2/Jewel:

    • (2) 6½” x 2½” rectangles
    • (2) 4½” x 2″ rectangles
    • (2) 2½” x 2½” squares (for HSTs)
    • (4) 2″ x 2″ squares

    Fabric 3/Flying Geese: 

    • (2) 3½” x 2″ rectangles

    Fabric 4,5/Hourglass:

    • (2) 4½” x 4½” squares

    You will also need (2) 2½” x 8½” strips for the ends of the row to make it finish at 64″ wide

    Block Dimensions: 10″ w x 8″ h (finished) / 10½” w x 8½” h (unfinished) 

    Suggested precuts: Fat eighths, layer cakes OR charm packs

     
    Use a scant ¼” on all seam allowances. See the Scant Rant series for details.

    1. Make Hourglass/quarter square triangle units with 4½” x 4½” prints. Use (2) 4½” x 4½” print squares to make (2) Hourglass units. (Only one Hourglass unit is needed per block – but the extra Hourglass can be used in the row.) Label one square Fabric A and one square Fabric B. Draw a diagonal line on the wrong side of the Fabric A square. Layer the Fabric A square atop the Fabric B square with right sides together. Sew pairs together, stitching ¼” on each side of the drawn line. Cut the pair apart along the drawn line to make two half-square triangle (HST) units. Without moving the HST units from the mat, cut along the opposite diagonal. Match pairs of triangles together to sew the Hourglass block.

    The Hourglass block should be trimmed down to: 3½” x 3½” unfinished.

    2. Make Flying Geese Units. Use (2) 2″ x 2″ jewel squares and (1) 3½” x 2″ print rectangle to make (1) Flying Goose unit. Label the squares Fabric A and the rectangle Fabric B. Draw a diagonal line on the wrong side of the Fabric A squares. Layer the Fabric A square atop the Fabric B rectangle with right sides together. Stitch on the drawn line. Cut the excess ¼” away from the drawn line as shown. Press the unit open. Place the remaining Fabric A square atop the unit from the previous step as shown. Sew on the drawn line again. Cut the excess ¼” away from the drawn line as shown. Press that triangle open.

    Make 2 Flying Geese Units. Unfinished Block Size: 3½” x 2″ / Finished Block Size: 3″ x 1½”

    3. Make four half-square triangle (HST) units by pairing 2 background squares with 2 jewel squares. Draw a diagonal line on the wrong side of the background square. Layer the background square atop the jewel square with right sides together. Sew pairs together, stitching ¼” on each side of the drawn line. Cut the pair apart along the drawn line to make two half-square triangle (HST) units. Repeat the process, pairing the remaining background square with the remaining jewel square. Make 4 HST blocks total. The HSTs should be trimmed down to: 2″ (unfinished size).

    4. Layout the Block. Layout the Hourglass unit, 2 Flying Geese units, the 6½” x 2 1/3″ rectangles, the 4 HSTs, and the 4½” x 2″ rectangles as shown.

    5. Sew the Flying Geese units to the left and right sides of the Hourglass block. Then sew the HST blocks to the top and bottom of the 4½” x 2″ jewel rectangles.

    6. Next sew the 6½” x 2½” jewel rectangles to the top and bottom of the Hourglass unit.

    7. Sew the HST/jewel rectangle units to the left and right sides of the unit from step 6 to create the “Jewel” shape.

    8. Finally, attach the background border strips by first sewing the 9½” x 1″ strips to the top and bottom of the block. Then sew the 8 1/2″ x 1″ background strips to the left and right sides of the block.

    9. Make 6 blocks to complete the row. Add 2½” x 8½” border strips to each end of the row to make it 64″ (finished) wide.


    1 row, measuring 64″ x 8″

    Block design by AnneMarie Chany of {Gen X Quilters}

    Trifle Dish: Strawberries


    To make LAYER 4, use layer cakes. There is no scrappy version of this block unless you mix low value prints to create the background.

    For EACH Strawberry block, you will need:
    Fabric 1/Background:

    • (2) 3½” x 4¾”
    • (2) 2¼” x 2¼”
    • (2) 2¼” x 1½”

    Fabric 2/Strawberry:

    • (2) 5″ x 2¼” pieces
    • (1) 9½” x 7¾” piece

    Marking pen
    You will also need (5) 2½” x 9½” rectangles to go between blocks to complete the row.

    Suggested precuts: layer cakes

     
    1. From your background fabric, cut:(2) 3½” x 4¾” rectangles
    (2) 2¼” x 2¼” squares
    (2) 2¼” x 1½” rectangles

    background fabric shown with marked lines

    On the wrong sides of the 2¼” squares, draw diagonal lines with marking pen. On all four of the rectangle pieces, draw diagonal lines in opposite directions, i.e., one from the top left to bottom right, second one from the top right to the bottom left. Be sure to draw lines on the wrong side of the fabric.

    2. From your berry fabric, cut off 2¼” from the top off the layer cake square. Sub cut into (2) 5″ x 2¼” pieces. Cut the bottom piece to 9½” wide.


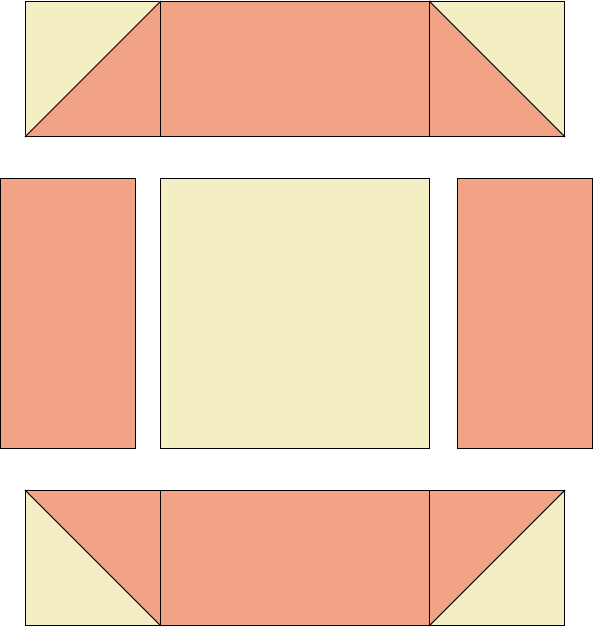
    3. Take your 2¼” background squares and 2¼” x 5″ strawberry pieces. With right sides together, lay one background square in the top left corner of the rectangle. Sew on the diagonal line. Trim off the seam allowance and press the corner.

        
    On the right side of this piece, lay the 2¼”  x 1½” background piece on top, lengthwise, with the diagonal going down the right side of the piece. Lay the 1/4 line on your ruler directly on the drawn line. Cut off the top.

    Flip your white rectangle over and align with the newly cut line. Match the tip of the white triangle with the edge of the red. Sew a scant ¼” seam and press.

    4. Repeat the process on the opposite corners of the second berry 5″ x 2¼” piece for the other side of the top of the strawberry.

    5. With right sides together, sew both top pieces together and press. 

    6. Sew the bottom and the top piece together and press.

    7. In the bottom left corner, lay one background 3½” x 4¾” piece on top lengthwise with the diagonal line going from the top left down to the bottom right. Line your 1/4″ ruler line on the diagonal drawn line. Cut off the seam allowance.


    Flip over the white triangle. Align the new cut edges matching up the point of the triangle to the bottom of the red piece. Sew a scant 1/4″ seam and press.

    Repeat this process on the right side of the strawberry. Press. Your strawberry should measure 9 1/2″ square.

    8. Make 6 strawberry blocks. Join strawberry blocks with (5) 2½” x 9½” rectangles so the finished row measures 64″ x 9″.


    1 row, measuring 64″ x 9″

    Block design by Anjeanette Klinder of {AnjeanetteK}

    Trifle Dish: Pinwheels


    To make LAYER 3, use charm squares to create a scrappy version. One layer cake and a fat quarter will make a non-scrappy version.


    For EACH Pinwheel block, you will need:
    Fabric 1/Background: 4 – 5″ squares
    Fabric 2,3,4,5/Pinwheels: 4 – 5″ squares (mixed prints or cut from one or two prints)

    Suggested precuts for scrappy version: fat quarters, layer cake

     
    1. Create 4 half square triangle (HST) units from 2 charm squares

    • With right sides together, sew a scant ¼” seam on each side of the charm squares. 
    • Trim along the diagonal of the HST unit to create 4 half-square triangles.
    • Press to the darker fabric.
    • Square up each HST to 2½”.

    Make 16 sets of HSTs per block.

    2. Lay out your block pieces as shown.


    Piece together in rows.


    Press well.
    3. Repeat steps 1-2 to make 7 more blocks (8 total).

    4. Join 8 blocks to form Layer 3.


    1 row, measuring 64″ x 8″


    Block design by Amanda Castor of {Material Girl Quilts}