
![]()
I am super happy to be sharing the recipe for this quilt with you all. My name is Michelle, I live in Australia and I blog over at Buttontree Lane. I wanted to make a small quilt as a gift for a little girl and when I first saw the Trade Winds charm pack by Lily Ashbury, I knew this range would be perfect for a quilt that would keep her warm for many years.
It’s a very quick-to-sew quilt (I sewed the top together in an afternoon and an evening, with frequent breaks) and the effect of the slanted stars really shows off the feature fabric. I hope you enjoy making this as much as I did!

2 Trade Winds charm packs
0.6 yards of contrast fabric for the star points (I used Bella Bleached White #9900-98)
1.5 yards of dark contrast solid fabric for border and binding (I used Bella Raspberry #9900-140
Fabric for backing (I used 0.9 yards each of three different fabrics for a 6-piece backing (Bella 30s Pink #9900-27, Bella Popsicle #9900-143 and Bella Azalea #9900-144) but you will need more if you only use one fabric)
Batting (I used 100% bleached cotton batting)


1. Select 80 charm squares for your quilt top. You can use the remaining 4 to include in the backing later on, if you like.
2. For the star points, cut 160 2 1/4 squares from the contrast fabric. I do this by cutting 9 strips 2 1/4 inch wide (from selvage to selvage) and then cross-cutting the squares. This should yield a little more than 160 squares, depending on how wide your fabric is.
3. Take a ruler, a wash out pencil and your 2 1/4 inch squares, and draw a diagonal line once on each. I use a sandpaper board to keep the fabric steady, but a cutting mat works just as well.


4. Place a square at the top left hand corner of each charm square, lining up the edges. With your sewing machine, stitch along the drawn line. Do this for each of your 80 charm squares. Chain piecing makes this easier.


5. Do the same for the bottom right hand side of each charm square. You will end up with 80 charm squares with a little square at the top and bottom, diagonally across from each other.
6. Now gently press the little sewn squares open on one or two of the charm squares and see if you’re happy with the result. I wasn’t happy with the darker prints showing through the white, so I trimmed my excess off. Normally I’d be happy to leave three layers there though – I find it gives the corners of the block some extra stability. I’ll leave that decision up to you though. If you do decide to trim the bottom two layers of the point off, make sure you do it before you press them open!

7. It goes without saying – double check your blocks and trim to 5 inches if needed.
8. Head over to your design wall/floor/bed/kitchen table, and start arranging your squares into an 8-across and 10-down arrangement until you are happy with how they look together.
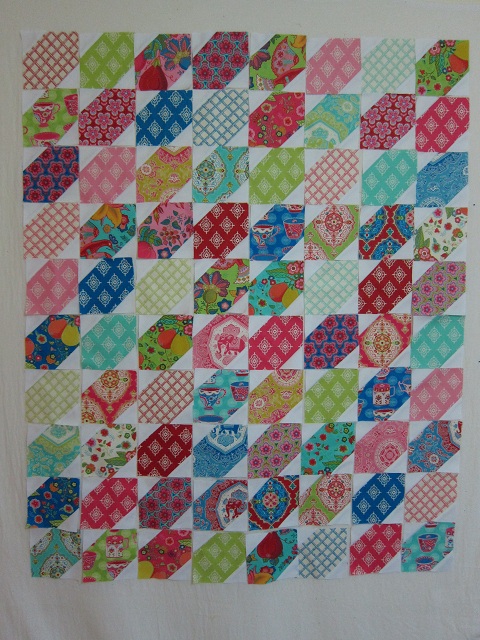
9. Sew the blocks into rows, then together to give you section 1 of your quilt top. It’s getting exciting now, isn’t it?

10. Have a cup of tea and a square of chocolate – you’ve deserved it!
11. Cut 4 x 7 1/2 inch strips lengthwise from your border fabric. I always cut more than I need and trim after sewing – I get a much more accurate result that way and I don’t mind the scraps. Sew a strip to each of the left and right sides of the quilt top, then trim so the top and bottom of the border is even with the pieced section. Sew a strip to the top and bottom of the quilt – and again, trim back so everything is even and square.

And there you have your quilt top! You’re so clever! Now go ahead and prepare your backing and batting, and quilt to your heart’s desire. Using a walking foot, I quilted from top to bottom and side to side in straight lines 1/4 inch from the joins of each block (I marked the border out with washout pencil). Then I quilted a cross hatch in the middle of each block, using the start of the star point as the guide.
Here’s a photo of the back so you can see the quilting lines (and the backing I sewed together) a little easier.

Bind with the same fabric as your border.

One quilt sized 58″ x 48″, and hopefully a very delighted little girl.

Michelle
{buttontreelane.blogspot.com}
![]()
