SLICED Tutorial: Quilt Story Apron


Hello!! I’m back sharing another tutorial from a project I made for the Moda Sliced Competition!  You can also check out my Pea Pod Pincushion tutorial from the competition.  I hope you enjoy making this sweet apron.  Make sure to come and say hi at Quilt Story too! 🙂


2-3 fat quarters for bodice and pockets
Six 1/4 yard cuts for skirt and ruffles
1/4 for scallops
1/4 yard for neck straps
Fat quarter for center waistband
1/3 yard for waistband ties

Pattern Pieces {included in the Printer Friendly Version}:
Main Bodice
Side Bodice
Top Band
Scallop & Pocket


Four 1 yard cuts of ric rac, lace, pom poms, etc.
1 yard medium weight interfacing for bodice and pockets
Tape measure for flower pin
1 yard thin ribbon


*** Use half inch seams for construction of this apron unless otherwise noted.
***The bodice for this pattern is a women’s size 5.

Part 1: Bodice Construction


Use a medium-weight interfacing and sew bodice sides to main bodice piece, then add the top band. Main bodice pattern, side bodice pattern, and top band pattern are included in the Printer Friendly Version.  Repeat and create an identical lining piece, no interfacing needed.

Add iPod pocket to inside of lining.  Cut two pieces, 5″ x 6″ and interface one piece.  Sew right sides together along each side and top, leave the bottom open.  Turn right side out and press.  When pressing, turn in the edges of the unfinished bottom by 1/4″ and press.  Add a trim along the finished top if you’d like.  Pin the pocket in place and sew around sides and bottom.  Reinforce the tops of each side.
Next, top stitch a ribbon across the seam of top band and bodice. Create a bow and tack into the middle of  ribbon bodice.
Create neck straps by cutting 2 strips of fabric, 4″ x 38″. Fold in half lengthwise and sew down entire strip with an angle at the end. Turn right side out and press.
Next is the bodice ruffle trim. Fold in  half lengthwise RST (right sides together) a piece of fabric measuring 2.5″ x 20″. Sew short edges together. Turn right side out and press. Run a narrow gathering stitch along raw edge. Gather to a ruffle to match the top of the bodice. Add the ruffle with a narrow top stitch to front apron bodice piece, along the top band piece. *Minding the half inch edges on each side of bodice. 
Put bodice and lining RST and pin neck straps in between and to the sides of bodice.  However you will leave a little more than a half inch on edges so they don’t get sewn into the seam.  Stitch together sides and top, turn inside out and press. 
Bodice complete.
Part 2: Skirt Construction
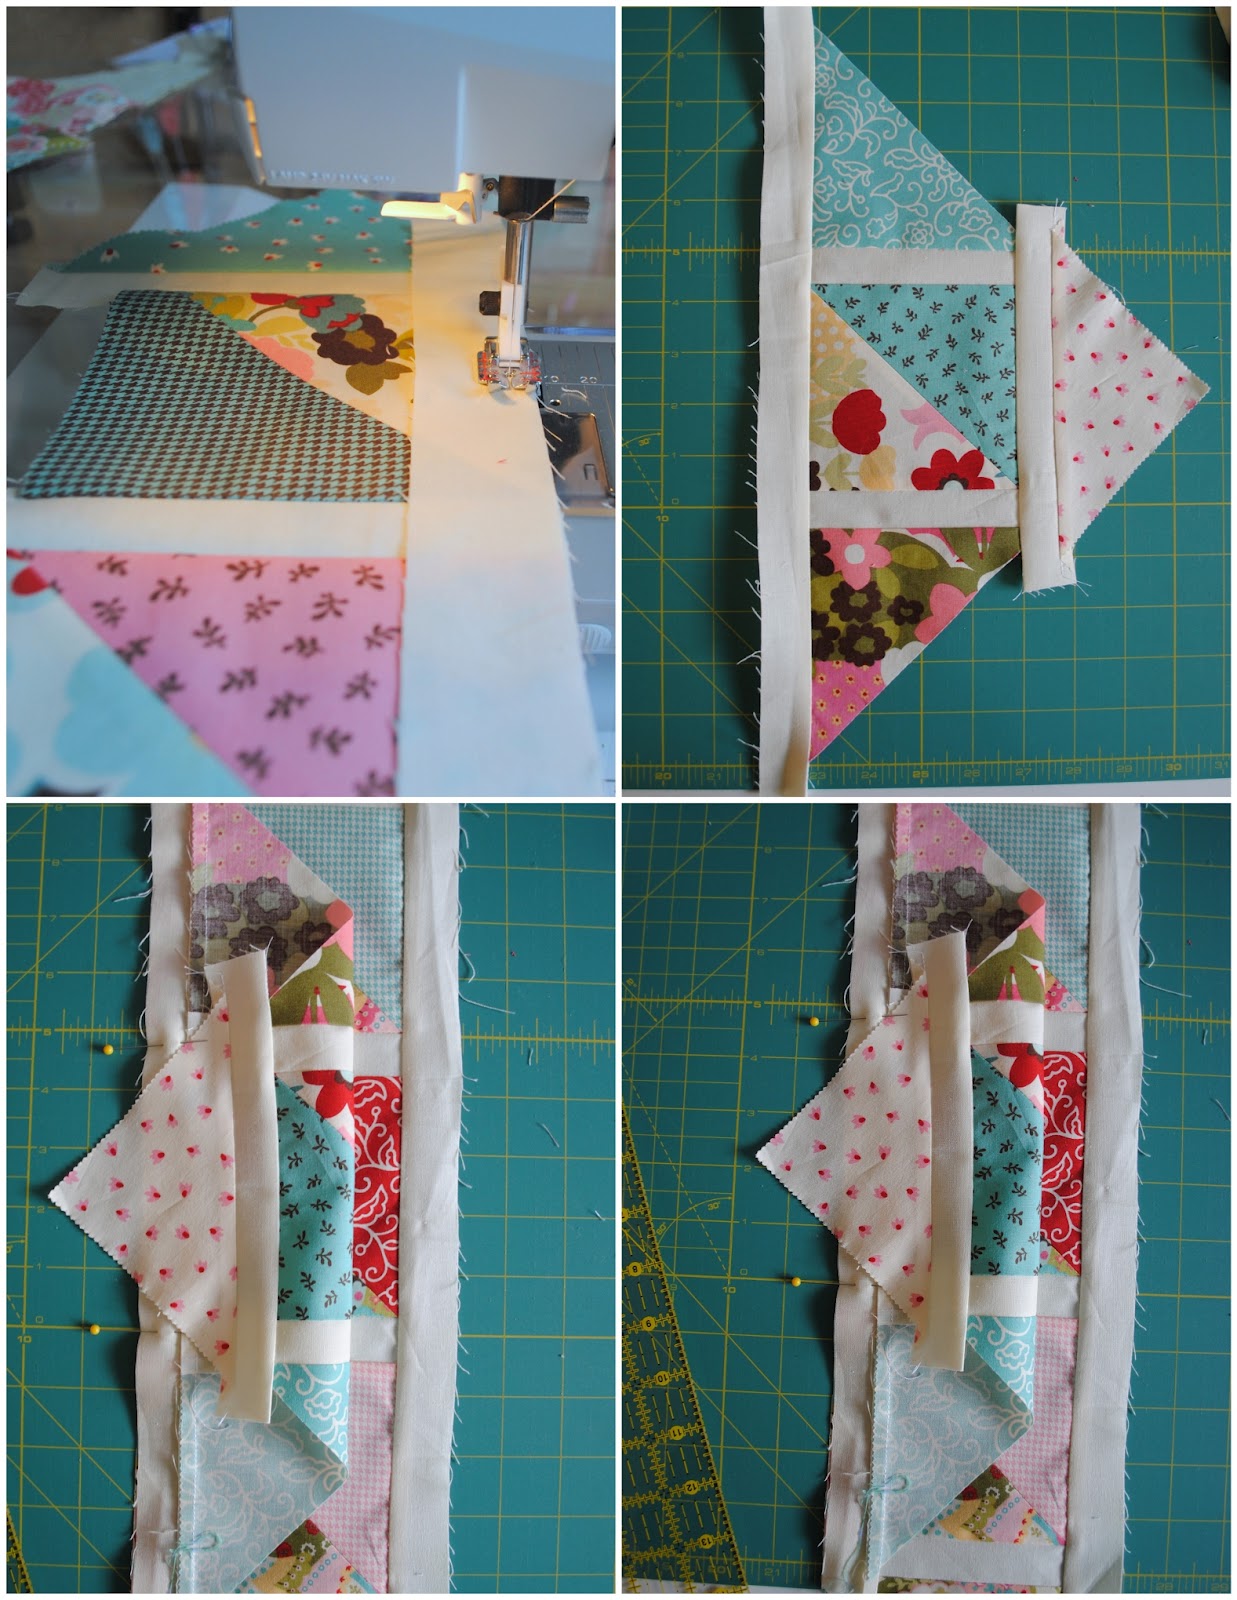
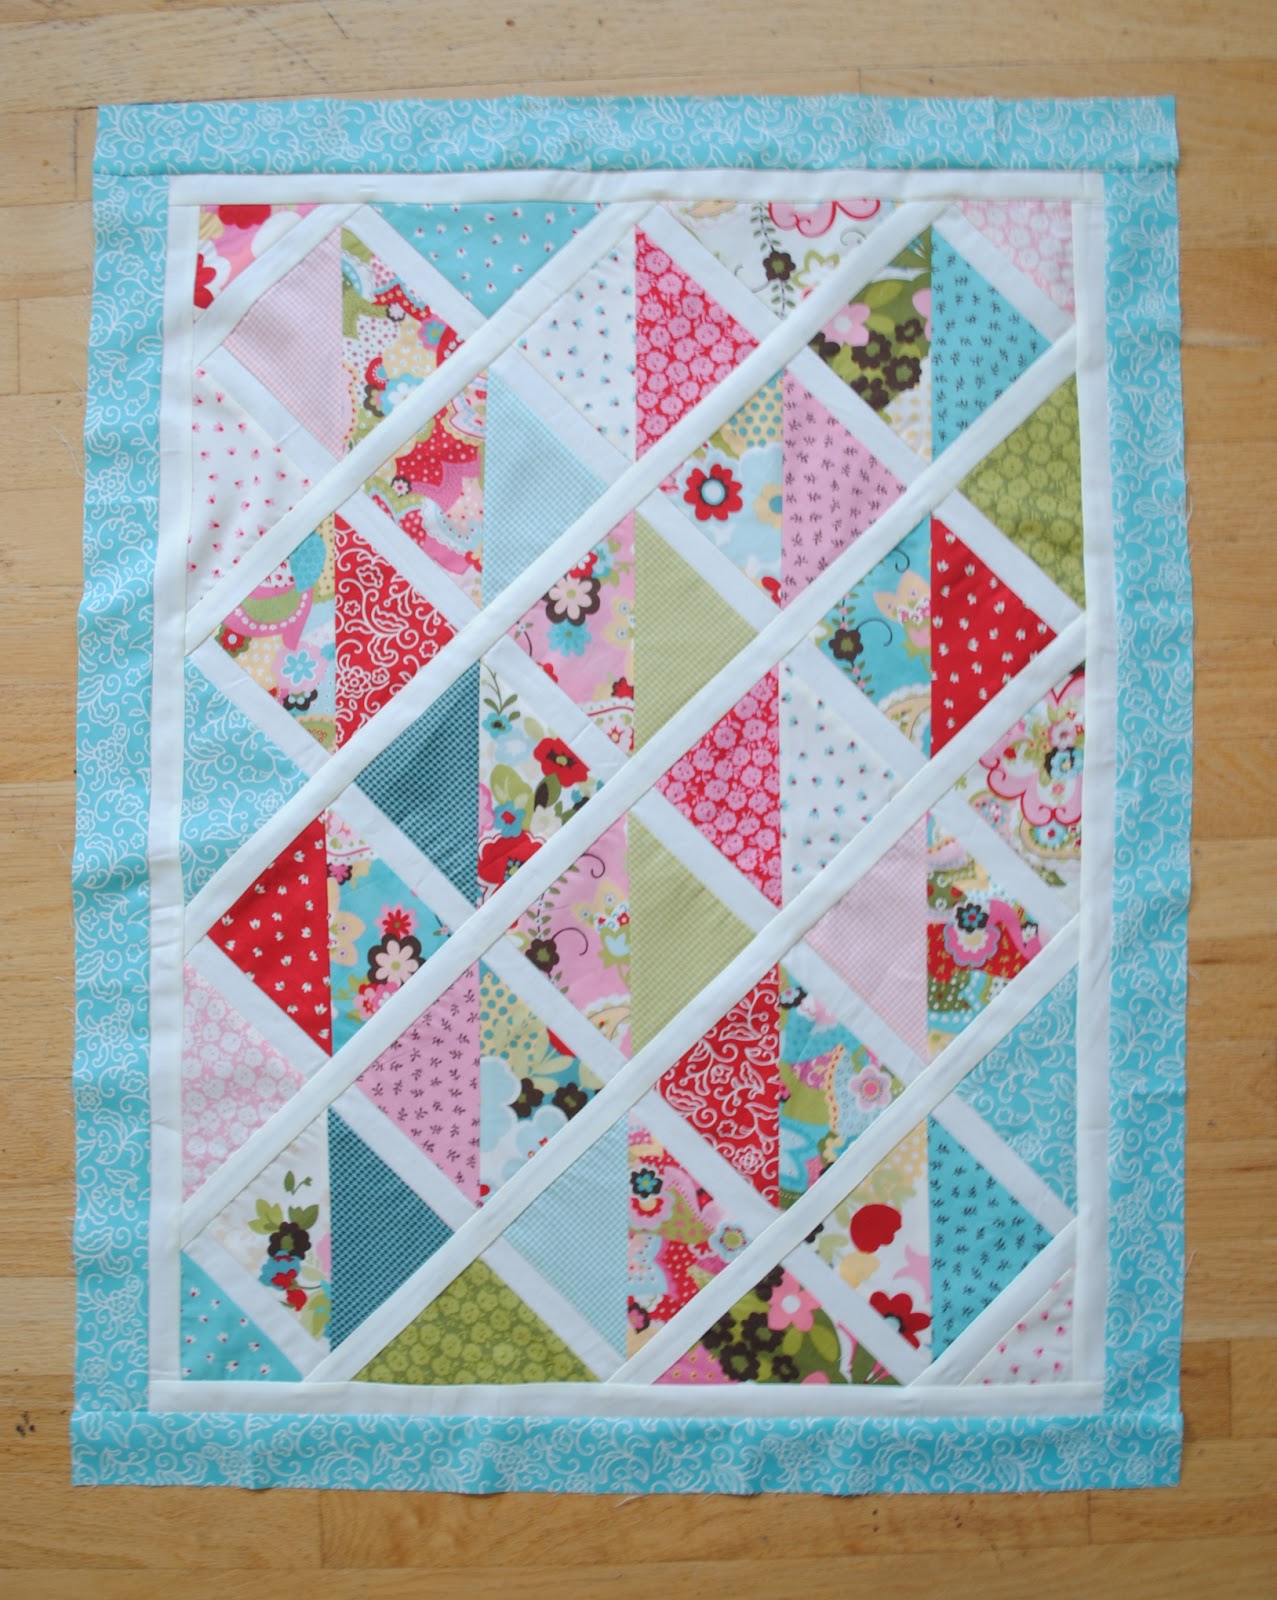
Cut 5 strips for the skirt.  From top to bottom my measurements are 5.5″, 6″, 4.5″, 5.5″ and 3.5″ inches long, all by 25″ inches wide.  Sew together in that order.
Using the trims, and coordinating threads, sew trims cross all the seams (as pictured).  Serge or turn side edges in 1/4″ and 1/4″ again and stitch to finish sides of apron. 
Make a wide gathering stitch across top of apron as shown.
Create your bottom ruffle by cutting a piece of fabric 2″ x 40″, turn bottom edge 1/4″ in, and 1/4″ in again press and stitch. Do this to the two sides as well.  Make a wide gathering stitch 1/4″ from raw edge. Gather evenly to match apron width. Set aside.
Cut scallop fabric in half widthwise, to have two pieces 4.5″ x WOF.  Using the scallop pattern {in the Printer Friendly Version}, trace onto the wrong side of your fabric and create four full scallops.  Take the wrong sides of the scallop fabrics and pin together.  Sew along tracing and trim 1/4″ around.  Turn right side out and press.
Take your ruffle and scallop and with RST pin to the apron along the bottom edge. Serge or stitch 1/4″. Open and press. Do a very narrow top stitch on the bottom apron edge.
Create your pocket using pattern piece {found in the Printer Friendly Version}. Embellish as you would like with trim, different fabrics, embroidery etc. Using same pattern piece create a lining piece out of white or coordinating fabric.  Interface one side of the pocket.  Using 1/4″ seams, stitch around the sides and rounded bottom of pocket, leaving the top open. Turn right side out and press. Turn top edges in about a 1/4″, press really nicely and top stitch closed.  Pin pocket in place on apron and use a narrow top stitch to stitch in place. Be sure to reinforce each side at the top.
Gather top of skirt to match finished apron top. With RST pin and sew or serge together.
Part 3: Finishing
Using the fat quarter piece for the center waistband cut a piece 7″ x 13″.  RST sew together lengthwise.  Press with the seam in the center.  Also press the short ends 1/4″ in for a finished look, but do not stitch yet.  Set aside.  Cut two waistband ties 6″ x 34″.  RST sew together lengthwise and on one end of each finish at an angle.  Turn right side out and press. 
Place the waistband ties into the unfinished edges of the center waistband piece.  Center the waistband piece over top of the bodice and skirt seam.  Pin in place and sew a narrow top stitch around the entire center waistband, closing the sides as you go. 
Part 4: Tape Measure Flower Pin, optional
Clip metal ends of measuring tape off. Using hot glue, create a circle center roughly the size of a finger. Create petals by softly folding measuring tape and gluing to center. Alternate sides of flower while rolling and rotating softly.  Start with smaller folds and get larger as you get to the end of the flower.  Try first without glue to get a feel for the process.
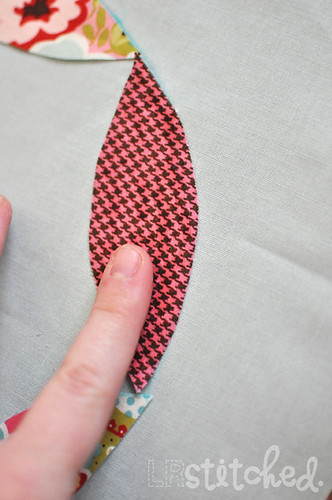
Once you’ve finished the tape measure flower you can add some fabric petals or leaves.  Fold a 2″ piece of fabric in half and in half again. Trim raw edge sides into a curve. Add hot glue and place little fabric petals within the measuring tape flower.  Create larger petals using the same method and 3″ pieces of fabric. Put 3-4 of these at the base of the measuring tape flower.  Hot glue a pin clasp thing (that’s what they are called right) 🙂  to the back of the flower, and pin where you would like.
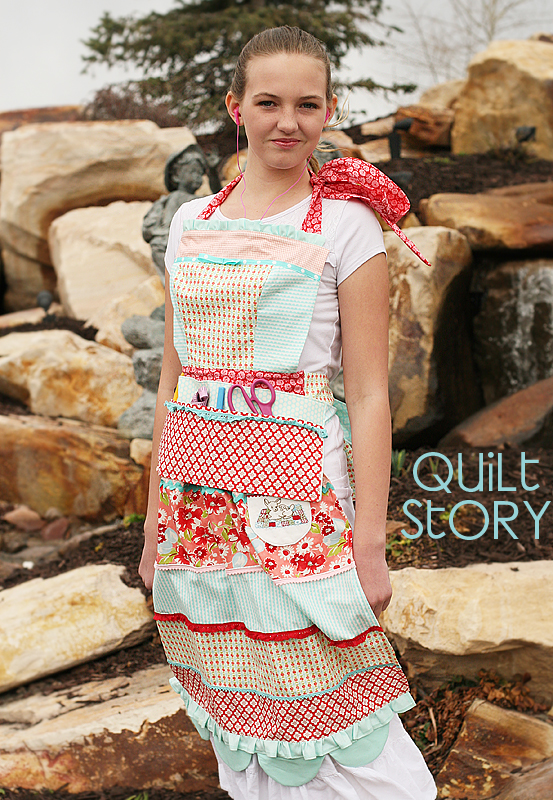
One darling apron!

Thank you so much for all of you who left comments during the competition, it was so much fun and we had a blast!  Thanks to Moda too!! 🙂  I’ll be posting a tutorial for my portable file folders soon!
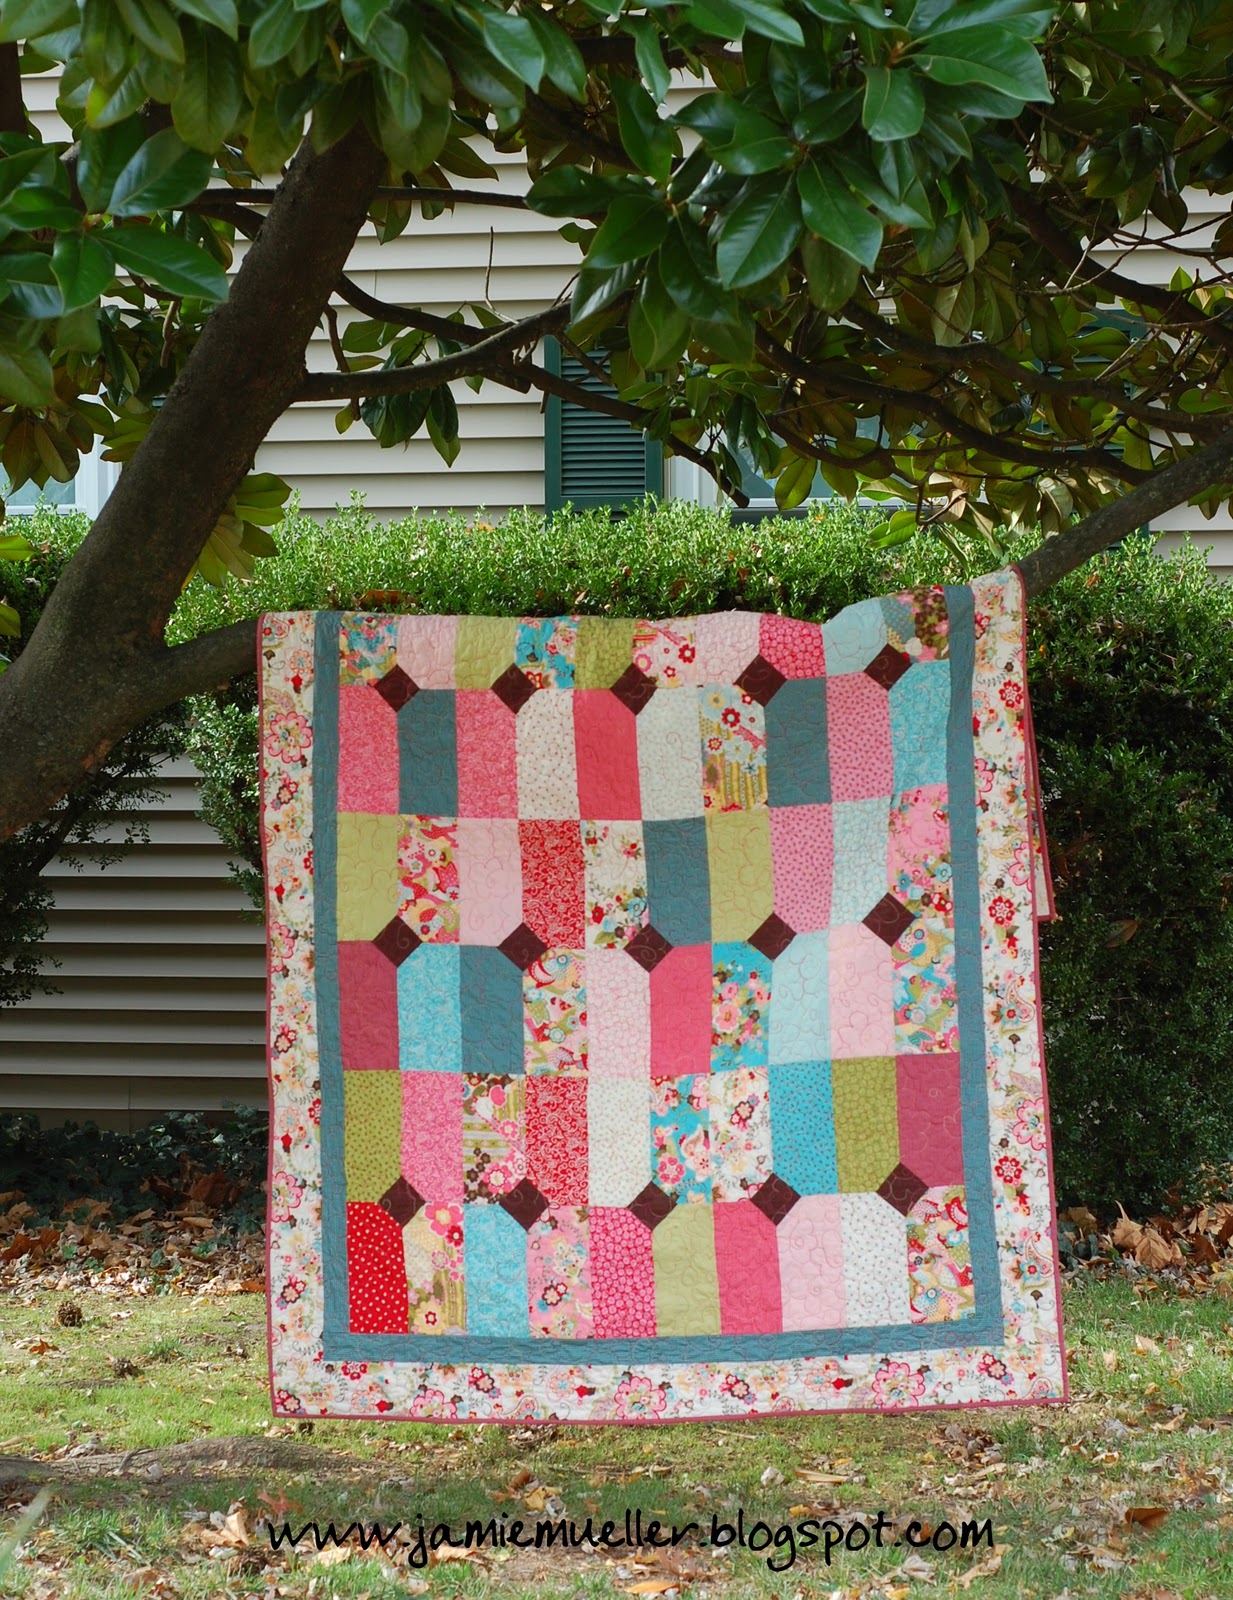
Be sure to visit our blog, Quilt Story.  We’d love to have you!
Quilt Story

Sophie Car Seat Quilt


Hello!  I’m Jennie and I blog {along with my mom} over at Clover and Violet.  I have two little kids, both born in the winter.  With my little boy I quickly discovered how easily blankets are kicked off, so I designed a little quilt that tied to the infant car seat handle.  When I found out my second was a girl, I knew she needed a girly version for the car seat too!  This little quilt also works great for a stroller and can be a little play mat in a pinch too!

If you’re interested in making one of these too, my friends at Sew Lux Fabric and Gifts have put together a a few special kits at a special price just for this quilt {the kits feature a few different fabrics as they’re already sold out of Sophie charm squares…I think I might need to make another one!}.  Click here for details.

1 Charm Pack
1 yard large print for backing and binding
1/4 yard small print for borders
1/2 yard Bella Solids Snow for sashing
1 yard cotton flannel or batting

First, select 18 charm squares and pair them up {for 9 pairs}.  Then, chose 7 more charms for the setting triangles, cut them in half diagonally {from point to point}, set aside.

Place the pairs right sides together, then draw a line a line on the wrong side of one of the charms from point to point.  Stitch through both charms 1/4 inch from the centerline on both sides of the line.

Cut the pair of charms in half along the drawn line.  Press the halves open to make two half-square-triangle pairs.  Trim each new square to 4 1/2″.

Once you have sewn all 18 pairs and have 18 new squares, arrange the squares and setting triangles into rows, as shown:

From the Bella Snow, cut ten {10} 1 1/2″ strips.  Leave behind the very last triangle of each row and sew the remaining pieces onto about four {4} of the sashing strips.  Cut the blocks from the strips and begin forming quilt rows as shown:

I like to leave a little bit of the sashing hanging past the blocks so that I can trim it after I’ve sewn the rows, this gives a nice straight finish.  Then sew the remaining triangle onto the end of the row.

After completing the rows, begin sewing the rows onto about three {3} remaining sashing pieces.  In order to line up the short sashing rows, I fold the top half-square-triangle row in half, line up the short sashings and pin at the intersections.  This creates a nice grid.

Once you’ve completed sewing all your rows together, trim the quilt.  To get nice, accurate points, trim 1/4″ past each of the points, always lining up at least two points while you’re trimming.

Use the remaining sashing pieces to create a border around the quilt.  Then, from the small border print, cut four {4} 2″ strips.  Sew the border on in the same manner as the sashing.

Layer using your favorite batting.  I used prewashed cotton flannel in my little quilt because where we live a heavy quilt isn’t necessary.  This is a great option for a warm climate or a spring or fall baby, when a little warmth is needed, but not as much as a full quilt.  I quilted with an allover meander.  Because my quilt was lightweight, I also used a single fold binding method.

Instead of using a 2 1/2″ piece of binding folded in half {as for a standard double fold binding}, use a 1 1/2″ piece not folded.  Then pull it flat, tuck the raw edge in, and wrap it around to the back.  I always pin or clip my binding down when using a single fold to avoid excess fraying.

Now, the final touch to this little quilt is adding the ties.  Cut two 1 1/2″ x 28″ strips {I cut mine from the remaining backing piece}.  Fold in half, press, then fold both raw edges toward the center seam as for bias binding.

Pin one ties ten inches {10″} from the top of the quilt on each side.  Stitch in place and your quilt is ready for outings!

One 25″ x 30″ quilt, ready to be tied on to any car seat or stroller!

Oh, and hopefully one cozy warm {and stylish} baby too!

I hope you enjoy this design, and if you make it I’d love for you to share it to the Clover & Violet and the Moda Bake Shop Flickr groups.

{Clover & Violet}

Auntie’s Diamonds


Finished Size: 57″ X 88″
Hello again!!  It’s Jamie from SunFlower Seeds with my new Moda Bake Shop project! Auntie’s Diamonds is a quilt made from a Layer Cake and a Bella Solids Charm Pack!  I hope you like it and if you make one please add it to my Flickr Group!!  As always, be sure to check out my blog {jamiemueller.blogspot.com} for a giveaway!


1 Layer Cake “LC” (Sophie by Chez Moi)
1 Moda Bella Charm Pack “CP” (brown)
½ yard inner border fabric (blue houndstooth)
1 ¼ yard outer border fabric (paisley floral)
5 ½ yards backing fabric
¾ yard binding fabric (pink houndstooth)


Cutting Blocks:

1. Choose 40 LC squares (there are 42 in each pack) and cut each one in half. You will have 80- 5” X 10” rectangles.

2. Take 20 Charm Squares (1/2 of the pack) and cut each one in half horizontally and vertically. You will have 80- 2.5” squares.

Block Assembly:

1. Take one 2.5” square, fold in half diagonally and press. The pressed line will be your stitching line. Repeat with all 80- 2.5” squares.

2. Place one 2.5” square RST (right sides together) on the top right corner of one 5” X 10” rectangle. Pin in place and stitch on pressed line of 2.5” square. Repeat until you have 40 total on the top right corner. See photo:

3. Place one 2.5” square RST on the top left corner of one 5” X 10” rectangle. Pin in place and stitch on pressed line of 2.5” square. Repeat until you have 40 total on the top left corner. See photo:

4. Trim off excess fabric ¼” from sewn line. See photo:

5. Press all 40 RIGHT corner blocks towards the solid corner.

6. Press all 40 LEFT corner blocks towards the printed fabric (larger piece).

7. Square (trim) all blocks to 5” X 10”.

Top Assembly:

1. Layout blocks 8 rows of 10 blocks each as desired, making sure to match the small triangle corners to make the diamond in the center. See photo:

2. Sew blocks together in 4 patches to have 20 larger blocks, making sure to match seams of small triangles. See photo:

3. Sew the 20 larger blocks of four together until the center of the top is complete.

Inner Border:

1. From inner border fabric cut 7- 2 ½” X WOF (width of fabric) strips.

2. Measure center length of quilt top and cut 2 strips to that measurement. (You will have to sew 2 of the 7 strips short ends together to have enough length).

3. Sew side strips on each side of the quilt. Press towards border.

4. Measure center width of quilt top and cut 2 strips to that measurement. (You will have to cut 1 of the left over strips in half and sew each half strip to the short end of each top and bottom strips).

5. Sew top and bottom strips on the quilt. Press towards border.

Outer Border:

1. From outer border fabric cut 9- 4 ½” X WOF strips.

2. Measure center length of quilt top and cut 2 strips to that measurement. (You will have to sew 2 of the 9 strips short ends together to have enough length).

3. Sew side strips on each side of the quilt. Press towards border.

4. Measure center width of quilt top and cut 2 strips to that measurement. (You will have to cut 1 of the left over strips in half and sew each half strip to the short end of each top and bottom strips).

5. Sew top and bottom strips on the quilt. Press towards border.

Quilt as desired.

Binding:

1. From binding fabric cut 8- 2 ½” strips

2.Sew all 8 strips together (short ends) to make 1 continuous strip. Fold binding strip in half wrong sides together and press. Attach binding to right side of quilt (raw edges even) and machine stitch all the way around. Turn binding to back and hand stitch down.

Finished Size: 57″ X 88″

Your new quilt is done!! ENJOY!

Jamie Mueller
{jamiemueller.blogspot.com}

Mod Circles Appliqued Baby Quilt


Hi there, I’m Lindsey from LRstitched. I’m very excited to share my first recipe at the Moda Bake Shop!

Today, I’m going to show you how to make a fun and easy appliqued baby quilt.

  • 1 Charm Pack, “Sophie” by Chez Moi
  • 1 yard background fabric (Moda Bella Solid “Home Town Sky”)
  • 1 yard backing fabric (Sophie “Blue Fiesta Collage”)
  • 1/2 yard for the binding (Sophie “Green Peas Houndstooth”)
  • batting (minimum 34×44)
  • 8″ circle and petal templates (included in the Printer Friendly Version)
  • water soluble pen
  • measuring tape/ruler
  • scissors
  • fabric glue (My favorite is Liquid Stitch).
  • template plastic (optional, if you’d like to transfer your paper templates for ease of use)

One charm pack will give you enough petals to make 2 of these baby quilts.

We will be using 72 petals for one quilt (18 charms). Keep that in mind, if you would prefer to only make one quilt, select 18 charms and save the rest for another project.

If you would like to make 2 quilts, you will use 36 of the 42 charms. You’ll also need to double the fabric requirements for background, backing and binding, as well as batting.

Once you’ve decided whether to make 1 or 2 quilts, grab your charm pack and let’s get started!

——–

With the printed petal template, trace four petals per charm as shown below.

I like to cut my petals by hand since I’m trying to use every last scrap of fabric. However, if the thought of hand cutting makes you cringe, you can certainly use a rotary cutter!

If you choose to use a rotary cutter, be careful using this layout because space is tight. You may want to bump down to 3 petals per charm.


Now we need to prepare the background. Take your 1 yard background fabric (approx. 36″ by 44″) and cut down to 32″ by 42″. Press well.


Next we are going to trace our guide circles onto the background piece.

You will need the 8″ circle template and a fabric pen. Lay out your background fabric on a hard surface and beginning in the top left corner, lay down your template. While measuring, adjust the circle template until it rests 2″ from the top and 2″ from the left and trace.

Measure 2″ to the right of the first traced circle and repeat. Continue until you have traced all 12 circles as seen below.

Once the circles are traced, it’s time to layout the petals. You will need 6 petals per circle.

If you imagine a line down the center of each circle, you will be placing 3 petals to the left of the line and 3 to the right.

Place your first petal on the top left side of the circle you’ve traced. The drawn circle will be your guide for placement as you work your way around.


Once all 12 circles are filled, adjust the petals if necessary until you’re happy with the placement.


Now we need to secure the petals to the fabric to prepare for applique.

Begin by removing one petal from its place; apply a thin coat of glue and press firmly back to its spot on the background fabric.

Repeat for each petal until all are secured.


Once everything is glued down, you can start appliqueing each petal to the background fabric. I’m using a blanket stitch in the picture below.

If your machine doesn’t offer that option, you can zigzag or straight stitch close to the petal edge.


We’re almost done!

After appliqueing all the petals, press your top well. Take the backing fabric and layer it along with your batting and top, then quilt as desired.


Trim off the excess backing and batting and square up your quilt. Using your preferred method, make and apply the binding.

All finished!

A beautiful baby quilt, approximately 30″ x 40″.

Thanks so much, I hope you enjoyed this tutorial!

Lindsey Rhodes

{www.LRstitched.com}

If you do make a Mod Circle quilt, I’d love to see it! Feel free to share it in the LRstitched Flickr pool.

Sophie’s Bouquet

Fresh from the oven at Jo’s Country Junction is the latest Moda Bake Shop recipe….Sophie’s Bouquet. Our old farm dog, Pepper, is showing off the quilt that features fabric from the line Sophie by Chez Moi. I am in love with the fabric. I am especially in love with the turquoise blue floral fabric that is used as the setting squares. The floral design is amazing. The quilt uses one jelly roll along with extra yardage.


To get you started, Kimberly over at the Fat Quarter Shop is sponsoring a giveaway over on my blog to get you started on the project. After you’re done here, hop on over and check it out.


1 Jelly Roll-Sophie for Blocks and Scrappy Binding


4 1/4 yards Nosegay Blue Fiesta (32501-11) for Setting Squares, Setting Triangle and Corner Triangles


2 yards Sophie Leafy Swirl Pink Sorbet 32504 13- for constant pink in the blocks and the inner border


1 3/4 yards Sophie Petal Pink Sorbet 32506 22-for background fabric in the blocks


6 yards Sophie Paisley Floral Cream 32502 14


You will also need a half square triangle ruler such as an Easy Angle.

If you would want to fussy cut the setting squares, you will need extra yardage.


From the setting fabric:
Cut 12~ 6 1/2″ strips. Sub cut into 72~ 6 1/2″ squares.


Cut 3~ 9 3/4″ strips. Sub cut into 9~ 9 3/4″ squares. Cut these squares twice on the diagonal to get your setting triangles. You will use 34.


Cut 2~ 5 1/8″ squares. Cut once on the diagonal to create 4 corner triangles.


From the pink constant fabric in the blocks:
Cut 17~ 2 1/2″ strips. Sub cut into 270 2 1/2″ squares.

For the background fabric in the blocks:
When I made my version, I used the lights from the jelly roll pieces for some of the back ground in the blocks. I cut the remainder from the light yardage. You can do it the way I did or you can make all of the background from the same fabric. You will need a total of 23~ 2 1/2″ strips for the background.

I pulled out the strip of fabric that matches the setting fabric and set it aside.


Take one of the jelly roll strips. Layer it right sides together with one of the light 2 1/2″ strips as shown. Place it on the cutting mat. Take the half square triangle ruler and position it over the top. Cut a straight edge on the side as shown.

Following the manufacturers instructions that came with the ruler, cut triangles as shown. Flip the ruler as you make each cut. Each block needs six sets of triangles. Continue cutting across the strip making triangles. You will get four sets of six triangles per strip.

Chain piece the triangles, keeping the like triangles together.


Cut the triangles apart. Clip the dog ears and press towards the dark fabric. Continue keeping like squares together.


Layout the half square triangles along with three pink squares as shown.


Sew the blocks into rows.


Sew the rows into blocks. Continue until you have 90 blocks. Press blocks.


Now is the fun part…the layout. This quilt is set on the diagonal. It’s easy to get blocks twisted or turned. I kept watching and checking to make sure those pink squares were lined up in rows.

Continue laying the blocks out in a 9 x 10 setting. Sew the blocks into rows then sew the rows into a quilt top. Notice the pink squares are all in a line.

Take the backing fabric and cut it in half. From the remaining jelly roll strips cut 6~ 21″ pieces. Piece them together connecting them on the diagonal as you would binding strips. Sew the strip between the two backing pieces. This isn’t completely necessary. I just like to do it so that I don’t have to try to match the prints in the backing fabric.


Layer the backing, batting and quilt top together. Quilt as desired.


Cut eight 2 1/2″ strips of the blue floral fabric. Use them to bind the quilt.


One 74″ x 83″ quilt.


Come on over to my blog, Jo’s Country Junction, and see all the pictures I took while making the quilt. There were a few mishaps that went into this quilt. You will also want to check out the giveaway that Kimberly from The Fat Quarter Shop is sponsoring there.


Jo Kramer
{Jo’s Country Junction}