Trifle Dish: Cherry Spools and Lady Fingers


To make LAYER 1, use fat eighths to create a two-color version. Two fat eighths will yield two blocks. Alternatively, use a variety of precuts to create a scrappy version.

For EACH Cherry Spool block, you will need:
Fabric 1/Spool:

  • (2) 2½” squares 
  • (2) 2″ x 8″ strips

Fabric 2/Leaves:

  • (6) 2½” squares

Fabric 3/Cherries:

  • (4) 2″ squares

Fabric 4/Background:

  • (8) 2½” squares
  • (2 ) 2″ x 8″ strips
  • (9) 2″ squares

You will need (6) 2½” x 11½” strips for sashing between blocks (Lady Fingers)

Finished block measures 11″ square

Tip: use a mix of low value prints for the background if desired

Suggested precuts for scrappy version: fat quarters, layer cake, charm pack

 
1. Create half square triangle (HST) units


  • Draw a line on the wrong side of each 2½” background square. 
  • Pair each 2½” background square with spool squares and leaf squares (a total of 8 pairs of background fabric + print), right sides together. 
  • Lining up the edge of your foot with the pencil line, sew a scant ¼” seam on each side of the line. 
  • Cut on the pencil line and press to the darker fabric. 
  • Square up each HST to 2″.

  Make 12 sets of background/leaves HSTs and 4 sets of background/spool HSTs per block.

2. Lay out your block pieces for the center as shown.

Piece together in rows.

Add background side strips and spool top and bottom. Press well.

3. Repeat step 2 to make 4 more blocks (5 total).

4. Join 5 blocks and 6 lady fingers together to form Layer 1.


1 row, measuring 64″ x 11″

Block design by Robin Nelson of {www.craftsisters.com}

Simple Snowman Mini Quilt


Early Season’s Greetings fellow Bakers! This is Robin over at Craft Sisters. Here’s a simple idea for a winter/holiday wall quilt using jelly roll strips and a fat quarter. It’s so great to be sharing it with you. Joy Batiks from Laundry Basket Quilts delivers the perfect colors for this and I love red (makes it an easy choice for the background for me). The greens are also gorgeous or a combo could be great too. There are lots of things you could do with this design and some other ideas are suggested at the end of the recipe. Hope you have fun with it.


1 Jelly Roll Joy Batiks from Laundry Basket Quilts 42120JR
1 Fat Qtr. Joy Holiday Pudding 4212585 for snowman circles
1 Scrap Lightweight sew in interfacing (big enough for 3 snowman circles)
2/3 Yd. Backing fabric
24″ x 30″ Low loft batting (suggest fusible batting)
White chalk pencil for tracing tree Freezer paper
 18 4-mm press on crystals for snowflakes
1 Skein Rayon embroidery thread (ivory or cream) for snowflake embroidery
1 Skein Sashiko thread or embroidery thread for tree stitching


Make the Appliqué Background 
Choose 10 strips from jelly roll in high contrast to snowman circle fabric. Cut strips in half and remove selvedges. Sew 10 half-strips together lengthwise using 1/4″ seam allowance. Press seams to one side. Save the other half-strips for another project. Choose two more strips for borders. Sew border strips to sides of background. Press seams out. Trim and square. Sew border strips to top and bottom of background. Press seams out. Trim and square and set background piece aside.

Make Snowman Circles 

Using the circle templates found in the Printer Friendly Version, trace 1, small, medium, and large circle on to sew-in interfacing. Leave an inch of space between the traced shapes.

Place and pin interfacing circle on right side of the snowman fabric. Shorten your stitch length (15-18 stitches per inch) and sew around circles on the drawn line. The needle down feature of your machine really helps here with staying on the line, stopping and pivoting.

Trim the circles leaving 1/8″ – 1/4″ seam allowance outside the drawn lines. Cut a center slit in the interfacing only of each circle.

Turn circles right side out and use a chop stick to smooth seams. Press. I love this method of appliqué because it adds a bit of dimension and is a stabilizer for the embroidery.

Note: It’s easy to remove the interfacing if you don’t want it by following these steps: Use water soluble thread in the needle and regular thread in the bobbin to sew around the circles. Trim and turn circles right side out and smooth seam with chopstick. Lightly spray circle edges with fabric sizing. Press edges with steam and interfacing will lift away. Edges will still be turned under and bobbin thread can be removed or remain to help maintain edges.


Use a window or a light box to trace snowflake embroidery lines on each circle. Embroider the snowflakes using two strands of rayon embroidery thread (rayon thread adds some shine). Stem or outline-stitch each snowflake. Couch or use fly stitch for the snowflake cross pieces. Crystals get ironed/pressed on after snowman is appliquéd to background.

Trace the Fir Tree


Trace numbered tree lines on to freezer paper, leaving generous space between lines. Cut out the separate pieces.


Place top of tree shape on to background fabric 3″ down from the top edge and 4″ in from left edge (not including borders).  Iron the shape with the waxy side of freezer paper down. Trace around the shape using a white chalk pencil. Peel off the paper shape.

Press line #2 in place and trace. Continue with remaining pieces until tree is entirely traced.

Place and Appliqué Snowman Circles
Pin circles in place and hand or machine stitch using your favorite method.

Stitch Tree on Background 


You won’t need to stitch the entire tree because the snowman covers part of it. There are a number of ways to stitch this tree. Choose what you like best and stitch it – whether it is outline embroidery, bobbin work, Sashiko (Japanese surface embroidery), small ric rac. I opted for Sashiko. Here are a few basics to get you started. It’s fun and relaxing and no hoop is needed. Use a Sashiko needle and Sashiko thread. The thread stands out on the surface and is easy to work with. Sashiko needles are longer than regular embroidery needles. Cut the thread approx. 20″ and knot one end. Load needle with several stitches before pulling it through. Pull fabric taught so there isn’t any puckering. Try to make all of your stitches and spaces between the same length (think rice grains). End stitches in corners to define a pattern sharply. Space stitches so they don’t touch or cross where pattern lines connect. Knot on back when you finish.

Apply Crystals to Snowflakes
Place press on crystals on to snowman circles as shown on template and in photos. Press each one following manufacturer’s directions. A small craft iron is helpful for this step (easier to control and not bump crystals out of place).

Finishing 
Make a quilt sandwich (spray baste or use fusible batting) and quilt around the tree shape close to all Sashiko stitches and around snowman circles. Quilt vertical lines in the ditch in remaining background strips. Trim and bind using left over jelly roll strips. Add hanging strip to back and hang in a noticeable place.

Or… add one more border and use it to wrap quilt around an art canvas. Staple to secure and add picture wire to hang. The intent for this quilt was to keep it very simplistic but a lot more could be done with it.

Here are a few more ideas to try using the rest of your jelly roll.

  • Make it a pillow(s) 
  • Make it a much larger quilt using the whole jelly roll for background, enlarging the snowman and quilting a fancy holiday motif inside the circles. 
  • Make it a runner lengthening the background and adding a tree and snowman to each end.
  • Make the tree an appliqué instead of stitching it out.

 
One simplistic, wintery, snowman, wall quilt approximately 21″ x 25″


I hope to try some of those other ideas and will post pictures on my blog. Please stop by and visit.

Thanks,

Robin Nelson
{www.craftsisters.com}

Framed Square Throw Quilt


Here’s a bright throw using one jelly roll that will add color to any room. I used the Over the Rainbow batik line from Laundry Basket Quilts. All of Moda’s batik lines have rich saturated colors though, making it easy for us to create something vibrant. You could use any one of them. Hopefully you’ll have fun making or taking this on vacation.


1 Batik Jelly Roll – Laundry Basket Quilts “Over the Rainbow”
3-1/4 yd. Backing fabric
1/2 yd. Binding fabric
64″ x 72″ Batting

Step 1 
Remove selvedges from strip ends. Choose 4 strips that are close in color and in high contrast to most of the other jelly roll strips. These will be used for the frames. Choose one more strip that contrasts to the 4 for centers of framed squares. Set aside.

Step 2 – Quilt Sections
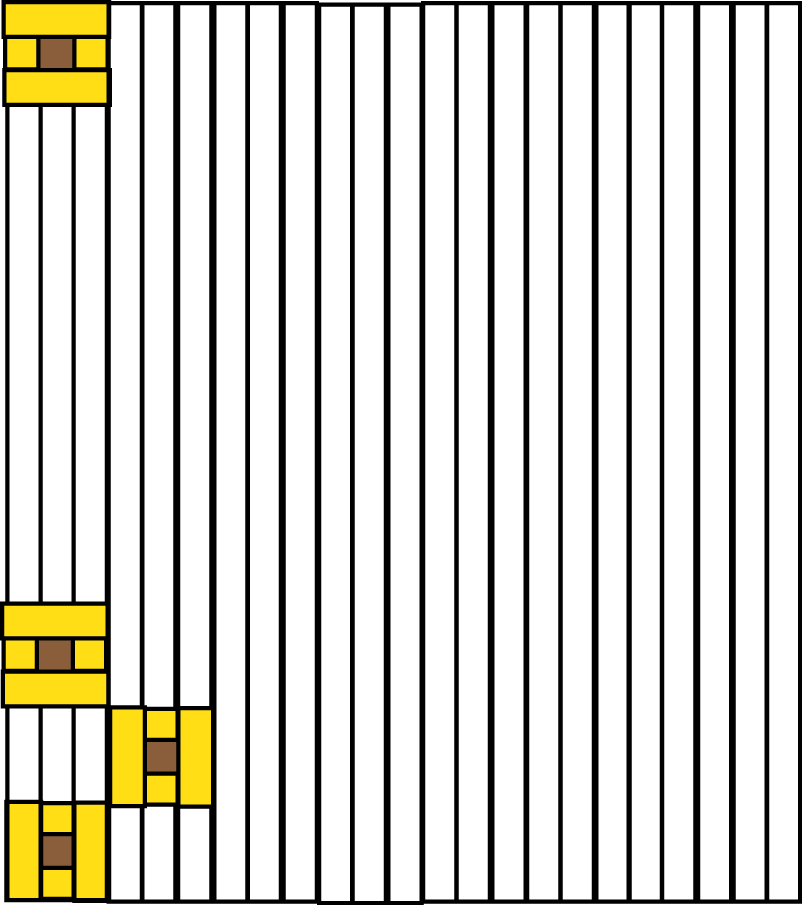
Using a design wall, the floor, or whatever you’ve got, lay out the remaining strips in two sections.

Use 23 strips for the lower section and 10 strips (+ scraps later) for the upper section. Line up lower section strips vertically in the color order you prefer. I used most of the darker strips at left in the bottom section shading and ending with lighter fabrics at right. Use 10 strips for the upper section and shade for best contrast with framed squares placement.

Step 3 – Make 9 Framed Squares
Sew one set of high contrasting strips (3 strips) together approx. 13″ in length with the darker strip in the middle. Turn the strip to horizontal and cut 5, 2-1/2″ strips. These are the centers of the framed squares. Do the same with the other two strips you set aside (10.5″ length this time) and cut 4 center strips for a total of 9 centers 

Sew strips to the sides of each of the framed square center strips. Press seams out and trim as needed.

Step 4
Beginning at the left side of the lower section, sew three strips together (lengthwise). Press. Sew the next three strips together in the same way (strip sets 1 and 2). Press.

Step 5
Sew one framed square to the top of strip set 1. Press seam toward dark. Trim strip set 1 to same length as strip set 2.

Step 6
Press top and bottom edges under (1/4″) on 2, framed squares. Press under top edge of square to be used at bottom of strip set 1. Place strip set 1 next to strip set 2. Pin squares in place as shown with one square matching up to bottom of strip sets 1 and 2. Offset and place the other two squares matching up corners.

Step 7 
Appliqué or topstitch top and bottom edges in place as pinned on each strip.

Step 8 
Carefully cut away the extra fabric beneath the appliquéd squares, leaving a 1/4″ seam allowance. Remove stitches and separate the scrap strips. Press. Scraps may come in to use to extend the width of the quilt upper section.

Step 9 – Complete Lower Section 
Sew all the remaining strips together lengthwise as you laid it out creating one piece with 4 framed squares. Press.

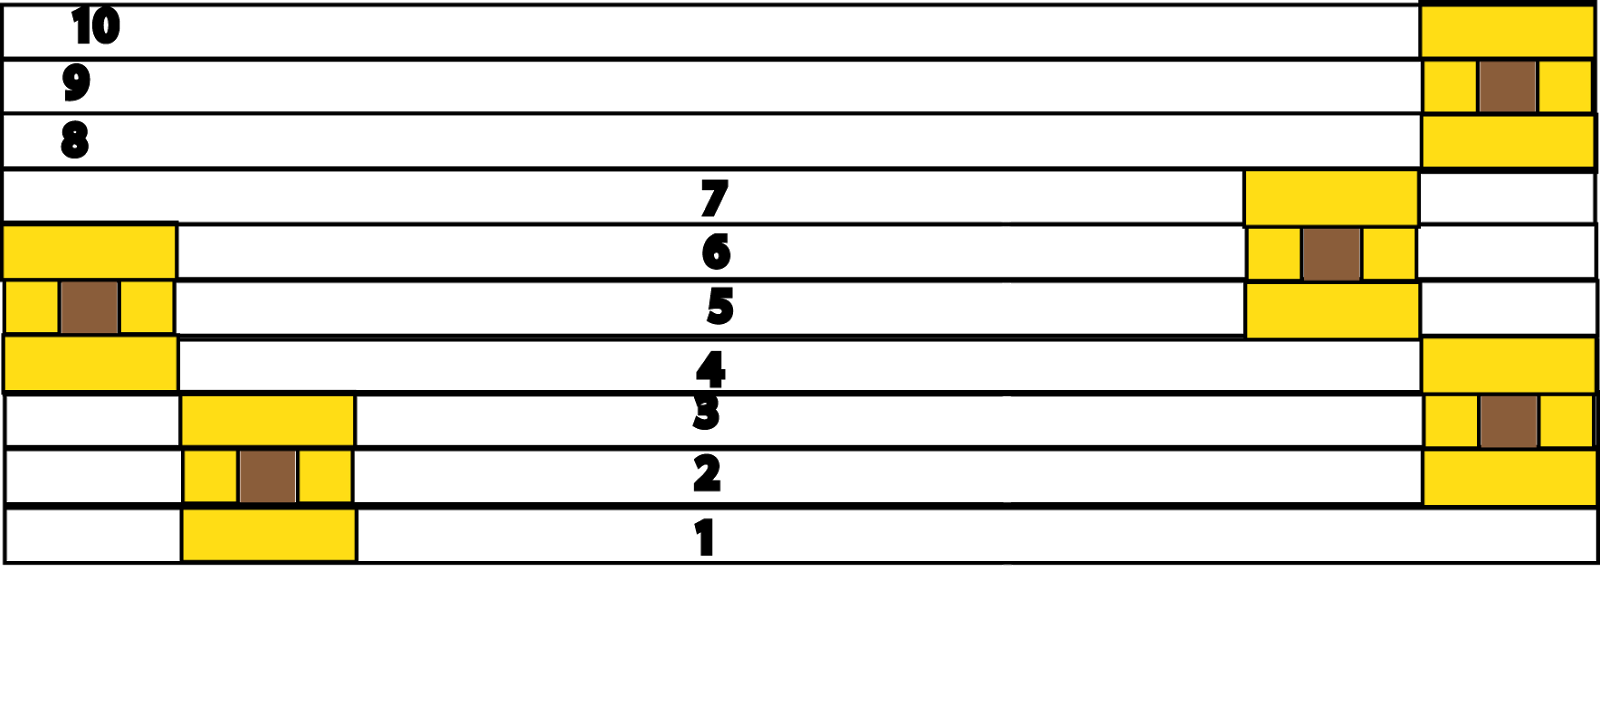
Step 10 – Upper Section
Number horizontal strips starting from bottom up 1-10. Sew strips 8, 9 and 10 together and sew a framed square to the end at top right. This is the top of upper section. Trim this strip set to match the width of lower section. Press.

Step 11
Sew strips 4, 5 and 6 together and sew a framed square to the left end. Press seam towards strips. Trim to same width as lower quilt section.

Step 12
Use strip scraps from beneath appliqués and ends of sets to extend width of remaining strips (1, 2, 3 in diagram) in upper section. Sew all the horizontal strips together to create one piece the same width as the lower section.

Step 13
Press edges under on remaining 3 squares for appliqué. Place as shown and appliqué edges except for the ones within seam allowance (bottom and far right edges).

Step 14
Sew the two sections together. Press seam towards upper section.

Step 15
But wait, there’s more… You’re sure to have more strip scraps available. Get more by trimming away any extra beneath appliqués. Sew scraps together end-to-end to yield two strips the length of the quilt. Sew one strip to each side which gets you an extra four inches in width.

Finish
Press the top again and make a quilt sandwich. Easy quilting suggestion: Start at top center and stitch vertical lines in varying widths out to the edges.

Trim excess batting and backing. Prepare and sew on binding.


One colorful, quilted throw approx. 53″ x 64″ finished.

You could easily make it a little bigger by adding a border. Have fun!

Robin Nelson
{www.craftsisters.com}