Garden Girl Quilt


We’re back…Yep, it’s been awhile since Kelli and I have had a quilt for you here at Moda Bake Shop. We’ve been really busy.  We sent our quilt book, scheduled to come out in early 2015, to our publisher.  Kelli’s been taking college classes and we bought an old foreclosure house that we are remodeling.  You can read all about that and see pictures on our blog, Jo’s Country Junction.  With all that going on you’d think we’d not have time to to sew anything else..NOT!!  Sewing is therapy for us and trust me, we need therapy.  Besides, who can resist a great fabric line like MoMo’s Avant Garden…not us!  Read the pattern here then stop over to our blog and we’ll fill you in on some behind the scenes info about the quilt and we have a sweet $50 gift certificate for one our readers to win.

Before we get going here are a few stats on the quilt.

Finished Block Size:  10”
Finished Quilt Size:  80” x 90”

Layout:  8 x 9

Fat Quarter Bundle of MoMo’s Avant Garden
4 yards Blue Background
4- 1/3 yard cuts of coordinating solids/dots
5 1/2″ yards backing
3/4 yard binding

**Note WOF means the width of the fabric**

Pick 24 fat quarters from the bundle.  From Each (of 24) fat quarters cut:
                -Cut 2- 7 1/2″ x 21” strips.  Subcut 1- 7 1/2″ x 21” strip into 2- 7 1/2″ squares
                -Cut the remaining 7 1/2″ x 21” strip into 1- 7 1/2″ square and 2- 3 ½” x 13.5” rectangles. 
                -Cut the 2- 3 1/2” x 13 1/2″ strips into a total of 12- 2” x 3 1/2″ rectangles.
                **From each fat quarter, you will need a total of 3- 7 1/2″ squares and 12- 2” x 3 1/2”                                  rectangles.
From Blue background fabric:
                -Cut a total of 36- 2” x WOF strips
                                -Subcut into a total of 576- 2” x 2 1/2″ rectangles.
                -Cut a total of 29- 2” x WOF strips
                                -Subcut into a total of 576- 2” squares
From Each of 4 coordinating solids/dots (cornerstones):
                -Cut 4- 2” x WOF strips
                                -Subcut each strip into a total of 72- 2” squares of each color (288- 2” squares)
From binding fabric:
                -Cut a total of 9- 2 1/2″ x WOF strips.
Sewing Instructions (for one block):
1.  Using 4- 2” squares and 4 matching 2” x 3 1/2″ rectangles, place a blue square, right sides together, on the corner of each of the colored rectangles.  Sew from corner to corner on the blue square.  

Trim seam allowance to a quarter of an inch.  Press to the blue.  Add a second square to the opposite side of the printed rectangle.  Again, sew from corner to corner of the blue square.  Trim seam allowance to a quarter of an inch and again, press to the blue. 

 Repeat for each matching colored rectangle.

2.  Attach a 2” x 2.5” rectangle to opposite sides of each flying goose created in step 1.  Press to the blue rectangles.

3.  Attach a 2” colored square (cornerstones) to opposite ends of two of the units created in step 2. 

 Attach the remaining two segments created in step 2  to the opposite sides of the main 7 1/2″ colored squares.  Press to the colored center.

4.  Attach the remaining segments (with cornerstones) to opposite sides of the block.  Press to the colored middle.

5.  Repeat to make a total of 72 blocks.
6.  Arrange in a 8 x 9 layout sewing the blocks first into rows then sewing the rows together.
7.  Quilt as desired. Check out our blog, Jo’s Country Junction, to see what we did for a quilting design.

8.  Join binding strips and bind.


Finished Quilt Size:  80” x 90”

This is such a fun fabric line…perfect for picnics and perfect for any girls room.  We couldn’t resist the fabric!!


Jo and Kelli Kramer
{ Jo’s Country Junction}

Scattered Squares Pillow


Hello All!–Corey Yoder of Little Miss Shabby here!  I always love hanging out over here on MBS and sharing a new project with you. =)  This is a quick, beginner friendly design that will add a dash of panache to your living space.  It uses just one mini charm pack and a bit of yardage–you might even already have all the supplies you will need to complete this project.  I love adding hand quilting to my projects but you could easily swap out the hand quilting for machine quilting and have this pillow on your couch in a jiffy.


(The fabrics I used are in parentheses)

-1 Mini Charm Pack (Miss Kate)
-1/4 yard background fabric (9900-98)
-1/8 yard border fabric (55091-12)
-1/2 yard pillow backing fabric (55090-17)
-1/8 yard binding fabric (55092-17)
-20″ square piece of pillow backing fabric (this will be used for the pillow top sandwich)
-20″ square piece of quilt batting

-18″ pillow form

Thread for hand quilting, if desired.  I prefer to use an 8 wt. Perle Cotton.

Cutting Instructions

From the background fabric cut:
(3) 1″ x width of fabric strips, subcut into (36) 1″ x 2 1/2″ rectangles
(3) 1″ x width of fabric strips, subcut into (36) 1″ x 3″ rectangles
(2) 1″ x width of fabric strips, subcut into (2) 1″ x 15 1/2″ strips & (2) 1″ x 16 1/2″ strips
From the border fabric cut:
(2) 1 1/2″ x wof strips, subcut into (2) 1 1/2″ x 16 1/2″ strips & (2) 1 1/2″ x 18 1/2″ strips
From the pillow backing fabric cut:
(2) 12 1/2″ x 18 1/2″ rectangles
From the binding fabric cut:
(2) 2 1/8″ x wof strips, trim selvages and sew together to create continuous binding


Piecing Instructions 

Notes:
-Use a scant 1/4″ seam allowance

-You will need (36) mini charms from the charm pack.  I opted to remove several of the solid colors.
1.  Sew a 1″ x 2 1/2″ background rectangle to the side of each of the 36 mini charm squares.  Press toward the rectangle.
2.  Sew a 1″ x 3″ background rectangle to the side of the units made in Step 1.  Press toward the rectangle.
3.  Layout the squares as pictured.  Sew the squares together in horizontal rows.  Press seams in adjoining rows in opposite directions.  Sew together the rows.  Press seams in one direction.

Adding the Borders:

(Press all seams away from the center)
-Sew the 1″ x 15 1/2″ background strips to the sides of the pillow top.
-Sew the 1″ x 16 1/2″ background strips to the top and bottom of the pillow top.
-Sew the 1 1/2″ x 16 1/2″ border strips to the sides of the pillow top.
-Sew the 1 1/2″ x 18 1/2″ border strips to the top and bottom of the pillow top.
This completes your pillow top!
Layer the pillow top, 20″ batting square, and 20″ pillow backing square to create a pillow sandwich.  Quilt as desired.

Finishing the Pillow

1.  Hem (1) 18 1/2″ side of each of the 12 1/2″ x 18 1/2″ pillow backing rectangles.  To do so, fold the edge in(wrong sides together) approx. 1/4″ and press into place.  Fold in an additional 1/4″ and press.  Top stitch into place.

2.  With the pillow top facing down, place the hemmed rectangles as shown.  The finished pillow backing edges will overlap in the center of the pillow and all raw edges will be aligned.


3.  Pin the backing pieces into place.  Use a long stitch and baste 1/8″ around the perimeter of the pillow top.
4.  Sew the binding onto the pillow to complete your pillow.  The scalloped fabrics in Bonnie & Camille’s fabric lines are perfect binding fabrics.


1 beautiful 18″ x 18″ Pillow which, incidentally, is the perfect companion to my Ruby, Pearl, & Opal quilt which I shared on MBS several years ago when Bonnie & Camille’s Ruby line of fabric was released.

You can find the tutorial for this quilt here.

I hope you have enjoyed this tutorial!–I hope you’ll stop by my blog, Little Miss Shabby, for a visit!

Corey Yoder
{Little Miss Shabby}

Christmas in July Round Up

Fabric stores are teeming with beautiful and festive Moda holiday fabric. Over the years our talented Chefs have whipped up some lovely holiday projects to help you get a jump start on Christmas sewing.

Click through to view the links to the recipes.

-Oda May


Jelly Roll Race Remix Quilt


Hello, Karin Vail from Cascade Quilts back again this month with yet another Christmas in July project!

2 Jelly Rolls (or 2 jelly roll race quilt tops – or a combo of the two!)  I used 24th and Pine by Basic Grey
2/3 yard for binding (or use leftovers for a scrappy binding)
1 yard inner border (cut into 8@ 4.5”WOF strips)
1 1/2  yards outer border (cut into 8@ 6.5”WOF strips)
5 yards backing

Probably most quilters have tried this at one point or another –  a ”Jelly Roll Race” (JRR) quilt top.  It works up fast for sure – but makes a rather ho-hum quilt.  I made one myself years ago, but it was not ever destined to be made into a quilt after I finished the top and didn’t love it.
So, WHAT do you do with a JRR quilt top that you love the fabric, but don’t love the design?  Rework it by adding yet another JRR top to the mix…..
Now, there are lots of JRR quilt tutorials out there, so I am not going to go into how to make those.  What I am going to explain is how I remade these two JRR tops into a beautiful quilt with MUCH more visual interest!  These JRR tops will each measure around 50”x64” to begin with.

Yes, I made TWO identical JRR tops, but you could certainly make two different tops and use this same technique.  It is similar to a ‘bargello’ technique.  If you did this, I would alternated between strips from the two JRR tops to get a uniform look throughout.
First, take one JRR top and fold it in half so that the top strip can be sewn to the bottom strip – so you make a JRR ‘tube’.  Think of it like a *giant* trip-around-the-world block setup.  From that tube, you will cut cross-section strips.   Here the seam has been sewn to make the tube and it’s again folded in half horizontally so I can do the subcutting.
In this quilt, I cut my strips 2.5” so that I have 2” squares in my final quilt, but you can certainly change it up and cut varying widths of strips!
For the first strip, take apart one seam between blocks.
The next strip, you will take apart the next seam up from the one you took apart on the first strip, and so on.
To make it easier to keep track and keep them in the right orientation (how they came off of the original JRR top), I cut only a few strip tubes at a time and sewed them a few at a time.
Match up your seams and sew the long verticle seams.
Where the fabrics change, you will get several almost-half square triangles.  Or, you might luck out and get a perfect HST in the mix too:
You should be able to get twenty 2.5” strips from each JRR ‘tube’, so with two ‘tubes’ you would be able to get a total width of 80” if you used it all.  But, since the length of the quilt is only 64” at this point, and I didn’t want an 80×64 quilt,  I decided to stop at 64” wide and add borders to enlarge it and have a balanced quilt.  I personally prefer a square quilt since you don’t have to worry which side is ‘up’ that way 🙂  If you are using 2 identical tops, cut 20 strips from one top, and 12 from the second.  If you are using 2 different JRR tops, then cut 16 strips from each JRR ‘tube’.
Now, take your 8@ 4.5”WOF strips and sew them into pairs to create 4 longer strips.  Measure your quilt top, cut border fabric to match, and sew the border on top and bottom.  Mine measured 64.5”.  Press, measure the length you will now need for the sides and cut your remaining border strips to length, and sew on left and right sides.  Mine measured 72.5”.
For your second border, take your 8@ 6.5” strips and sew them into pairs.  Again, measure your quilt top as per the first border.  My first measurement for the top/bottom was 72.5” and second for the sides was 84.5”.


A generous 84”x84” quilt!

Karin Vail
{Cascade Quilts}

Beach Umbrella Quilt


Hello everyone! I’m Becky from Patchwork Posse. Today I am sharing the quilt pattern for a cute and beachy umbrella quilt. During the summer I find that a little bit of shade goes a long way! These umbrellas are all about giving you a place to hide away from the heat. The fun contrast in the Weeds fabric collection with red, blacks, and grays is perfect for showcasing the fun print on the umbrella. Even though there is curved piecing in this quilt, once you get the hang of it, you can quickly sew all the blocks together. The key is pinning. You will be using pins. A lot of them. If you notice one umbrella is facing the wrong way….I did this on purpose. You don’t have to do that if you don’t like. I find it fun to add something a little ‘off’ in quilts.

  • 5 to 10 fat quarters in red for the umbrellas
  • 5 to 10 fat quarters in gray for the block backgrounds
  • ½ yard fabric for spacer blocks (I used a light gray on dark gray polka dot); cut into (12) 7″ squares
  • 1½ yards of red ric rac for umbrella handles; cut into (13) 4″ pieces
  • Coordinating thread for top-stitching the ric rac
  • ¼ yard red fabric for 1st border; cut into (2) 2″ x 32″strips and (2) 2″ x 35″
  • 4 to 5 gray fat quarters for 2nd border; cut into (60) 2″ x  9″ strips
  • 1 fat quarter for cornerstones; cut into (4) 4″ squares
  • {Beach Umbrella Quilt template at the end of the Printer Friendly file}

(1) Cut out the umbrella pieces using the {templates}. Make sure you pay attention to the grain line arrow on the template. This will help keep the curves on the bias which will be a lot easier to sew. I used red for the umbrella parts and the dark gray and black for the background. Notice that section D is the bottom of the block and where you will be sewing the ric rac handle. NOTE: when cutting your fabric make sure you ADD 1/4″ to each. If you don’t, your blocks will be too small.

(2) Pin the center of piece A to the center of piece B- the will be curved in different directions.


(3) Pin the ends of the pieces together.


(4) Sew across this edge, stopping every few stitches and easing the edges together. When you get to the center, leave your needle down and adjust the rest of the piece.

(5) Using this method, continue sewing pieces C and then piece D to make your block. This is what the back of the block will look like:

 
Front of the block:
 

(6) Press the block.

(7) Repeat steps (1) through (6) to make a total of 13 umbrella blocks

(8) Pin the ric rac in place and sew down the center of it using matching thread. Tuck the ends under to make it look more finished.

(9) Taking your spacing blocks and your umbrella blocks, sew 3 rows:

(10) Taking your spacing blocks and your umbrella blocks, sew 2 rows:

(11) Sew your rows together to make the quilt center.

(12) Attach the first (red) border to the top and bottom (shorter strips). Attach the longer strips to the sides.

(13) Create the gray pieced border:

  • Sew (6) 2″ x 9″ strips together. Square up to 9″. 

  •  Cut from corner to corner twice to make 4 triangles. 

  • Sew the triangles together. Notice that the strips will be going different directions. You can choose if you want them to miter or go the same direction. The point will go past the other piece by a little bit. That is what you want to happen. In the example, I chose to keep them all going the same direction. The strips will NOT line up. Don’t go crazy trying to make that happen. 

  • Sew additional triangles together until you have 4 borders with 9 triangles in each. 

  • The ends will have a point and aren’t quite long enough. You will need to unpick one end of the row. 
  • Sew the extra triangles to the ends of the rows to get them to the correct length and to make them square on the ends. The 4 border pieces should be 35″ long each. 

(14 )Pin the border to the quilt center and sew to the top and bottom of the quilt.

(15) Sew the 4 squares to the ends of the other 2 pieced border rows and sew these rows to the sides of the quilt.

(16) Layer, baste, quilt, and bind.

Above is a close-up of the quilting I chose. Feel free to do whatever quilting pattern you would like.


Finished Quilt Block: 7″ x 7″
Finished Quilt: 42″ x 42″

For more quilt tutorials and easy sewing projects, stop by {patchworkposse.com} or follow me on {Facebook}. You can also find me on {Pinterest}. Hope you enjoy this quilt!

Becky Jorgensen
{www.patchworkposse.com}

Peppermint Swirl Christmas Tree Skirt

Happy Christmas in July! I’m Heather from Heather Kojan Quilts. I’m excited to share this tutorial for a super fun Peppermint Swirl Christmas Tree Skirt! Start now and you’ll have it done way before the holiday rush. (Tip: Make this in any fabric of your choosing to create a fun table topper for any season. Or, maybe a fun and unique baby quilt or play mat. Simply applique a center circle and you’re good to go!)

So, this is truly made in July, and nary a Christmas tree to be seen. So, here you have the perfect basketball hoop skirt!

Ready to get started?

12 Fat Quarters of Basic Grey’s 25th and Pine (4 green, 4 red and 4 white)
3 yards backing fabric
1/2 yard binding fabric

Batting, 54″ x 54″

Nine Degree Wedge Ruler

I’m using the fabulous 25th and Pine from Basic Grey. I love the feel of this fabric. So luxurious.

You’ll need 12 fat quarters to make your swirl: 4 green, 4 red, 4 white. 

Take each of your fat quarters and cut into strips, 2.5″ x 22″. You should get 7 strips from each fat quarter to yield 28 strips of each color.

Next we’re going to make strip sets. Following the chart below, we’ll make 9 unique strip sets. R=Red, G=Green, W=White. Use a 1/4″ seam allowance throughout this project.

Row 1
Row 2
Row 3
Row 4
Row 5
Row 6
Row 7
Row 8
Row 9
R
R
R
G
G
G
W
W
W
R
R
G
G
G
W
W
W
R
R
G
G
G
W
W
W
R
R
G
G
G
W
W
W
R
R
R
G
G
W
W
W
R
R
R
G
G
W
W
W
R
R
R
G
G
W
W
W
R
R
R
G
G
G
W
W
R
R
R
G
G
G
W
W
R
R
R
G
G
G
W
W

Sew your first strip set together, using the chart above. A finished strip set should measure 22″ wide and 18.5″ top to bottom.

After you sew your first strip set, lay out the next strip set beside the first. Try to avoid having the same fabrics next to each other. Label your strip sets 1-9 as you sew them. Press the odd numbered strip sets in one direction, and the even numbered strip sets in the opposite direction. After sewing all of the strip sets, you should have one leftover strip of each color. 

Now it’s time to cut your wedges.

You need to get 5 wedges from each strip set. Place the ruler so that the 22″ mark is aligned with the top edge of your strip set. Use your seam lines on your strip set and the lines on the ruler to make sure your ruler is placed correctly and everything is lined up straight. It’s helpful if you can place your cutting mat so that you can walk around it to make the cutting easier. Cut your first wedge. Re-position ruler at the top edge, and cut your second wedge. Repeat to make 5 wedges total. Stack the wedges (I clip them with a wonder clip) and label stack #1. You’ll end up with smaller “waste” wedges as you cut. Save these for creative play later!

Continue to cut your wedges from each strip set. Label and keep in order.

Find a nice open spot of “design floor”. Lay out your wedges in a circle, starting with one, continuing through nine, then repeating with one through nine and so on. Do you see the spiral happening? Cool, right? You’ll only need 40 wedges for this project. Again, set the remaining wedges aside for creative play (mug rugs? table runner?) After you have all 40 wedges laid out, check to make sure the spiral works and that nothing got out of order. (Your ending wedge will not create a continuous spiral with the first wedge.)

Let’s sew the spiral. I like to sew 8 wedges at a time. I pair the first 2, second 2, third 2 and fourth 2 by laying the right sides together. At my sewing machine, I sew the first pair, then 2nd, 3rd and 4th, chain stitching as I go. Because we did alternate pressing, the seams should nest together nicely. I then sew the first two pairs together, then the last 2 pairs together, and finally the 2 four wedge units together. Then I take this unit and return it to the spiral. Repeat for the reaming wedges. Once I have all 5 eight wedge units sewn, I check to make sure the spiral is continuous and nothing got out of order. Then I sew all the units together, including the seam where the end meets the beginning. I mark this seam with a pin.

Pretend there’s only 4 pairs of wedges above!
Back at the sewing machine, I do a little stay stitching around the inside and outside circle to keep the stitches from “popping”, about 1/8th inch from the edge. 
Cut your backing fabric into two pieces, 54″ in length x width of fabric. Trim selvages and seam the two pieces together. You’ll have a piece of fabric 54″ x 80″ (approximately). Trim to 54″ square. 
Layer your backing, batting and skirt top. Baste as preferred.
Time to quilt! I used my walking foot and did straight line quilting on each side of the seams. I started and stopped each line of quilting where wedge one and forty meet (where I placed that pin earlier.) Be sure to do an 1/8th of an inch stitch around the inner and outer circle edges as well. 
With your scissors, trim around the outer circle. Cut right down the seam where wedge one and wedge forty meet, then continue to cut the inner circle.

Make your bias binding. You’ll need approximately 240″ of bias binding. 1/2 yard will give you more that plenty! Lay out your 1/2 yard of fabric. Use the 45° line of your ruler to lop off the bottom left and top right corners of your fabric, approximately 10″ from the point. I do this so that I don’t have super short pieces of binding fabric. Keep the 45° angle going, and cut binding strips 2.5″ wide. If you want to make the optional ties, reserve two lengths, approximately 22″ long.

To join your strips, place two pieces together, matching the right angles.
Place right sides together. The strips will be at a right angle. Be sure to off set the corner by a 1/4 inch, as shown in the picture. Sew strips together with a 1/4″ seam. Continue to join all the strips until you have enough binding. Fold binding strip in half and press. Voila! Bias binding!
Optional ties: Take one piece of the bias binding strip approximately 20-22″ long. Fold in half length wise. Press. Unfold, then press so that each long edge meets the center “line” that you just pressed. Fold each short end under 1/4″ and press. Re-fold and press entire tie. Stitch along the long edge and short folded edges, close to the open edge. Cut into 2 lengths, approximately 10″ each. Repeat with second strip.
Pin ties in place with raw edges together, approximately 4″ from inner and outer circle. These will get sewn into the tree skirt as you sew on your binding.
Bind your quilt. Congratulations ~ your first Christmas finish of the year!


One Peppermint Swirl Christmas Tree Skirt, 45″ diameter.

Heather Kojan
{heatherkojan.blogspot.com}

Trifle Dish Quilt

Today’s instructions give fabric requirements for the entire quilt top plus backing and binding. Remember that there are many options when piecing the Trifle Dish blocks so you can make substitutions using other precuts for a more scrappy look. Several options are given.

  • 1 fat quarter bundle (at least 32 fat quarters) -OR- 52 layer cake squares {1 layer cake plus 5 fat quarters cut into 10 additional layer cake squares} + 12 fat eighths -OR- 5 charm packs + 12 fat eighths 
  • 4¼ yards background + whipped cream fabric
  • 41 layer cake squares for border (optional)
  • ¾ yard binding fabric (370″) | ⅝ yard binding fabric if you omit the borders (306″)
  • 9 yards backing fabric | 5⅛ yards backing fabric if you omit the borders


Links below will take you to the instructions for each individual row. For the entire set in one file, scroll to the bottom of this post for the Printer Friendly Version.

6 blocks measuring 9½” square + (5) 2½” x 9½” sashing strips = 64½” x 9½”

8 blocks measuring 8½” square + 0 sashing strips = 64½” x 8½”
 
{whipped cream}
13 blocks measuring 4½” w x 8½” h + (12) 1 ½” x 8 ½” sashing strips = 64½” x 8½”
6 blocks measuring 10½” w x 8½” h + (2) 2½” x 8½” end sashing strips = 64½” x 8½”
6 blocks measuring 9½” square + (5) 2½” x 9½” sashing strips = 64½” x 9½”
8 blocks measuring 8½” square + 0 sashing strips = 64½” x 8½”

5 blocks measuring 11½” square + (6) 2¾” x 11½” sashing strips = 64½” x 11½”


80½” w x 99½” h with borders | 64½” w  x  83½” h without borders

Today is our last installment of the Trifle Dish series and we want to see what you’ve been sewing! Link up to your blog/Flickr/Instagram at the end of this post to show us your blocks so far. We will leave the linky party open for a week and then choose 3 winners from the list.

Summer Sand and Stars Quilt


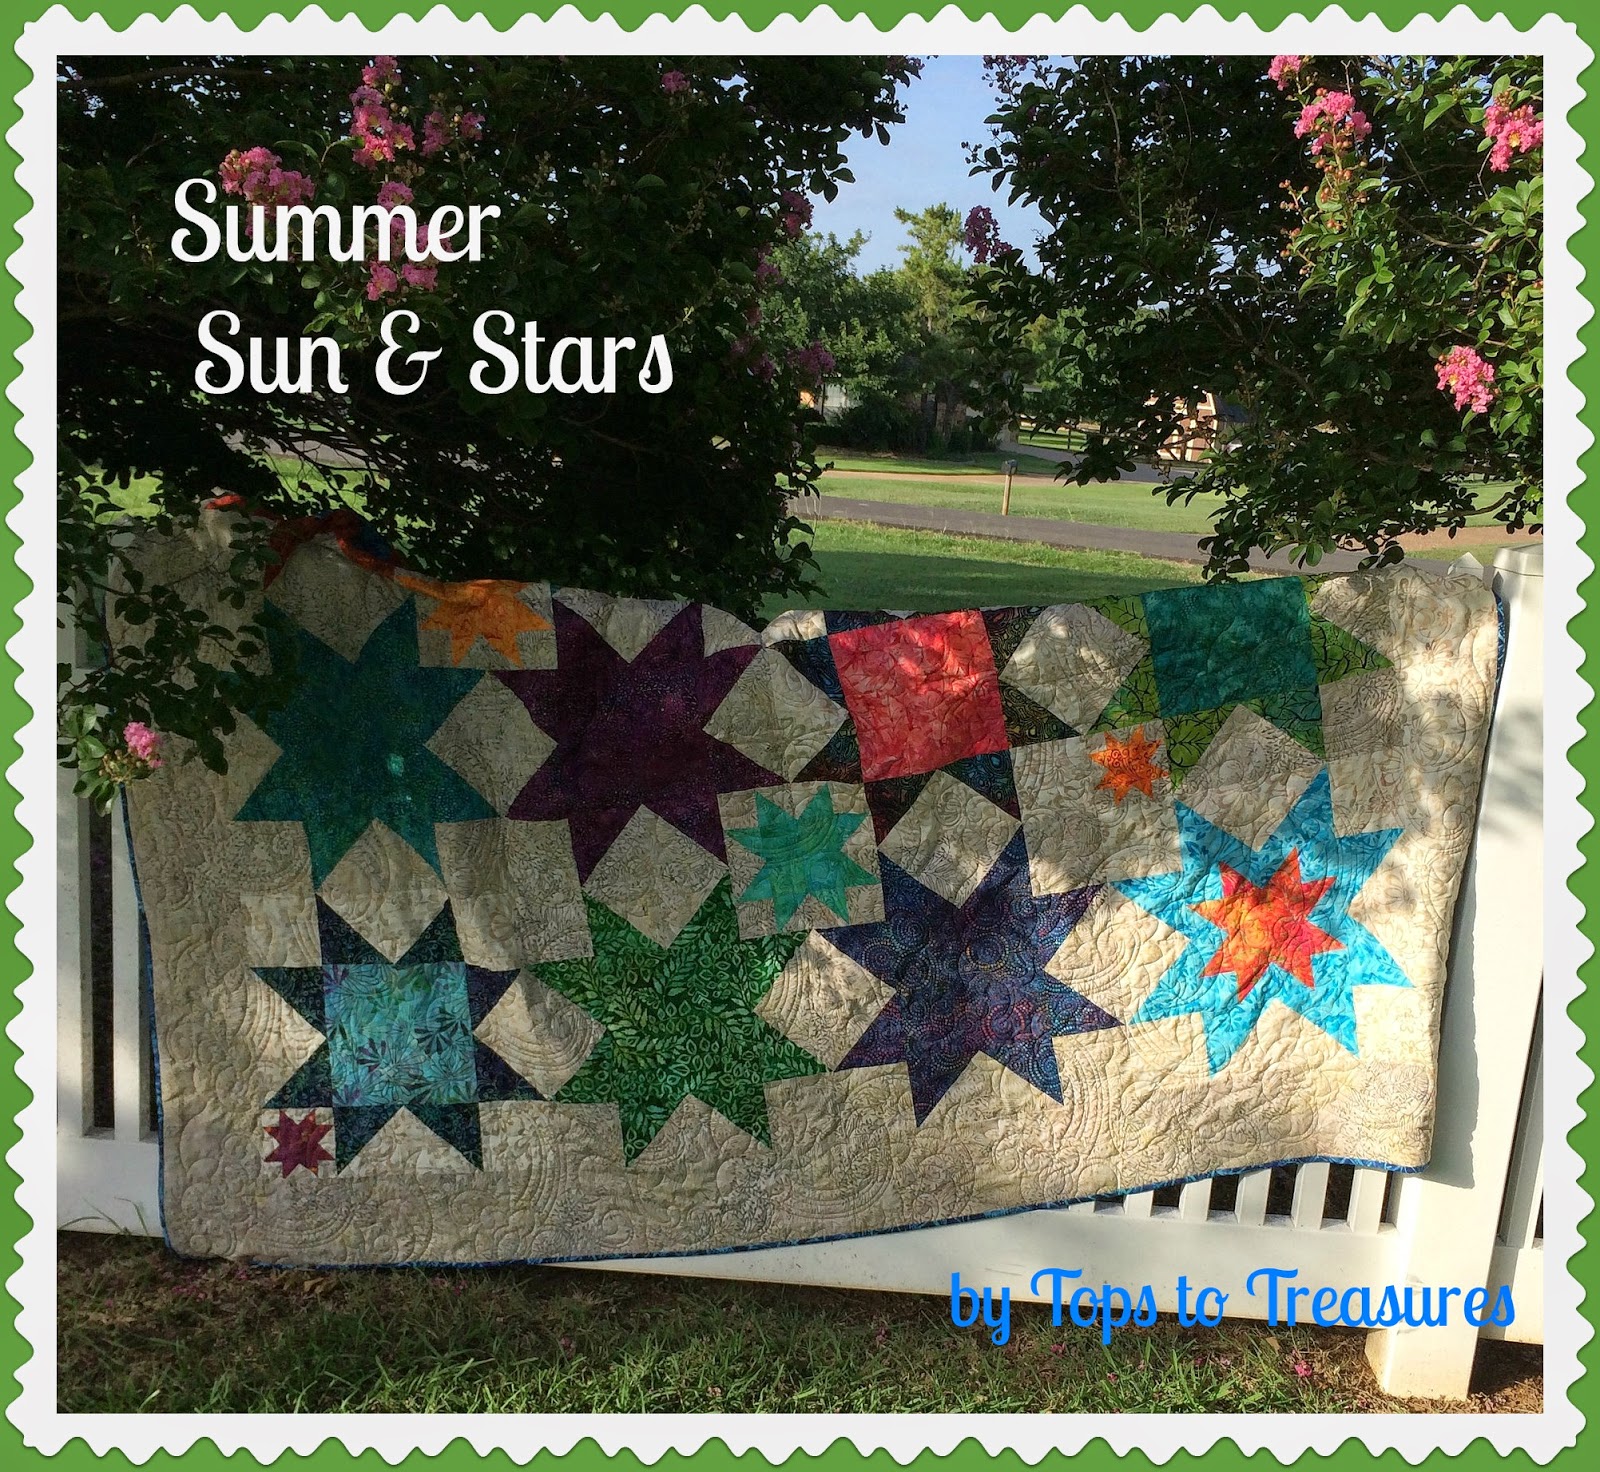
Summer Sand and Stars is about stars! Big stars, little Stars, embedded stars, floating stars…all made from the same basic set of instructions.  Playing with shadows and color, it is the perfect picture of summer daydreams and night sailing.

This quilt is made from 12 large blocks, set in a 3 x 4 grid.  There is one border with one setting square.


  • Stars: 1 Fat Quarter Bundle – I used Catalina Batiks
  • Backgrounds:
    • 1¾ yards light – I used SKU #4328-41 from Summer Vacation Batiks
    • 2½ yards dark – I used SKU #4328-42 from Summer Vacation Batiks
  • Binding: ¾ yards – I used SKU #4329-29 from Catalina Batiks
  • Backing: 5½ yards  – I used SKU #4329-30 from Catalina Batiks
  • It will also be helpful to have at least 13 Ziploc sandwich bags to hold your pieces.
  • 3 pieces of printer paper – on which to print a paper foundation pattern for the tiniest stars. When you print the patter be certain that the longest dotted line of the pattern measures 5″.  If it does not you can adjust its size by fiddling with the sizing on your printer. The Printer Friendly file at the end of this post has the foundation pattern for the star.

Determine Color Placement. Think of your quilt as a piece of 8½” x 11″ white printer paper.  In your mind, draw a line from one corner of the paper to its diagonal opposite. The colors in my quilt are loosely arranged along this line. The cooler colors (blues, purples, and greens) live in the north, above the line, and the warmer colors (reds, yellows, and oranges) live to the south, below the line. Sparkle happens when you let some of the colors drift across the imaginary border line.  It creates little pockets of interest that keep your eyes moving across the quilt.


Look at the gray scale drawing below.  Each block of the quilt is numbered.  The light and dark backgrounds are shaded respectively with white and dark gray.  The cold colors are black.  The warm colors are light gray.  Some blocks have three fabric in them.  Where this is the case an additional gray is used.

With all these things in mind, turn to your stack of fabrics. You want to select the fabrics for each square and label them accordingly.

Fat Quarter cutting diagram

Each Big Star (1 center square and 8 points) can be made from 1 fat quarter with enough left over to make one Center Star and a Tiny Star.   You could make the Big Star in block #2 and the Center Star in block #9, and one of the Tiny Stars in block #11 all from the same fat quarter, but no more

NOTE: Blocks 2, 3, 5, and 6 share a Quarter Star and so do blocks 4, 5, 7, and 8. You want to make sure that you use the same fabric for these pieces.

Block Types. There are 7 different block types in this quilt.  Their placement is illustrated in the drawing below and the block types are shown in the other diagram.


Before you start cutting, make labels for your blocks and block components so you can keep track of all the pieces. Label 13 different Ziplocs with numbers 1 through 13 (these are for the 12 blocks in the quilt top plus the star block pieced into the border). Make additional Post-It labels for each individual block and stick them on the Ziploc bags. Use Wonder Clips or paper clips to keep the pieces for each type of star together if desired.

  • Bag #1 | Labels for Big Star 1 (BS1) and Tiny Star 1 (TS1)
  • Bag #2 | Labels for BS2 and Quarter Star 1 (QS1)
  • Bag #3 | Labels for BS3, Center Star 1 (CS1), and QS1
  • Bag #4 | Labels for BS4  and QS2
  • Bag #5 | Labels for BS5, QS1, and QS2
  • Bag #6 | Labels for BS6 and QS1
  • Bag #7 | Labels for BS7 and QS2
  • Bag #8 | Labels for BS8 and QS2
  • Bag #9 | Labels for BS9 and CS2
  • Bag #10 | Labels for BS10 and CS3
  • Bag #11 | Labels for BS11 and TS2
  • Bag #12| Labels for BS12 and Tiny Embedded Star (TES)
  • Bag #13 | Labels for Tiny Floating Star (TFS)

CUTTING DIRECTIONS
Cut the pieces for one block at a time. When cutting from fat quarters, cut the biggest pieces you need first. When cutting background fabric, cut a 5½” x WOF strip.  Starting with the biggest pieces, cut all of your pieces from this strip.  Save any leftover bits and use them for the smaller cuts as you go.  You should have plenty of fabric.

BLOCK 1A | Big Star 1 + Tiny Star 1

  • BS1, cut (4) 5½” squares for points and (1) 9½” square for center
  • TS1, cut (1) 2¾” square for center and (8) 1½” x 2″ for points
  • Background (light), cut:
    • (4) 5½” squares for Big Star points
    • (3) 5″ squares for Big Star corner patches
    • (4) 1¾” squares for corner patches of Tiny Star
    • (4) 1¾” x 2¾” rectangles for edge patches of Tiny Star
  • Paper Pattern for Tiny Star. Be certain that the longest dotted line of the pattern measures 5″.

BLOCK 2B | Big Star 2 + Quarter Star 1

  • BS2, cut (4) 5½” squares for points and (1) 9½” square for center
  • QS1, cut (1) 3½” square for Quarter Star points and (1) 2¾” square for center
  • Background (dark), cut:
    • (3) 5” squares for Big Star corner patches
    • (4) 5½” squares for Big Star points
    • (1) 3½” square for Quarter Star points
    • (1) 2¾” square  for Quarter Star corner

BLOCK 3C | Big Star 3 + Center Star 1 + Quarter Star 1

  • BS3, cut (4) 5½” squares for points, (4) 2¾” squares for block corners, and (4) 3½” squares for points
  • CS1, cut (1) 5” square for center and (4) 3½” squares for points
  • QS1, cut (1) 2¾” square  for center and (1) 3½” square for points
  • Background (dark), cut:
    • (3) 5” squares for corners
    • (4) 5½” squares for Big Star points
    • (1) 2¾” square  for Quarter Star corner
    • (1) 3½” square for Quarter Star points

BLOCK 4B | Big Star 4 + Quarter Star 2

  • BS4, cut (4) 5½” squares for points and (1) 9½” square for center
  • QS2, cut (1) 3½” square for points and (1) 2¾” square for center
  • Background (dark), cut:
    • (3) 5” squares for Big Star corner patches
    • (4) 5½” squares for Big Star points
    • (1) 3½” square for Quarter Star points
    • (1) 2¾” square for Quarter Star corner

BLOCK 5D | Big Star 5 + Quarter Star 1 + Quarter Star 2

  • BS5, cut (4) 5½” squares for points and (1) 9½” square for center
  • QS1, cut (1) 3½” square for points and (1) 2¾” square for center
  • QS2, cut (1) 3½” square for points and (1) 2¾” square for center
  • Background (dark), cut:
    • (2) 5” squares for Big Star corner patches
    • (4) 5½” squares for Big Star points
    • (2) 3½” squares for Quarter Star points
    • (2) 2¾” squares for Quarter Star corners

BLOCK 6B | Big Star 6 + Quarter Star 1

  • BS1, cut (4) 5½” squares for points and (1) 9½” square for center
  • QS1, cut (1) 3½” square for points and (1) 2¾” square for center
  • Background (light), cut:
    • (3) 5” squares for Big Star corner patches
    • (4) 5½” squares for Big Star points
    • (1) 3½” square for Quarter Star points
    • (1) 2¾” square for Quarter Star corner

BLOCK 7B | Big Star 7 + Quarter Star 2

  • BS7, cut (4) 5½” squares for points and (1) 9½” square for center
  • QS2, cut (1) 3½” square for points and (1) 2¾” square for center
  • Background (dark), cut:
    • (3) 5” squares for Big Star corner patches
    • (4) 5½” squares for Big Star points
    • (1) 3½” square for Quarter Star points
    • (1) 2¾” square for Quarter Star corner

BLOCK 8B | Big Star 8 + Quarter Star 2

  • BS8, cut (4) 5½” squares for points and (1) 9½” square for center
  • QS2, cut (1) 3½” square for points and (1) 2¾” square for center
  • Background (dark), cut:
    • (3) 5” squares for Big Star corner patches
    • (4) 5½” squares for Big Star points
    • (1) 3½” square for Quarter Star points
    • (1) 2¾” square for Quarter Star corner

BLOCK 9E | Big Star 9 + Center Star 2

  • BS9, cut (4) 5½” squares for points, (4) 2¾” squares for center block corners, and (4) 3½” squares for points
  • CS2, cut (1) 5” square for center and (4) 3½” squares for points
  • Background (dark), cut:
    • (4) 5″ squares for Big Star corners
    • (4) 5½” squares for Big Star points

BLOCK NUMBER 10E | Big Star 10 + Center Star 3

  • BS10, cut (4) 5½” squares for points, (4) 2¾” squares for center block corners, and (4) 3½” squares for points
  • CS3, cut (1) 5” square for center and (4) 3½” squares for points
  • Background (light), cut:
    • (4) 5″ squares for Big Star corners
    • (4) 5½” squares for Big Star points

BLOCK NUMBER 11A | Big Star 11 + Tiny Star 2

  • BS11, cut (4) 5½” squares for points and (1) 9½” square for center
  • TS2, cut (1) 2¾” square for center and (8) 1½” x 2″ for points
  • Background (light), cut:
    • (4) 5½” squares for Big Star points
    • (3) 5″ squares for Big Star corner patches
    • (4) 1¾” squares for corner patches of Tiny Star
    • (4) 1¾” x 2¾” rectangles for edge patches of Tiny Star
  • Paper Pattern for Tiny Star. Be certain that the longest dotted line of the pattern measures 5″.

BLOCK NUMBER 12F | Big Star 12 + Tiny Embedded Star

  • BS12, cut:
    • (3) 5” squares for Big Star center
    • (4) 5½” squares for Big Star points
    • (4) 1¾” squares for corner patches of Tiny Embedded Star
    • (4) 1¾” x 2¾” rectangles for edge patches of Tiny Embedded Star
  • TS1, cut (1) 2¾” square for center and (8) 1½” squares for points
  • Background (dark), cut:
    • (4) 5” squares for corner patches
    • (4) 5½” squares for Big Star points
  • Paper Pattern for Tiny Embedded Star. Be certain that the longest dotted line of the pattern measures 5″

BORDERS + 13 G | Tiny Floating Star

  • TFS, cut (1) 3½” square for center and (4) 2½” squares for points
  • Background (light), cut:
    • (4) 2″ squares for Tiny Floating Star corners
    • (4) 2½” squares for Tiny Floating Star points
  • Light background, cut (4) 6½” x WOF strips
  • Dark background, cut (4) 6½” x WOF strips

BINDING: cut (8) 2½” x WOF strips

If you have cut and labeled all of those pieces you deserve a break.  Step away from the table and the rotary cutter.  Go outside and breath some fresh air.  Gaze at the sky.  Listen to the sounds that surround you.  Breath.

Make sure you take a break after you cut your pieces.

SEWING DIRECTIONS
As much as you are tempted to create a production line, play it safe and make only one block at a time.

Block A

Block A {There are 2 A type blocks. Gather bags 1 and 11 plus foundation pattern for tiny stars.}

  • Tiny Star.  Make 1 tiny star per block. Use the tutorial located {here} to paper foundation piece the tiny stars.
  • Big Star.  Create Double Half Square Triangles (HSTs).
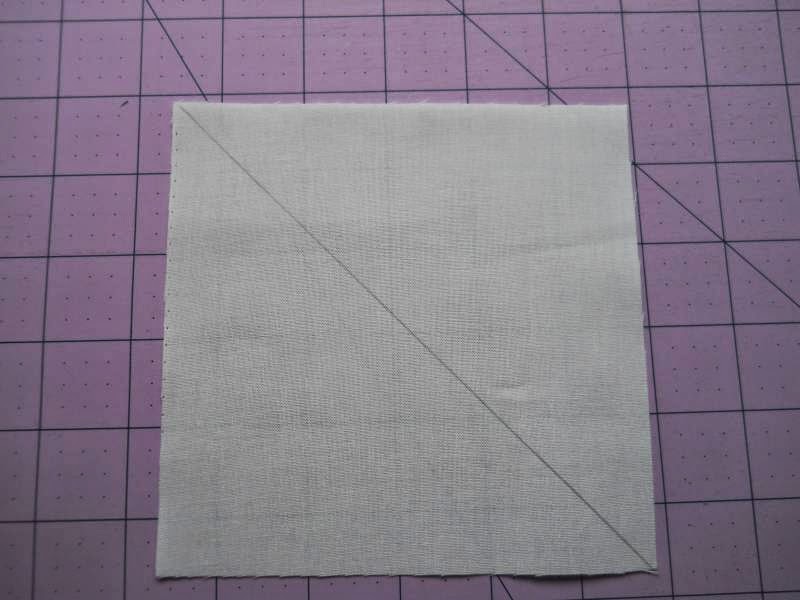
    • Draw a diagonal line on the wrong side of 5½” background squares. Layer 1 background block with 1 star color block, right sides together. Sew ¼” on each side of the drawn diagonal line. Iron to set seams. Cut on drawn line to create 2 (HSTs). Gently iron seam allowances open. Trim to 5″ square. Repeat 3 times for a total of 8 HSTs.
Half Square Triangle Construction

  • Sew HSTs together in 4 sets of 2 so that the seam line marks the center of a large triangle of background fabric. Sew seam allowances open. Arrange pieces on desk or design wall in front of you to match drawing of block A.
Double HST

Piece A blocks together in rows, using the components you have created plus the background squares.

Big Star A, row 1
Big Star, row 2
Big Star, row 3

Iron seam allowances away from the double HSTs. Trim blocks to 18½” square. Create 2 of these blocks.

Block B

Block B {There are 5 B type blocks. Gather bags 2, 4, 6, 7, and 8.}

  • Quarter Star. Repeat process from A blocks to make 4 HSTs.Trim to 2¾” square. Join Quarter Star HSTs with background and print squares to make a Quarter Star unit as shown below. Trim to 5” square. Make a total of 5 Quarter Star units.

Quarter Star
  • Big Star. Repeat process as described for Block A replacing Tiny Star with Quarter Star when putting the block rows together. Be sure that the Quarter Star is on the outside corner of the block.

Block C

Block C. {There is only one type C block. Gather bag number 3.}

  • Repeat process for Quarter Star as described for Block B
  • Repeat process for double HSTs as described for Block A
  • Center Star. Repeat process for Big Star in Block A with smaller pieces. Use 3 1/2″ x 3 1/2″ squares for HSTs. Trim HSTs to 2¾” square. Arrange pieces to create a 9½” square star just like the big star but with 4 plain corners. Piece together the row components for block C:
    • Row 1: 5″ square background fabric; double HST with background triangle pointing down; 5″ x 5″ square background fabric.
    • Row 2: double HST with background triangle pointed to the right; 9 1/2″ x 9 1/2″ whole star block; double HST with background triangle pointing to the left
    • Row 3: Quarter Star with star fabric on bottom left edge; double HST with background triangle pointing up; 5″ x 5″ square background fabric
Block D

Block D. {There is only one type D block. Gather bag number 5.}

  • Repeat process for Block B replacing one 5″ background square with a Quarter Star
  • Rows 1 and 3 of this block are the same….but flipped.
Block E

Block E. {There are 2 E type blocks.  Gather bags 9 and 10.}

  • Repeat process for Block C replacing Quarter Star with a 5” background square.

Block F

Block F. {There is only one type F block. Gather bag number 12.}

  • Make Tiny star as described in Block A
  • Using Tiny star and (3) 5″ square star fabric make 4 patch.
  • Trim 4 patch to 9½”’ square to make center of block
  • Repeat process as described in Block A, replacing tiny star in corner with a 5″ square of background fabric.

Block G. {There is only one type F block. Gather bag number 13.}

  • Repeat process for Big Star in Block A with smaller pieces.
    • Use 2 1/2″ x 2 1/2″ squares for HSTs
    • Trim HSTs to 2″ x 2″
  • Arrange pieces to create a 6 1/2″ x 6 1/2″ star just like the big star but with 4 plain corners.

QUILT ASSEMBLY
Make sure all blocks are trimmed to 18½” square and join them together as shown below.

Block placement

Block placement

  • Be careful to keep the Quarter Stars pointing in the right directions.  You want them to create whole stars when the blocks are sewn together.
  • Sew 4 rows of 3 blocks each
  • Iron seam allowances to the right in rows 1 and 3 and to the left in rows 2 and 4
  • Sew rows together to complete center of top

BORDERS

  • Gather setting star, block G, (4) 6½” x WOF strips light background,  and (4) 6½” x WOF strips dark background
  • Measure quilt. It should be something like 54½” wide by 72½” long. Record measurements:
    •  ___________ wide
    •  ___________ long
  • Sew 2 light background strips together along short edge, creating a strip that is approximately 6 1/2″ x 84″
  • Trim newly created strip to 6 1/2″ x length of quilt
  • Sew to lighter/warmer side of quilt top.  In the diagram it will be to the right.
  • Iron seam allowance towards the border.
  • Repeat process with dark background, sewing strip on the opposite side of the top.
  • Measure width of quilt and record _______________.  (It should be close to 66 1/2″)
  • Sew remaining dark background strips together to make a strip that is 6 1/2″ x width of your quilt.
  • Sew to top of quilt.
  • Iron seam allowances towards the border.
  • Sew remaining light background strips and setting star block G together, with the star on one end to make a strip that is 6 1/2″ x width of your quilt.
  • Iron seam allowance between strip and block towards the strip.
  • Sew to bottom of quilt making sure that the star block falls to the left side, under the light background border.
  • Iron seam allowance towards the border.

Layer, baste, and quilt as desired.

I hope you enjoy making my quilt.  Be sure to share it with the other Tops to Treasures quilters on the Tops to Treasures flickr group.

A fun 67″ x 85″ throw or topper for a star struck twin bed.

Cindy Sharp
{topstotreasures.blogspot.com}

Christmas Ribbons Quilt


Shops are filled with holiday fabrics and we have a series of fun and festive quilts to inspire you to get that Christmas sewing done early this year!

14 Fat Quarters (Be Jolly by Deb Strain)
3 yards light background (Bella solids in Bleached White)
3/4 yard binding
4 1/2 yards backing


Iron and starch your fat quarters.  Make sure you have at least 16”x21” of usable material in each piece.  Cut each fat quarter into eight 5” squares and four 5.5” squares according to diagram:

From your background (white) fabric, cut:
twelve 2.5”xWOF strips (sashing)
eight 4.5”xWOF strips (border)
eight 5.5”xWOF strips
Subcut your 5.5”xWOF strips into 56 @ 5.5” squares.    Draw a diagonal line on all of these background squares:

I found it easiest to work with one ‘row’ at a time, so you are working with the prints from 2 contrasting fat quarters at a time (so no fabric mix-ups within the row are possible).

Pair each background 5.5” square with one of the print 5.5” squares cut from your fat quarters:

Sew a scant 1/4” from each side of the marked line:

Cut along diagonal line:

Press seam open:

Trim each HST (half square triangle) to 5”:

On each of the 5” print squares cut from your fat quarters, draw a diagonal line:

Pair each of the 5” squares with a 5” contrasting HST:

Align them so that the drawn diagonal line goes in the opposite direction as the seam on the HST:

Sew a scant 1/4” seam from either side of the drawn line:

Cut on drawn line:

Press seams open:

Trim off dog ears if you prefer (optional).  This creates two 3-patch quarter square triangles that are the mirror image of each other:

When you get all the 3-patch quarter square triangles done for each pair of fat quarters, then you can arrange them into the blocks.  Sort your 3-patch blocks into piles (there will be 4 different configurations).  Lay them out so that all the white triangles face toward you and the small print triangles face each other.  I found this the easiest way to keep everything straight.

Half of them will be for the A block, and half for the B block (B block top 2, A block, bottom two):

So, start with the bottom two piles:

There are 8 of each of these 3-patch blocks.  Seperate 4 from each pile:

And rotate them 180 degrees so the white triangle face away from you:

Now you can sew these 4 sets of 4 3-patch blocks into your A blocks:

The B block is assembled the same way:

Only, when you sew the B block to the A block, you rotate is 180 degrees.

There will be 4 ‘A’ blocks and 4 ‘B’ blocks (don’t forget to rotate the B blocks!) per row.  Sew these 8 blocks (alternating A block and rotated B block) into one long row:

(sorry, my ironing board wasn’t quite long enough to show the entire row!)

Repeat with the other 6 pairs of fat quarters.  When you have your 7 rows sewn, you can start to assemble them into your quilt top.  Sew your twelve 2.5”xWOF strips into pairs to make 6 longer strips.  Measure your rows (mine measured just over 67” at this point), and cut your 2.5” strips to that measurement.  Sew the strips between the rows:

With your eight 4.5”xWOF strips, sew them into 4 pairs and attach your border.  You should now have a completed top!

Layer, baste, quilt as desired, and bind!


An approx. 76” x 79” quilt!

Karin Vail
{cascadequilts.com}