
![]()
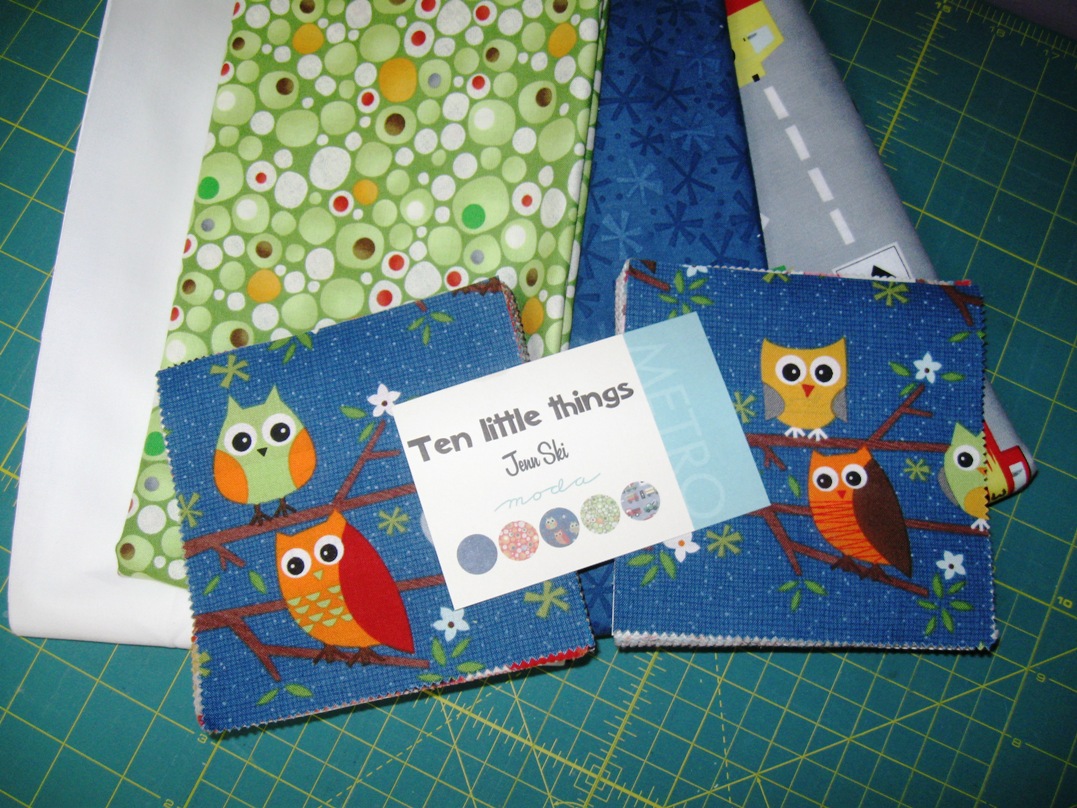
Hello fellow quilting enthusiasts. It’s me, Melissa from Happy Quilting!! I am so excited to share another fun filled tutorial with you today. When I saw Jenn Ski’s Ten Little Things line I knew I had to make something with it, I mean it isn’t every day a fabulous line comes along shouting All Boy!!! So I designed a pattern to go right along with that All Boy, perfect for a special little guy 🙂 This particular one is for my little nephew slated to arrive any day now 🙂
And if you have a special little guy to make an On The Go quilt for then pop on over to Burgundy Buttons where Leah has made up a fabulous On The Go Quilt Kit just for you 🙂 And of course, it is at great Burgundy Buttons prices 🙂

And as always, should you have any questions at all, please do not hesitate to write me at happyquiltingmelissa (at) gmail (dot) com. I would love to help out in any way I can. And, when you are finished your own version of On The Go please add a picture of it to my Happy Quilting Flickr group. I absolutely love seeing your work!!!

All Right . . . Let’s get going 🙂 To make your own On The Go baby boy quilt you will need 🙂
2 Ten Little Things Charm Packs
1 1/4 Yards of Bella Solid White for Quilt Top Background
1/2 Yard for Applique and Binding (I used 30505 40 – Navy Stars)
1/2 Yard for Borders and Pieced Back (I used 30504 17 – Lime Dots)
1 1/2 yard for backing (I used 30501 19 – Grey Trucks)

STEP 1 : CUTTING
For pieces for the small arrow select 18 prints from your first charm pack and then gather the same 18 prints from your second charm pack. From the first set of prints cut a 3 1/2″ x 3 1/2″ square out of each charm. From the second set of prints cut a 3 1/2″ x 3″ piece out of each charm. Set squares aside.
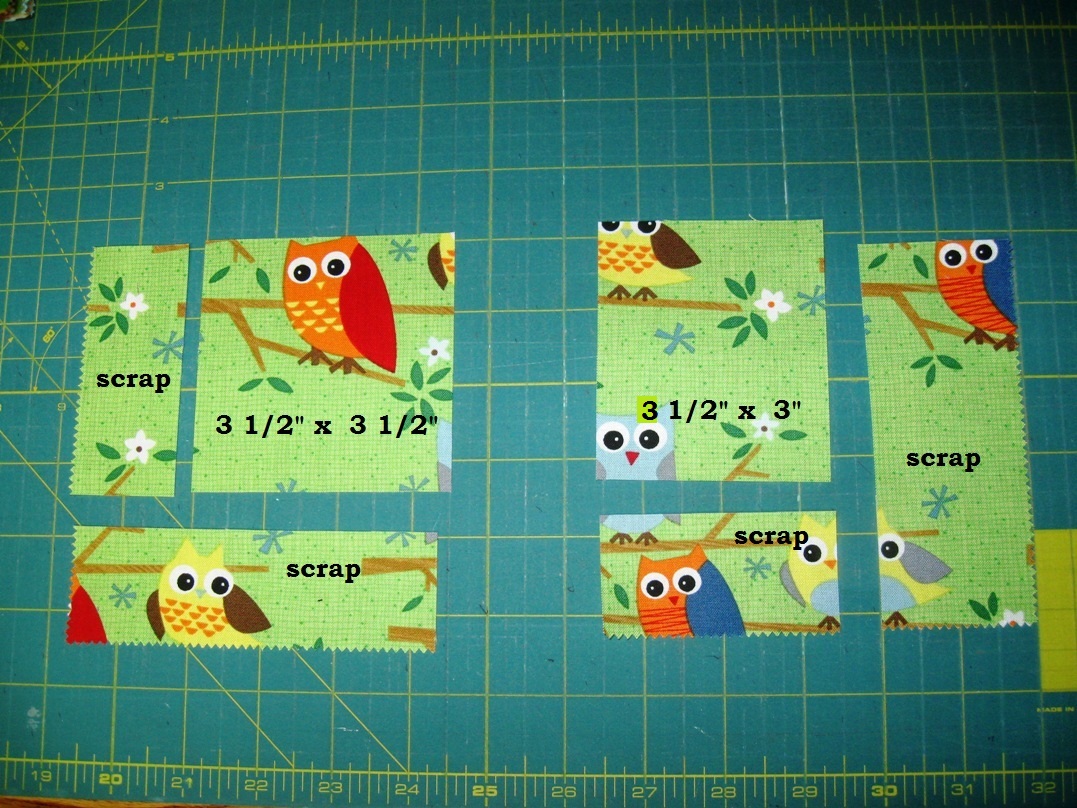
For pieces for the large arrow select another18 prints from your first charm pack and then gather the same 18 prints from your second charm pack. From the first set of prints cut a 4″ x 4″ square out of each charm. From the second set of prints cut a 3 1/2″ x 4 1/2″ piece out of each charm.
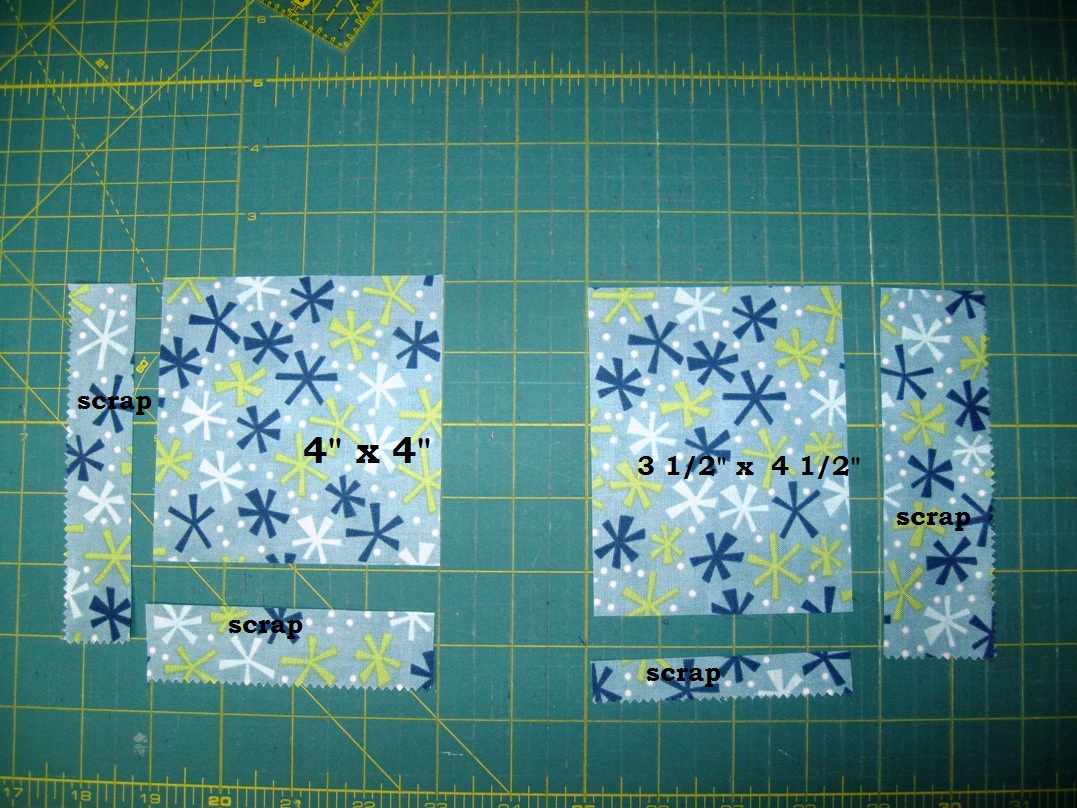
You should now have 18 squares of each of the 4 designated sizes. (2 piles for the small arrow, and 2 piles for the large arrow) Great 🙂 Let’s keep cutting!

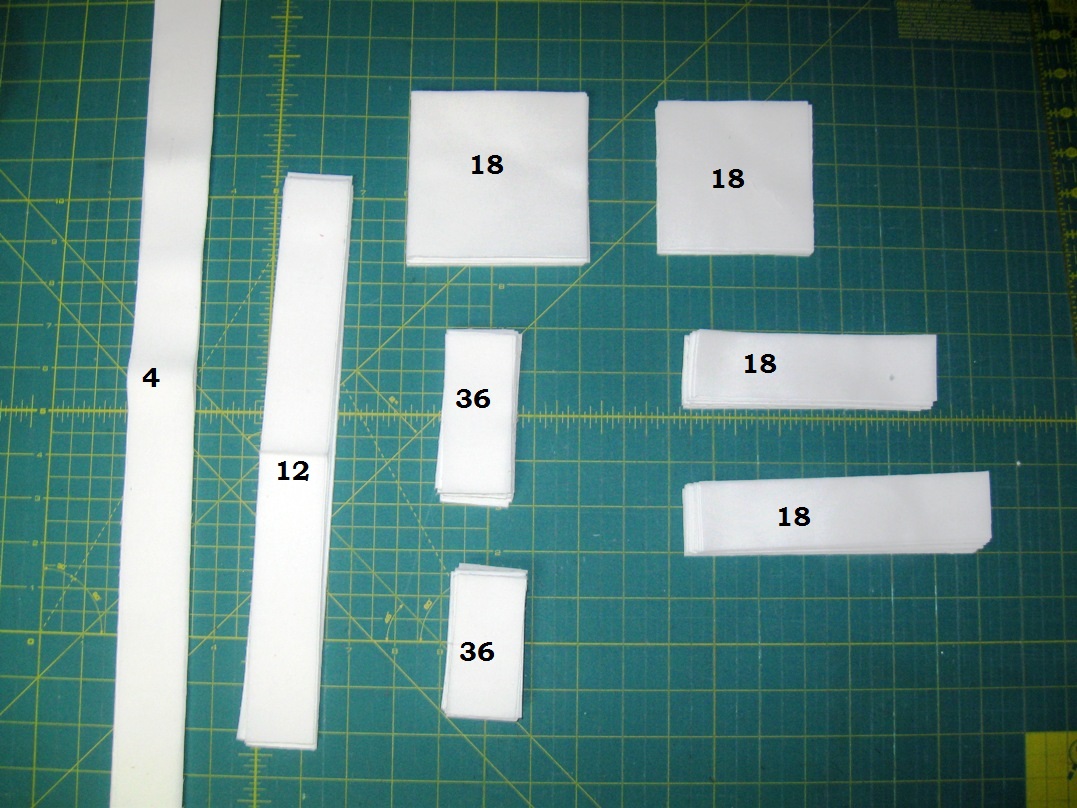
From your white yardage you will need to cut the following:
For the Small Arrows For the Large Arrows
(36) 1 1/2″ x 3″ rectangles (36) 1 1/2″ x 3 1/2″ rectangles
(18) 3 1/2″ x 3 1/2″ squares (18) 4″ x 4″ squares
For the Small Arrow Sashing For the Quilt Top Sashing
(18) 1 1/2″ x 5 1/2″ rectangles (12) 1 1/2″ x 12 1/2″ rectangles
(18) 1 1/2″ x 6 1/2″ rectangles (4) 1 1/2″ x Width of Fabric strips
From your remaining yardage you will need to cut the following:
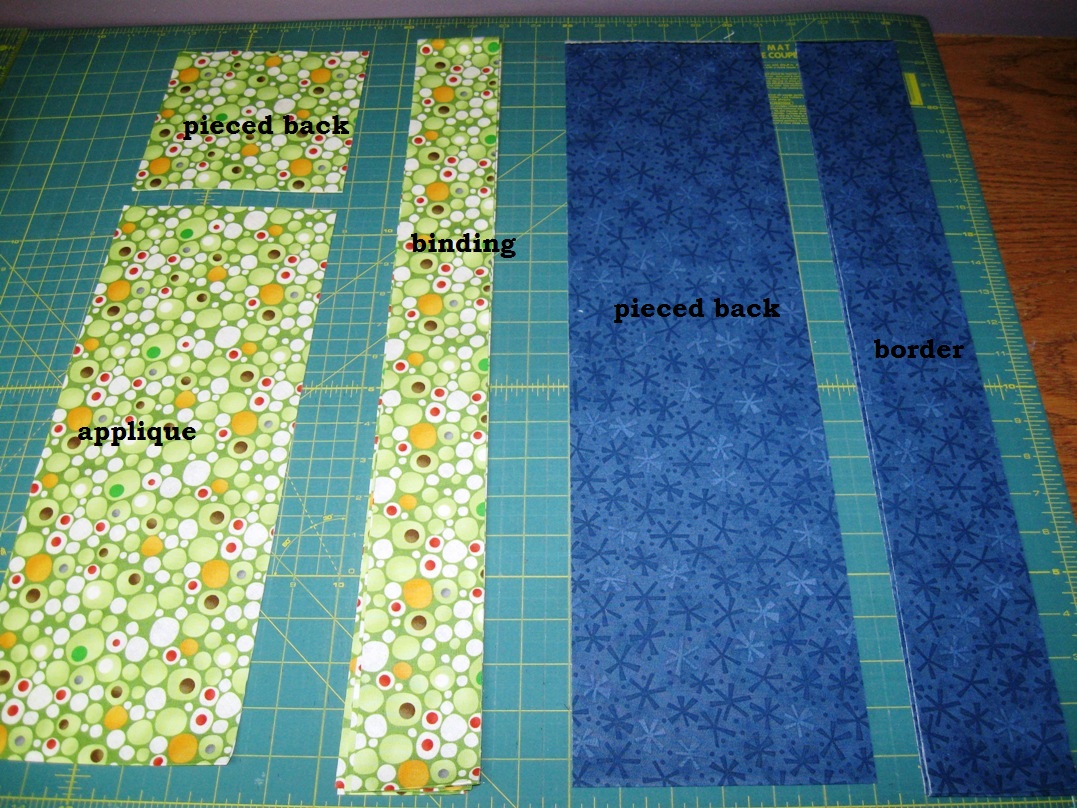
From your Pieced Back and Border Yardage cut
(4) 3″ x Width of Fabric strips
(1) 6″ x Width of Fabric strip
From your Applique and Binding Yardage cut
(5) 2 1/2″ x Width of Fabric strips
(1) 6″ x 5 1/2″ rectangle (if they cut a little crooked you can just do 6 x 6 🙂
Set the rest aside for your applique
STEP 2 : MAKING THE ARROWS
*** Note… Sew all of step 2 assembly line fashion. For each part of the direction repeat the process 18 times and when stitching make sure to chain stitch, this will save a lot of time 🙂
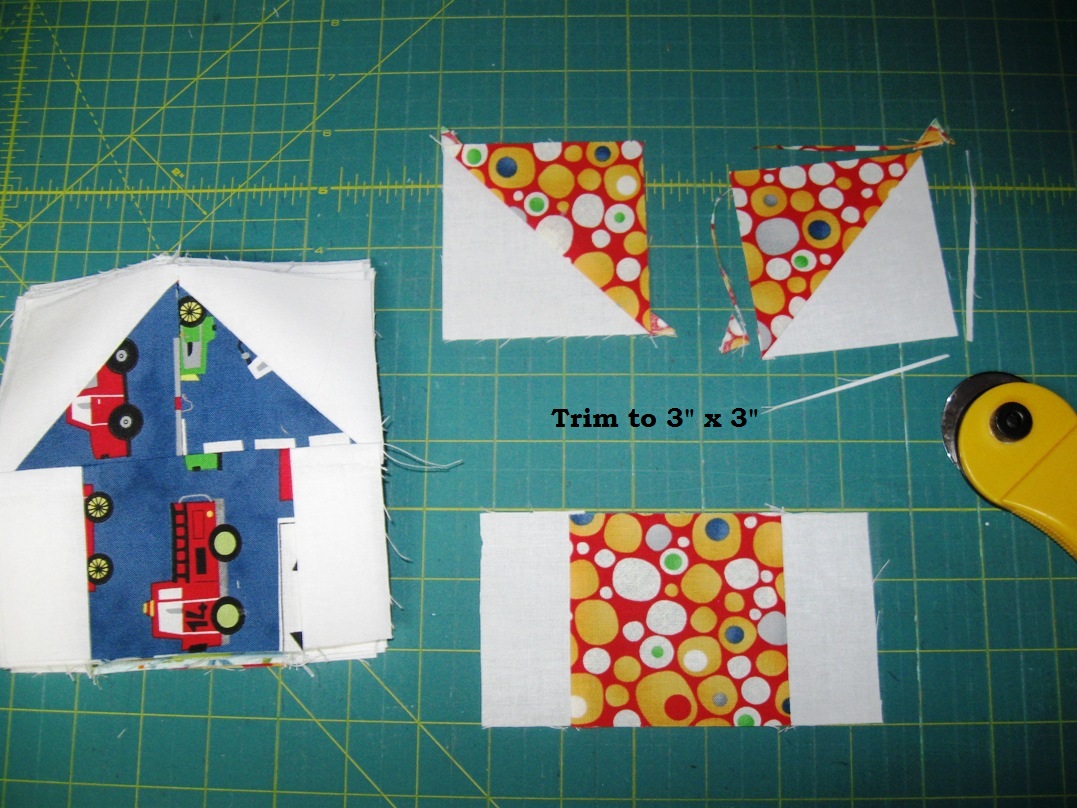
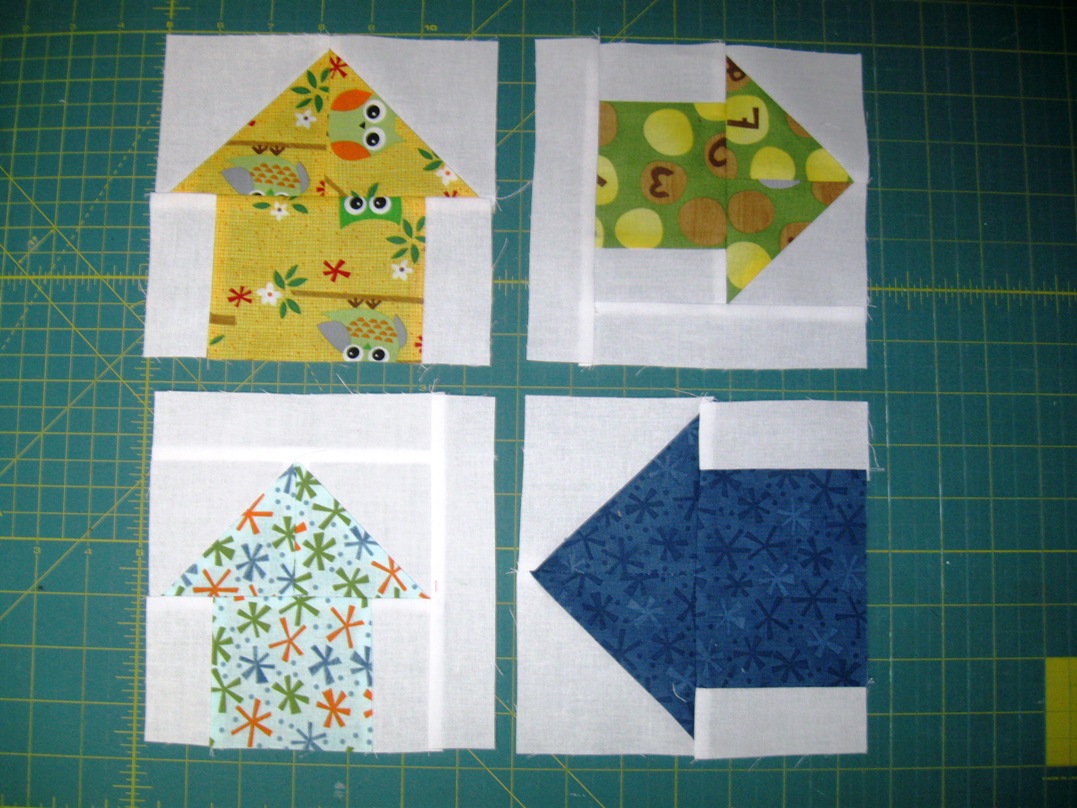
We will start with the Large arrows. So grab your pile of 4″ x 4″ cut charms and your 4″ x 4″ white squares. Draw a diagonal line from corner to corner on the back of the charm. Place the charm with right sides together on a white square. Pin along either side of the drawn line. Sew a 1/4″ seam on either side the drawn line by chain stitching all 18 left hand seams, clip your threads, and then go back and chain stitch all 18 right hand seams and clip your threads.
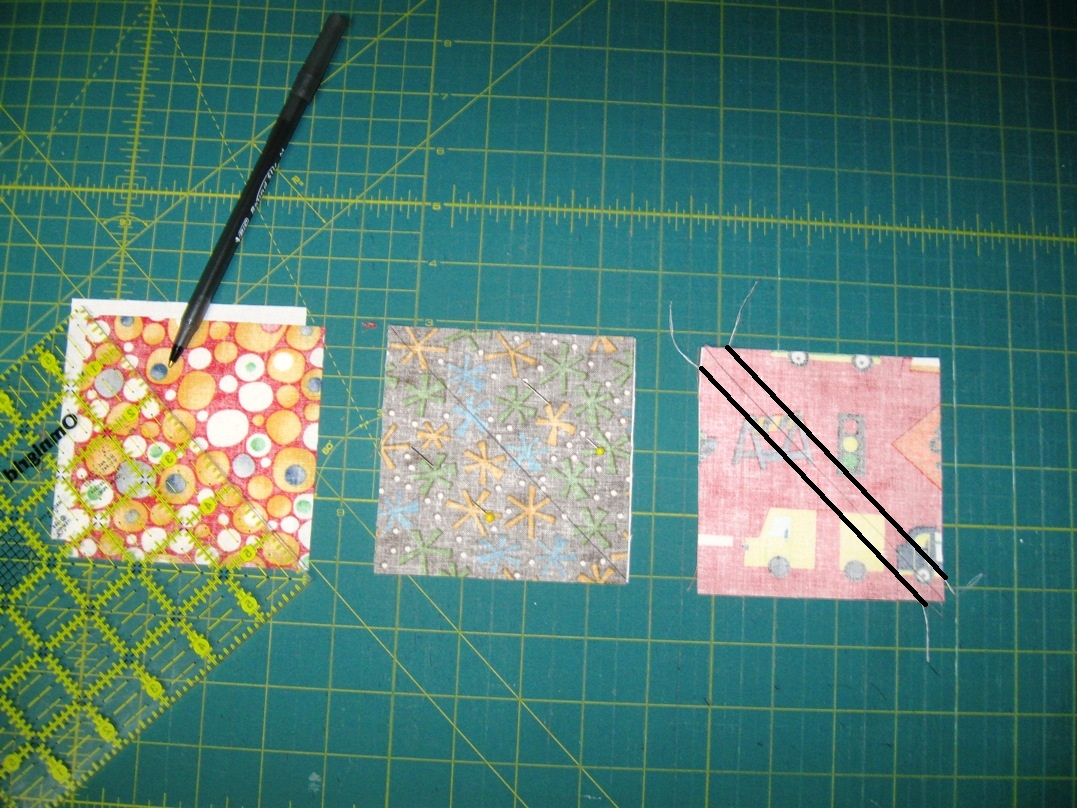
Cut down the drawn line. (you can use your rotary cutter or scissors, whatever is easier for you) Press your seam towards the charm fabric.
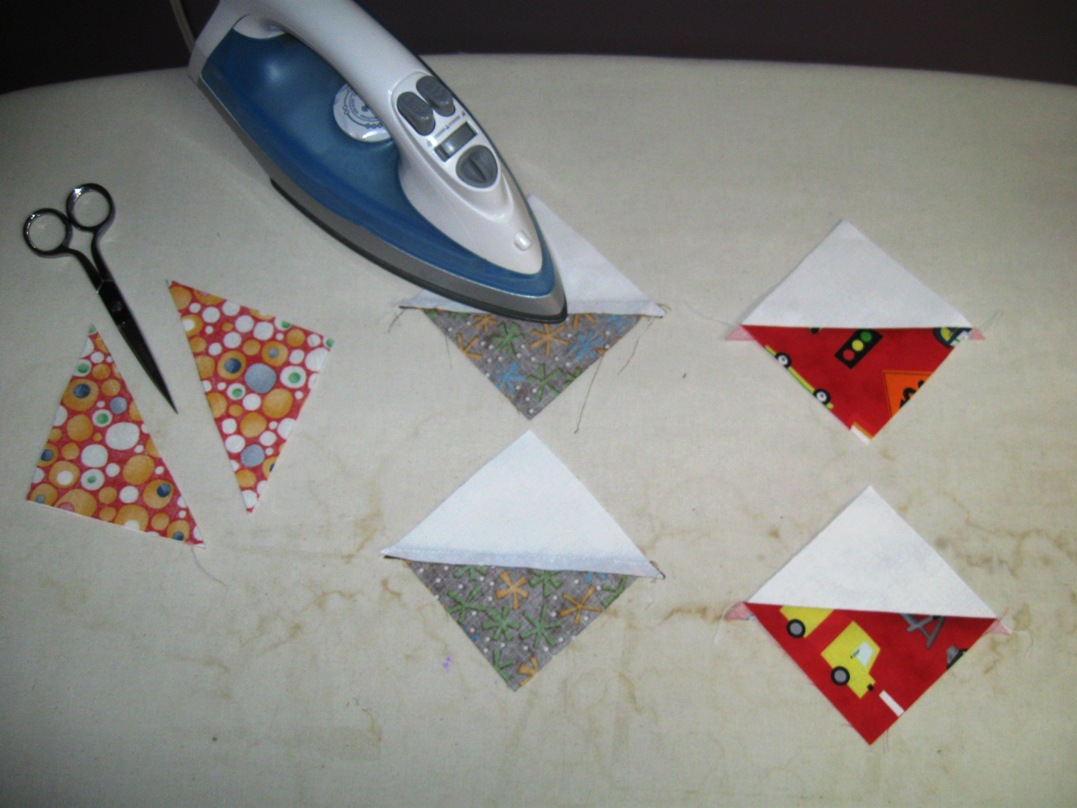
Now you should have 36 HST’s and they are ready to be trimmed up. Using the diagonal on your ruler trim the HST’s down to 3 1/2″ x 3 1/2″. If you are unsure how to trim your HST’s please see the tutorial I have here for help 🙂

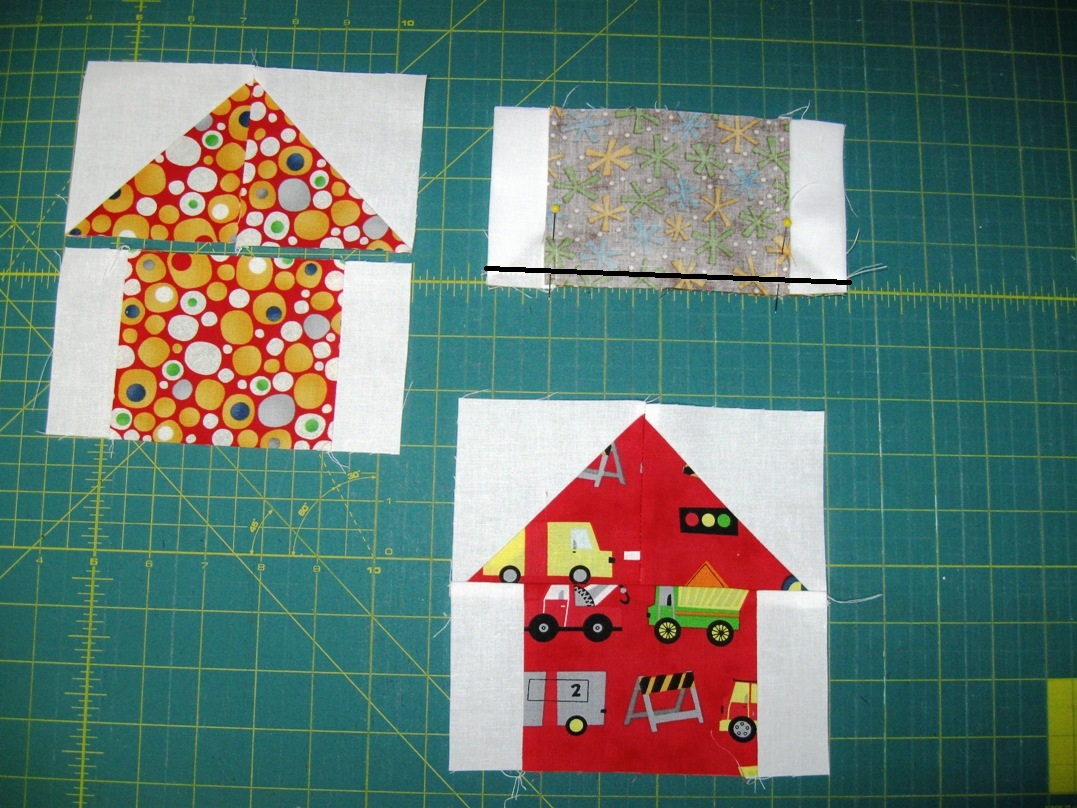
Now we are ready to make the arrow points. Take your 2 HST’s of the same print and lay them out as follows. Place the left HST onto the right HST with right sides together. Pin if you desire. Stitch a 1/4″ seam along the pinned edge. Clip your threads and press seams open to reduce bulk.
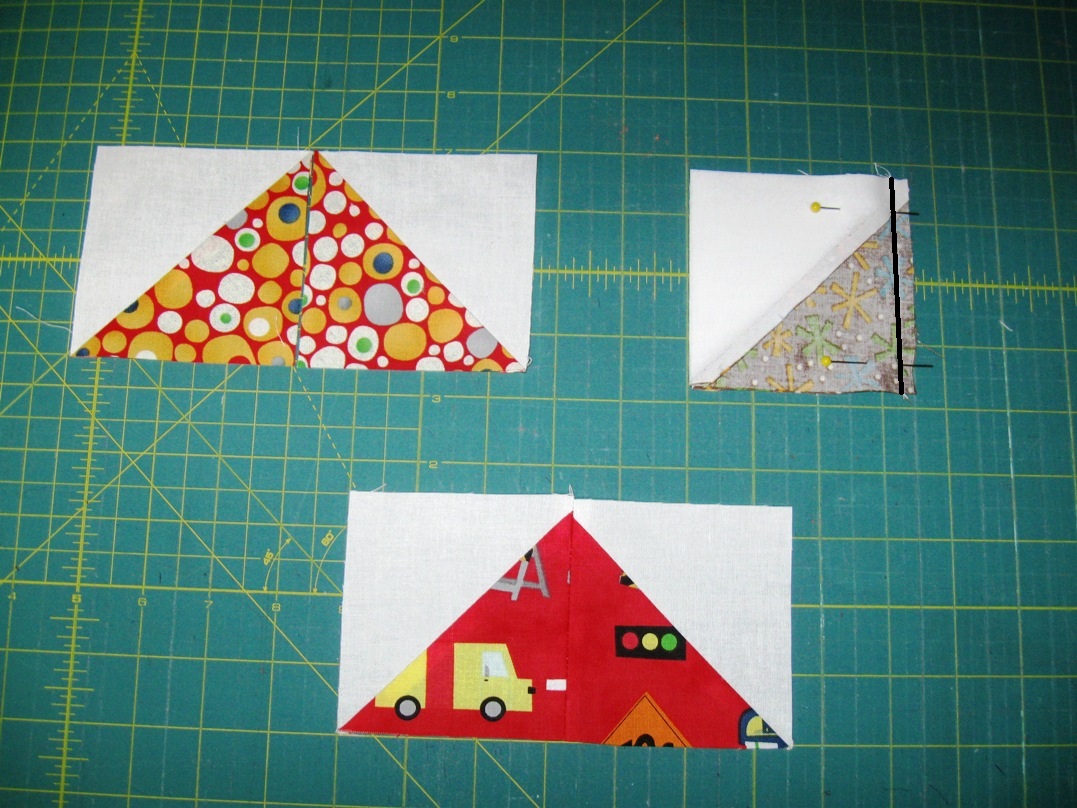
And for the bottom of the arrows, grab your 18 print 3 1/2″ x 4 1/2″ print rectangles and your 36 1 1/2″ x 3 1/2″ white rectangles. Lay them out as follows. Lay a white rectangle onto the left hand side of a cut charm with right sides together. Stitch a 1/4″ seam along the edge. Repeat the same process on the right hand side. Clip threads and press towards charm print.
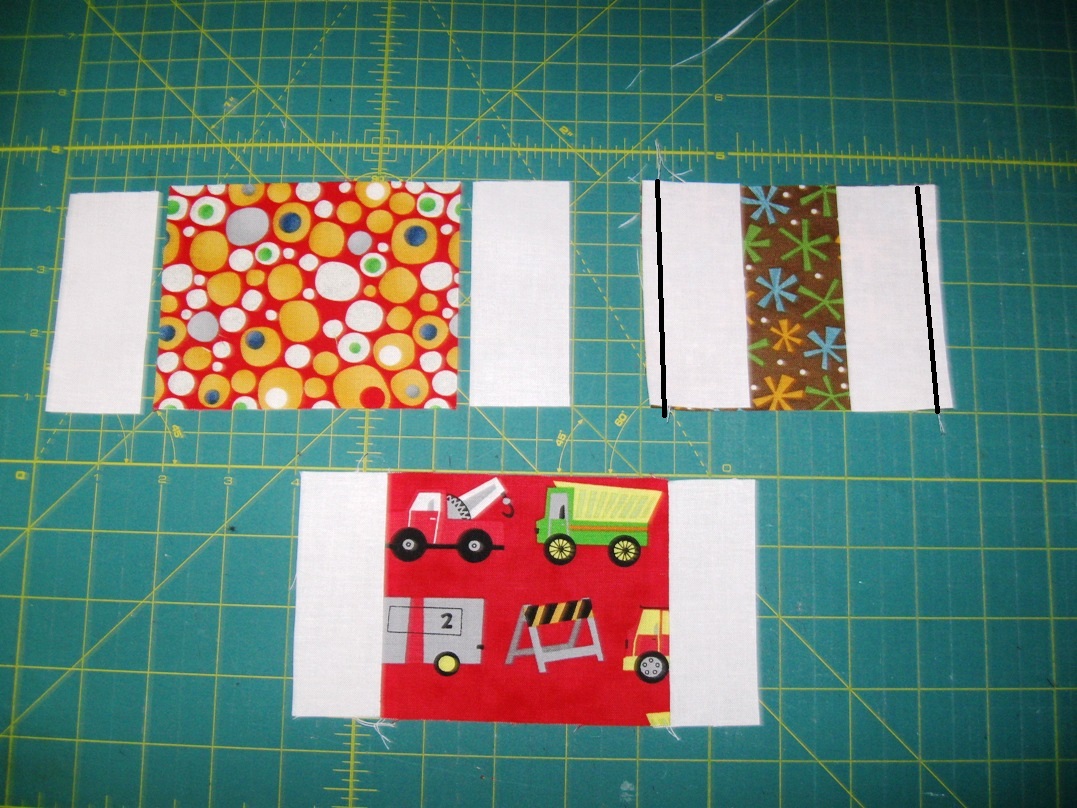
And now you can put your arrows together. Match your arrow point prints to your arrow square prints and layout as follow. Lay the square print piece onto the point print piece and pin. Sew a 1/4″ seam along the edge. Press the seam open to avoid bulk. You should now have 18 Large Arrows 🙂 Set them aside.
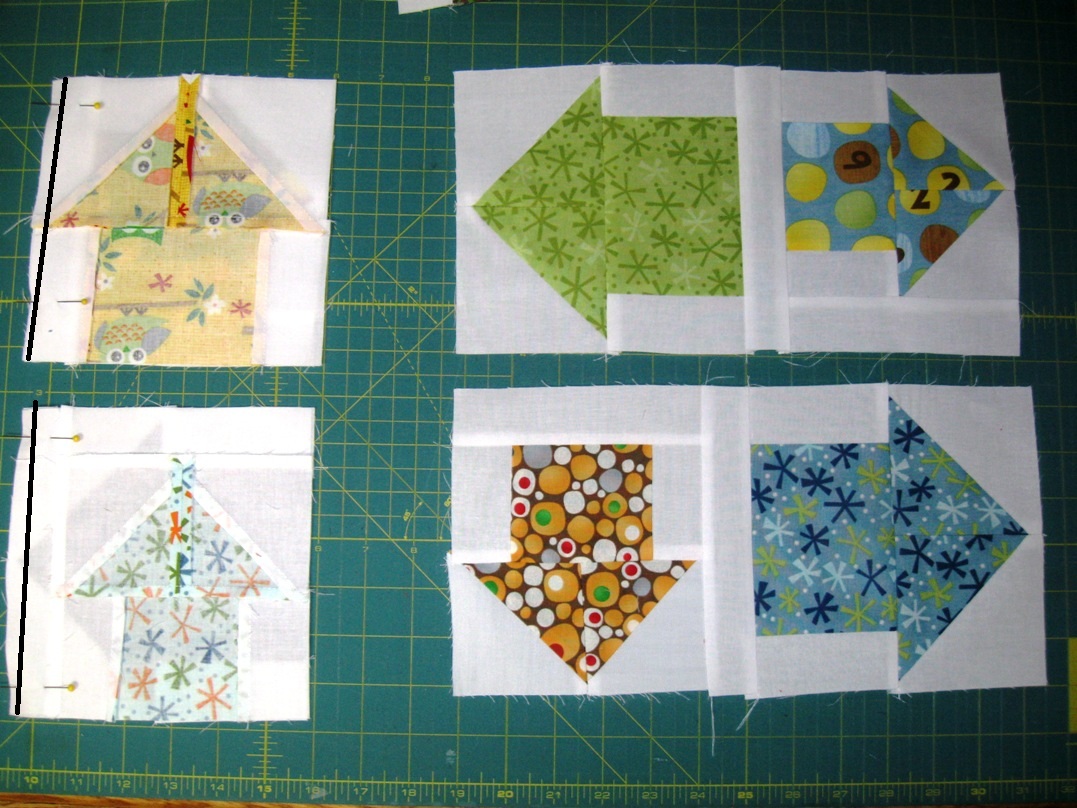
Onto the small arrows, These are made in the same fashion with just a minor change. So grab your small arrow pieces ((18) 3 1/2″ x 3 1/2″ cut charms, (18) 3 1/2″ x 3″ charms, and (36) 1 1/2″ x 3″ white rectangles) and use the same steps you used to create the small arrows. The only difference being that when you trim your HST’s trim them to 3″ x 3″. You should now have 18 small arrows.
Now you can add the small arrow sashing. Retrieve your small arrow sashing pieces. ((18) 1 1/2″ x 5 1/2″ rectangles and (18) 1 1/2″ x 6 1/2″ rectangles. ) Choose any side of the block to start on. Lay a small sashing piece onto the side with right sides together. Stitch a 1/4″ seam along the edge. Press the seam towards the white. Now lay the long sashing piece along the bottom of the block with right sides together. Stitch a 1/4″ seam along the edge. Press the seam towards the white.
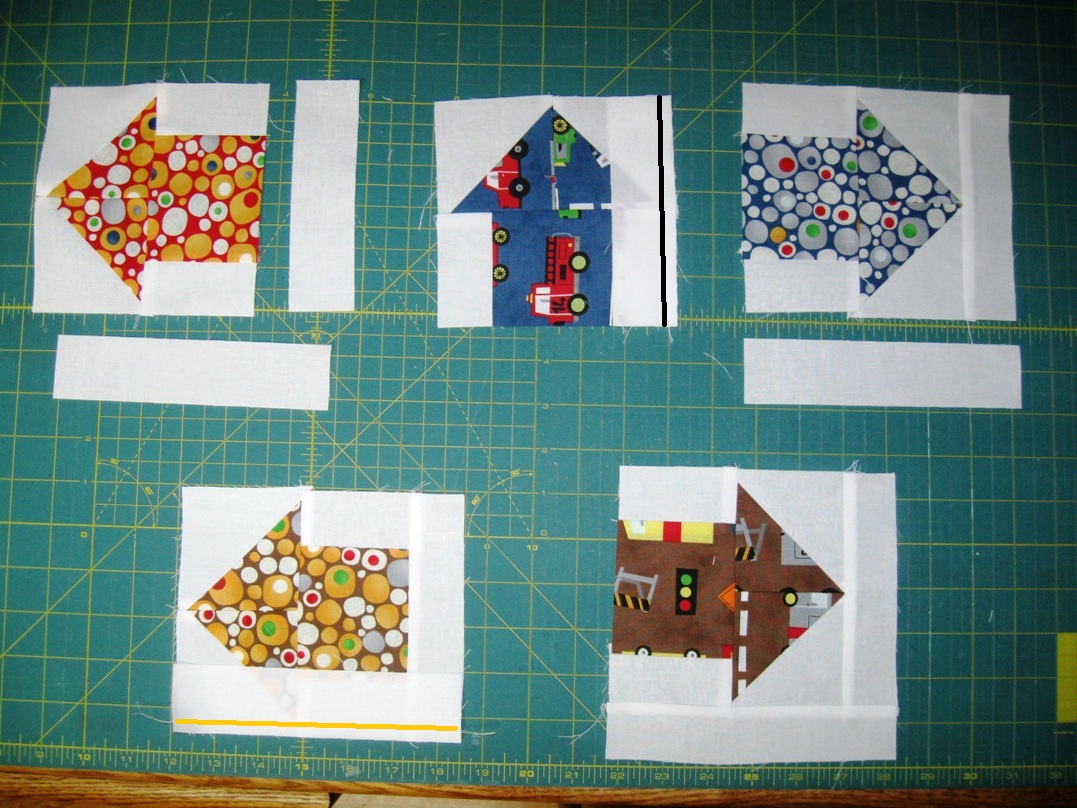
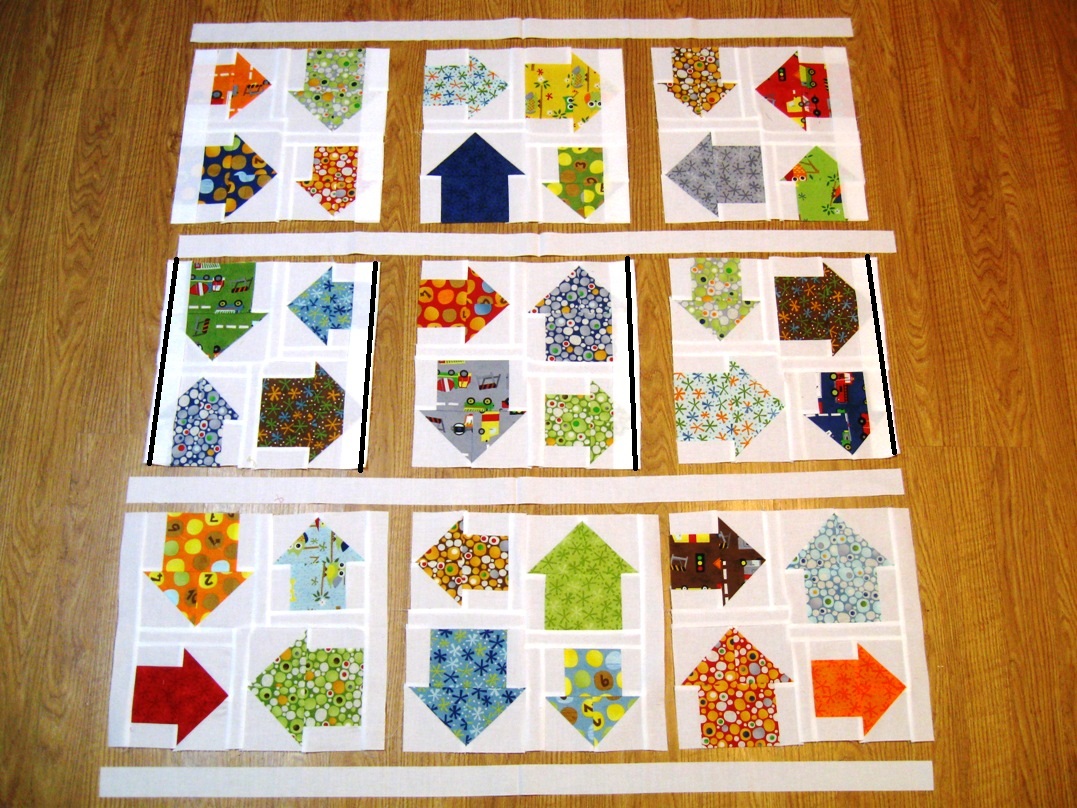
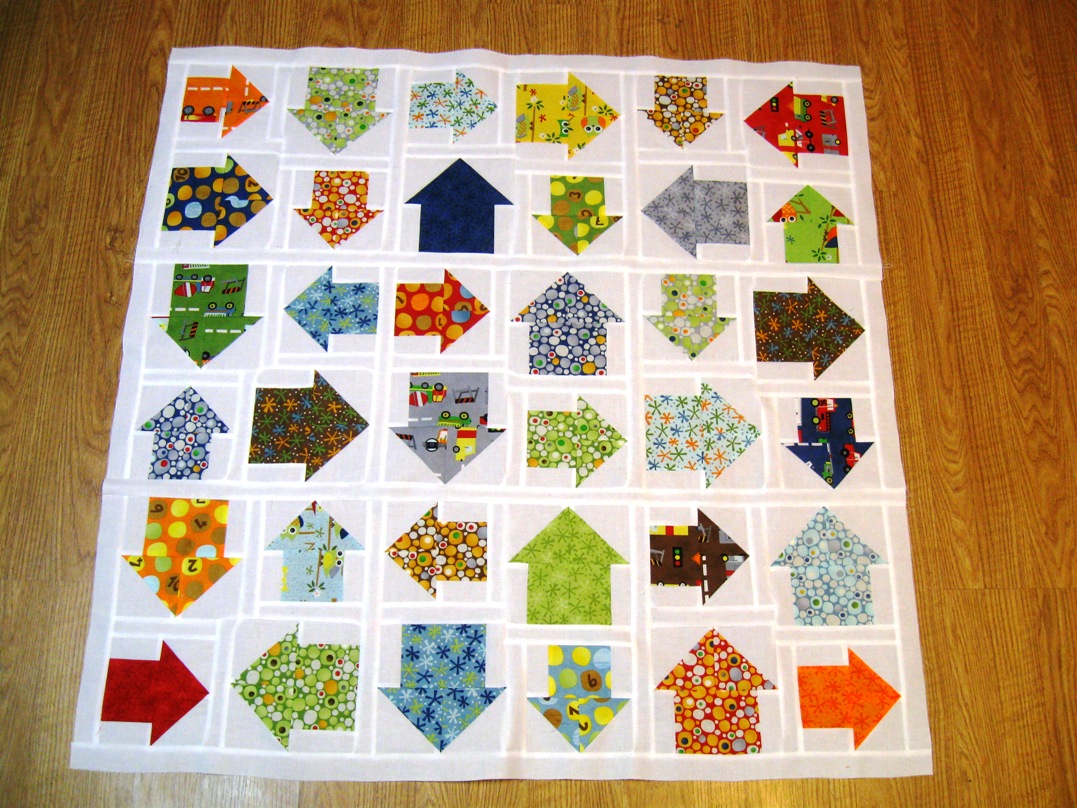
I tried to make sure that I was creating 4 – 5 blocks pointing each way. This gives you a lot more flexibility when laying out your quilt to make it look more random 🙂 And now your arrows are done.

STEP 3 : BUILDING THE BLOCKS
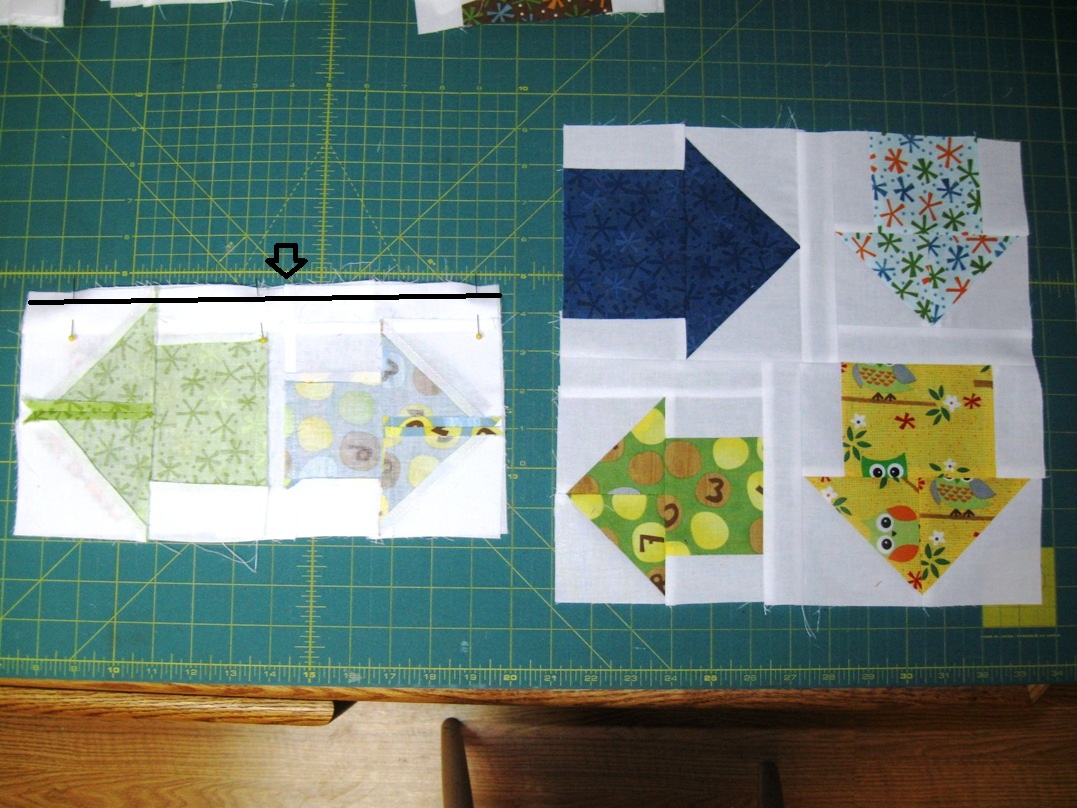
With your arrows, you can low build your blocks. For each block you will need 2 small sashed arrows, and 2 large arrows. Lay them out taking care that the sashing pieces of the small arrows are on the inside of the block and opposite corners, as shown. Point your large arrows any direction you choose. You will be making 9 blocks this way so you can lay them all out and piece your blocks assembly line or do them individually 🙂
Lay the left hand block onto the right hand block on both the top and bottom rows. Pin along the edge. Stitch a 1/4″ seam along the pinned edge. Clip threads and press towards the small arrow sashing. (This will allow you to nest your seams in the next step.)
Now lay your top row onto your bottom row with right sides together. Pin taking care to nest your center seam. Sew a 1/4″ seam along pinned edge. Press seam open to avoid bulk. You now should have 9 12 1/2″ unfinished blocks.
STEP 4 : PIECING THE TOP
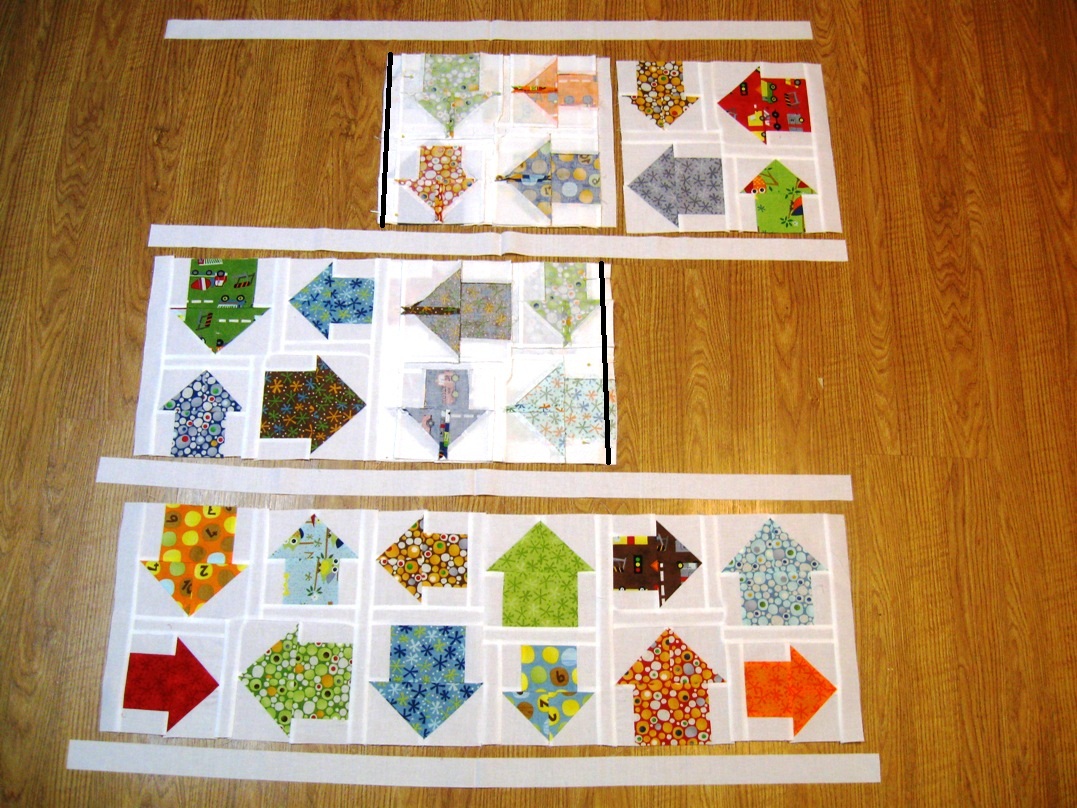
Take your 9 blocks and quilt top sashing pieces (your remaining white cut strips) and lay them out as follows. Play around with the placement of your arrow blocks until you get a look that is pleasing to you. I find it best to take a picture of my layout that I can refer back to 🙂
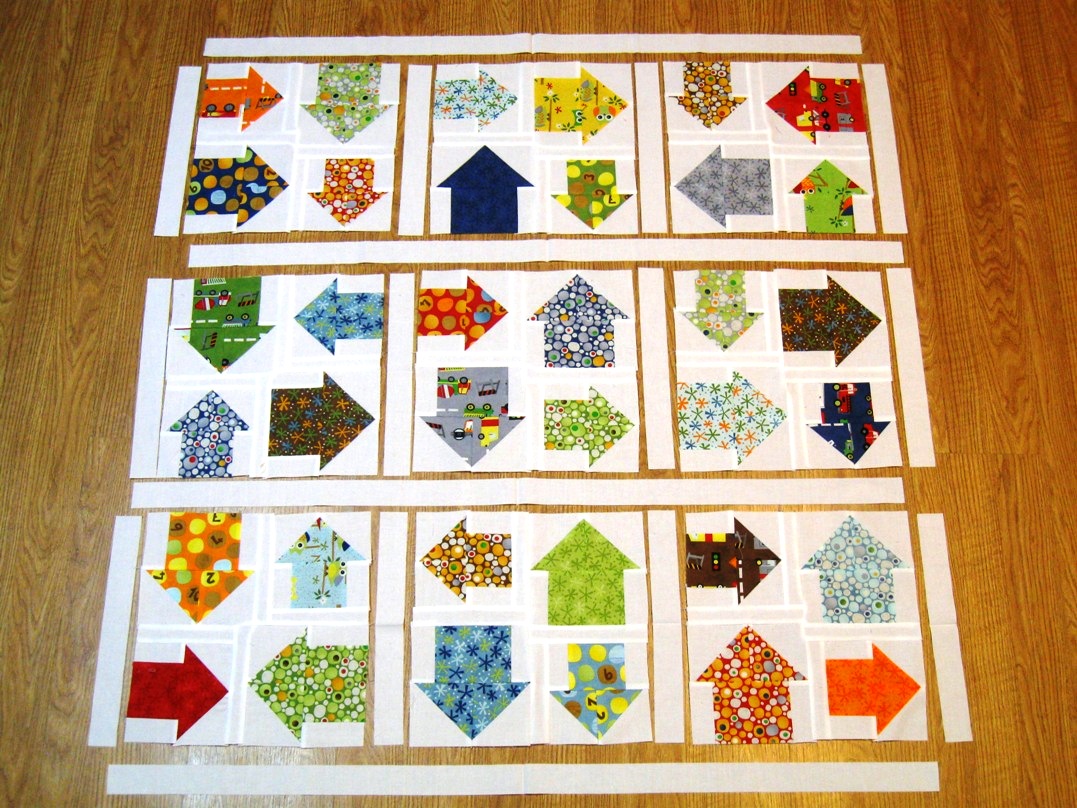
For each block, place the small row sashing pieces onto the arrow blocks with right sides together (see row 1). Pin if you desire. Stitch a 1/4″ seam along the edges (see row 2). Press the seams towards the sashing (see row3).
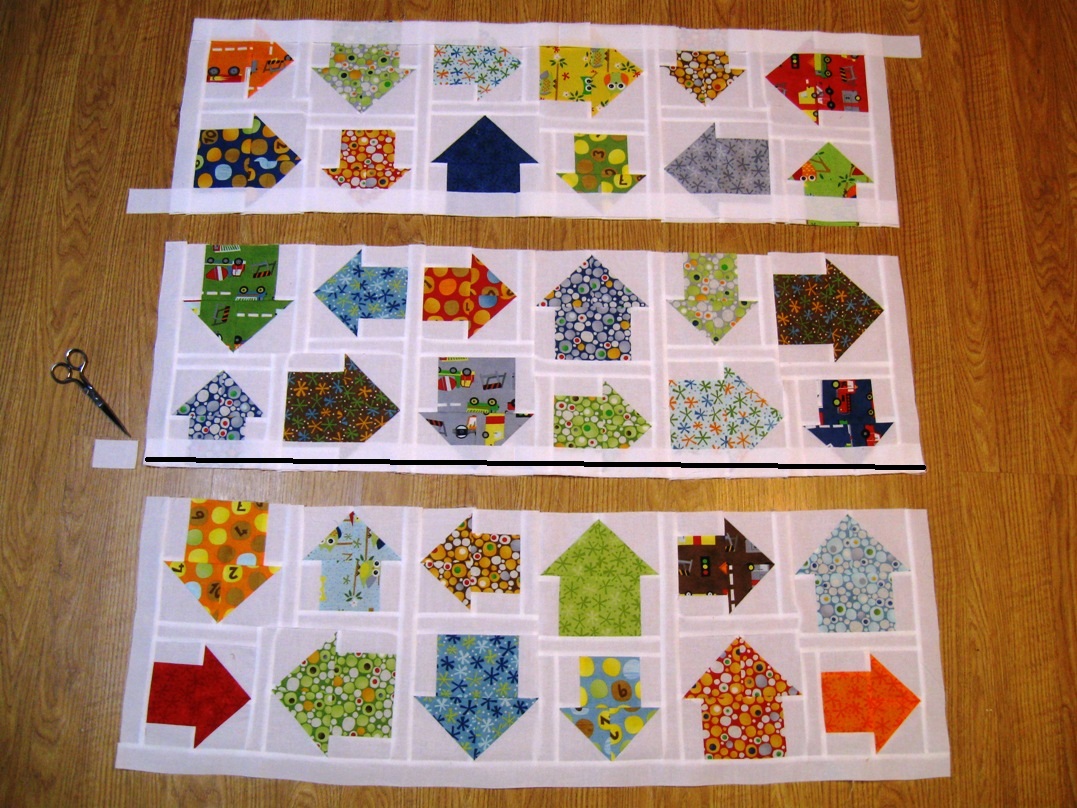
Now to sew the rows together. For each row, place block 1 onto block 2 with right sides together. Pin along edge. Sew a 1/4″ seam along pinned edge. (see row 1). Place block 3 onto your now sewn together block 1 and 2 , pin along the edge, and sew a 1/4″ seam along the pinned edge (see row 2). Press your seams towards the sashing (see row 3).
And now to add the sashing to the rows. Same process as before, just on a longer scale. Place the sashings along the edge of the row with right sides together (see row 1). Stitch a 1/4″ seam along edge and then trim excess sashing. (see row 2). Press towards the sashing (see row 3).
And now finally, just sewing the rows together. Once again, same as making the rows just on a longer scale. Place row 1 onto row 2 with right sides together. Pin along the edge taking care to match up your seams. Sew a 1/4″ seam along the pinned edge. Press towards the sashing. Then repeat the process laying your row 3 onto your now sewn together row 1 and 2, pin, sew, and press.
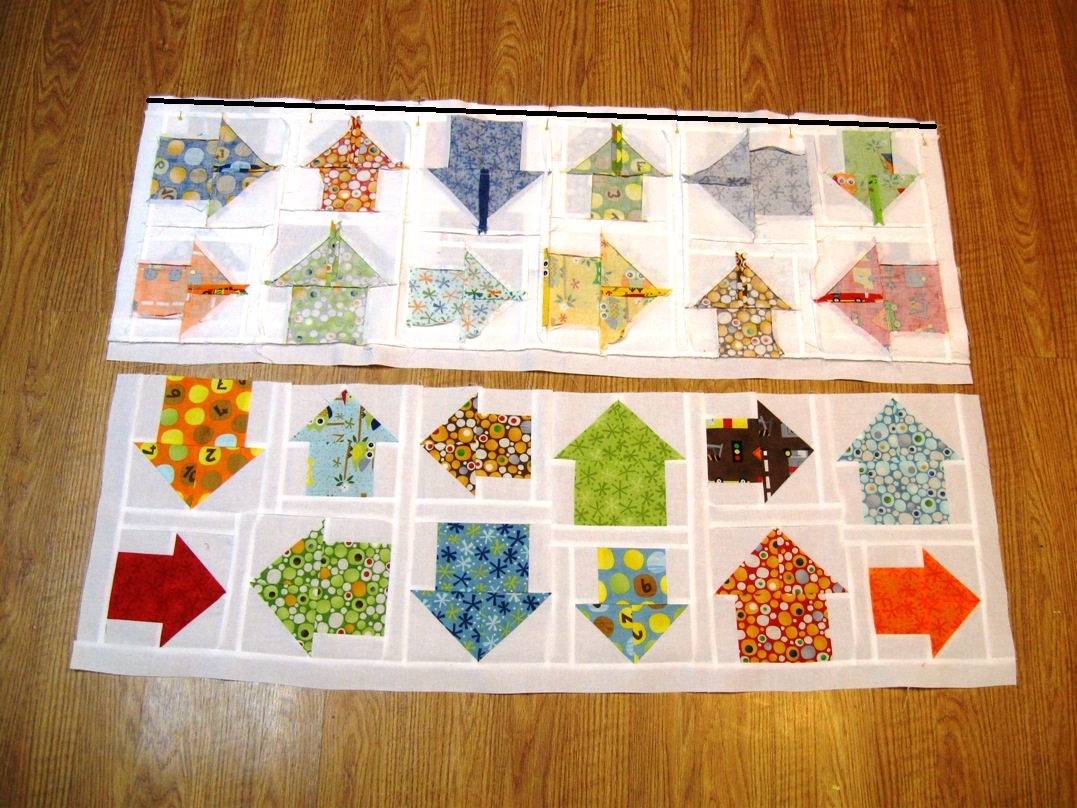
And your top is just about complete. Doesn’t it just look so fun 🙂 Now you are ready to add the borders so go ahead and grab those 4 3″ border strips you cut.
Lay the strips along the top and bottom of the quilt top with right sides together. Stitch a 1/4″ seam along the edge, (I don’t use pins, I just align as I go) and the trim the excess border fabric.
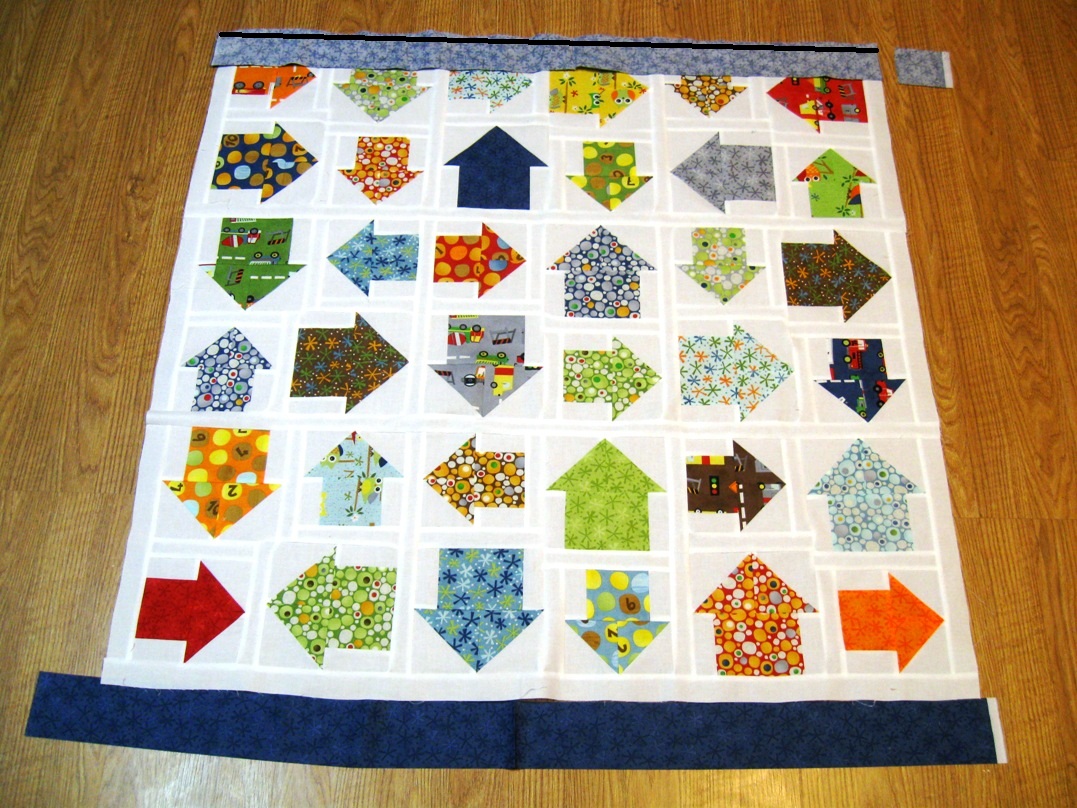
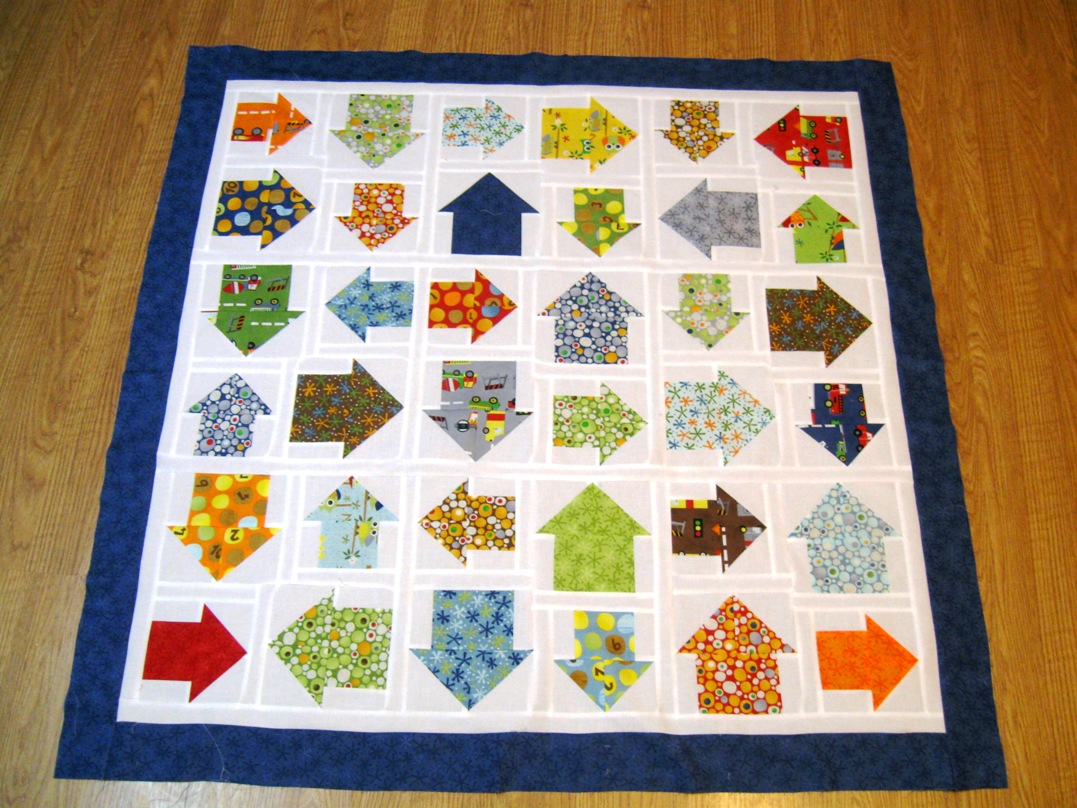
Repeat the same process for the 2 sides. And now your quilt top is done 🙂 Yippee Skippee!!!
STEP 5 : MAKING THE PIECED BACKING
Grab your 1 1/2 yard backing fabric and trim it down to 50″ x Width of fabric. Then go ahead and subcut it into 2 pieces by cutting off a 12″ strip from the selvage side. Lay the 2 pieces along with your 6″ x 6″ backing square and your 6″ x WOF pieced backing strip out as follows.
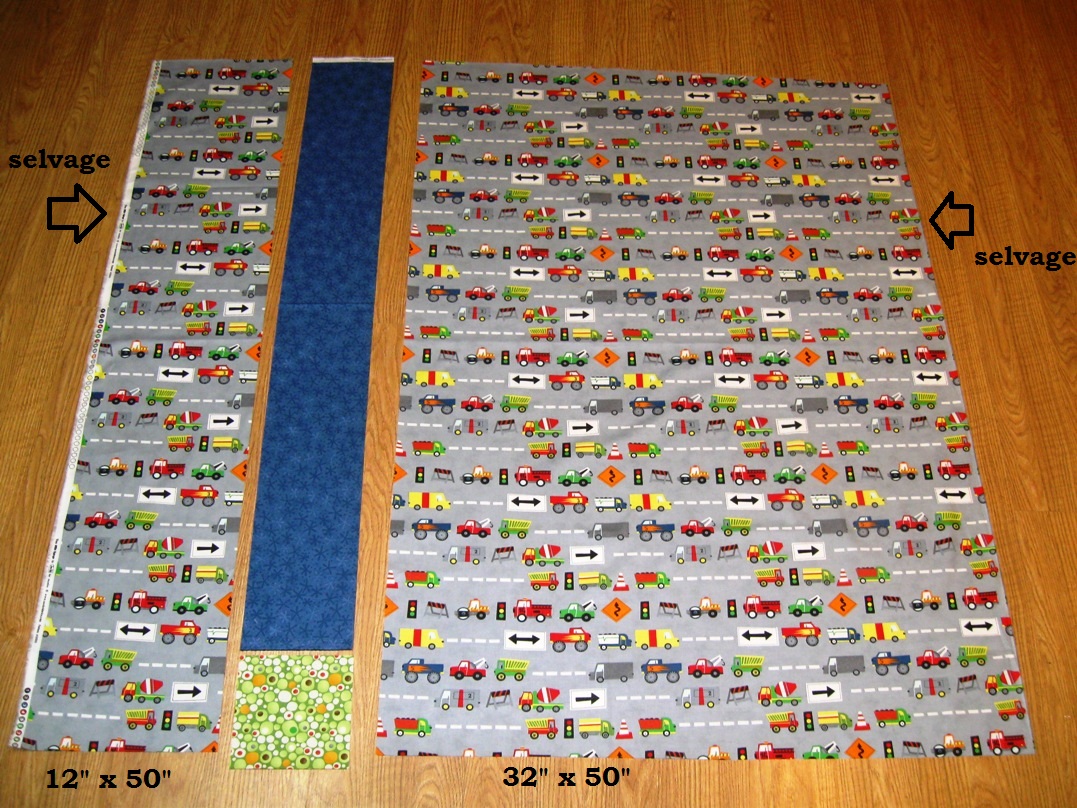
Sew the 6″ square to the bottom of the 6″ x WOF strip to create your applique space. There is a template in the Printer Friendly Version for the applique designs. Cut, adhere, and secure stitch your applique.
*Note – If you have not done applique before I would recommend 1 of 2 methods. The first is using Heat N Bond and the process can be found in Step 5 of this other Bake Shop tutorial I did. The second is using starch and glue and the best tutorial I have seen is Natalia’s (fellow Bake Shop chef) and can be found on her blog here 🙂
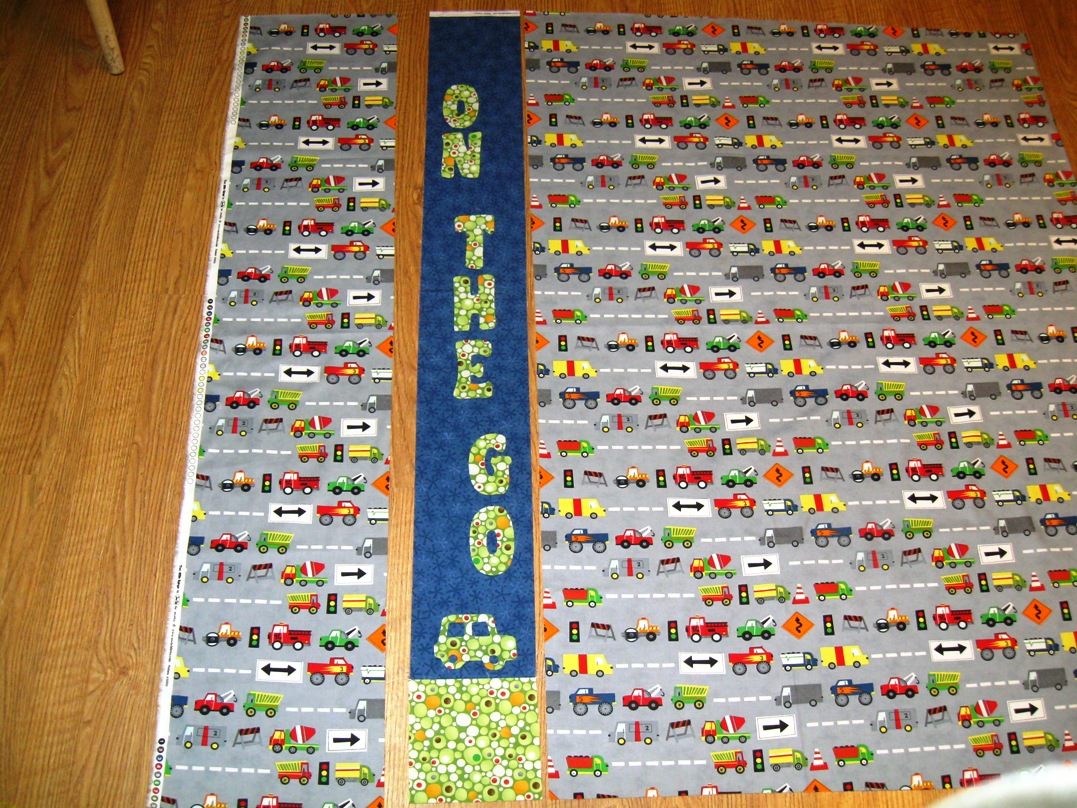
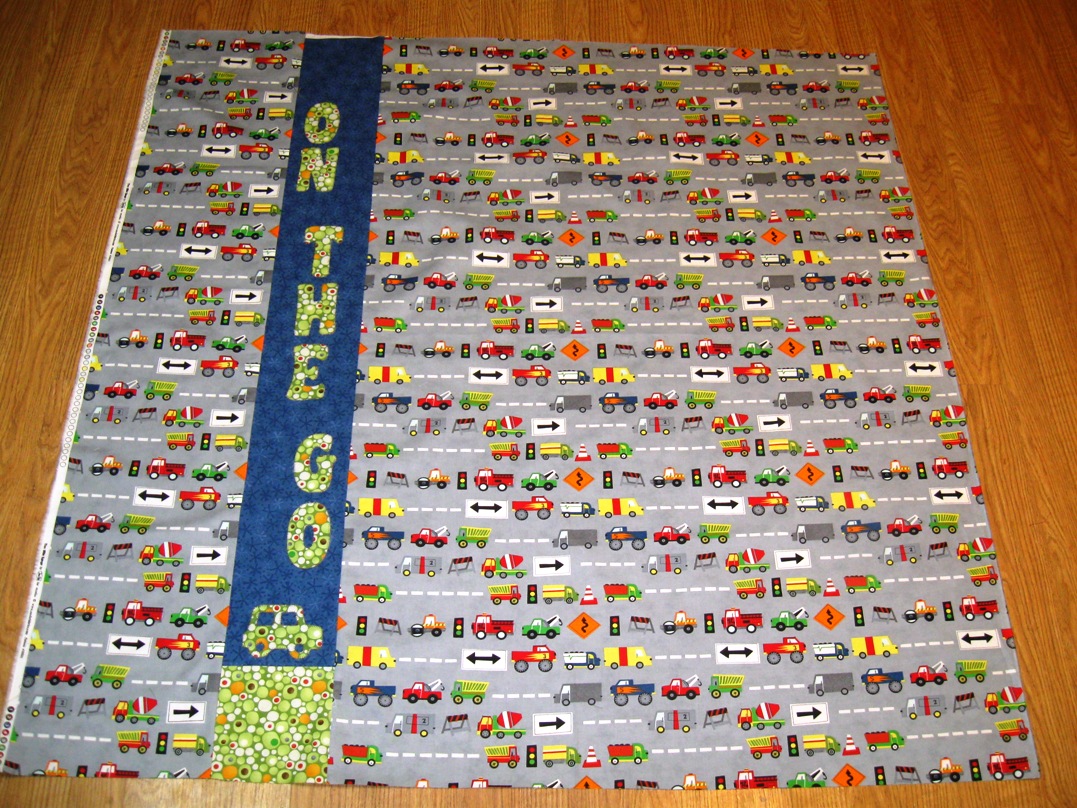
Once your applique is done, go ahead and sew the 3 rows of your pieced quilt back together. You do this the same way you sewed your quilt top rows together only this time it is vertical instead of horizontal 🙂
STEP 6 : FINISHING IT UP


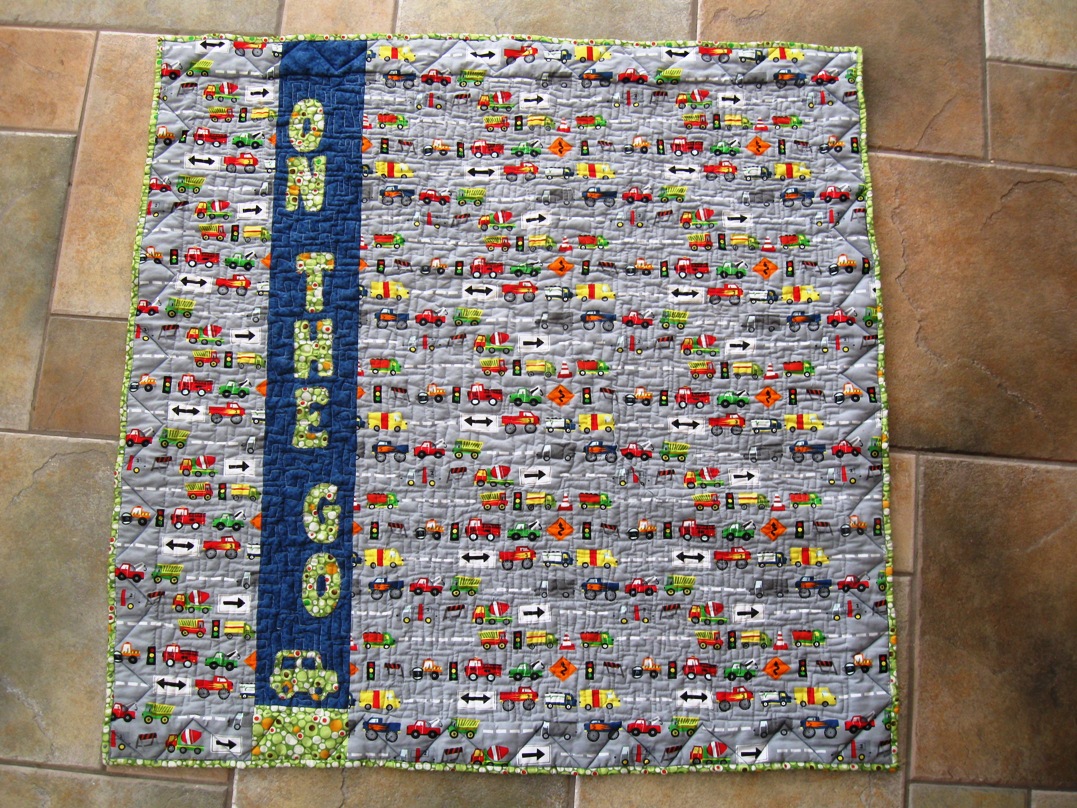
And you are done!!!! And you have One Super Adorable ON THE GO Baby Boy Blanket measuring 46″ x 46″ perfect for a special little guy!!!!
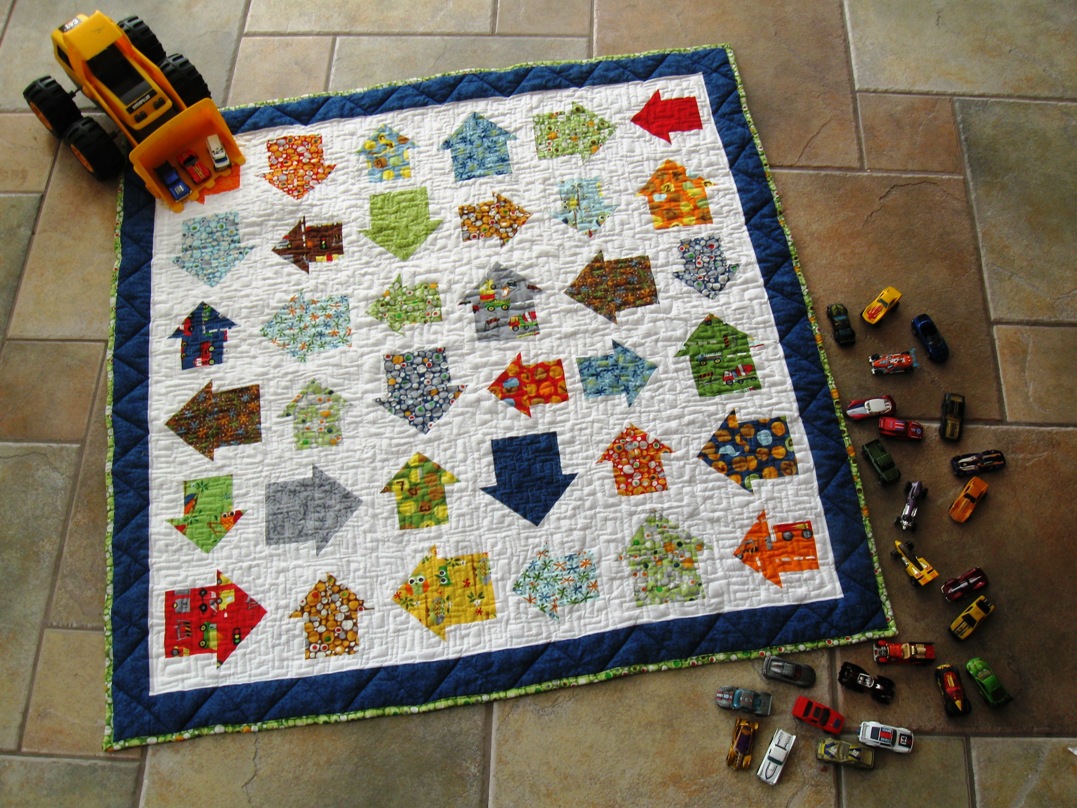
With a totally all boy pieced back that you know they are just going to want to snuggle up with.
![]()
