
If you have a special little one who needs a baby quilt of her own, you can click on over to Burgundy Buttons where you can get an All Framed Up Quilt Kit with everything you need to make this quilt at a stellar Burgundy Buttons price 🙂

If you have any questions about this tutorial, please email me at happyquiltingmelissa (at) gmail (dot) com. I will answer them ASAP. When you are finished, feel free to add a picture of your All Framed Up Baby Quilt to my Flickr Group. I love to see and parade everyone’s individual completions 🙂

To make this quilt you will need :
2 Ruby Charm Packs
1 Yard of Moda Bella Solid White
1 1/4 of Backing Fabric – I used 55035 14
1/3 Yard of Binding Fabric – I used 55032 21
Several 5 x 5 squares of Heat -N – Bond


STEP 1 – CUTTING
There is not too much cutting of your charm packs needed.
Select 36 charm squares that will not be cut. Pull out 6 charms and set them aside (I choose to pull out the polka-dot prints because I wanted my all of my applique to match 🙂
From the second charm pack, cut 32 charms down to 3 3/4″ x 3 3/4″ squares (once again, the 10 charms I pulled aside were all the polka-dot prints).
From the 16 charms you pulled aside, cut out (16) 1 1/2″ x 1 1/2″ squares. (I cut out 2 squares from each of the 8 polka dot prints).
Set your remaining charms and larger pieces of charms aside to use for the applique 🙂 This is what you should have:

Let’s move to your Moda Bella Solid White yardage. Start by ironing your yardage and then cutting a nice straight edge. From your yardage, cut the following strips: a 3″ x WOF Strip, a 7 1/2″ X WOF Strip, a 8 1/2″ x WOF Strip, and a 12 1/2″ x WOF Strip. Trim the selvage edges off the top of all 4 strips.


For your 7 1/2″ x WOF Strip cut as follows:

For your 8 1/2″ x WOF Strip cut as follows:

For your 12 1/2″ x WOF Strip cut as follows:


This is it for the cutting. Now you are ready to start putting your top together!!
STEP 2 – MAKING THE BLOCK BORDERS
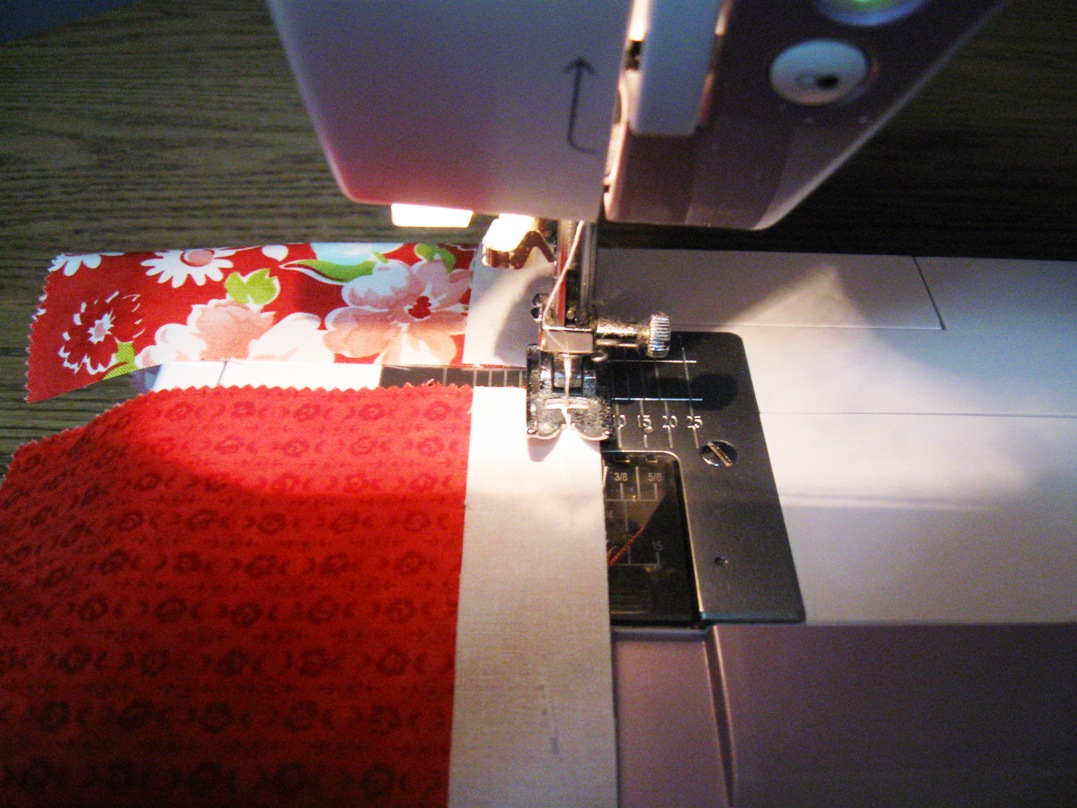
Start by grabbing your pile of 5 x 5 charms and 1″ x 5″ white rectangles. You will be adding a sashing strip to the side of each charm. Lay a white rectangle along the side of your charm with right sides together (any side will do). I don’t pin a lot in this project, but if you prefer to pin, please do 🙂 Sew 1/4″ along the edge.

You don’t want to cut after each one, that takes too much time. Chain stitch instead (when you are finished sewing the first, feed the second pair through and keep feeding through pairs until you have sewn a sashing on all 36 charms).
Clip the threads between each set and press the seam toward the charm square.

Repeat the process on the opposite side. Lay a white rectangle along the opposite side of your charm square with right sides together. Chain stitch a 1/4″ seam along the side of all 36 charm sets, clip your threads, and press toward the charm square.
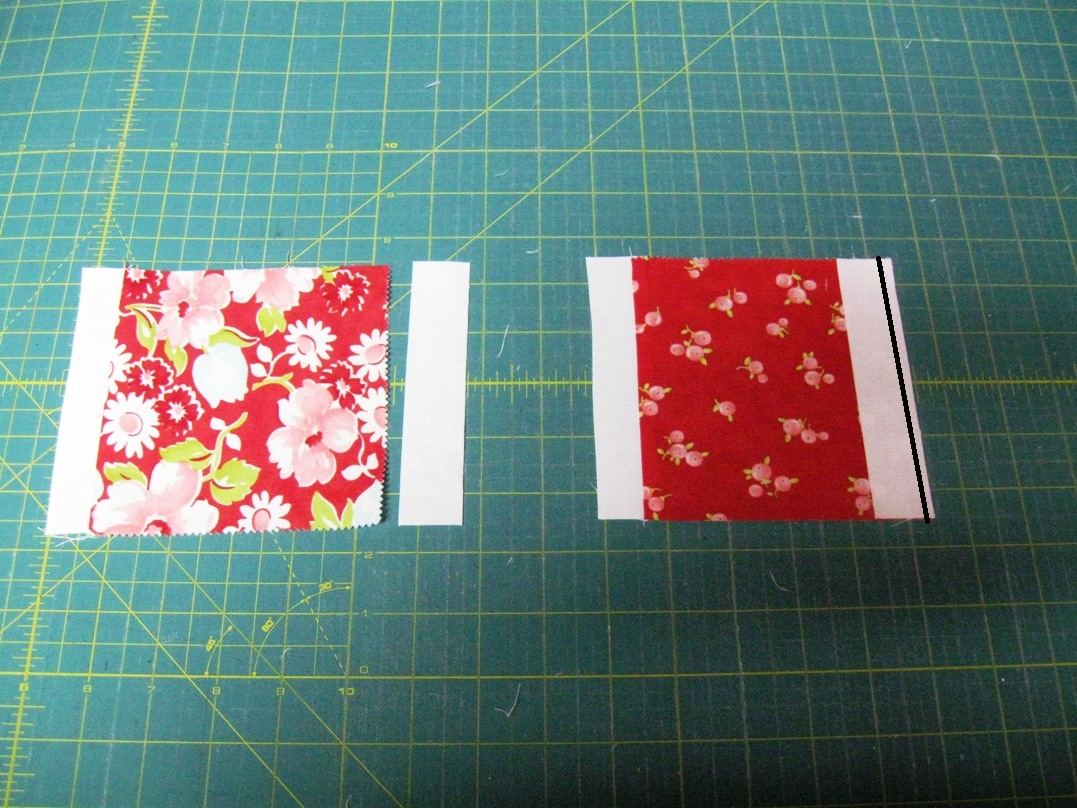
Now they are pressed and ready to be sub-cut. Each charm needs to be sub-cut in half both ways. From side-to-side, measure in 3″ and cut. From top to bottom, measure in 2 1/2″ and cut. You should now have 144 little 2 1/2″ x 3″ squares that are sashed on 1 side.

Start sewing them together. Align 2 squares with the sashings on the same sides. Lay your first square on top of your second with right sides together. (You did this right if the sashing is on top of the print.) Sew a 1/4″ seam along the edge. Don’t pin, just align as you go. Continue to chain stitch sets of 2 until you have used all of your squares. Clip your threads and press. You should now have 72 sets of 2.

We are going to turn those sets of 2 into sets of 4. Same exact process. Align two sets with right sides together, chain stitch a 1/4″ seam along the edge of all your sets, clip your threads, and press. You should now have 36 sets of 4.

And now we do it again one last time to turn sets of 4 into sets of 8. Align two sets with right sides together, chain stitch a 1/4″ seam along the edge of all your sets, clip your threads and press. You should now have 18 sets of 8.

There is one last step to finish your borders. You need to unpick one seam. (I know it seems silly to unpick, but trust me, it is way faster to sew them this way and unpick 18 seams then to do them without chain stitching 🙂 So unpick along the outer sashing of the 3 square (see the arrow).

You should now have 18 rows of 3 that have sashings on both ends and 18 rows of 5 that do not have sashing on either end. You can set your borders aside for a minute. Way to go!!!

STEP 3 – MAKING THE BLOCK CENTERS
For each block center you will need (4) 3 3/4″ x 3 3/4″ charm squares, (2) 1″ x 3 3/4″ white rectangles, (3) 1″ x 7 1/2″ rectangles, and (2) 1″ x 8 1/2″ rectangles. Lay them out as follows. (the 8 1/2″ strips are along the top and bottom 🙂

Start by sewing your small center sashings to your top 2 charm squares. Lay the sashings along the bottom of the charm squares with right sides together. Once again, it isn’t necessary to pin. Sew a 1/4″ seam along the edge of the two squares, clip your threads, and press.

Now you can sew your top sashed charms to your bottom charms. Lay the top charm square onto your bottom with right sides together. Sew a 1/4″ seam along the edges, clip your threads, and press.

Now that your charm columns are done, you can sew the sashings to the sides of them. Lay your sashings onto your charm columns as follows. Sew a 1/4″ seam along the three edges, clip your threads, and press.

Now you can sew the 2 charm columns together. This time it is important to pin so that you can make sure you align your center seam. Once it is pinned, sew a 1/4″ seam along the pinned edge and then clip your threads and press.

Lastly, you just have to add the top and the bottom sashings. Lay the sashings along the top and bottom of the block with right sides together. Sew a 1/4″ seam along the edge of the top and bottom, clip your threads and press.

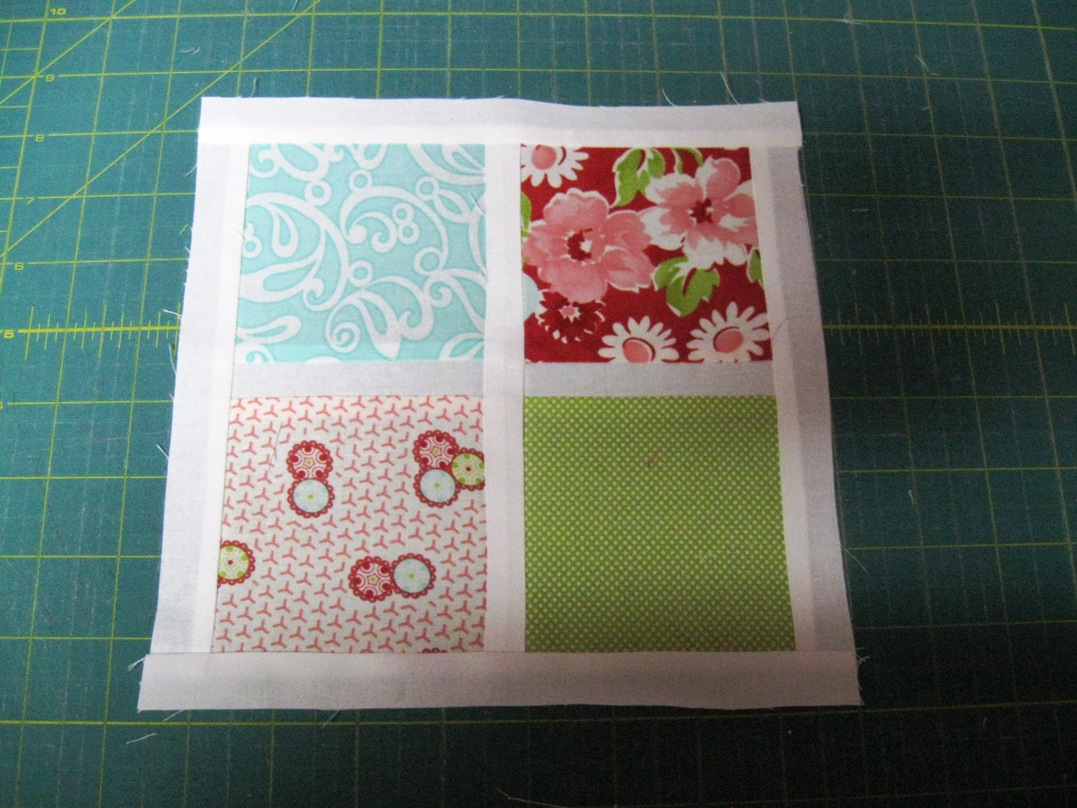

We’ll start by sewing on the top and the bottom borders. Lay the top and bottom border with right sides together along the top and bottom edge of the block center. Make sure to pin and align your seams where the 4 arrows designate. Sew a 1/4″ seam along the pinned edge, clip your threads, and press.

And now… you guessed it, we are going to do the sides. Lay your side borders with right sides together along the sides of the block center. Once again, make sure to align your seams where the arrows indicate. Sew a 1/4″ seam along the pinned edge, clip your threads and press.

Now your block is completed!!! Yippee Skippee!! Repeat this process with the other 7 block centers so you have a total of 8 completed blocks.
Grab your 8 1/2″ x 8 1/2″ white square and use your remaining 4 borders to finish the block in the same manner. You will use the exact same process of adding the top and bottom first, followed by the sides.

STEP 5 – ADDING APPLIQUE TO THE CENTER BLOCK
To give this quilt a super adorable and personalized look, I added applique to the center block. This is optional. Grab your leftover (mine are polka-dot) charm squares that you set aside at the beginning. Fuse your pre-cut squares of heat-n-bond to the wrong side of your charm square. Now trace your letters onto the paper side of the heat-n-bond. Remember, to do your letters backwards!!!! (You can make your own letter templates by printing the name you’d like in any word program and then cutting out the letters.) Cut out your letters and wha-la!! You have applique letters. You can add flowers and such if you’d prefer.

Once you have your entire applique cut out, you are ready to add it to your block. Play with the arrangement in the center block until you get something that is pleasing to you. (I find it best to do this on your ironing board so you don’t have to move it once you get it where you like.) Once you have it set, go ahead and fuse your Heat-N-Bonded appliques to your center square.

Lastly, secure your applique by stitching around it. You can do any type of secure stitch you like. I chose to do a blanket stitch in white 🙂

STEP 6 – PIECING THE QUILT TOP
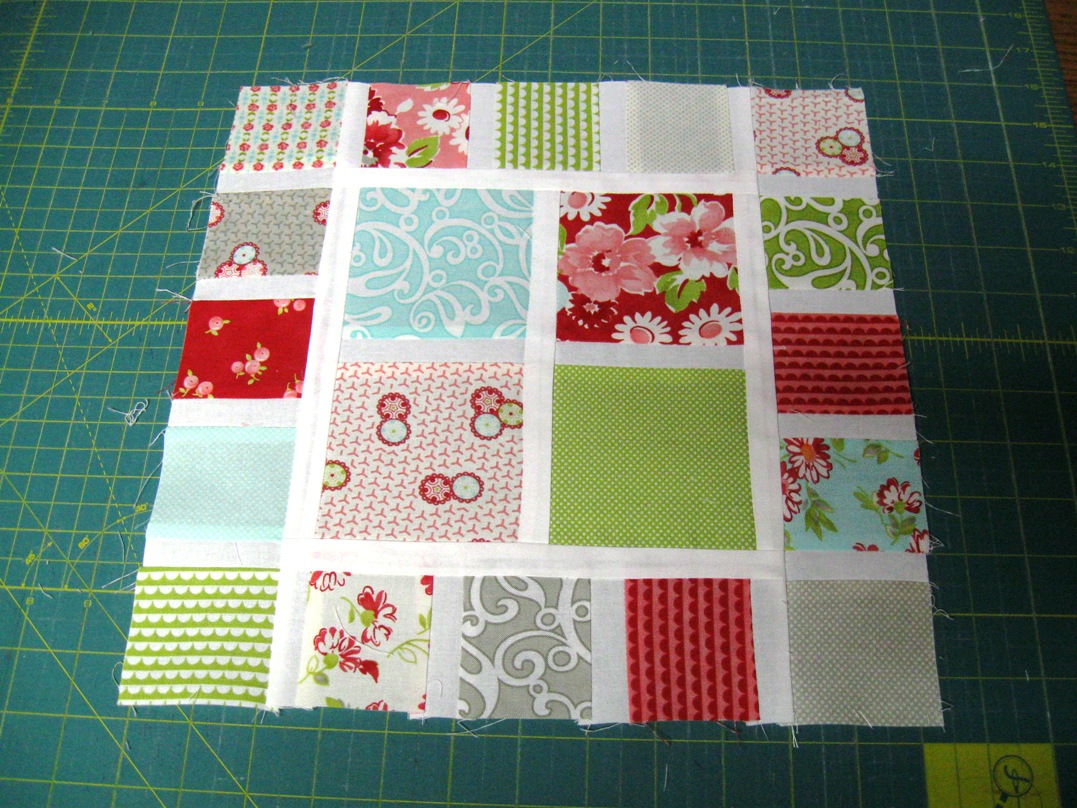
Now that you have all of your blocks done, you are ready to piece the quilt top together. Grab your 9 blocks, the (16) 1 1/2″ squares and and the (24) 1 1/2″ x 12 1/2″ rectangles and lay them out as follows. Go ahead and play around with your layout until you get a nice even mix of colors and it is pleasing to the eye. A great way to see this is to take a picture of it and then look at it on the computer screen, it really helps to give you a good overall look.

Start sewing your top together. I like to do this one row at a time; it makes it easier not to change my layout on accident. I start with the sashing rows. Using a 1/4″ seam, sew the squares onto the edges of your first piece of sashing in your first row. Continue to add on to the row. Add another sashing followed by another square etc. until you have sewn the entire row together. Once the row is all sewn together, go ahead and press it. Repeat for all 4 of your sashing rows.

Now that your sashing rows are sewn together, you can move onto your block rows. This is done with the same process. Start by sewing a sashing onto each side of your first block. Then add a block, followed by a sashing, followed by a block etc. until you have sewn together the entire row. Press it and repeat the process for the other 2 block rows.

Your quilt top should look like this. You with me? Almost done!!!

We are going to sew the sashings rows onto the block rows. Same process, just on a larger scale. Lay your sashing row onto the top of your block row with right sides together. Make sure to pin your seams to match where the arrows indicate. Your bottom row will have a sashing pinned along the top and the bottom. Sew a 1/4″ seam along your pinned edges, clip your threads and press.

Sew the 3 rows together. Start by laying your bottom row onto your center row with right sides together. Make sure to match your seams along those same points. Pin your entire edge, sew a 1/4″ seam along the pinned edge, clip your threads, and press. Now just repeat the same process laying your top row onto your now sewn together center and bottom row. Pin, Sew, Clip, and Press!!

And your top is complete!!! Don’t you just love it!!! It is so adorable!!!

STEP 7 – FINISHING UP

One adorable All Framed Up Quilt measuring approx. 40″ x 40″.
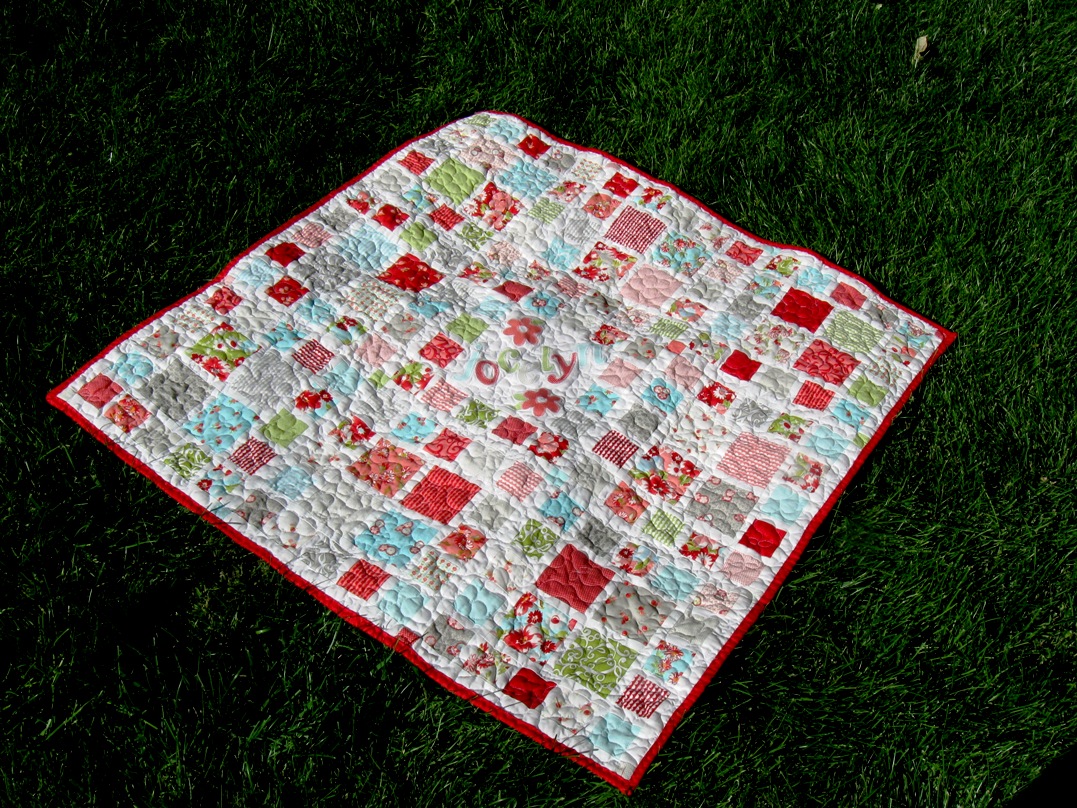
Perfectly Personalized for your little Precious one!!!

![]()
