Hey Everyone! I am Crystal Hendrix from Hendrixville. I am so happy to bring to you all another amazing Moda Bake Shop Quilt!
I was inspired by my wonderful Mother-in-Law who loves birds! I designed and made this for her! I hope that you all will fall in love with it as much as I have!
1 layer cake Spirit by Lila Tueller
2 charm packs Spirit by Lila Tueller
3 7/8 y 11434-13 (background- blue)
2 7/8 y 11435-13 (thick border-dark blue)
2 1/4 y 11436-16 (thin border-white)
5/8 y 11435-15 (roof-brown)
7 y 11436-18 (backing)
3/4 y 11430-13 (binding)

I am not a big fan of applique … mostly because I am afraid of it, so I try to patchwork as much as I can. If you have any questions about the instructions, PLEASE let me know and I will help out.
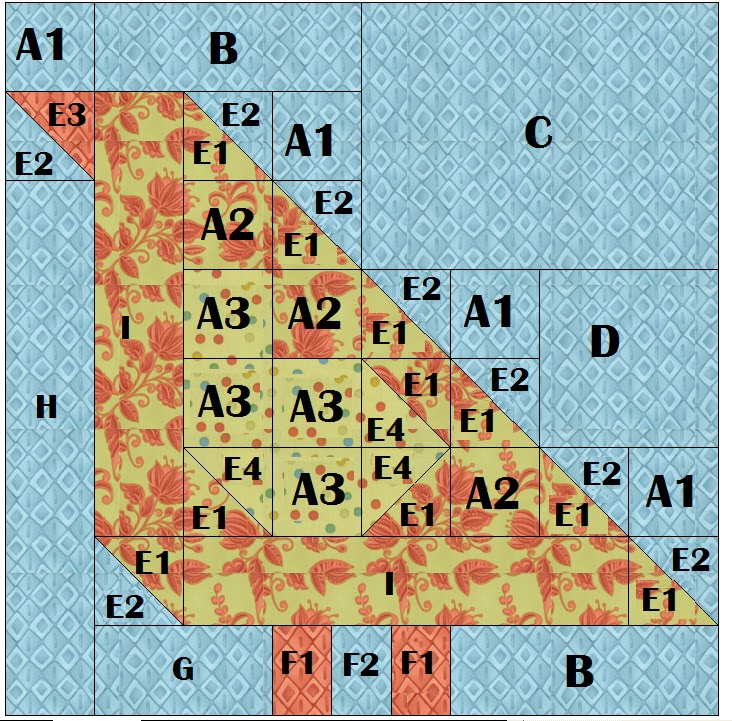
Making the Bird Block: (Total needed: 9)
I have labeled each piece so that it may be easier to understand. In the parentheses is how many you will need to make the total 9 blocks.
*Please watch for your pattern lines. If you want them to all match up right please cut your pieces accordingly! I had to redo quite a few because of this reason!*
A1: 4 (36) pieces of background fabric 1¾”x1¾” square
A2: 3 (27) pieces of main bird fabric 1¾”x1¾” square
A3: 4 (36) piece of wing bird fabric 1¾”x1¾” square
B: 2 (18) pieces of background fabric 4 ¼”x1 ¾” rectangle
C: 1 (9) piece of background fabric 5 ½”x4 ¼” rectangle
D: 1 (9) piece background fabric 3”x3” square
E1: 10 (90) pieces of main bird fabric 2 1/8”x2 1/8” square cut into half
E2: 8 (72) pieces of background fabric 2 1/8”x2 1/8” square cut into half
E3: 1 (9) piece of bird beak fabric 2 1/8”x2 1/8” square cut into half
E4: 3 (27) pieces of bird wing fabric 2 1/8”x2 1/8” square cut into half
F1: 2 (18) pieces of bird leg fabric 1¾”x1 3/8” rectangle
F2: 1 (9) piece of background fabric 1 ¾”x1 3/8” rectangle
G: 1 (9) piece of background fabric 3”x1 ¾” rectangle
H: 1 (9) piece of background fabric 8”x 1 ¾” rectangle
I: 2 (18) pieces of main bird fabric 6 ¾”x1 ¾” rectangle
After you cut out all of your fabric, you can now combine your “E” pieces.
Combine 3 of your main bird fabrics with 3 of your bird wing fabric. Then combine all of your background pieces with the remaining pieces.
*Instead of cutting your squares into triangles, you can leave the squares intact and sew ¼” from the middle (after marking a line). I did mine this way so that I could have my patterns line up*
To make assembly easier, I layout all of my pieces to make the bird.
To make sure you can put your bird together easily and line up so you don’t have to do any tricky stitching, I sew my pieces together in a particular order.
As you can tell from the picture, I layout all of my 9 block pieces so I can do all the blocks at one time. This makes it go by faster.
*I found that I had to constantly check my pattern to make sure all my pieces lined up correctly. I did more seam ripping in this quilt than any other that I have made*
Making the House Block: (Total needed: 9)
This block is easier than the bird block. I have labeled each piece as well. In the parentheses is how many you will need to make the total 9 blocks.

A1: 1 (9) piece background fabric 6”x5” cut in half rectangle

A2: 1 (9) piece house roof fabric 6”x5” cut in half rectangle

B1: 1 (9) piece background fabric 6”x5” cut in half rectangle
B2: 1 (9) piece house roof fabric 6”x5” cut in half rectangle
*Make sure to cut carefully if you want your fabric patterns to line up!*

C: 2 (18) pieces of background fabric 6 3/8”x1¾” rectangle
 D: 2 (18) pieces of background fabric 3 3/8”x1 3/8” rectangle

E: 1 (9) piece of brown fabric 2 1/8”x1 3/8” rectangle

F: 2 (18) pieces main house fabric 5½”x3 3/8” rectangle

G: 2 (18) pieces main house fabric 2 1/8”x2 1/8” square

H: 1 (9) piece of brown fabric 2 1/8”x2 1/8” square

I: 4 (36) pieces of main house fabric 1 ¼”x1 ¼” square
* This piece is so tiny, you can’t see the fabric pattern well, so don’t worry about the fabric pattern*
I find it easier to piece it in a particular order.
To assemble the rest of the quilt: (Cut and sew the following)
1 1.Cut out (18) 10” squares for the background fabric. (Once you have trimmed up your house and bird blocks you will need to trim these down to match).
2) 2.Cut (2) 60”x2½” strips of white fabric.
3) 3.Cut (2) 65”x2½” strips of white fabric.
4) 4.Cut (2) 75”x2½” strips of white fabric.
5) 5.Cut (2) 79”x2½” strips of white fabric.
6) 6.Cut (2) 79”x 7” strips of Dark blue outer border fabric.
7) 7.Cut (2) 93”x7” strips of Dark blue outer border fabric.
8) 8.Sew together (2) 13 – 5” squares (charm).
9) 9.Sew together (2) 15 -5” squares (charm).
*You will need to cut down some of your extra layer cake pieces*
Assemble bird, house and plain blocks together:
Sew the 60”x2½” strips of white fabric to the top and bottom of the quilt, followed by the 65”x2½” strips of white fabric to the sides:
Sew the (2) 13 – 5” squares (charm) to the top and bottom of the quilt followed by the (2) 15 -5” squares (charm) to the sides of the quilt:
Sew the 2 – 75”x2½” strips of white fabric to the top and bottom of the quilt followed by the 2 – 79”x2½” strips of white fabric to the sides of the quilt:
Finish off the quilt top by sewing the 2 – 79”x 7” strips of Dark blue outer border fabric to the top and bottom of the quilt and the 2 – 93”x7” strips of Dark blue outer border fabric to the sides of the quilt top:
Baste, pin, quilt and bind as desired.

Once finished, you will have an approximate 93”x93” quilt. Perfect for a queen size bed!
If you have enjoyed this quilt and tutorial feel free to see what else I am up to with my family at my blog!
Crystal Hendrix