
![]()
Hello! It’s Crystal Hendrix again! I want to thank you all for your support and love that you have had for my previous tutorials! Thank you all for having patience with me when you discover that I am human! The main point is that quilting is fun and if you don’t make a mistake you don’t learn anything!
Today I bring you Kissing Stars made from the line, Flirt by Sandy Gervais. I fell in love with this line as soon as I saw it! I just love the greys, pinks,reds and teals that it showcases! This is a very popular block and there are tons of great tutorials that you can find out there, but I hope you like mine and that it teaches you how to make a good star block!
This is a LARGE quilt but the great thing about it is you can leave off rows or columns to fit any size bed or quilt size you want! Love that about this pattern! Now I am happy to present the tutorial, Kissing Stars!

For the Blocks:
1 Layer Cake + 2 Charm Packs OR 6 Charm Packs : Flirt by Sandy Gervais
1 Layer Cake + 2 Charm Packs OR 6 Charm Packs : Moda Solid White (another good color that would go great with this is the Bella Solids : Gray, Zen Gray or Feather)
For the Border:
1 1/2 yards 17701-14 (or any other color combo you would like)
For the Binding & Backing:
3/4 yards 17705-22 (or any other color combo you would like)
8 1/4 yards 7521-552 (or any other color combo you would like)

*Notes* – Use a 1/4″ seam allowance through out the whole quilt
– When I refer to the term “solid color” this is my Bella White solid color.
– To make 30 blocks you will need 240 Flirt charm pieces and 240 solid color charm pieces. Each charm pack has a total of 42 pieces in each. This comes out to 5.7 charm packs needed. If you use a layer cake, you can cut it down to 4 charm packs. This is what I have done with my layer cake. So if you are using a layer cake, cut it all into 4 – 5″ squares and this will give you your charm pieces. Then you can either use 2 more charm packs or 1/2 of another layer cake.
– WOF = Width of Fabric. This is usually 45″ but after trimming off the selvedge edges you end up with either 42″ to 40″ left. This is still the WOF.
For this pattern we are working with a 5 x 6 layout design for a total of 30 blocks.
For each block you will need:
4 – 5″ charm pieces of your solid color
8 – 5″ charm pieces of Flirt ( This is 8 DIFFERENT charm pieces)
4 – 4.5″ x 4.5″ of your solid color
For the entire quilt you will need:
120 – 5″ charm pieces of your solid color
240 – 5″ charm pieces of Flirt (You only need 8 different pieces for each block, so for all of the blocks you can mix up the different charm pieces)
120 – 4.5″ x 4.5″ of your solid color
For your border cut your fabric into 10 – 5” strips. With these strips make 2 – 80.5″ x 5″ and 2 – 105.5″ x 5″ pieces.
For the binding cut your fabric into 10 – 2.5″ strips. Sew these all together to make your binding. I use a fold-over binding method.
For the backing cut all of your yardage into 3 – 97″ x WOF or 3 – 2 3/4 yards pieces. Then with your 3 different panels, cut the WOF down to 38“. Then sew the 3 panels together to give you approximately a backing of 97″ x 113″.
Now lets put together one block. You will do this same thing for a total of 30 blocks.

1. Take your 4 – Solid color charm pieces and your 8 – Flirt charm pieces and cut each of them on the diagonal. (There are MANY other ways that you can make a half square triangle, but this is how I prefer to make them. Simple and to the point. You can make the half square triangles using a different method but you will need to figure out the fabric required for it.)

2. Now I am a very visual person so at this point I lay out my block (see picture below –Yes I did this for all 30 blocks.) I think laying out your block helps reduce mistakes and having to use the dreaded seam ripper!
Once you know which piece you are going to sew together, I work on all of the half square triangles. Just place the right sides together and sew a 1/4″ seam down the diagonal of the pieces. Then press (always towards the darker side) and trim down your piece to 4 1/2″ x 4 1/2″. There may not be a lot of discard but if you combine all of the discard for the entire quilt, you will see that it makes a difference when assembling your quilt top.

You can see above all of my half square triangles sorted and piled all together. See my trimmings pile? If you were to keep all of that it would have made assembling the blocks and eventually the quilt top a lot harder. This also helps give you your nice points!

3. Once you have all of your half square triangles assembled, sew together two of your smaller blocks (your finished block will have a total of 16 smaller blocks – but you will now have a total of 8 sets of blocks, refer to the picture above if you are confused). Then press each block pieces.

4. Sew 2 sets to make 1 block (you will have a total of 4 sets now) and press. Then sew together 2 sets to make 1 block (you will now have a total of 2 sets) and press. Then sew your last two sets together to make your finished block!
Now at this point you have finished one block. Continue making 29 more blocks using the 4 steps above. I did not take a picture of this, but at this point I trim all my blocks to measure 16.5″ x 16.5″. Once again I might not get much trimmings, but it makes sure that when I assemble my quilt top, that it is easier. (I guess you could say that this is optional)

5. Now we will need to assemble 6 rows of 5 blocks. I used a random order and pulled one block after another to make my rows. Always press your seams when finished.

6. Then we will take our 6 rows and sew them together to give us our quilt top. Don’t forget to press your seams!

At this point your quilt should measure approximately 80.5″ x 96.5″. I say approximately because even though I trim and make sure that I use only a 1/4″ seam allowance I am sometimes off. But this gives you a good idea of where you should be.
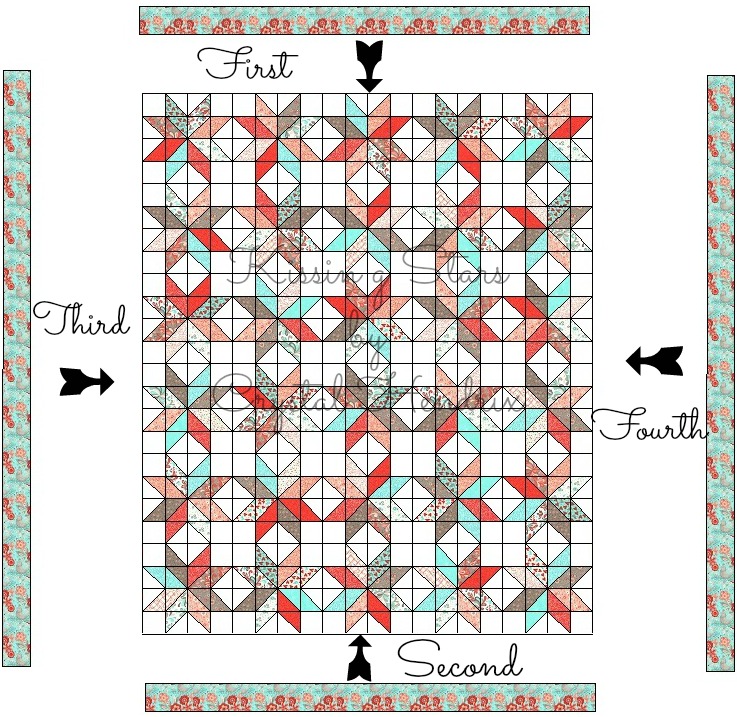
7. Now we are to our last step! Attach your borders to your quilt top, but doing adding the top and bottom strips (80.5″ x 5″) and then adding strips to each side ( 105.5″ x 5″). Make sure you press all of your seams when you are done.

There you have it, your quilt top is done! Now you can baste, quilt and bind any way you like. I did add fabric and cutting information that you may use for your binding and backing if you like.


If you have any questions or have found where I have made an “oops” please send me an email! I will help you the best I can!
![]()
