
Hello all! It’s Crystal Hendrix over at Hendrixville. I am so happy to bring you a fun combination of quilts! I am always trying to come up with fun new things to do with charm packs and layer cakes. Then one day this idea popped into my head! Nice, easy, and a fun project!

Framed:
2 layer cakes, Spirit by Lila Tueller
1 3/8 yd Spirit 11436 16 (white with colored poka dots)
3/4 yd Spirit 11436 16 (brown, for binding)
8 yd Spirit 11430 12 (for backing)
Mini Framed:
2 1/4 yd white snuggles (for strips and backing)
3/8 yd 11430 11 (for binding)
***You will use leftover fabric from the Framed quilt to make this quilt. (Go to the cutting instructions for the Framed quilt to see what to do with the Layer Cakes)

Mini Framed Baby Quilt
Cut the following strips from the snuggles:
2 – 2.5” x 5”
2 – 2.5” x 9”
2 – 2.5” x 13.25”
2 – 2.5” x 17.25”
2 – 4” x 25.625″ (25 5/8”)
2 – 4” x 32.625” (32 5/8″)
***Make sure that you pin a lot throughout the process. You will need a total of 9 pieces of layer cake to make this quilt. Cut 20 pieces into – 2 5/8” x 2 5/8” squares. This takes 3 layer cake pieces, but I would try to get a variety to work with.

Take a 5”x 5” square and sew the 2 ½” x5” strips to two sides. Press and then sew the 2 ½” x 9” strips to the opposite sides. Press.
*** I liked to press the seams toward the white snuggles because it made the fabric pop more once the other strips were sewn on.
Next, you will want to sew a variety of mini squares together to make: Each one is 2 5/8″ by 2 5/8″ (mini charm).
2 – 4 mini charms
2 – 6 mini charms
***Make sure you are using a ¼” seam allowance.
Lay your mini charm square rows around your quilt top, this way you can get a nice feel of how it will look.

Sew one 4 mini charm row to the top (follow the direction of the white snuggles seams, sew this to the shorter white snuggles row) and sew the last to the bottom. Press and sew the remaining mini charms rows to the opposite sides.
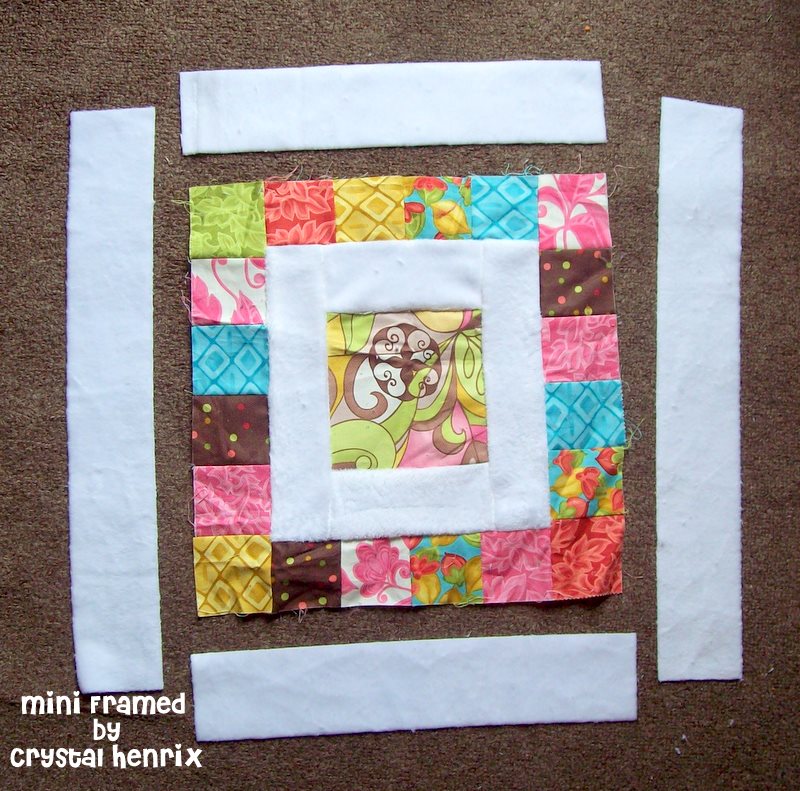
Now sew the 2 – 2 ½” x 13 1/4” snuggles to the top and bottom. Press and sew the 2 – 2 ½” x 17 1/4” snuggles to the opposite sides.
We will do the exact same thing as the mini charms, but will use a combination of a 4 5/8″x 4 5/8″ (Square A) square and a 4 3/4″x 4 3/4″ (Square B) square for these rows. When you sew them together, I line them up like such:
A + B + A + B: Top row
B + A + B + A: Bottom row
B + A + B + A + B + A: Left side row
A + B + A + B + A + B : Right side row
A + B + A + B: Top row
B + A + B + A: Bottom row
B + A + B + A + B + A: Left side row
A + B + A + B + A + B : Right side row

Now we will take the remaining strips and sew and press as before.

***At this stage, if you are not satisfied with the size of the baby quilt, feel free to add more rows on.
Baste, quilt and bind your baby quilt as desired.

Framed Quilt:
Cut the following from the border fabric:
2 – 2 ½” x 10”
2 – 2 ½” x 14”
2 – 2 ½” x 23”
2 – 2 ½” x 27”
2 – 2 ½” x 44 7/8”
2 – 2 ½” x 48 7/8”
2 – 2 ½” x 57 5/8”
2 – 2 ½” x 61 5/8”
2 – 2 ½” x 79 1/4”
2 – 2 ½” x 83 1/4”
***The easiest way is to cut out 12 – 2 ½” strips from the fabric.
You will be using 2 layer cakes. Select 7 squares from the second layer cake and set aside. You will use the rest of the second layer cake and the first for this quilt. You will need a total of 49 layer cakes (10″x10″ square) and 64 charms (5″x5″ square).
Out of the charms, you will need to make need to make the following rows:
2 rows of 3 – 5″x5″ squares
2 rows of 5 – 5″x5″ squares
2 rows 11 – 4 7/8″x 4/78″ squares
2 rows 13 – 4 7/8″x 4/78″ squares
Out of the layer cakes you will need to make the following rows:
2 rows of 3 – 9 3/8″ x 9 3/8″squares
2 rows of 5 – 9 3/8″ x 9 3/8″squares
2 rows of 7- 9 1/4″ x 9 1/4″ squares
2 rows of 9 – 9 1/4″ x 9 1/4″ squares
Once you have these, we basically follow the same step for the Mini Framed Quilt.
***Make sure that you use a ¼” seam allowance.
****The easiest way to line up your rows is to pin the rows and strips to the quilt top.

Take a layer cake (10″x10″ square), sew the 2 ½” x 10” to the top and bottom (creating the top and bottom). Press and then sew the 2 ½” x 14” border to the opposite sides.

Now we will take the 2 rows of 3 – 5″x5″ squares and sew one to the top and then bottom. Press and then sew the 2 rows of 5 – 5″x5″ squares to the opposite sides.

Take the quilt top and sew the 2 ½” x 23” border to the top and bottom. Press and then sew the 2 ½” x 27” border to the opposite sides.

Now we will take the 2 rows of 3 – 9 3/8″ x 9 3/8″squares and sew one to the top and then bottom. Press and then sew the 2 rows of 5 – 9 3/8″ x 9 3/8″squares to the opposite sides.

Take the quilt top and sew the 2 ½” x 44 7/8” border to the top and bottom. Press and then sew the 2 ½” x 48 7/8” border to the opposite sides.

Now we will take the 2 rows 11 – 4 7/8″x 4/78″ squares and sew one to the top and then bottom. Press and then sew the 2 rows 13 – 4 7/8″x 4/78″ squares to the opposite sides.

Take the quilt top and sew the 2 ½” x 57 5/8” border to the top and bottom. Press and then sew the 2 ½” x 61 5/8” border to the opposite sides.

Now we will take the 2 rows of 7- 9 1/4″ x 9 1/4″ squares and sew one to the top and then bottom. Press and then sew the 2 rows of 9- 9 1/4″ x 9 1/4″ squares to the opposite sides.

Take the quilt top and sew the 2 ½” x 79 1/4” border to the top and bottom. Press and then sew the 2 – 2 ½” x 83 1/4” border to the opposite sides.
Baste, quilt and bind as desired.

Two beautiful quilts!
Framed Quilt is 83″x83″ and the Mini Framed Quilt is 32 1/2″x 33 1/2″


Crystal Hendrix
![]()
