

1 3/4 yards of a focus fabric for the center panel
6 3/4 yards background fabric (this will be used for the backing as well)
batting and thread

First, cut your focus fabric. Trim off the selvage edges and square up the ends. The center panel measures 43″ x 63″.
 From the background fabric, cut 2 pieces 4″ x 63″. Sew to the sides of your center panels, press your seams.
 Cut 2 pieces of 4″ x 50″. Sew to the top and the bottom of your center panel. Trim any excess. (there should be about 1/2″ extra, depending on how exact your seam allowance is.) Press well.
 The first border is complete.
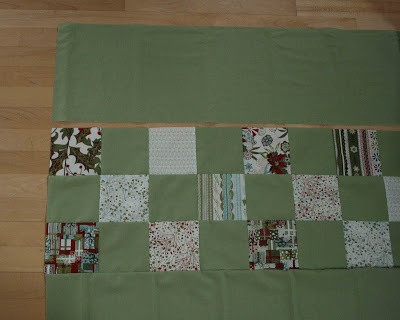
 Take 7 squares from the layer cake and cut each piece into 4 strips—each 2.5″ wide, for a total of 28 strips. These will be for the next border. Mix up the fabrics so they will be placed randomly around the quilt.
 Join 6 strips of fabric end to end. Make 2.
 Attach these borders to the sides of the quilt first, centering them along the edge, cutting off the excess after sewing the border on.
 Then attach the top and bottom borders, again centering them and then cutting off the excess.
 Now, to finish off the quilt, cut 6″ strips for the final border. I cut two pieces 53″ x 6″ for my quilt, but you will want to measure your own quilt top at this point.
 When you measure, measure in the center or your quilt, not at the outside edge. This will help prevent wavy borders. Each person’s seam allowances will cause these lengths to vary, that is why I’m recommending this method. My final two borders measured 6″ x 88″. Again, you will want to measure your own quilt at this point for the exact measurement that you will need. After attaching borders, press all seams and the top of your quilt is done! Easy enough, right?
 I like to make a pieced backing for my quilts, so I added a little checkerboard to the top and the bottom of the quilt using more of the layer cake pieces. Of course you can skip this step and back the quilt with one fabric if you would like.
Select 12 layer cake pieces and cut them into quarters to make 48 5″ squares. (You will have 2 extra.) Also, cut 44 5″ squares from the background color. Assemble them to make a checkerboard 3 blocks high and 15 blocks wide. Make 2. Attach to the checkerboard strips to the top and the bottom of the center panel.
 Cut two more pieces of background fabric 11″ x 68″. Attach to the top and the bottom of the checkerboard strips.
 Press well and you are ready to baste your quilt.
 I baste my quilts on a tile floor which has a built in grid. It makes it easier to center the front and back of the quilt while keeping everything fairly square. It’s especially helpful in cases like this where both the front and the back are pieced.

Here’s the front, complete:

And the back.


A two sided Christmas quilt that measures 64″ x 88″. Large enough to use on a twin sized bed or perfect for snuggling on the couch.
 by amandajean of crazymomquilts
![]()

oh aj.
this. is. amazing.
i NEED it.
like yesterday.
do you need my address???
*wink*
I love it!
Nice work AmandaJean! Simply adorable!
Gorgeous! I love how easy that would be to make.
amazing and clever!!! thanks Amanda for that easy tutorial!
Fab!
Ahh…so beautiful! Very nice work!
love it…very cozy!
super cute.. and i have a figgy pudding layer cake sitting right here.. if only i had the time to get this done in a few days!!
Since I'm quilt challenged I won't be getting it done by Christmas but it looks like one I could do! Thanks for the instructions!
GORGEOUS!
You did it again!! So simple and So pretty!
lovin the simplicity and colors!
LOVE IT!!!!
Love it! You obviously didn't take that photo this afternoon! STay warm, I'm hoping for the never ever happens snow day!
That is just beautiful and Christmasy but not over done…..lovely. Thank you for your creations.
Super cute! And quick and easy, perfect for this time of the year!
NICE!! I want one!!
im digging through my figgy stash…its a MUST have!!!
I love the new blog!!! This is awesome! I will be making this quilt!! What a great Christmas project!
This is just so perfect Amanda Jean. If I only had a Figgy Pudding Layer Cake, I would drop everything and start it right now. Love the green you used with it.
Really well done; beautiful AND quick!
just gorgeous and a great tip with the tiled floor…thanks!
I love it Amanda,great work!
definitely loving this quilt! This is a great example of making the fabric do all the work. Well done!
Love it. Thanks for the wonderful tutorial Amanda Jean. Happy Holidays!
Absolutely wonderful!
Love the back of the quilt as much as the front!
If I find a sale on Figgy Pudding, I AM making this quilt! So pretty and SOOO easy. thanks for the inspiration.
Lovely quilt. I wonder if any of you have ever had figgy pudding. I had it last year when in Newfoundland. It was simply delicious.
Love it. I have a yard of a figgy pudding and some charm packs. I am thinking a smaller version would be great.
I just wanted to let you know that Bloggy Blog Designz is having another giveaway! Here is what we are giving away:
A Basic Package
A $40 Giftcard
A $30 Giftcard
A $20 Giftcard
55% off Any Package
45% off Any Package
See our site for details! http://www.bloggyblogdesignz.com
LOVE, LOVE, LOVE this ~~~ So quick, simple and fabulous!! Lucky for me, a bundle of
Figgy Pudding sits on my cutting table as I write this~~
Just wondering…what IS the green that you used; MODA Bella Solid? KONA Cotton? Something else?? Thanks for a wonderful idea~~
Oh my is that ever gorgeous!!!
Xoxoxxx Ree
http://reepeas.blogspot.com/
Love it. It's simple, yet elegant and oh so practical.
I love this quilt. This is especially wonderful for that one piece of Christmas fabric that you love and hate to cut up. Thank you for such a wonderful project.
love it!!!
love it!
love it!
WOW this looks amazing! I am new to quilting and new to your lovely bubble space! Your space is soo gorgeous and i love it here!
I adore your turotials! Thanks for sharing them. 🙂 So happy to be in PTMC with you!
Have a lovely merry happy weekend and love to you!
jacqueline
http://jqlinesocuteithurts.typepad.com/
Oh I love love love this quilt. What a great way to use figgy pudding and not have to cut it into little pieces.
How did I miss this??? That's awesome! And so easy to do! I think I'm going to try this with some spring fabric or something. Love it!
That is gorgeous!
I love it, Amanda! Of course, I LOVE EVERYTHING YOU DO! Sorry. Your quilts get me so excited I start shouting. I'll be quiet now.
love!