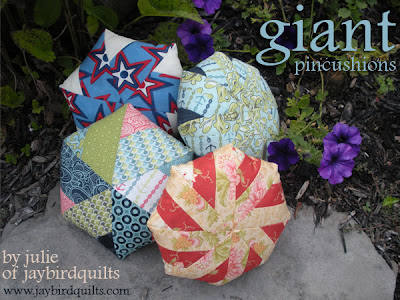
These are super simple to make and adorable! They come in handy around your sewing room and work as great gifts for sewing friends.

honeybun or jelly roll strips
hand sewing needle & matching thread
pincushion filler of your choice

Patisserie by Fig Tree – Neptune by Tula Pink
1. Pick 3 honeybun strips that look good together and have some contrast.
2. Sew them together into a strip set. Offset the start of your strips like this.

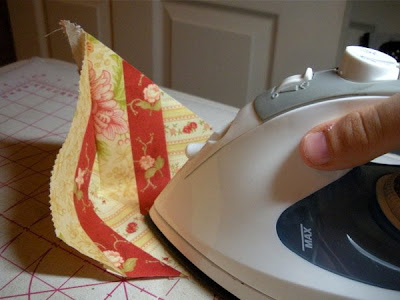
3. Press seams. This can be in any direction.
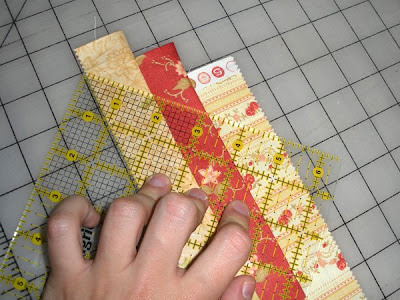
4. Measure your strip to make sure it is 3 ½” wide. If it is not it is ok if it is smaller (your ¼ is bigger) but not larger (you are sewing too scant) Correct if needed and write down what the width of your strip is.
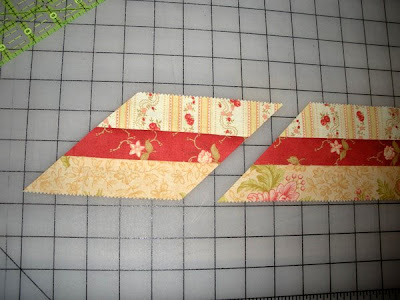
5. Cut a 45 degree angle at the one end of your strip.
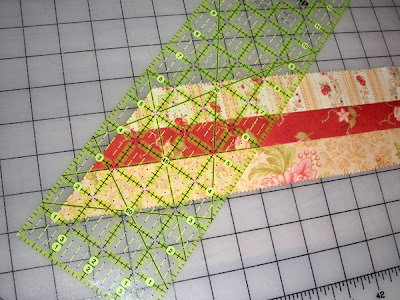
6. Turn your ruler so you can cut a diamond. Cut it to be 3 ½” or the width of your strip set.
Repeat for a total of 8 diamonds.
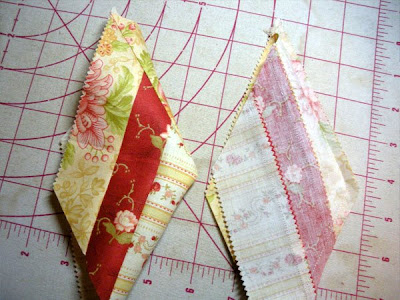
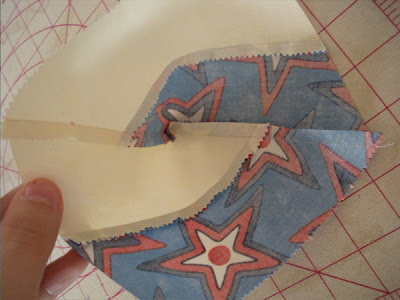
7. Place diamonds RST into 4 sets making sure that the top points are the same fabrics.
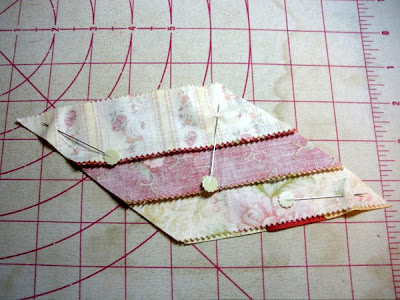
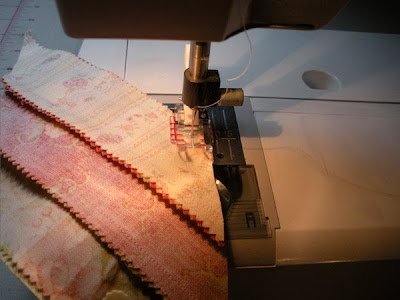
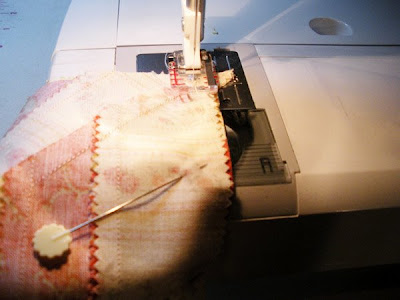
8. Pin & Sew along 2 sides from top to bottom pivoting in the center. (repeat 3 times for 4 sets)

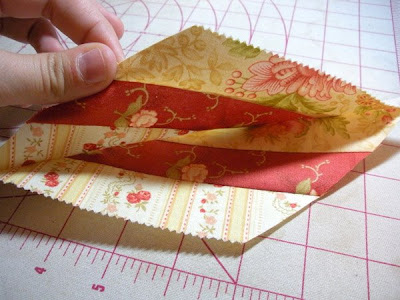
9. Open and press towards solid strip. (not the part with 2 seams) (repeat 3 times.)
10. Similar to step # 7 place diamond sets RST and pin. The ironing from step #9 should help you interlock the seams at the top and bottom. Sew 2 sides from top to bottom, repeat for 2nd set, and iron again.
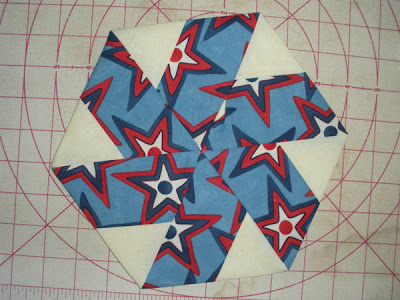
11. Now you have 2 halves of your pincushion.
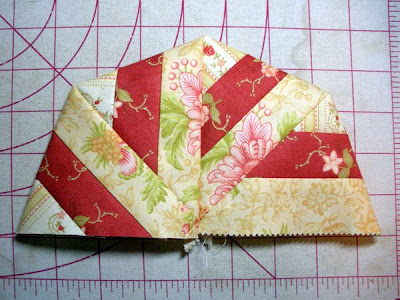
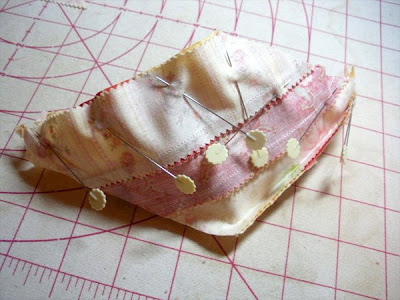
12. Put one half inside the other RST. Pin all the way around and sew leaving a 1 ½” opening.
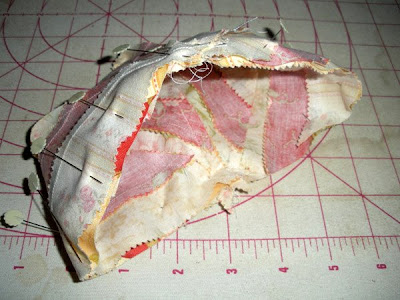
13. Turn right side out. Fill with stuffing or filling of choice.
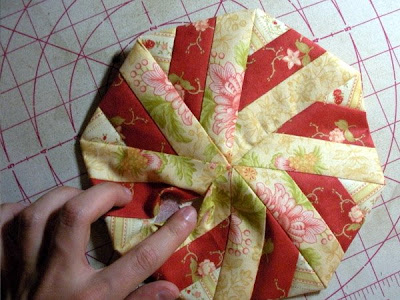
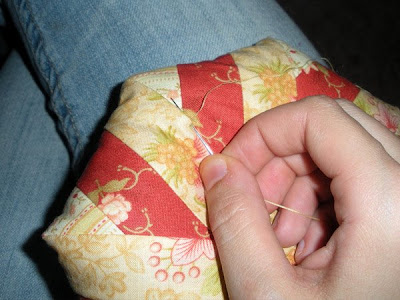
14. Hand sew opening closed and you are done!
See how easy that was!
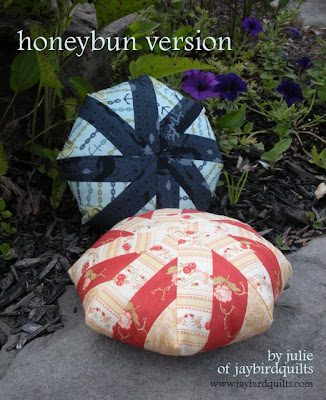
Red White & Bold by Sandy Gervais – Neptune by Tula Pink
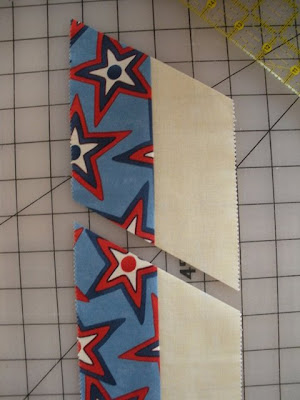
1. Pick 2 jelly roll strips that look good together and have some contrast.
2. Sew them together into a strip set. Offset the start of your strips.
3. Press seams. This can be in any direction. (since i had a light color solid here i pressed toward the blue print)
4. Measure your strip to make sure it is 4 ½” wide. If it is not it is ok, just write down what the width of your strip is.
5. Cut a 60 degree angle at the one end of your strip.
6. Turn your ruler so you can cut a diamond. Cut it to be 4 ½” or the width of your strip set.
Repeat for a total of 6 diamonds.
7. Place diamonds RST into 2 sets making sure that the top points are the same fabrics. You will have 2 leftover at this point.
8. Pin & Sew along 2 sides from top to bottom pivoting in the center. (repeat 1 time.)
9. Open and press towards solid strip. (not the part with 1 seam) (repeat 1 time.)
10. Similar to step # 7 place a diamond set RST with a loose diamond and pin. Sew 2 sides from top to bottom, repeat for 2nd set, and iron again.

11. Now you have 2 halves of your pincushion.

12. Put one half inside the other RST. Pin all the way around and sew leaving a 1 ½” opening.

13. Turn right side out. Fill with stuffing or filling of choice.
14. Hand sew opening closed and you are done!
see just as easy!!
you probably noticed that one of my pincushions has a lot of fabrics… this is achieved by cutting your diamonds from different strip sets… it makes a nice scrappy look and can help you use up leftover strip sets so you can go buy more fabric!

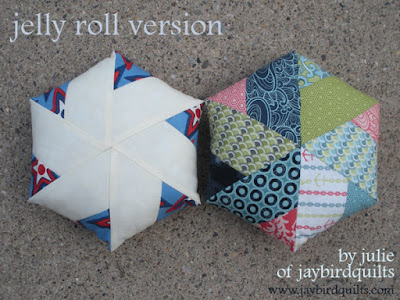
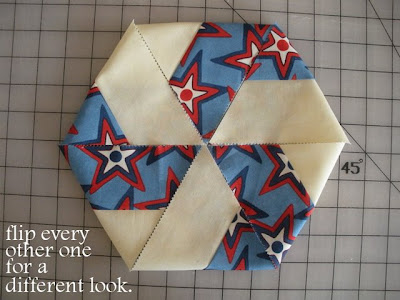
another option is to flip every other diamond… instead of a star you’ll end up with more of a pinwheel…
the possibilities are endless!!

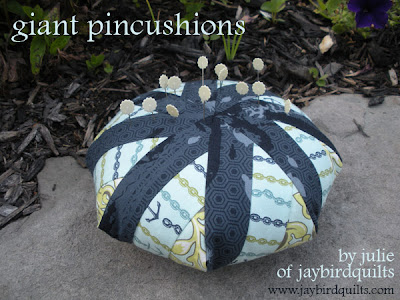
Super cute pincushions.. you won’t be able to make just one!
3 Honeybun strips = 6 1/2″ x 6 1/2″ x 3″
2 Jelly Roll strips = 8″ x 7″ x 3″
Enjoy!
by Julie of jaybirdquilts!
![]()

I just love this!!! Terrific tutorial!
great tutorial. I will look closer later, but it seems easy to follow. Thanks!
Very very cute!
what a neat pincushion! i think id like to try this super sized vs. small. thanks!
jenny
krousegirl2 at aol dot com
Great tutorial! I may have to make one of each :0).
Great tutorial…I really love Moda Bake Shop for all the great tutorials they have…
How pretty. Thanks for posting the tutorial.
What a great pattern! Thanks!
Nice tutorial Julie- the fabrics are lovely and the pincushions are very cute- Nice giveaway that you have posted.
Regards,
Anna
Thank you for the great tutorial. I'll have to go make myself one.
Peggy in NJ
I love pincushions and these are just wonderful. Can't wait to try one!
libertythreads@charter.net
This is a really good tutorial..good pictures, clear directions. Thanks so much. I can't wait to make one of these, or should I say several !!
Julie is great! I've enjoyed getting acquainted with her these last few weeks! Thanks Julie!
BEautifull!!!
Checking out one of my favorite blogs. Also saw these on jaybird blog. Would love to win pincushion in simple Abundance fabric.
Great job Julie, can't wait to make this one!
way cool! I think I have a few orphan jelly roll strips laying around – time to play!
Super tutorial Julie, I have posted another comment on your blog to get a double chance of winning! Thanks for the generous giveaway.
Lynn B
http://www.happinessiscrossstitching.blogspot.com
So cute!!
I love this blog, one of my favourites
Thank you for these♥x
great pincushion. I am making one soon. Thanks for the giveaway.
These look easy. I'm adding them to my to-do list.
Julie,
I love this, I am going to put this on my to do list! Thanks for sharing!
Hugs & Stitches,
Melody
Great tutorial! Will be making one for sure!
These a great! I love your choice of fabrics, especially the floral-themed one!
sooo lovely! I am afraid I'll have to do a couple at least… And post them on my blog, too!!
Great idea! so fun and easy! I think i need a bigger one anyway 🙂
Oh I love the neptune one, so cute!
Hey Julie, met you at Festival, you bought the cute Tula Pink Chatter Block! Can't wait to get my new Giant Pincushion 🙂
These are cute. Thanks for making the tutorial!
Thanks! This is so great. I am going to make one for a gift that I need for a friend next week. This will be perfect in pinks and browns which she loves.
Hugs ~
Heidi
Very cute!
Love these pincushions. I need to make some up for Christmas presents for my quilt buddies!
Sue Cahill (sbonetsue at yahoo dot com)
These are so awesome! I will definitely write about you and your awesome directions on my own blog.
How unique – I love them!
I gotta make a couple of these, love that they're giant! Thanks for sharing your tutorial. –Lisa
Thank you for the tutorial for these gorgeous pincushions. They are great.
fun fun fun! can't wait til i get home from vaca and make one!
So very cute!
Thanks for the detailed tutorial, Julie!
Very cute. Your tutorial was very clear.
Thanks and hughs!!!
These are fantastic! I just love pincushions…and these giant so there's even more to love!!
They are so pretty!
Pirjo from Finland
Looove it! Who doesn't need another pin cushion?
I love pincushions. Like a friend of mine says: You never have enough pincushions.
The tutorial look really easy to do them, I love both versions!!!
arlette0521.blogspot.com
Those are fantastic. I will have to try it out.
I love this very much…….
it is really amazing….
keep it up……….
plz. click here
I just made myself an adorable Honey bun pincushion. Love it! Thanks for the great tutorial.